NanoPi K1 Plus
Contents
[hide]- 1 Introduction
- 2 Hardware Spec
- 3 Diagram, Layout and Dimension
- 4 Software Features
- 5 Get Started
- 6 Work with FriendlyCore
- 6.1 Introduction
- 6.2 System Login
- 6.3 Configure System with npi-config
- 6.4 Develop Qt Application
- 6.5 Setup Program to AutoRun
- 6.6 Extend TF Card's Section
- 6.7 Transfer files using Bluetooth
- 6.8 WiFi
- 6.9 Ethernet Connection
- 6.10 WiringPi and Python Wrapper
- 6.11 Custom welcome message
- 6.12 Modify timezone
- 6.13 Set Audio Device
- 6.14 Connect to DVP Camera CAM500B
- 6.15 Connect to USB Camera(FA-CAM202)
- 6.16 Check CPU's Working Temperature
- 6.17 Test Watchdog
- 6.18 Test Infrared Receiver
- 6.19 Read CHIP ID
- 6.20 Access GPIO Pins/Wirings with WiringNP
- 6.21 Run Qt Demo
- 6.22 How to install and use docker (for arm64 system)
- 6.23 Play & Record Audio
- 7 Compile FriendlyCore Source Code
- 8 Work with Android
- 9 如何编译Android系统
- 10 Android系统定制开发
- 11 Work with External Modules
- 12 3D Printed Housing
- 13 Resources
- 14 Update Log
1 Introduction
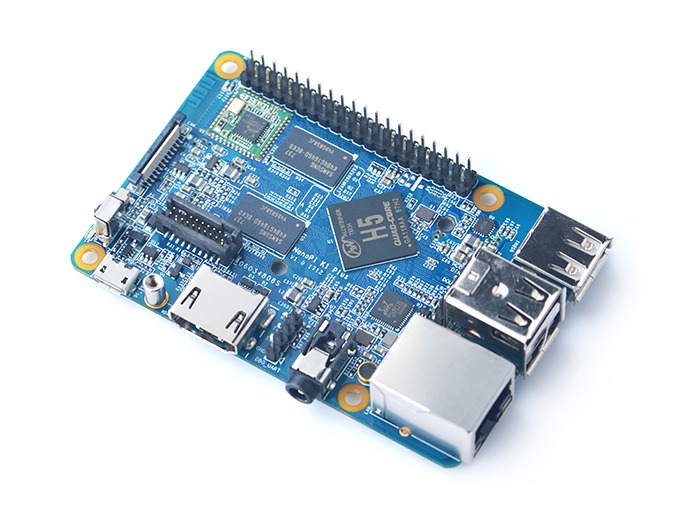
- The NanoPi K1 Plus uses the Allwinner 64-bit quad-core Cortex™-A53 H5 SoC. It can run either a 64-bit OS or a 32-bit OS. It has NEON multi-media engine and a hex-core Mali450 GPU. It supports various video formats and has strong HD encoding/decoding capabilities.
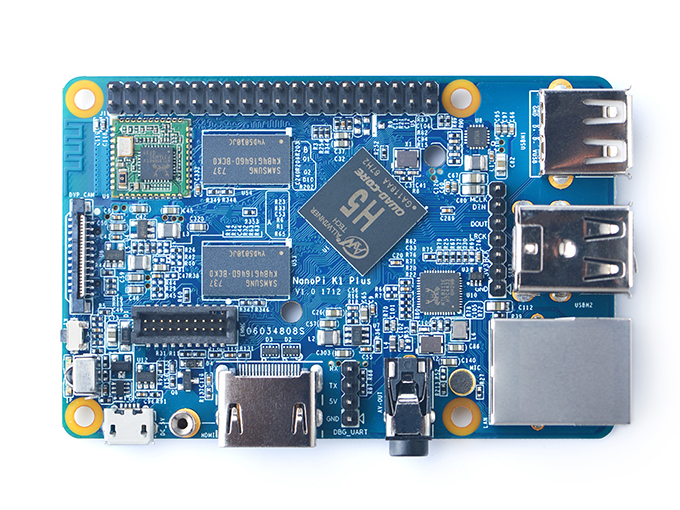
- The NanoPi K1 Plus has 2GB DDR3 RAM, onboard WiFi, DVP camera interface, Gbps Ethernet, USB, HDMI, infrared remote control, 3.5mm audio jack, I2S and etc. It can boot from a TF card and supports an external eMMC module.
- The NanoPi K1 Plus has the same dimension as RPi 3. Its 40-Pin GPIO pin-header is compatible with RPi 3's GPIO pin-header. It works with any RPi housing.
- A Ubuntu Core image and an Armbian image are ready for the NanoPi K1 Plus.
2 Hardware Spec
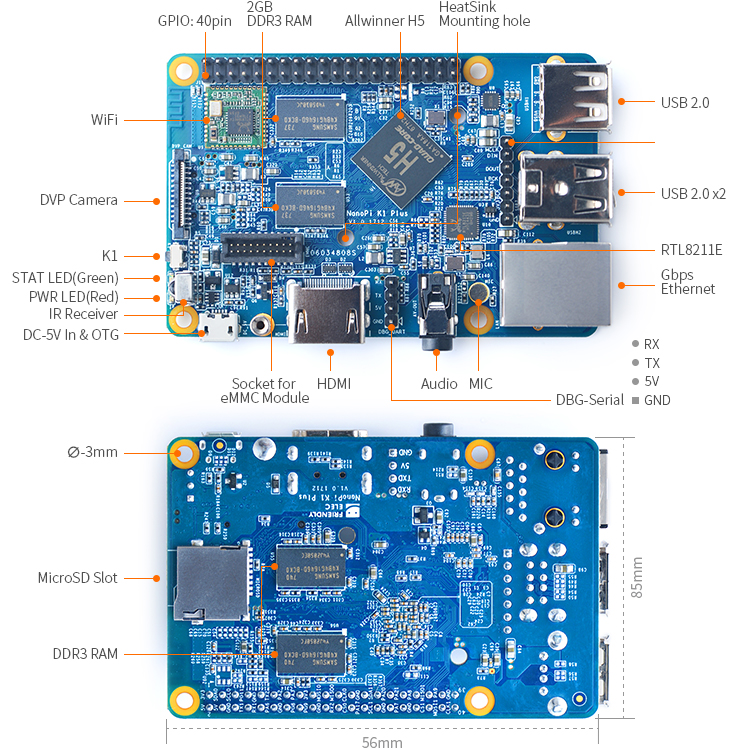
- CPU: Allwinner H5, Quad-core 64-bit high-performance Cortex™-A53
- GPU: Hexa-core Mali450
- DDR3 RAM: 2GB
- Ethernet: 10/100/1000M Ethernet using RTL8211E IC
- Wireless: 802.11 b/g/n and onboard PCB antenna
- Infrared: Onboard infrared receiver
- Audio: 3.5mm audio jack/Via HDMI
- Mic: onboard microphone
- eMMC: onboard eMMC interface
- I2S: onboard I2S interface(7Pin, 2.54mm pin-header)
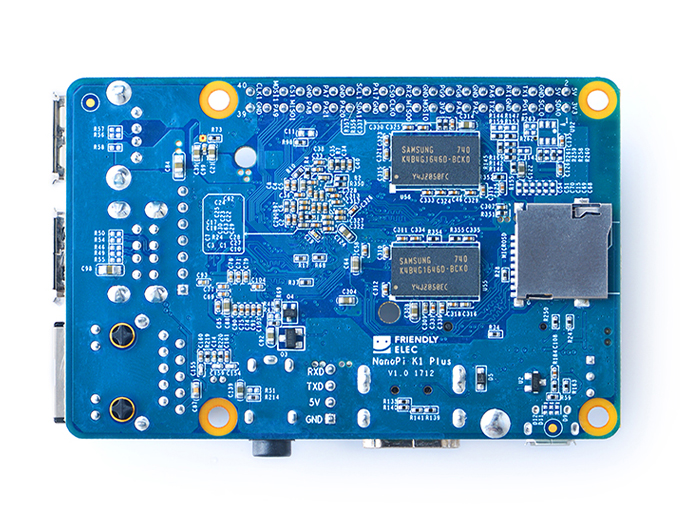
- MicroSD Slot: MicroSD card slot
- USB Host: 3 x USB 2.0 Host, type A port
- DVP Camera interface: 24-Pin, 0.5mm pitch FPC seat
- MicroUSB: 1 x USB 2.0, OTG, for power input and data transmission
- HDMI: HDMI Type-A port. It supports 4K@30fps dsplay
- Video Output: HDMI 1.4. It supports 4K@30fps display, CVBS
- GPIO Pin-header: 40 Pin,2.54mm pitch pin-header containing I2C, GPIO, UART, PWM, SPDIF, SPI and etc
- Serial Debug Port: 4Pin, 2.5mm pitch pin-header
- Button: 1 x GPIO button(user configurable)
- LED: 1 x power LED and 1 x status LED
- Power Interface: MicroUSB
- PCB Size:56 x 85mm, 6-layer, ENIG
- Power: DC 5V/2A
3 Diagram, Layout and Dimension
3.1 Layout
- GPIO Pin Spec
Pin# Name Linux gpio Pin# Name Linux gpio 1 SYS_3.3V 2 VDD_5V 3 I2C0_SDA / GPIOA12 4 VDD_5V 5 I2C0_SCL / GPIOA11 6 GND 7 GPIOG11 203 8 UART1_TX / GPIOG6 198 9 GND 10 UART1_RX / GPIOG7 199 11 UART2_TX / GPIOA0 0 12 GPIOA6 6 13 UART2_RTS / GPIOA2 2 14 GND 15 UART2_CTS / GPIOA3 3 16 UART1_RTS / GPIOG8 200 17 SYS_3.3V 18 UART1_CTS / GPIOG9 201 19 SPI0_MOSI / GPIOC0 64 20 GND 21 SPI0_MISO / GPIOC1 65 22 UART2_RX / GPIOA1 1 23 SPI0_CLK / GPIOC2 66 24 SPI0_CS / GPIOC3 67 25 GND 26 SPDIF-OUT / GPIOA17 17 27 I2C1_SDA / GPIOA19 / PCM0_CLK / I2S0_BCK 19 28 I2C1_SCL / GPIOA18 / PCM0_SYNC / I2S0_LRCK 18 29 GPIOA20 / PCM0_DOUT / I2S0_SDOUT 20 30 GND 31 GPIOA21 / PCM0_DIN/ I2S0_SDIN 21 32 GPIOA7 7 33 GPIOA8 8 34 GND 35 UART3_CTS / SPI1_MISO / GPIOA16 16 36 UART3_TX / SPI1_CS / GPIOA13 13 37 GPIOA9 9 38 UART3_RTS / SPI1_MOSI / GPIOA15 15 39 GND 40 UART3_RX / SPI1_CLK / GPIOA14 14
- eMMC Connector Pin Spec
Pin# Name Pin# Name 1 eMMC_D0 2 eMMC_D1 3 eMMC_D2 4 eMMC_D3 5 eMMC_D4 6 eMMC_D5 7 eMMC_D6 8 eMMC_D7 9 eMMC_DS 10 GND 11 eMMC_CMD 12 eMMC_CLK 13 NC 14 GND 15 NC 16 1.8V OUT 17 eMMC_RST 18 3.3V OUT 19 GPIOY_5 20 GND
- Debug Port(UART0)
Pin# Name 1 GND 2 VDD_5V 3 UART_TX 4 UART_RX
- 7Pin I2S Pin Spec
Pin# Name 1 GND 2 SYS_3.3V 3 I2S0_BCK 4 I2S0_LRCK 5 I2S0_SDOUT 6 I2S0_SDIN 7 I2S_MCLK
- Notes
- SYS_3.3V: 3.3V power output
- VDD_5V: 5V power input/output. Input power range: 4.7~5.6V
- All signal pins are 3.3V
- For more details refer to :Schematic_NanoPi-K1_Plus-1712_20171214.pdf
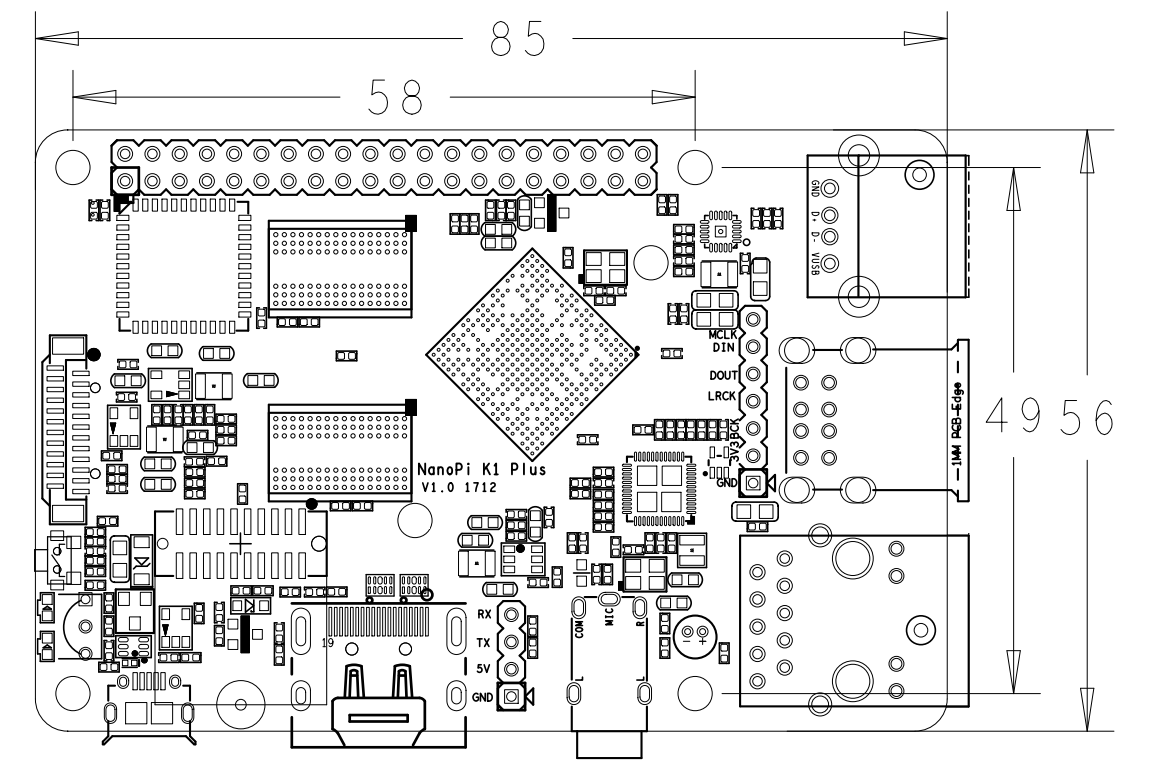
3.2 Board Dimension
- For more details refer to:NanoPi_K1_Plus_V1.0_1712_dxf.zip
4 Software Features
FriendlyCore System Cross-Compiler - gcc-linaro-6.3.1-2017.02-x86_64_aarch64-linux-gnu
- it applies to 64-bit Armv8 Cortex-A, little-endian architechture. FriendlyElec uses it for its H5 based boards.
U-boot-2017.11 - It can recognize a FriendlyElec's H5 based board and load its dtb file accordingly.
- It optimizes memory settings.
- It supports voltage regulation IC sy8106a and applies only to NanoPi K1 Plus/NanoPi NEO Core2.
- It supports MAC generation from H5's CPU ID.
- It supports system booting from either SD card or eMMC and can automatically load the kernel from the booting device.
Linux-4.14 - It supports LED. You can access it via "/sys/class/leds".
- It supports GPIO. You can access it via "/sys/class/gpio/".
- It supports UART0/1/2/3. You can access it via "/dev/ttySX".
- It supports I2C0/1/2. You can access it via "/dev/i2c-X".
- It supports SPI0/1. You can access it via "/dev/spidevX.X". The SPI1 and UART3 pins are multiplexed.
- It supports PWM0. You can access it via "/sys/class/pwm/". The UART0 pin is multiplexed.
- It supports I2S0. It works together with PCM5102A codec. The I2C1 pin is multiplexed.
- It supports Watchdog. You can access it via "/dev/watchX".
- It can read a CPU ID. You can access it via "/sys/bus/nvmem/devices/sunxi-sid0/nvmem".
- It supports IR Receiver
- It supports WiFi RTL8189.
- It supports HDMI audio output.
- It supports dynamic CPU voltage regulation.
- It supports Micro USB OTG.
- It supports USB Host1/2/3.
- It supports TF Card.
- It supports eMMC.
- It supports 1000M Ethernet.
- It supports H5's internal Codec and supports voice playing and recording.
- It supports DVP Camera(CAM500B).
- It supports USB Camera(CAM202).
- It supports popular USB WiFi Adapters.
- It supports popular USB Ethernet Adapters.
- It supports popular USB Serial Converters.
- It supports popular USB Sound Cards.
File System - Based on UbuntuCore-16.04, it has original UbuntuCore features.
- It has popular utilties:VIM/Nano/SSHserver and etc.
- It has Qt-Embedded-4.8 and suitable for rapid product prototyping which needs a GUI.
- It has a network management utility "NetworkManager" which can automatically detect and connect to a network. For more details refer to: NetworkManager。
- It has a commandline utility "npi-config" which can be used to set a user password, language, timezone, Hostname, SSH enable/disable, auto-login, hardware interface and etc. For more details refer to Npi-config。
- It uses overlayfs.
- It expands the file system on the first system boot.
- It supports file system auto-repair on system boot.
- It supports 512MB's swap.
- It supports WiringNP which functions like Arduino's API and can be used to access NanoPi boards' gpio/i2c/spi and etc. For more details refer to: WiringNP。
- It supports FriendlyElec's BakeBit which is a set of sensor modules including hardware components(such as NanoHat Hub extension board) and software (such as BakeBit). For more details refer to BakeBit .
- It supports RPi.GPIO which can be used to access NanoPi boards' gpio with Python. For more details refer to RPi.GPIO.
- gcc-linaro-6.3.1-2017.02-x86_64_aarch64-linux-gnu
eFlasher system Cross-Compiler - gcc-linaro-6.3.1-2017.02-x86_64_aarch64-linux-gnu
- it applies to 64-bit Armv8 Cortex-A, little-endian architechture. FriendlyElec uses it for its H5 based boards.
U-boot-2017.11 - Same as FriendlyCore
Linux-4.14 - Same as FriendlyCore
File System - Based on UbuntuCore-16.04, it has original UbuntuCore features.
- It has an eFlasher utility with GUI, which is set to auto-run on system startup. For more details refer to EFlasher.
- It has an eFlasher commandline utility.
- It supports multiple OS options.
- It shows system installation process bar.
- It supports data backup from and restoration to eMMC.
- It can detect image files located on the root directory of an external storage device(e.g. USB disk).
Android7.0 System Cross Compiler - gcc-linaro-arm-4.6.3.tar.xz, provided by Allwinner, used to compile a U-boot source code
- gcc-linaro-aarch64.tar.xz, provided by Allwinner, used to compile a Linux kernel
U-boot-2014.07 - Based on U-boot-2014.07 provided by Allwinner and it has all the functions Allwinner developed in it
- Supports fastboot。
- Supports flashing Android to eMMC with a bootable TF card.
Linux-3.10 - Based on Linux-3.10 kernel provided by Allwinner. It has all the functions Allwinner developed in it
- Supports booting Android from either TF card or eMMC
- Supports LED control, LEDs can be accessed with /sys/class/leds
- Supports IR remote control
- Supports reading a CPU ID with /sys/class/sunxi_info/sys_info
- Supports USB Host1/2/3。
- Supports Gbps Ethernet
- Supports CPU's internal Audio Codec
- Supports Micro USB device which works under fastboot and ADB
- Supports WiFi module RTL8189
- Supports HDMI's audio output
- Supports DVP camera (CAM500B)
- Supports USB camera (CAM200B)
- Supports video hardware encoding and decoding
- Supports Mali 450 GPU acceleration
File System - Based on Android7.0 provided by Allwinner and it has all the functions Allwinner developed in it.
- Supports simultaneous HDMI audio output and 3.5mm audio jack output
- Supports multiple HDMI resolutions and adjustable HDMI screen sizes
- Supports static IP address
- Supports Kodi
- Supports Miracast
5 Get Started
5.1 Essentials You Need
Before starting to use your NanoPi K1 Plus get the following items ready
- NanoPi K1 Plus
- MicroSD/TF Card: Class 10 or Above, minimum 8GB SDHC
- A DC 5V/2A power cord with MicroUSB port is a must
- HDMI monitor
- USB keyboard, mouse and possible a USB hub(or a TTL to serial board)
- A host computer running Ubuntu 16.04 64 bit system
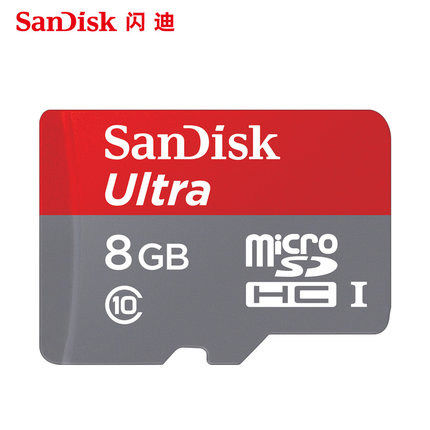
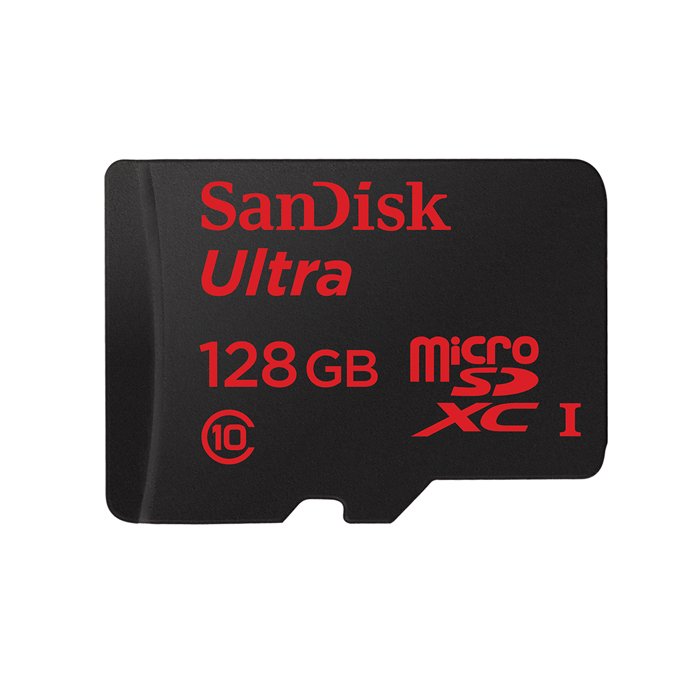
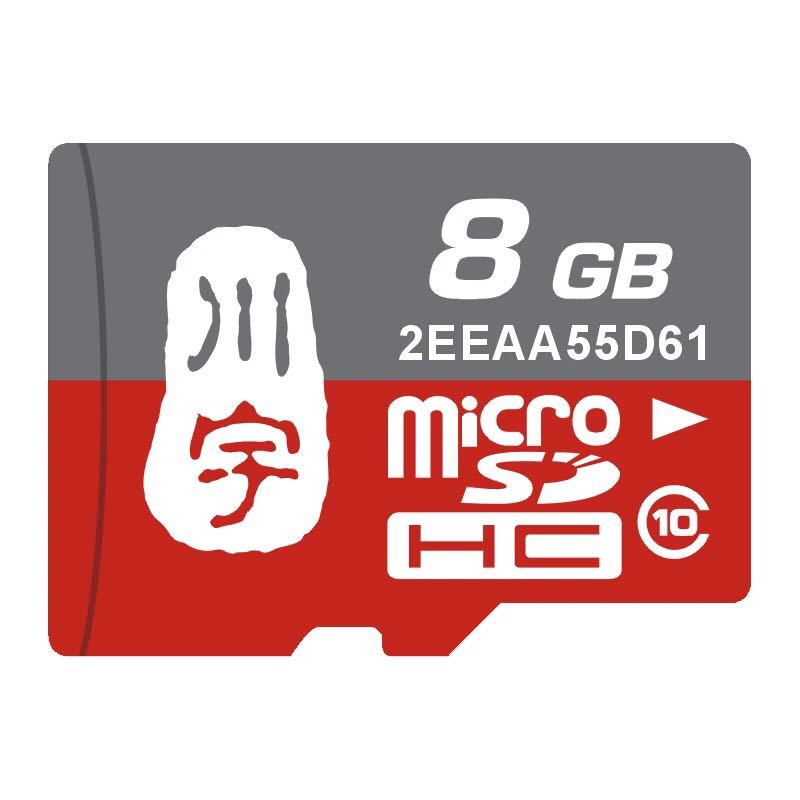
5.2 TF Cards We Tested
The following cards are what we used in all our test cases presented here:
- SanDisk TF 8G Class10 Micro/SD TF card:
- SanDisk TF128G MicroSDXC TF 128G Class10 48MB/S:
- 川宇 8G C10 High Speed class10 micro SD card:
5.3 Install OS
5.3.1 Download Image Files
Get the following files from here download link to download image files(under the "official-ROMs" directory) and the flashing utility(under the "tools" directory):
Image Files: nanopi-k1-plus_friendlycore-xenial_4.x.y_YYYYMMDD.img.zip FriendlyCore(based on UbuntuCore), kernel:Linux-4.x nanopi-k1-plus_eflasher_4.x.y_YYYYMMDD.img.zip eflasher image file, kernel: Linux-4.x nanopi-k1-plus_android7.0_YYYYMMDD.img.zip Android7.0 image file, Linux-3.10 kernel Flash Utility: win32diskimager.rar Windows utility. Under Linux users can use "dd"
5.3.2 Linux
5.3.2.1 Flash to TF
- FriendlyCore / Debian / Ubuntu / OpenWrt / DietPi are all based on a same Linux distribution and their installation methods are the same.
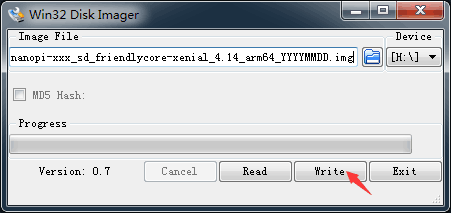
- Extract the Linux image and win32diskimager.rar files. Insert a TF card(at least 8G) into a Windows PC and run the win32diskimager utility as administrator. On the utility's main window select your TF card's drive, the wanted image file and click on "write" to start flashing the TF card.
Take "nanopi-k1-plus_sd_friendlycore-xenial_4.14_arm64_YYYYMMDD.img" as an example here is the installation window. Other image files are installed on the similar window:
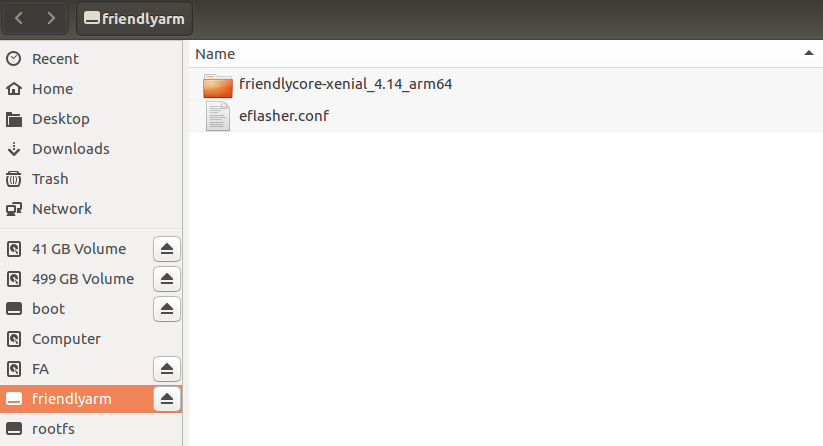
After it is installed you will see the following window:

- Insert this card into your board's BOOT slot and power on (with a 5V/2A power source). If the PWR LED is on and the STAT LED is blinking this indicates your board has successfully booted.
5.3.2.2 Flash to eMMC
5.3.2.2.1 Flash OS with eflasher Utility
- For more details about eflasher refer to the wiki link: EFlasher。
- Extract the eflasher Image and win32diskimager.rar files. Insert a TF card(at least 4G) into a Windows PC and run the win32diskimager utility as administrator. On the utility's main window select your TF card's drive, the wanted image file and click on "write" to start flashing the TF card.
- Insert this card into your board's BOOT slot and power on (with a 5V/2A power source). If the green LED is on and the blue LED is blinking this indicates your board has successfully booted.
- If your board doesn't support HDMI or no monitor is connected you can select an OS by running the following command:
$ su root
$ eflasher
The password for "root" is "fa".
We take "nanopi-k1-plus_eflasher_friendlycore-xenial_4.14_arm64_YYYYMMDD.img" as an example. After you run the "eflasher" command you will see the following messages:
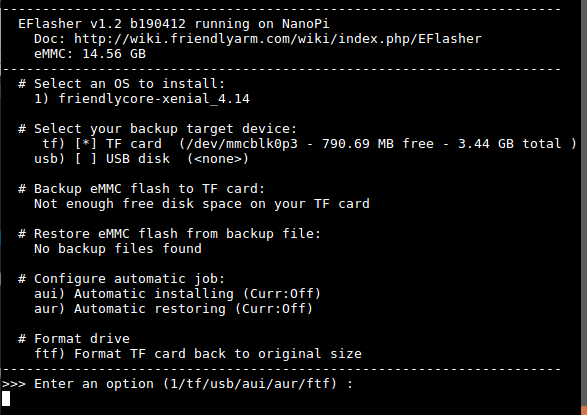
Type "1", select writing friendlycore system to eMMC you will see the following messages:
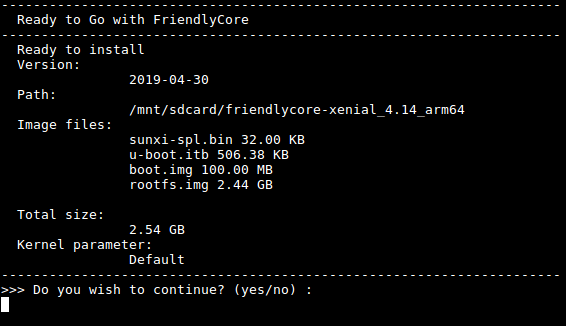
Type "yes" to start installation:

After it is done power off the system, take off the TF card, power on again your system will be booted from eMMC.
- If you want to flash other system to eMMC you can download the whole images-for-eflasher directory and extract the package under that directory to the FRIENDLYARM partition of an installation SD card.
5.3.2.2.2 Flash OS to eMMC on PC
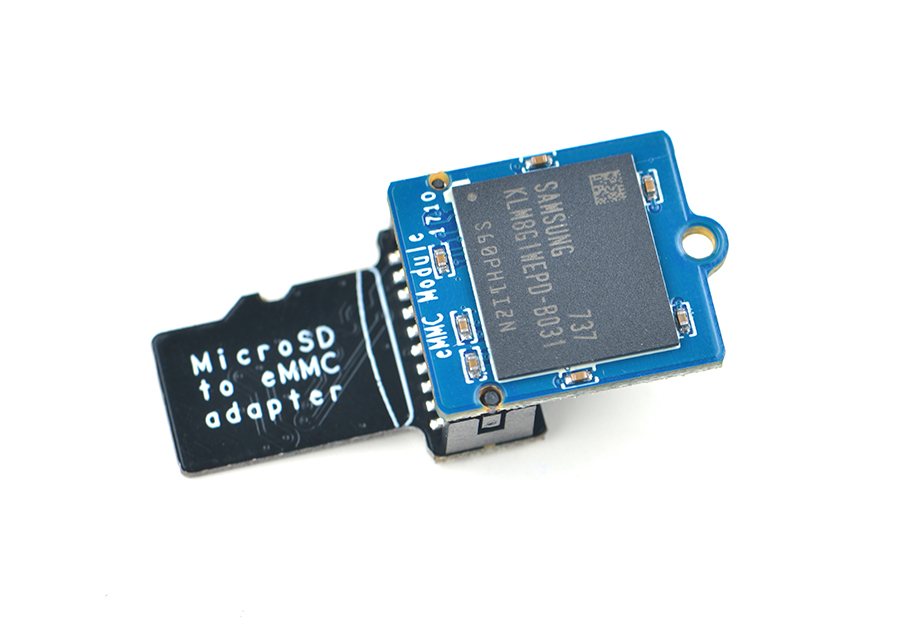
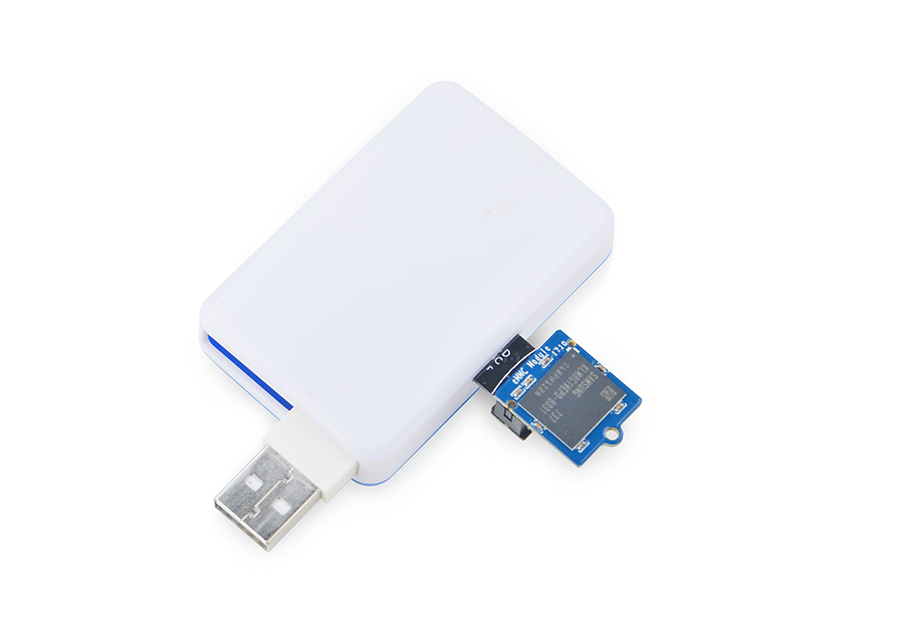
- An OS image for eMMC is the same as the one for an SD card. Extract an image package and flash utility. Insert an eMMC module(in a MicroSD to eMMC adapter) to a Windows PC. Run the win32diskimager utility as administrator. On the win32diskimager's main window select your MicroSD to eMMC adapter's drive, a wanted OS image and click "Write" to start flashing.
- After flash is done take out the MicroSD to eMMC adapter. Take the eMMC module off the adapter, insert this module to the board's eMMC slot and power up the board. If the PWR LED is solid on and the STAT LED is flashing it means your board has been successfully booted.
- When both an SD card and an eMMC module are connected to a board the board will be booted from the SD card first and if that fails it will be booted from eMMC.
5.3.3 Android
5.3.3.1 Flash to TF
Note:before make a MicroSD card to an Android image card you need to format this card.
- On a Windows PC run the HDDLLF.4.40 utility as administrator. Insert a TF card(at least 8G) into this PC and format it. After formatting is done take out the TF card, insert it into the PC again and format it with Windows internal format utility to format it to FAT32. After this formatting is done take out the card.
- Extract the the Android image and PhoenixCard_V310.rar . Insert the TF card you made in the previous step into a Windows PC and run the PhoenixCard_V310 utility as administrator. On the utility's main window select your TF card's drive, the wanted image file and click on "write" to start flashing the TF card.
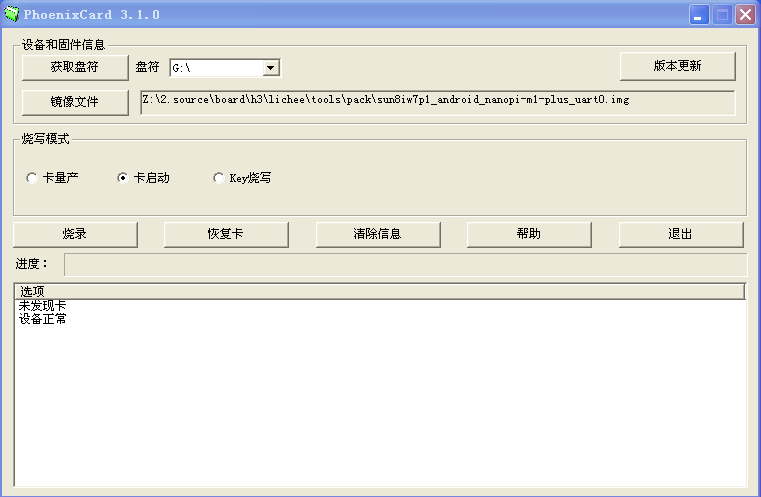
(In the screenshot an Android image file for the NanoPi M1 Plus was selected. You need to select a correct image file for your board.)
- Insert this card into your board' BOOT slot and power on (with a 5V/2A power source). If the green LED is on and the blue LED is blinking this indicates your board has successfully booted.
5.3.3.2 Flash to eMMC
5.3.3.2.1 Install Android to eMMC from TF Card
- Extract an Android image file and the flashing utility PhoenixCard_V310.rar, insert a TF card(at least 8G) to a windows PC and run PhoenixCard as administrator. On the PhoenixCard Window select your TF card's device and your wanted Android image file, set the mode to "卡量产(factory production)" and click on "烧录(Flash)" to start flashing the Android image to TF card.
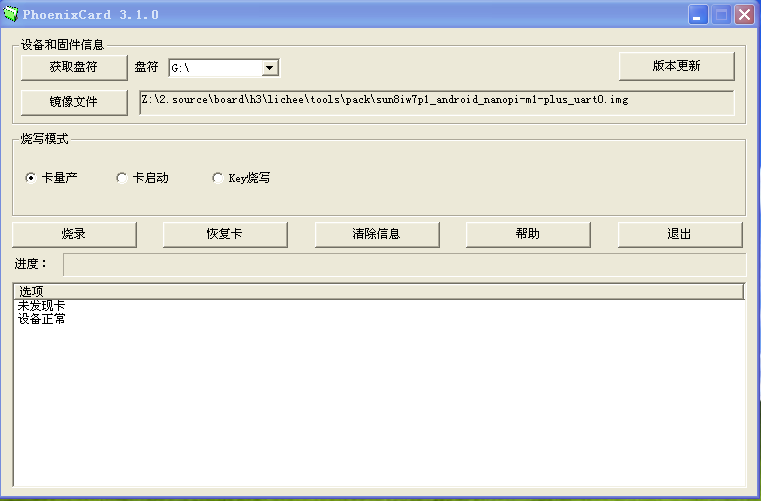
(In the screenshot an Android image file for the NanoPi M1 Plus was selected. You need to select a correct image file for your board.)
- After flashing is done, the TF card has the ability to burn the Android system to eMMC. Take out the TF card and insert it to your board's TF card slot. Connect your board to an HDMI monitor, power on your board(note:you need a 5V/2A power adapter) and you will see a green process bar on the HDMI monitor. After flashing is done take out the TF card and reboot your board and it will be rebooted from eMMC.
6 Work with FriendlyCore
6.1 Introduction
FriendlyCore is a light Linux system without X-windows, based on ubuntu core, It uses the Qt-Embedded's GUI and is popular in industrial and enterprise applications.
Besides the regular Ubuntu Core's features FriendlyCore has the following additional features:
- it integrates Qt4.8;
- it integrates NetworkManager;
- it has bluez and Bluetooth related packages;
- it has alsa packages;
- it has npi-config;
- it has RPiGPIO, a Python GPIO module;
- it has some Python/C demo in /root/ directory;
- it enables 512M-swap partition;
6.2 System Login
- If your board is connected to an HDMI monitor you need to use a USB mouse and keyboard.
- If you want to do kernel development you need to use a serial communication board, ie a PSU-ONECOM board, which will
For example, NanoPi-M1: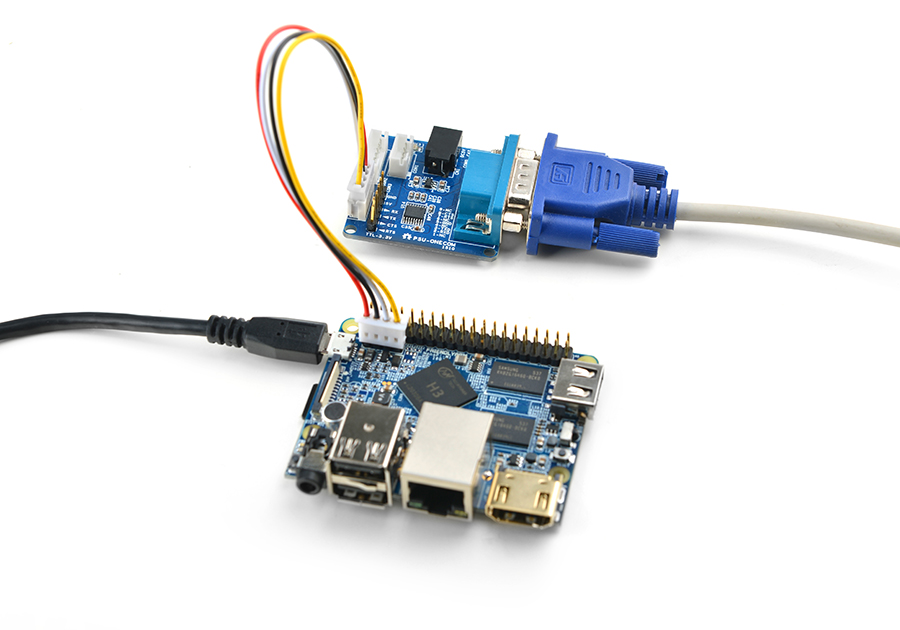
You can use a USB to Serial conversion board too.
Make sure you use a 5V/2A power to power your board from its MicroUSB port:
For example, NanoPi-NEO2: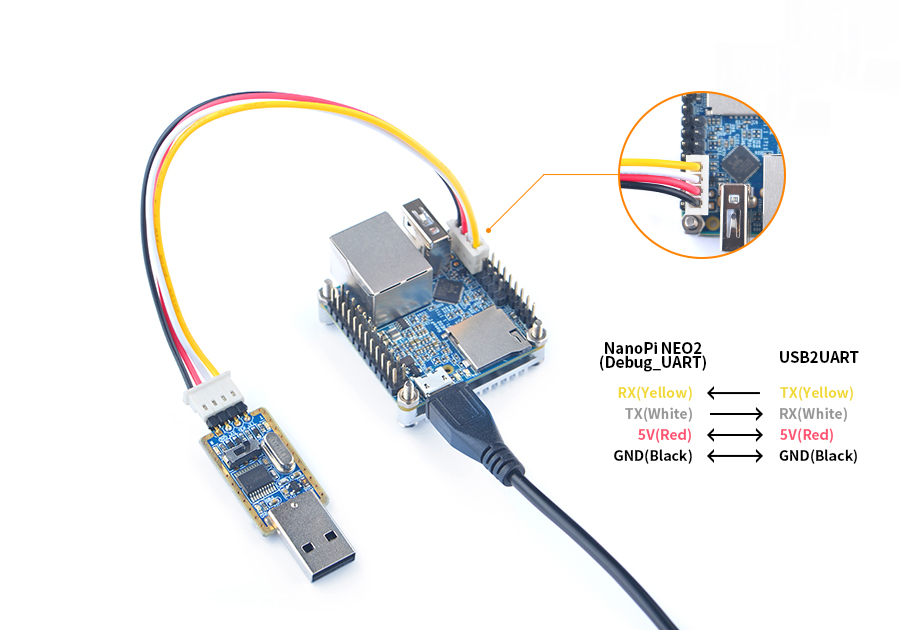
- FriendlyCore User Accounts:
Non-root User:
   User Name: pi
   Password: pi
Root:
   User Name: root
   Password: fa
The system is automatically logged in as "pi". You can do "sudo npi-config" to disable auto login.
- Update packages
$ sudo apt-get update
6.3 Configure System with npi-config
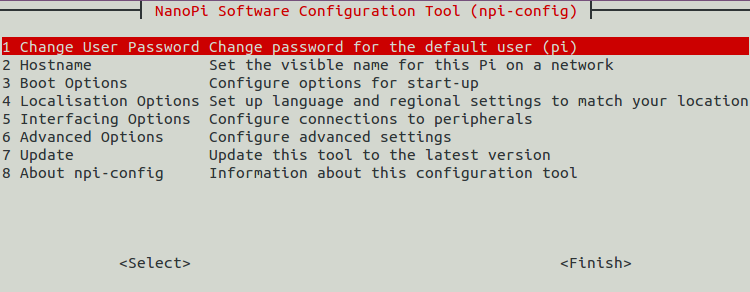
The npi-config is a commandline utility which can be used to initialize system configurations such as user password, system language, time zone, Hostname, SSH switch , Auto login and etc. Type the following command to run this utility.
$ sudo npi-config
Here is how npi-config's GUI looks like:
6.4 Develop Qt Application
Please refer to: How to Build and Install Qt Application for FriendlyELEC Boards
6.5 Setup Program to AutoRun
You can setup a program to autorun on system boot with npi-config:
sudo npi-configGo to Boot Options -> Autologin -> Qt/Embedded, select Enable and reboot.
6.6 Extend TF Card's Section
When FriendlyCore is loaded the TF card's section will be automatically extended.You can check the section's size by running the following command:
$ df -h
6.7 Transfer files using Bluetooth
Take the example of transferring files to the mobile phone. First, set your mobile phone Bluetooth to detectable status, then execute the following command to start Bluetooth search.:
hcitool scan
Search results look like:
Scanning ...
    2C:8A:72:1D:46:02   HTC6525LVW
This means that a mobile phone named HTC6525LVW is searched. We write down the MAC address in front of the phone name, and then use the sdptool command to view the Bluetooth service supported by the phone:
sdptool browser 2C:8A:72:1D:46:02
Note: Please replace the MAC address in the above command with the actual Bluetooth MAC address of the mobile phone.
This command will detail the protocols supported by Bluetooth for mobile phones. What we need to care about is a file transfer service called OBEX Object Push. Take the HTC6525LVW mobile phone as an example. The results are as follows:
Service Name: OBEX Object Push
Service RecHandle: 0x1000b
Service Class ID List:
  "OBEX Object Push" (0x1105)
Protocol Descriptor List:
  "L2CAP" (0x0100)
  "RFCOMM" (0x0003)
    Channel: 12
  "OBEX" (0x0008)
Profile Descriptor List:
  "OBEX Object Push" (0x1105)
    Version: 0x0100
As can be seen from the above information, the channel used by the OBEX Object Push service of this mobile phone is 12, we need to pass it to the obexftp command, and finally the command to initiate the file transfer request is as follows:
obexftp --nopath --noconn --uuid none --bluetooth -b 2C:8A:72:1D:46:02 -B 12 -put example.jpg
Note: Please replace the MAC address, channel and file name in the above command with the actual one.
After executing the above commands, please pay attention to the screen of the mobile phone. The mobile phone will pop up a prompt for pairing and receiving files. After confirming, the file transfer will start.
Bluetooth FAQ:
1) Bluetooth device not found on the development board, try to open Bluetooth with the following command:
rfkill unblock 02) Prompt can not find the relevant command, you can try to install related software with the following command:
apt-get install bluetooth bluez obexftp openobex-apps python-gobject ussp-push6.8 WiFi
For either an SD WiFi or a USB WiFi you can connect it to your board in the same way. The APXX series WiFi chips are SD WiFi chips. By default FriendlyElec's system supports most popular USB WiFi modules. Here is a list of the USB WiFi modules we tested:
Index Model 1 RTL8188CUS/8188EU 802.11n WLAN Adapter 2 RT2070 Wireless Adapter 3 RT2870/RT3070 Wireless Adapter 4 RTL8192CU Wireless Adapter 5 mi WiFi mt7601 6 5G USB WiFi RTL8821CU 7 5G USB WiFi RTL8812AU
You can use the NetworkManager utility to manage network. You can run "nmcli" in the commandline utility to start it. Here are the commands to start a WiFi connection:
- Change to root
$ su root
- Check device list
$ nmcli devNote: if the status of a device is "unmanaged" it means that device cannot be accessed by NetworkManager. To make it accessed you need to clear the settings under "/etc/network/interfaces" and reboot your system.
- Start WiFi
$ nmcli r wifi on- Scan Surrounding WiFi Sources
$ nmcli dev wifi- Connect to a WiFi Source
$ nmcli dev wifi connect "SSID" password "PASSWORD" ifname wlan0
The "SSID" and "PASSWORD" need to be replaced with your actual SSID and password.If you have multiple WiFi devices you need to specify the one you want to connect to a WiFi source with iface
If a connection succeeds it will be automatically setup on next system reboot.
For more details about NetworkManager refer to this link: Use NetworkManager to configure network settings
If your USB WiFi module doesn't work most likely your system doesn't have its driver. For a Debian system you can get a driver from Debian-WiFi and install it on your system. For a Ubuntu system you can install a driver by running the following commands:
$ apt-get install linux-firmware
In general all WiFi drivers are located at the "/lib/firmware" directory.
6.9 Ethernet Connection
If a board is connected to a network via Ethernet before it is powered on it will automatically obtain an IP with DHCP activated after it is powered up. If you want to set up a static IP refer to: Use NetworkManager to configure network settings。
6.10 WiringPi and Python Wrapper
- WiringNP: NanoPi NEO/NEO2/Air GPIO Programming with C
- RPi.GPIO : NanoPi NEO/NEO2/Air GPIO Programming with Python
6.11 Custom welcome message
The welcome message is printed from the script in this directory:
/etc/update-motd.d/
For example, to change the FriendlyELEC LOGO, you can change the file /etc/update-motd.d/10-header. For example, to change the LOGO to HELLO, you can change the following line:
TERM=linux toilet -f standard -F metal $BOARD_VENDOR
To:
TERM=linux toilet -f standard -F metal HELLO
6.12 Modify timezone
For exampe, change to Shanghai timezone:
sudo rm /etc/localtime
sudo ln -ls /usr/share/zoneinfo/Asia/Shanghai /etc/localtime
6.13 Set Audio Device
If your system has multiple audio devices such as HDMI-Audio, 3.5mm audio jack and I2S-Codec you can set system's default audio device by running the following commands.
- After your board is booted run the following commands to install alsa packages:
$ apt-get update
$ apt-get install libasound2
$ apt-get install alsa-base
$ apt-get install alsa-utils
- After installation is done you can list all the audio devices by running the following command. Here is a similar list you may see after you run the command:
$ aplay -l
card 0: HDMI
card 1: 3.5mm codec
card 2: I2S codec
"card 0" is HDMI-Audio, "card 1" is 3.5mm audio jack and "card 2" is I2S-Codec. You can set default audio device to HDMI-Audio by changing the "/etc/asound.conf" file as follows:
pcm.!default {
    type hw
    card 0
    device 0
}

ctl.!default {
    type hw
    card 0
}
If you change "card 0" to "card 1" the 3.5mm audio jack will be set to the default device.
Copy a .wav file to your board and test it by running the following command:
$ aplay /root/Music/test.wav
You will hear sounds from system's default audio device.
If you are using H3/H5/H2+ series board with mainline kernel, the easier way is using npi-config。
6.14 Connect to DVP Camera CAM500B
For NanoPi-K1-Plus the CAM500B can work with Linux-4.14 Kernel.
The CAM500B camera module is a 5M-pixel camera with DVP interface. For more tech details about it you can refer to Matrix - CAM500B.
connect your board to camera module. Then boot OS, connect your board to a network, log into the board as root and run "mjpg-streamer":
$ cd /root/C/mjpg-streamer
$ make
$ ./start.sh
You need to change the start.sh script and make sure it uses a correct /dev/videoX node. You can check your camera's node by running the following commands:
$ apt-get install v4l-utils
$ v4l2-ctl -d /dev/video0 -D
Driver Info (not using libv4l2):
        Driver name   : sun6i-video
        Card type     : sun6i-csi
        Bus info      : platform:camera
        Driver version: 4.14.0
	...
The above messages indicate that "/dev/video0" is camera's device node.The mjpg-streamer application is an open source video steam server. After it is successfully started the following messages will be popped up:
$ ./start.sh
 i: Using V4L2 device.: /dev/video0
 i: Desired Resolution: 1280 x 720
 i: Frames Per Second.: 30
 i: Format............: YUV
 i: JPEG Quality......: 90
 o: www-folder-path...: ./www/
 o: HTTP TCP port.....: 8080
 o: username:password.: disabled
 o: commands..........: enabled
start.sh runs the following two commands:
export LD_LIBRARY_PATH="$(pwd)"
./mjpg_streamer -i "./input_uvc.so -d /dev/video0 -y 1 -r 1280x720 -f 30 -q 90 -n -fb 0" -o "./output_http.so -w ./www"
Here are some details for mjpg_streamer's major options:
-i: input device. For example "input_uvc.so" means it takes input from a camera;
-o: output device. For example "output_http.so" means the it transmits data via http;
-d: input device's subparameter. It defines a camera's device node;
-y: input device's subparameter. It defines a camera's data format: 1:yuyv, 2:yvyu, 3:uyvy 4:vyuy. If this option isn't defined MJPEG will be set as the data format;
-r: input device's subparameter. It defines a camera's resolution;
-f: input device's subparameter. It defines a camera's fps. But whether this fps is supported depends on its driver;
-q: input device's subparameter. It defines the quality of an image generated by libjpeg soft-encoding;
-n: input device's subparameter. It disables the dynctrls function;
-fb: input device's subparameter. It specifies whether an input image is displayed at "/dev/fbX";
-w: output device's subparameter. It defines a directory to hold web pages;
In our case the board's IP address was 192.168.1.230. We typed 192.168.1.230:8080 in a browser and were able to view the images taken from the camera's. Here is what you would expect to observe:
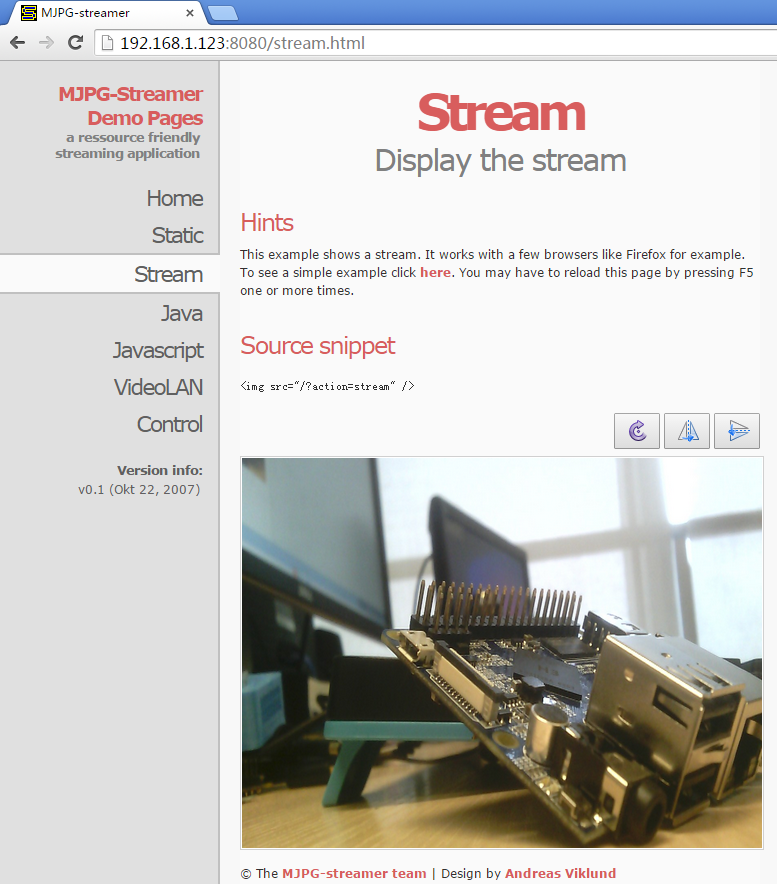
The mjpg-streamer utility uses libjpeg to software-encode steam data. The Linux-4.14 based ROM currently doesn't support hardware-encoding. If you use a H3 boards with Linux-3.4 based ROM you can use the ffmpeg utility to hardware-encode stream data and this can greatly release CPU's resources and speed up encoding:
$ ffmpeg -t 30 -f v4l2 -channel 0 -video_size 1280x720 -i /dev/video0 -pix_fmt nv12 -r 30 \
        -b:v 64k -c:v cedrus264 test.mp4
By default it records a 30-second video. Typing "q" stops video recording. After recording is stopped a test.mp4 file will be generated.
6.15 Connect to USB Camera(FA-CAM202)
The FA-CAM202 is a 200M USB camera. You can refer to <Connect DVP Camera (CAM500B) to Board> on how to connect a USB camera to a board.
You need to change the start.sh script and make sure it uses a correct /dev/videoX node. You can check your FA-CAM202's node by running the following commands:
$ apt-get install v4l-utils
$ v4l2-ctl -d /dev/video1 -D
Driver Info (not using libv4l2):
        Driver name   : uvcvideo
        Card type     : HC 3358+2100: HC 3358+2100
        Bus info      : usb-1c1b000.usb-1
	...
Information above indicates that /dev/video1 is the device node of the FA-CAM 202.
6.16 Check CPU's Working Temperature
You can get CPU's working temperature by running the following command:
$ cpu_freq
CPU0 online=1 temp=26581 governor=ondemand cur_freq=480000
CPU1 online=1 temp=26581 governor=ondemand cur_freq=480000
CPU2 online=1 temp=26581 governor=ondemand cur_freq=480000
CPU3 online=1 temp=26581 governor=ondemand cur_freq=480000
This message means there are currently four CPUs working. All of their working temperature is 26.5 degree in Celsius and each one's clock is 480MHz.
6.17 Test Watchdog
You can test watchdog by running the following commands:
$ cd /root/demo/watchdog/
$ gcc watchdog_demo.c -o watchdog_demo
$ ./watchdog_demo /dev/watchdog0 10
Set timeout: 10 seconds
Get timeout: 10 seconds
System will reboot in 10 second
System will reboot in 10 seconds.
6.18 Test Infrared Receiver
Note: Please Check your board if IR receiver exist.
By default the infrared function is disabled you can enable it by using the npi-config utility:
$ npi-config
    6 Advanced Options     Configure advanced settings
        A8 IR              Enable/Disable IR
            ir Enable/Disable ir[enabled]
Reboot your system and test its infrared function by running the following commands:
$ apt-get install ir-keytable
$ echo "+rc-5 +nec +rc-6 +jvc +sony +rc-5-sz +sanyo +sharp +mce_kbd +xmp" > /sys/class/rc/rc0/protocols   # Enable infrared
$ ir-keytable -t
Testing events. Please, press CTRL-C to abort.
"ir-keytable -t" is used to check whether the receiver receives infrared signals. You can use a remote control to send infrared signals to the receiver. If it works you will see similar messages as follows:
1522404275.767215: event type EV_MSC(0x04): scancode = 0xe0e43
1522404275.767215: event type EV_SYN(0x00).
1522404278.911267: event type EV_MSC(0x04): scancode = 0xe0e42
1522404278.911267: event type EV_SYN(0x00).
6.19 Read CHIP ID
As for Allwinner H2+/H3/H5/ SoCs each of these CPUs has an internal 16-btye CHIP ID which can be read by running the following commands in the Linux-4.14 kernel:
$ apt-get install bsdmainutils
$ hexdump /sys/bus/nvmem/devices/sunxi-sid0/nvmem
0000000 8082 0447 0064 04c3 3650 ce0a 1e28 2202
0000010 0002 0000 0000 0000 0000 0000 0000 0000
0000020 0000 0000 0000 0000 0000 0000 0000 0000
0000030 0000 0008 0508 0000 0000 0000 0000 0000
0000040 0000 0000 0000 0000 0000 0000 0000 0000
"8082 0447 0064 04c3 3650 ce0a 1e28 2202" is the 16-byte CHIP ID.
6.20 Access GPIO Pins/Wirings with WiringNP
The wiringPi library was initially developed by Gordon Henderson in C. It contains libraries to access GPIO, I2C, SPI, UART, PWM and etc. The wiringPi library contains various libraries, header files and a commandline utility:gpio. The gpio utility can be used to read and write GPIO pins.
FriendlyElec integrated this utility in FriendlyCore system allowing users to easily access GPIO pins. For more details refer to WiringNP WiringNP
6.21 Run Qt Demo
Run the following command
$ sudo /opt/QtE-Demo/run.sh
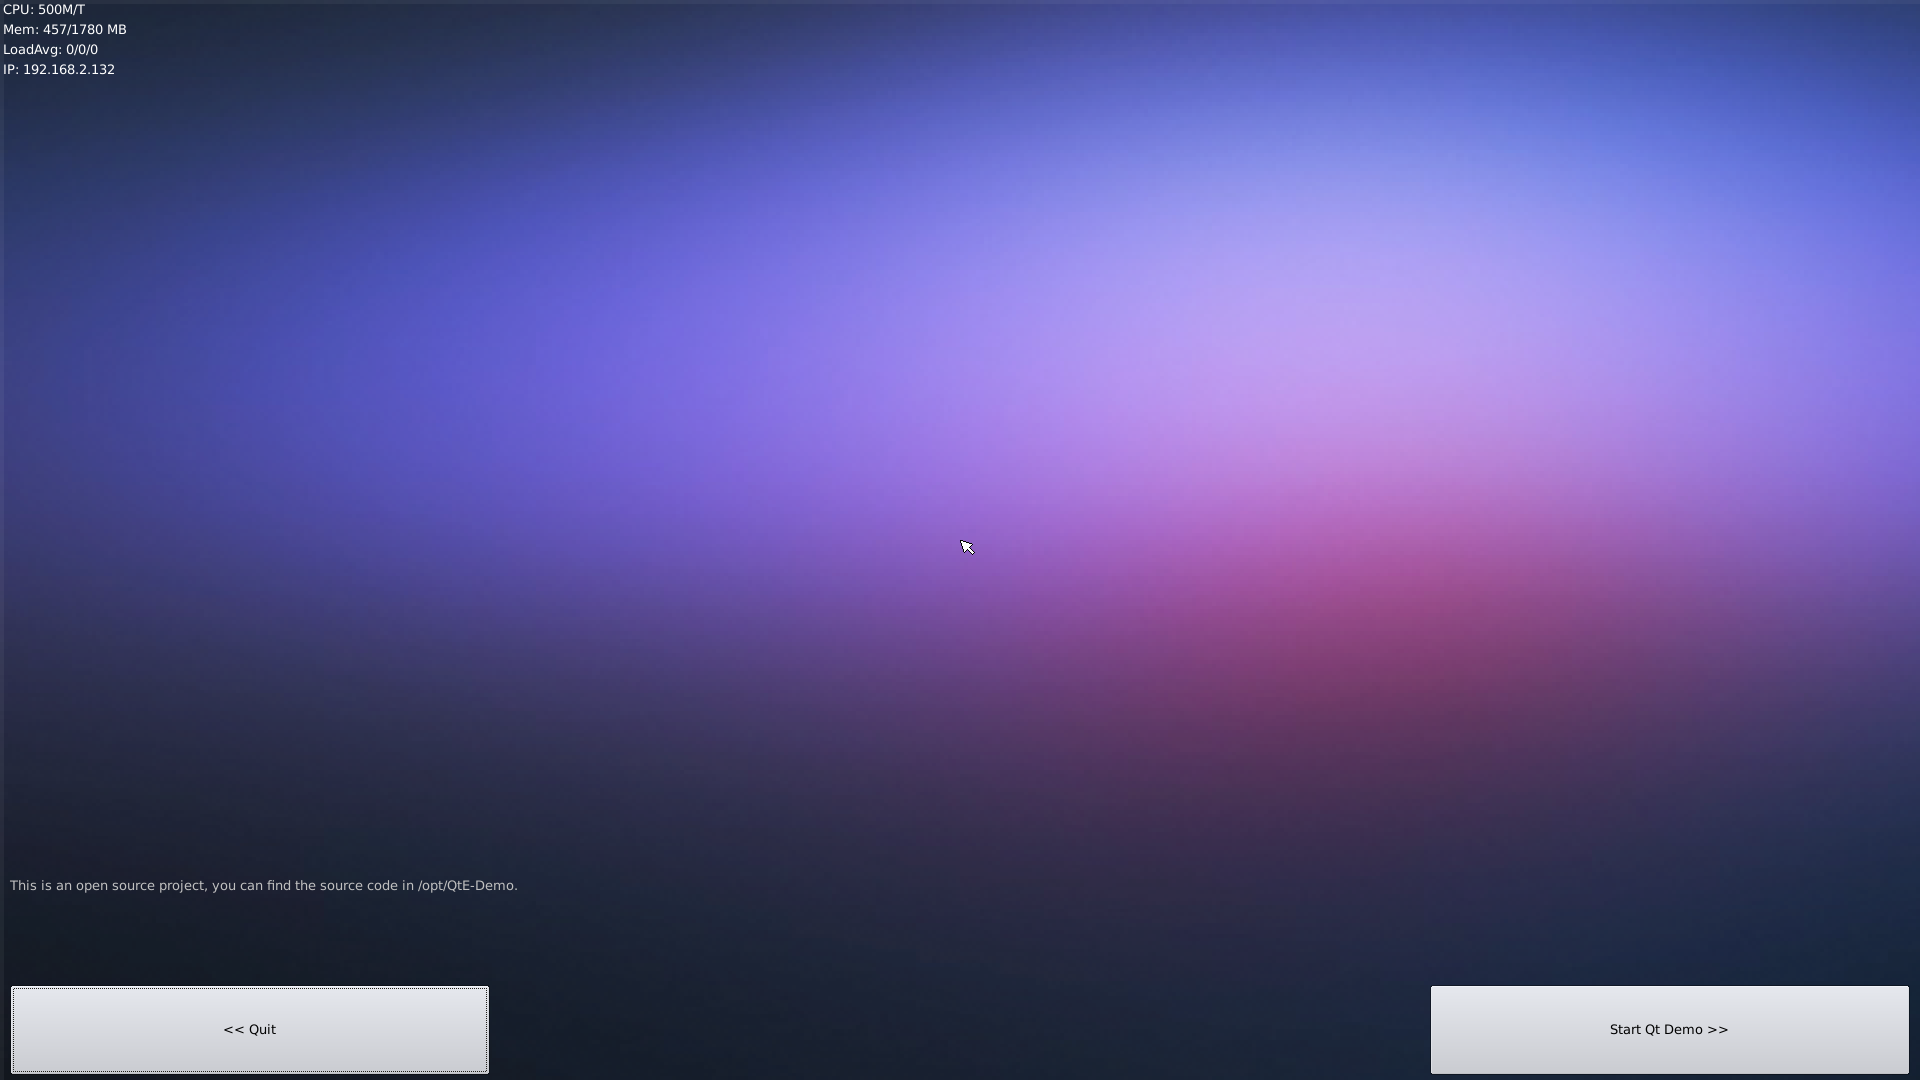
Here is what you expect to observe. This is an open source Qt Demo:
6.22 How to install and use docker (for arm64 system)
6.22.1 How to Install Docker
Run the following commands:
sudo apt-get update
sudo apt-get install docker.io
6.22.2 Test Docker installation
Test that your installation works by running the simple docker image:
git clone https://github.com/friendlyarm/debian-jessie-arm-docker
cd debian-jessie-arm-docker
./rebuild-image.sh
./run.sh
6.23 Play & Record Audio
You can play and record audio by running the following commands
Check audio devices:
$ aplay -l
**** List of PLAYBACK Hardware Devices ****
card 0: Codec [H3 Audio Codec], device 0: CDC PCM Codec-0 []
  Subdevices: 1/1
  Subdevice #0: subdevice #0
Both Allwinner H5 and H3 have an internal codec which is recognized as [H3 Audio Codec]. You need to use the actual device name that your [H3 Audio Codec] device is recognized as in your system.
Play Audio:
$ aplay /root/Music/test.wav -D plughw:0
Parameter "-D plughw:0" means the "card 0" device is used to play the audio file. You need to choose a device from the list obtained by running "aplay -l".
Record Audio:
$ arecord -f cd -d 5 test.wav
7 Compile FriendlyCore Source Code
7.1 Use Mainline BSP
K1 Plus now works with a 64-bit Linux kernel and a 64-bit Ubuntu Core 16.04 system. For more details on how to use a mainline U-boot and Linux-4.x.y refer to:Mainline U-boot & Linux
8 Work with Android
8.1 Start Android For the First Time
Before proceed make sure you either have Android installed on your board's eMMC or have a bootable TF card with Android image. Connect your board to an HDMI monitor and a USB mouse, and connect a 5V/2A power adapter to your board at its MicroUSB port. Power on the board and wait for Android to load. It takes relatively long time for Android to load for the first time.
8.2 Connect to IR Control(RC-100)
After Android is loaded you can interact with it with an IR remote control(Model:RC-100).
Here is a table of function keys on the RC-100's panel:
Key Function POWER Power F1 Search F2 PrintScreen F3 Enable/Disable Mouse UP Move Up DOWN Move Down LEFT Move Left RIGHT Move Right OK Confirm Volume- Turn Down Volume Volume Mute Mute Volume+ Turn Up Volume SETTING Enter Setting HOME Return to Home Page BACK Back to the Previous Page
When Android is loaded for the first time you need to click on the buttons shown on the screen to proceed. You can press F3 to enable mouse and proceed. After Android is fully loaded you can turn off the HDMI monitor by short-pressing the power button and turn on the HDMI monitor by short-pressing the power button again. And you can power off the board by long-pressing the power button and power on the board by pressing the power button again.
8.3 Set HDMI Resolution
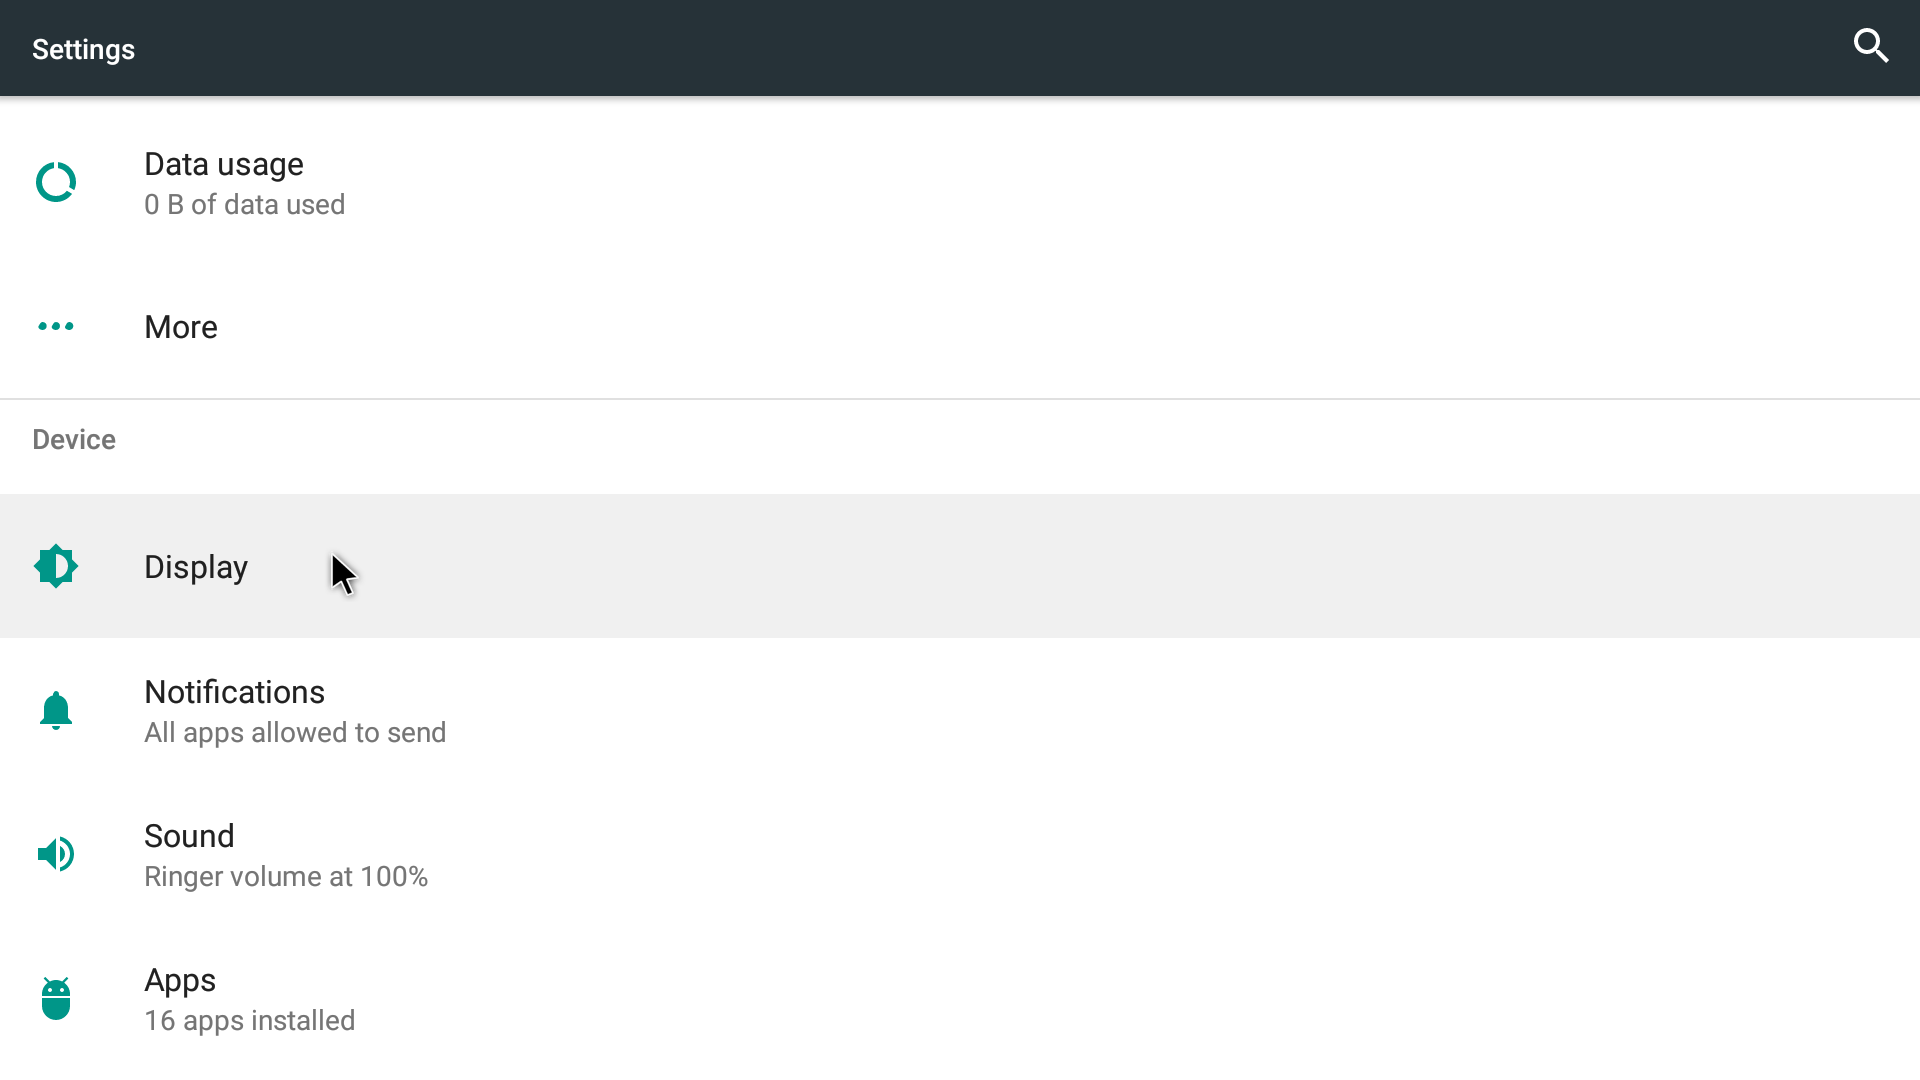
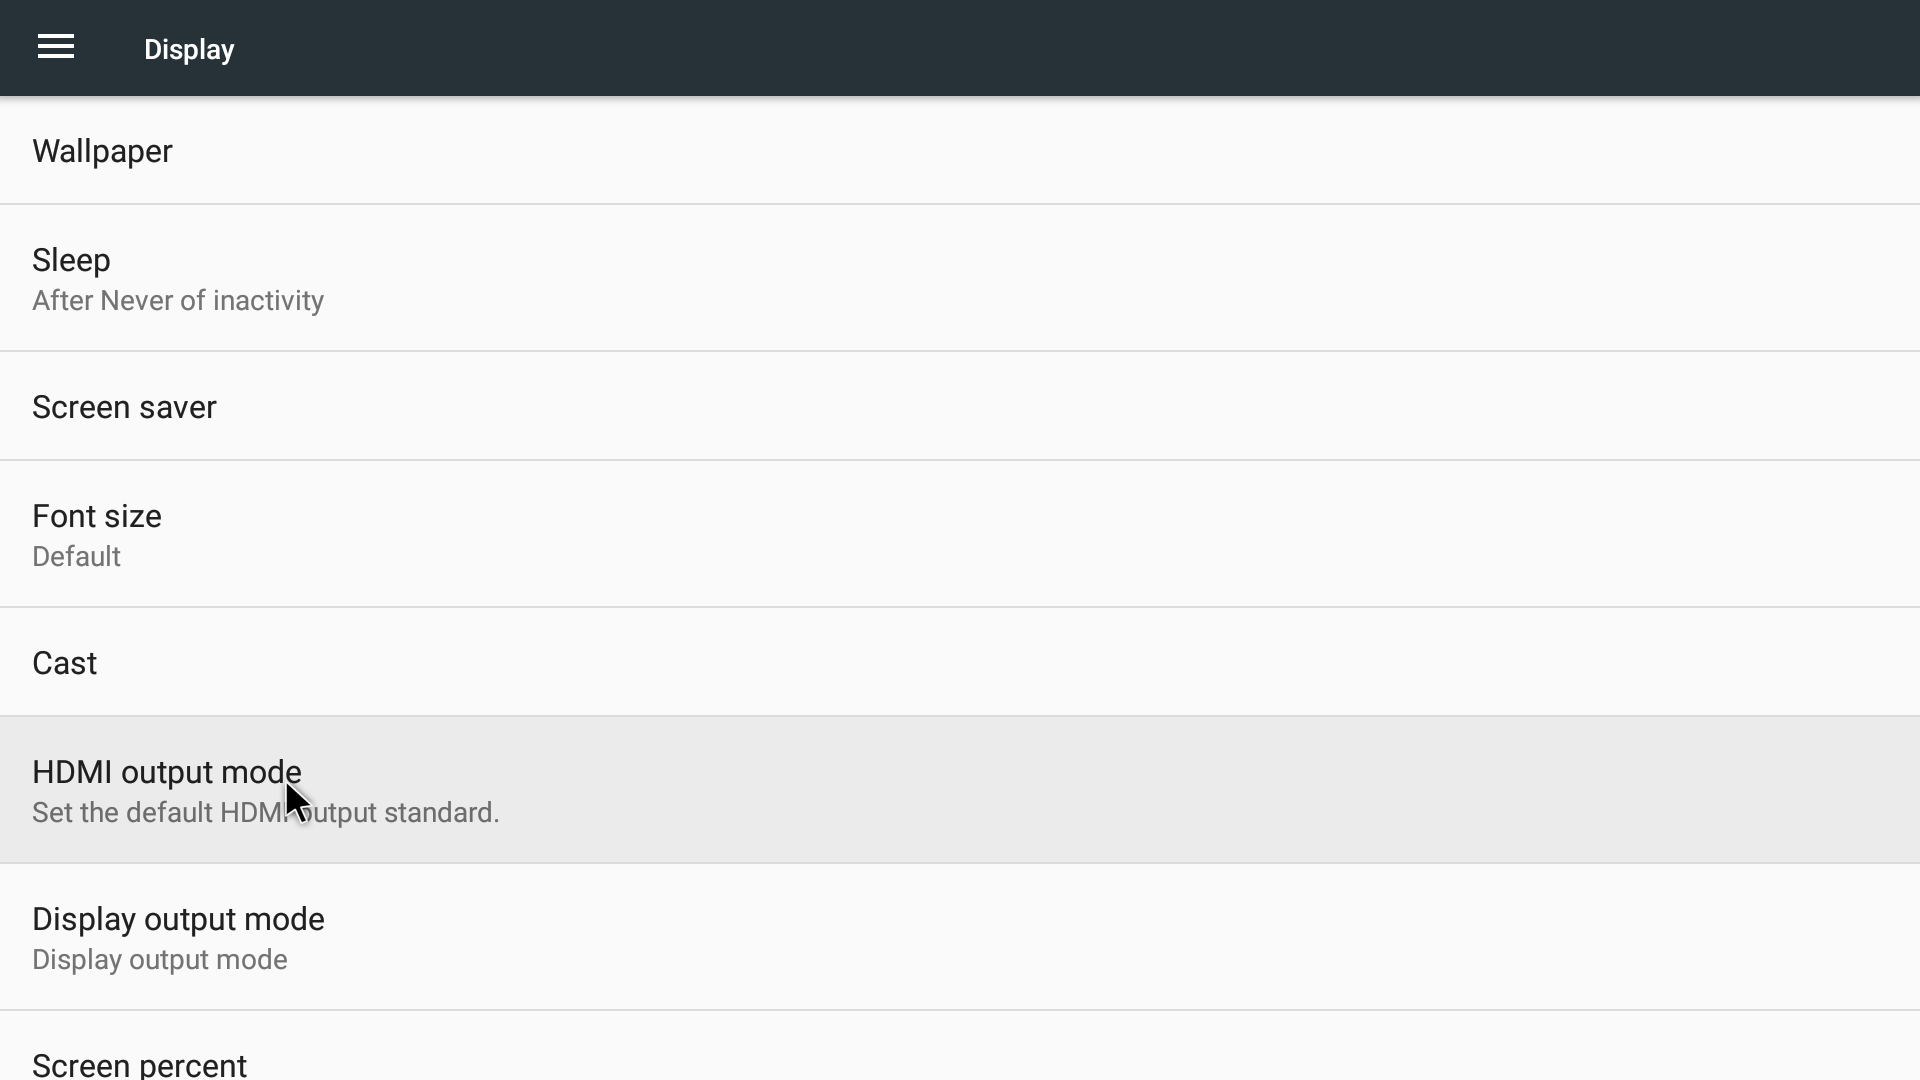
The default resolution for an HDMI monitor in Android for H5 is 720P/50Hz. You can change the resolution by following the steps below:
Go to "Settings":
Go to "Settings->Display":
Go to "Settings->Display->HDMI output mode":
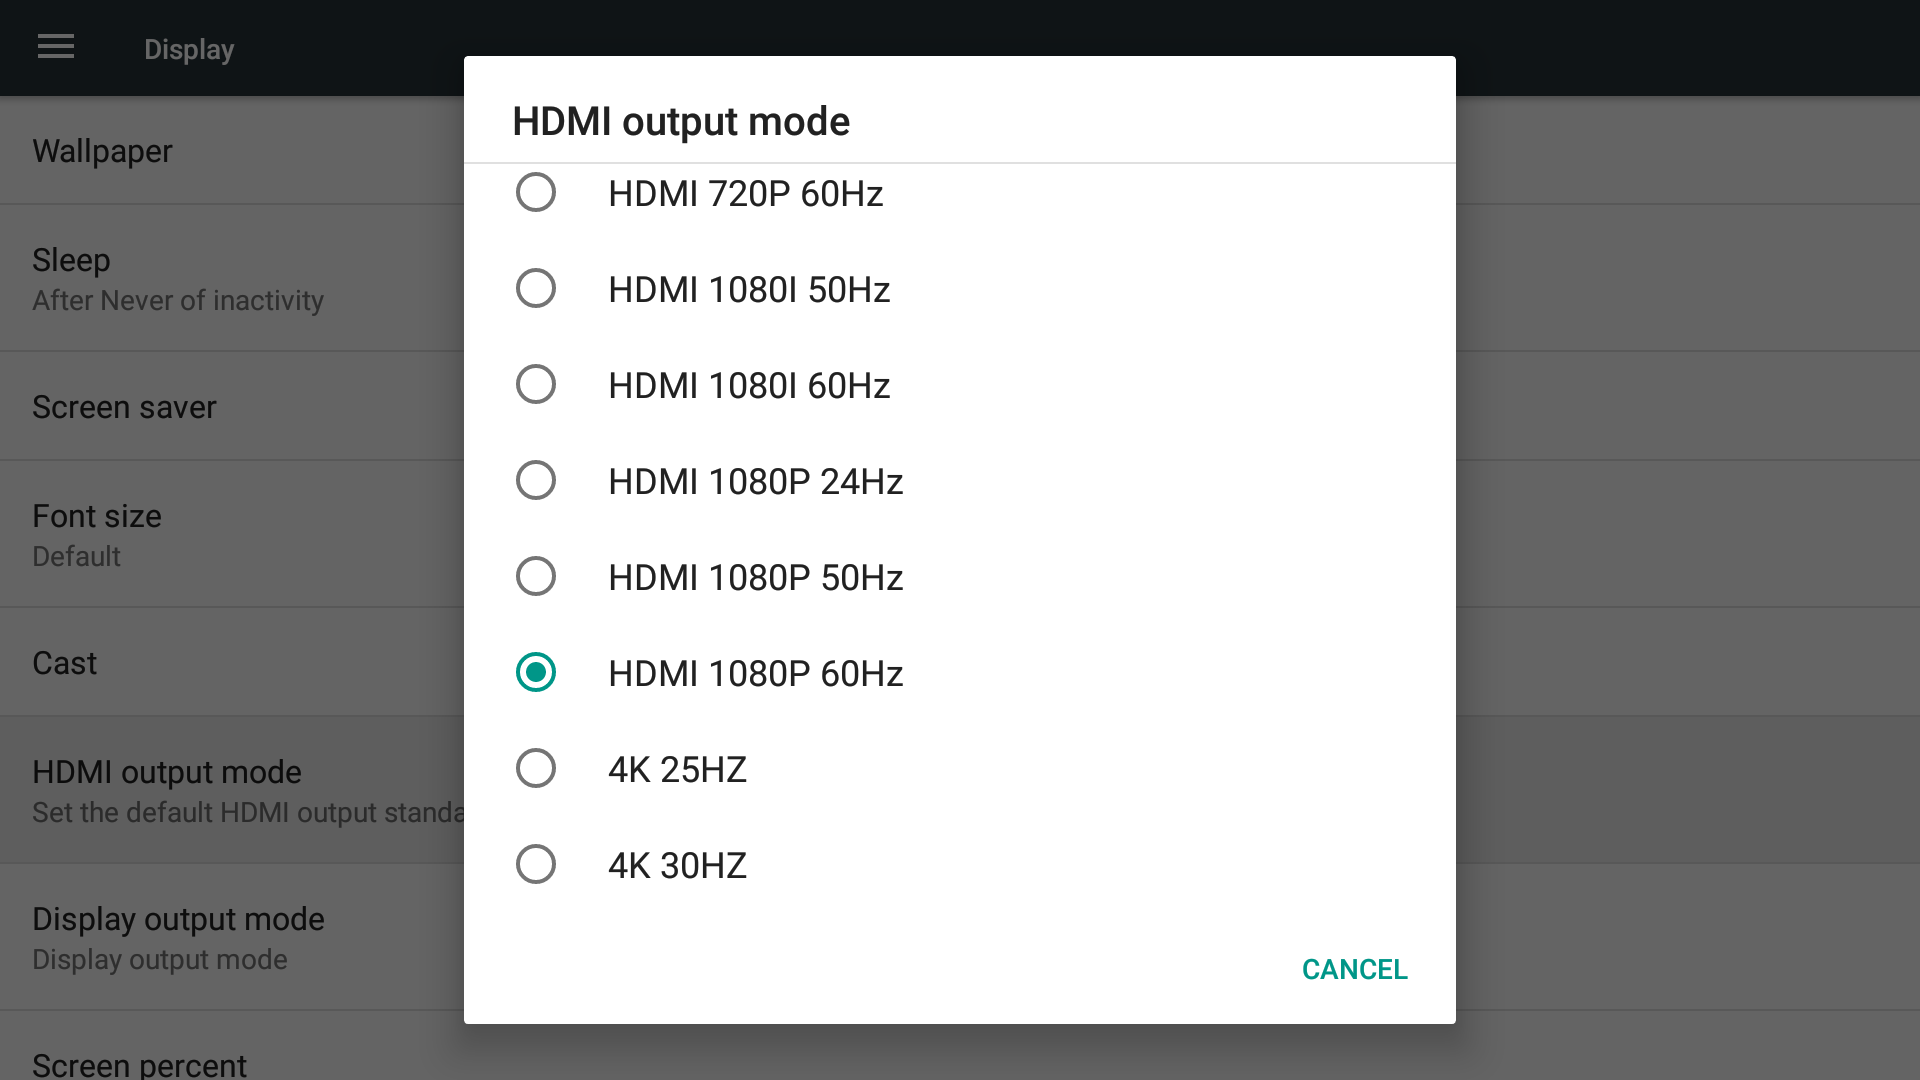
Select your wanted resolution.
FriendlyELEC's Android for H5 automatically adjusts screen display for an HDMI monitor such that the output will adapt its screen size for HDMI monitors with different sizes. Here are the steps to follow:
Go to "Settings":

Go to "Settings->Display":
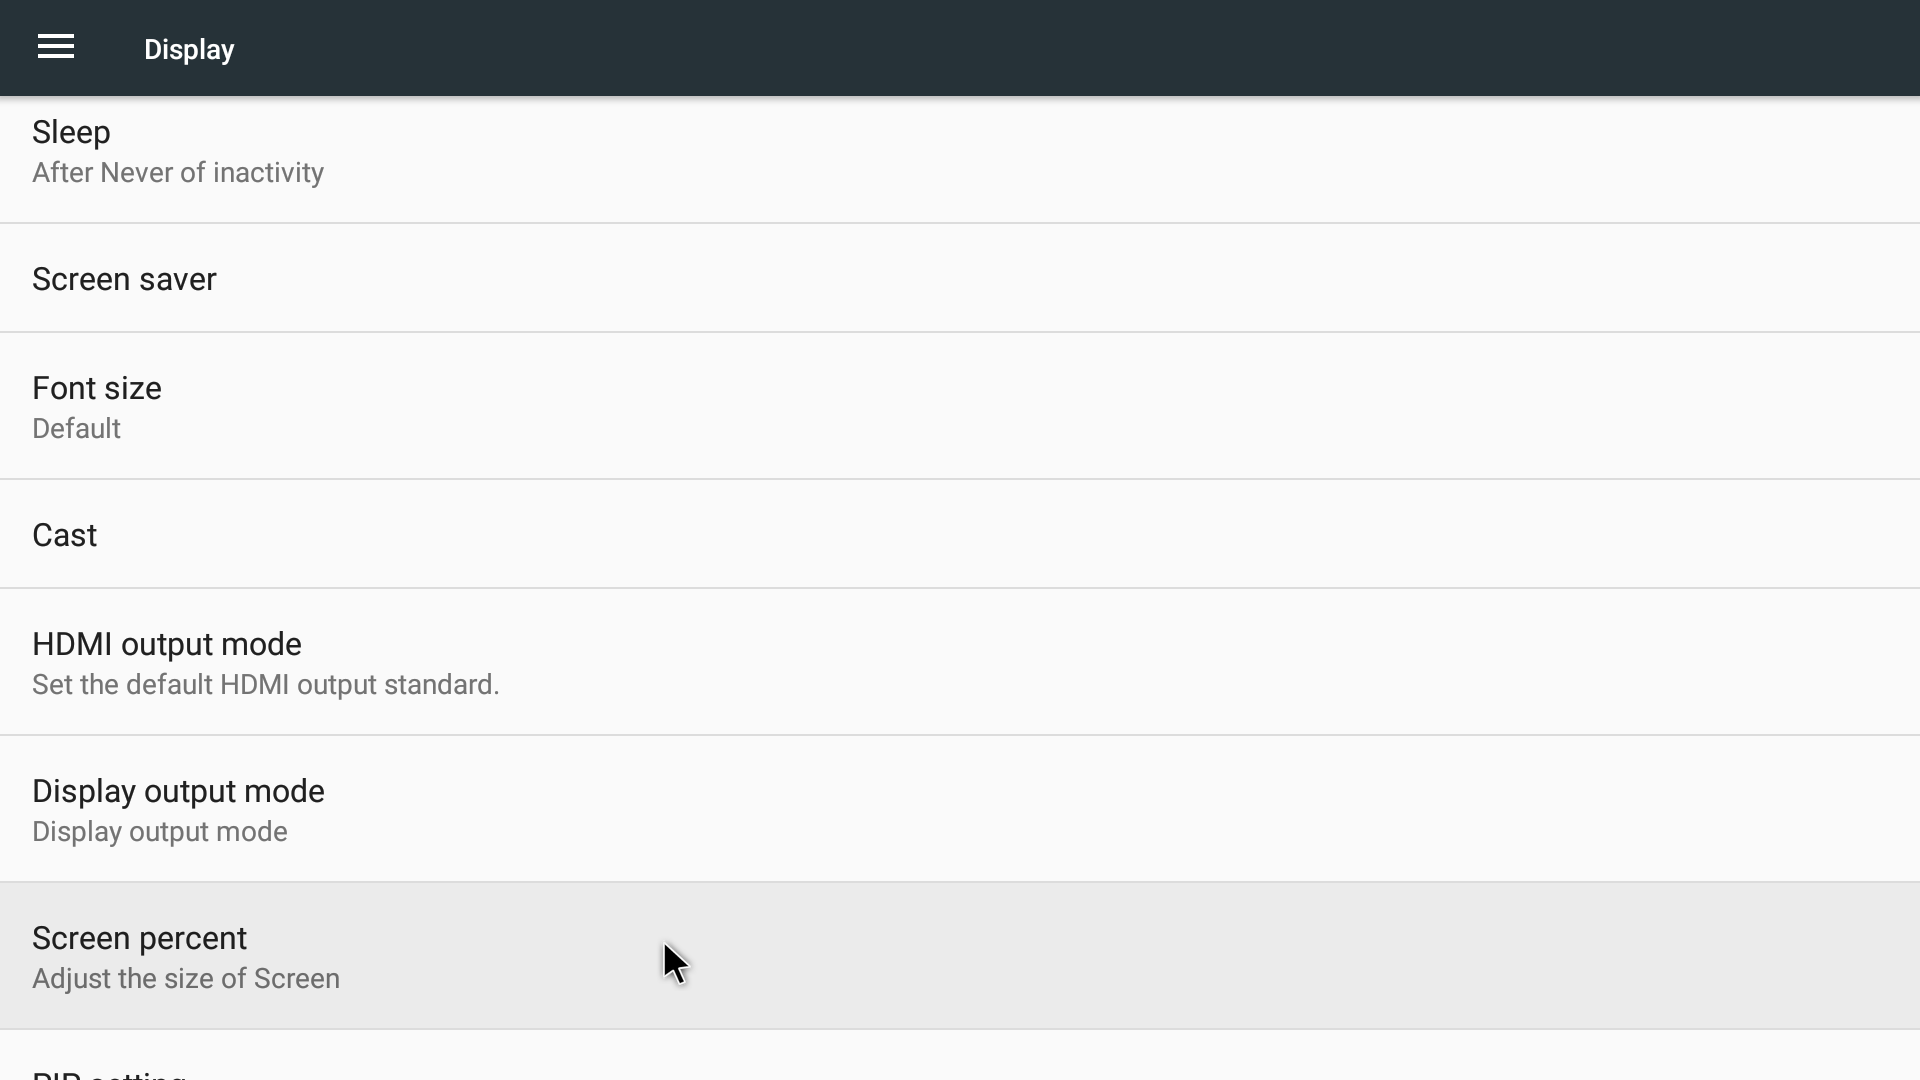
Go to "Settings->Display->Display output mode":
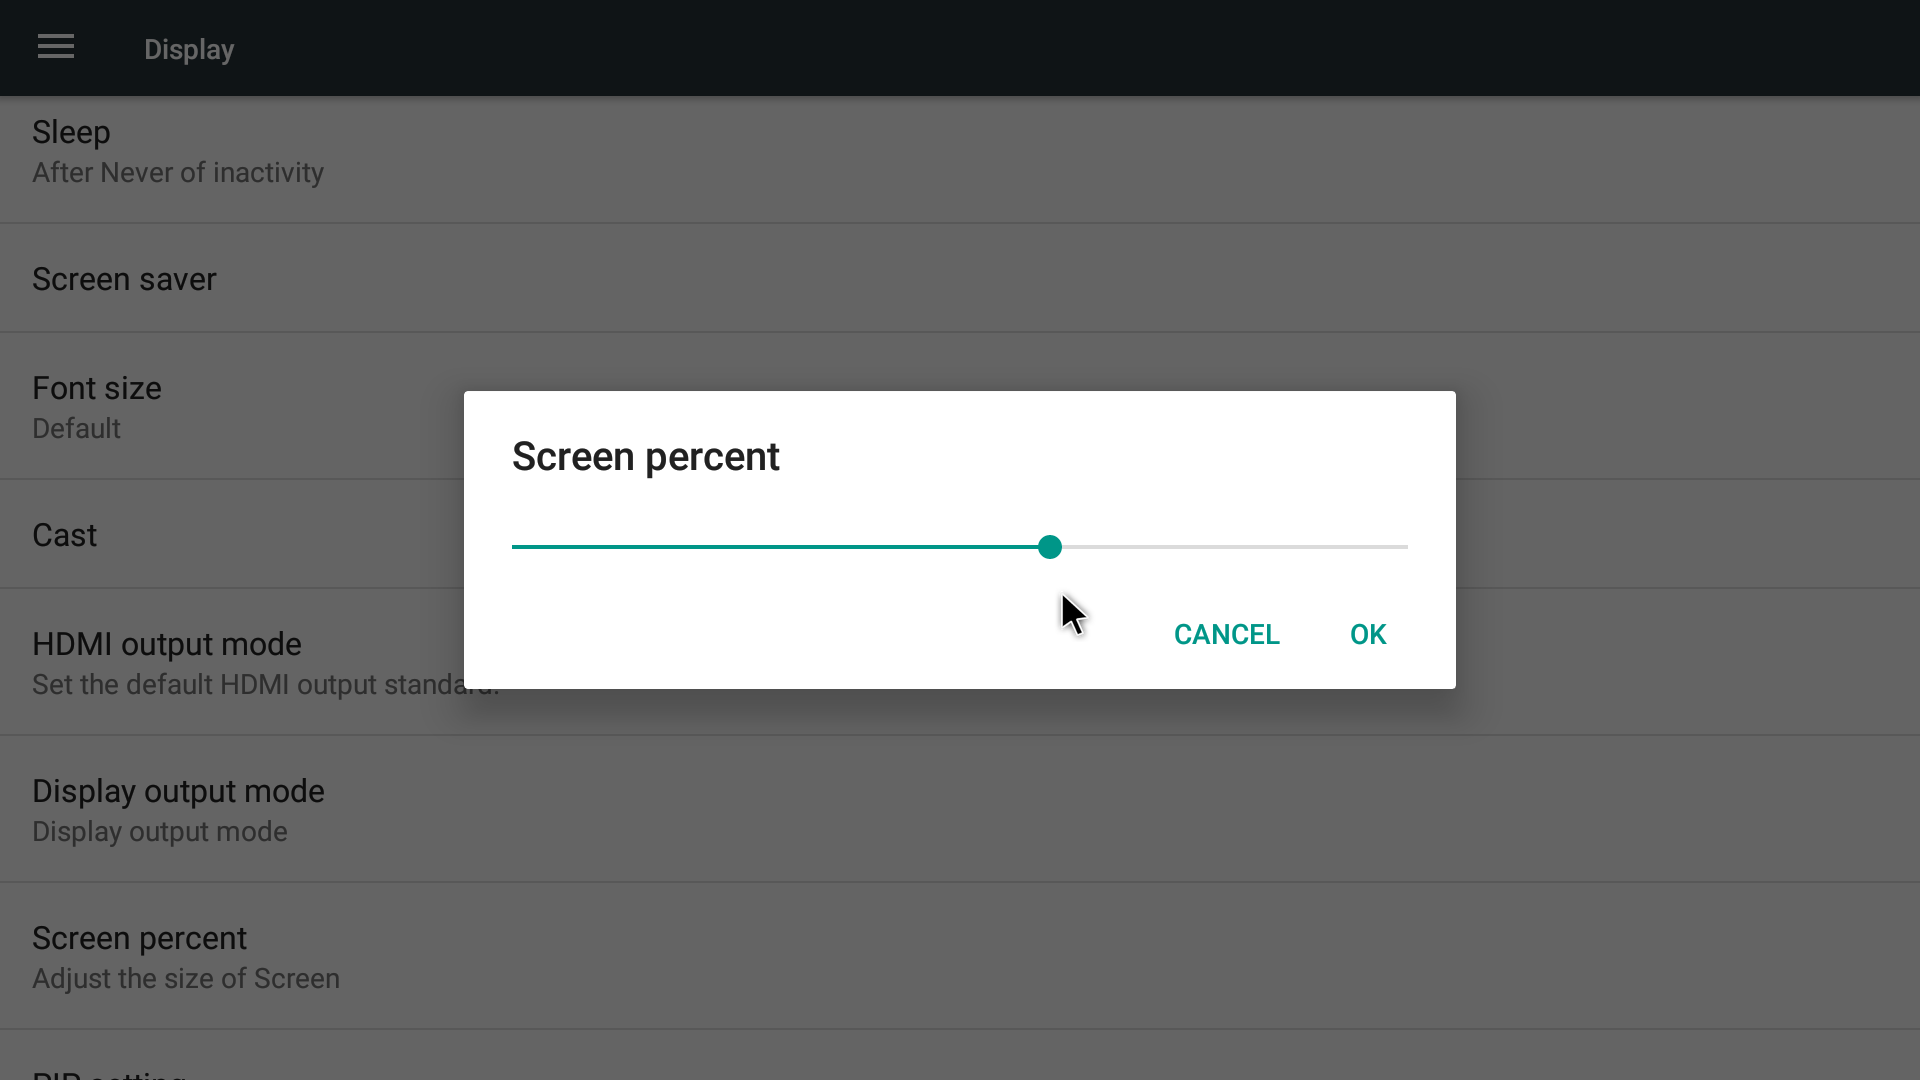
You can adjust the screen size by moving the scroll bar.
8.4 Audio Output from HDMI and 3.5mm Audio Jack
FriendlyELEC's Android by default sets audio output to both HDMI and 3.5mm audio jack. You can test this function by running Android's internal Music app.
8.5 播放视频
根据 H5 芯片手册里的说明,H5 支持的解码多种视频格式,使用安兔兔测试得到其Android系统支持播放的视频格式包括:
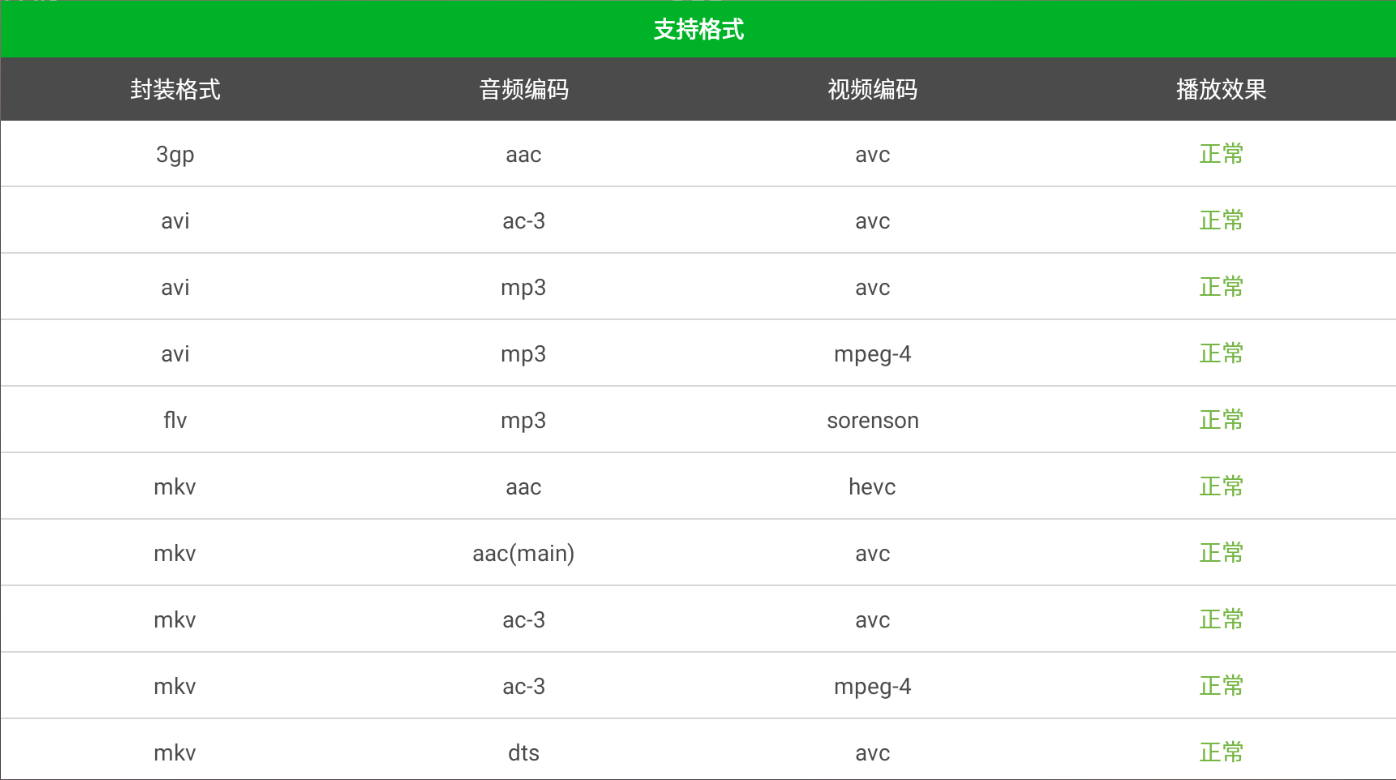
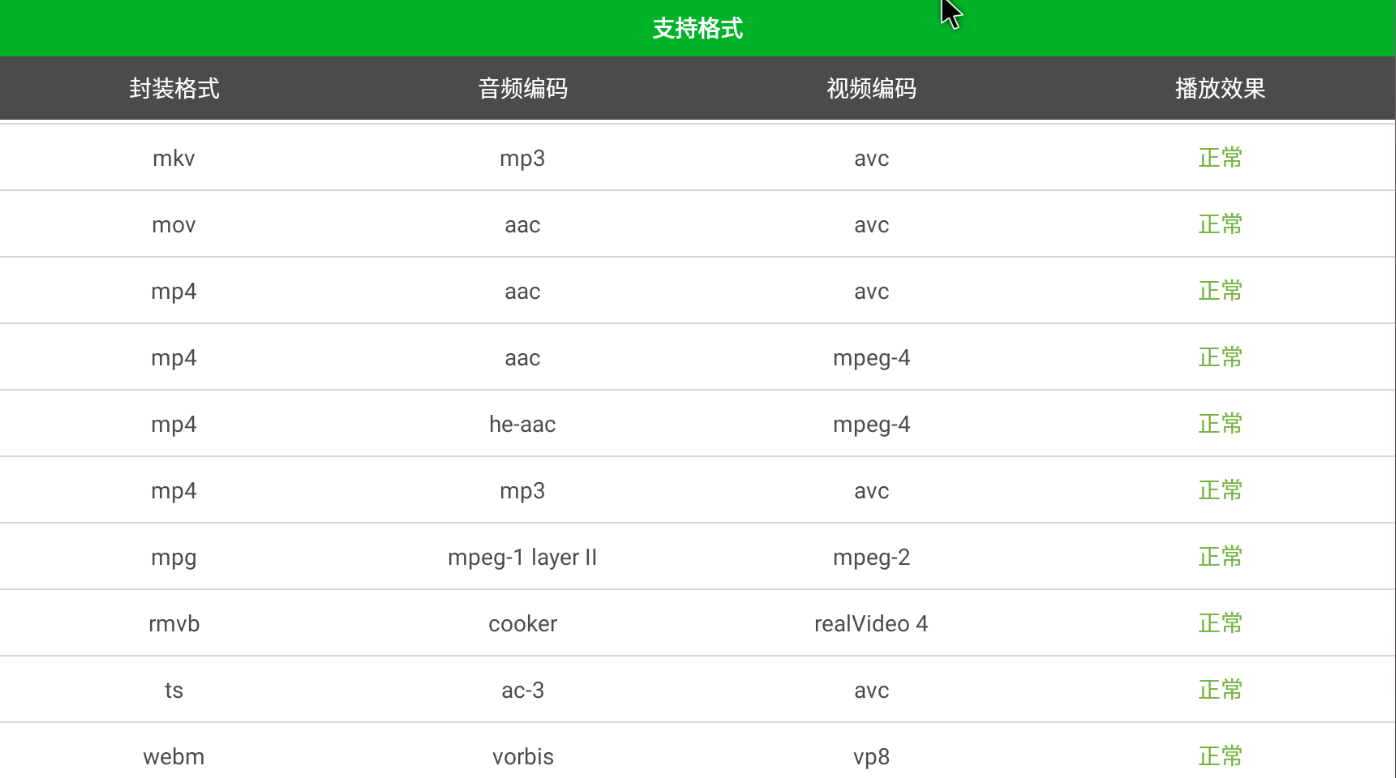
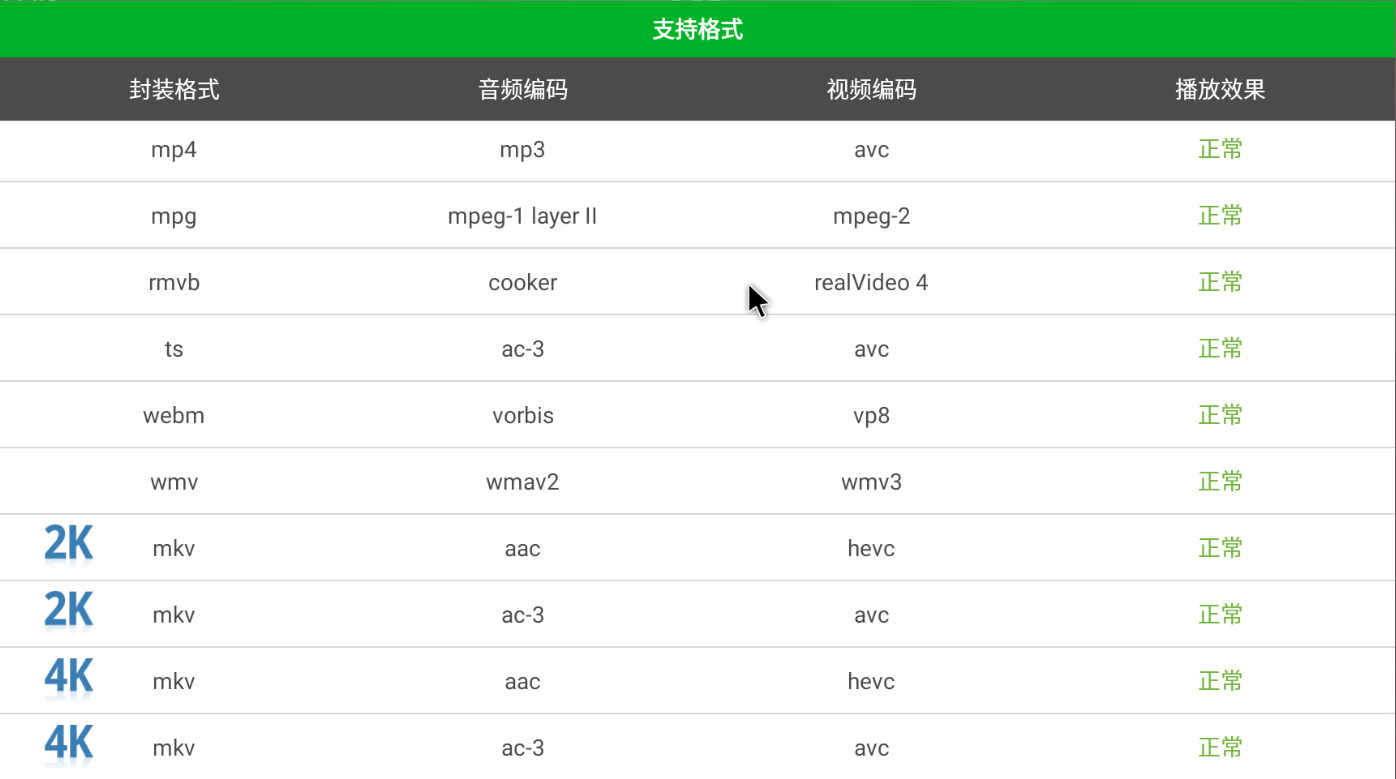
如果你想播放4K视频,可以访问此处下载地址的test-video目录,下载4K视频文件4K-Chimei-inn-60mbps.mp4,将其拷贝到SD卡或者U盘上。
将带有视频文件的SD卡或者U盘接到开发板上,启动并运行Android系统,运行系统自带应用Gallery并选择对应的视频文件,即可观看4K影片。
8.6 使用摄像头CAM500B
CAM500B是一款500万像素摄像头模块,以DVP并行信号输出,详细信息请参考Matirx-CAM500B的介绍章节。
由于CAM500B模块并不支持热插拔使用,所以请务必在上电前将其接到开发板的DVP接口上,连接方法参考Matirx-CAM500B的硬件连接章节。
启动系统后,使用Android自带的camera应用就可以进行图像预览了,如果你想切换拍照/录像模式,需要从屏幕的最左边向右边滑动一下,会弹出如下界面:
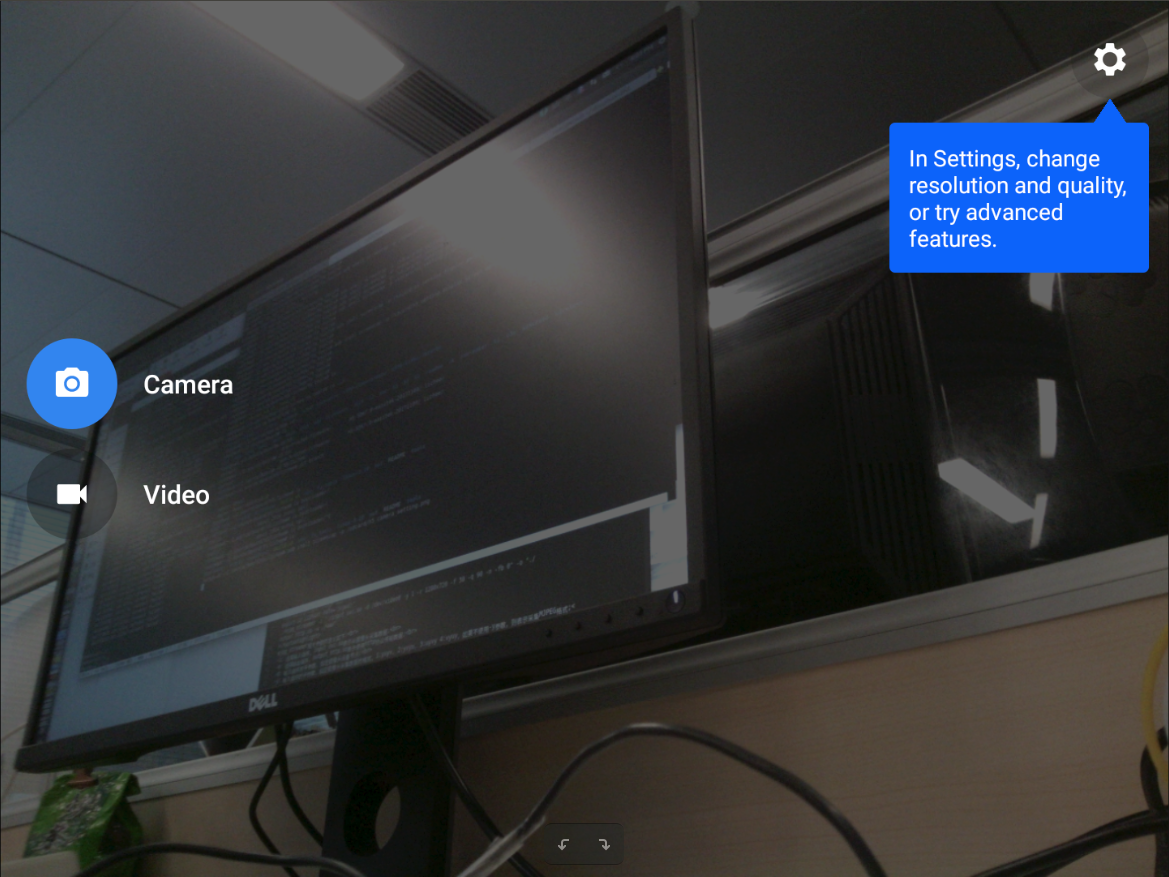
该界面同时也是设置界面,可用于设置拍照/录像模式的分辨率,点击设置图标进入如下界面:
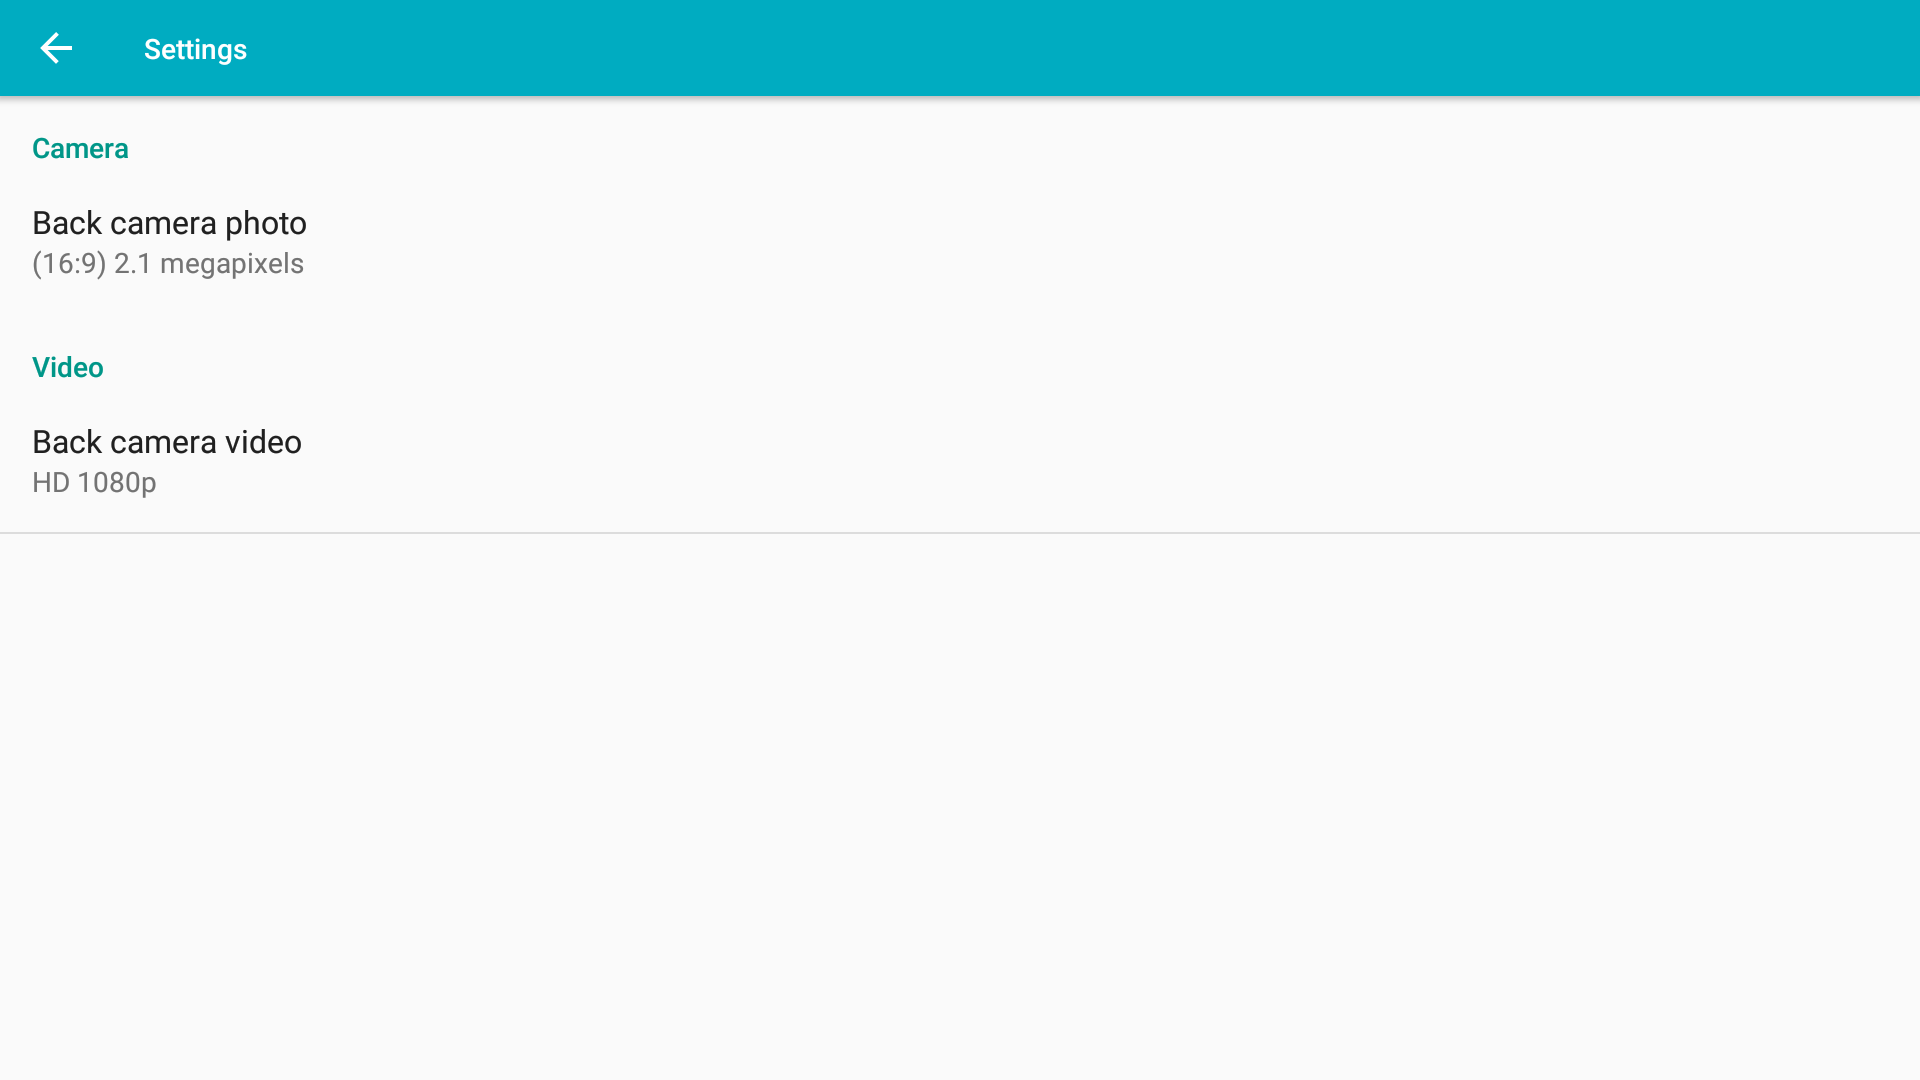
目前拍照仅支持1920x1080分辨率(2.1 百万像素),录像支持SD 480p/HD 720p/ HD 1080p。
9 如何编译Android系统
9.1 准备工作
- 编译Android必须使用 64bit 的Linux系统,并安装下列软件包,下列操作均基于Ubuntu-14.04 LTS-64bit:
$ sudo apt-get install bison g++-multilib git gperf libxml2-utils make python-networkx zip
$ sudo apt-get install flex curl libncurses5-dev libssl-dev zlib1g-dev gawk minicom
$ sudo apt-get install openjdk-8-jdk
$ sudo apt-get install exfat-fuse exfat-utils device-tree-compiler liblz4-tool
- 由于全志芯片的Android固件的打包过程依赖lichee源码里的脚本工具,需要先克隆lichee源码:
$ git clone https://github.com/friendlyarm/h5_lichee.git lichee -b master-android7.0
注:lichee是全志为其CPU的板级支持包所起的项目名称,里面包含了U-boot,Linux等源码和众多的编译脚本。因为全志Android系统固件的打包脚本依赖lichee这个路径,目录名称必须保持为 “lichee”。
-b master-android7.0表示使用master-android7.0分支,只有使用该分支才能正常配合Android7.0源码生成Android系统固件。
- 克隆Android源码:
$ git clone https://gitlab.com/friendlyelec/h5_android-7.0 android
因为Andoird系统固件的打包过程依赖lichee源码里的脚本工具,所以必须在lichee目录的同级目录下克隆Android源码,并且将目录名称保持为 “android”,效果如下:
$ ls ./
android lichee
- 下载交叉编译器:
为了编译lichee源码,还需要访问此处下载地址的toolchain目录,下载交叉编译器压缩包gcc-linaro-arm-4.6.3.tar.xz和gcc-linaro-aarch64.tar.xz。
其中gcc-linaro-arm-4.6.3.tar.xz用于编译U-boot,gcc-linaro-aarch64.tar.xz用于编译Linux内核。下载完成后,将它们拷贝到源码lichee/brandy/toochain/目录下即可。
后面编译U-boot或者Linux内核时,编译脚本会自动解压并使用这两个编译器进行编译。
9.2 lichee/fa_tools脚本介绍
lichee/fa_tools目录里的脚本为FriendlyElec工程师编写, 用于简化和统一管理lichee项目的编译和烧写操作,它们的功能和用法如下。
- build.sh脚本可用于编译整个lichee目录,单独编译U-boot/Linux内核,执行固件打包操作,清理lichee,用法如下:
$ ./build.sh
Usage: build.sh -b board[nanopi-k1-plus] -p platform[android] -t target[all|u-boot|kernel|pack|clean]
参数 作用 b 指定开发板型号 p 指定平台,目前仅支持android平台 t 指定本次操作的目标,对于Android平台: - "all"表示编译整个lichee;
- "u-boot"表示单独编译U-boot;
- "kernel"表示单独编译Linux内核;
- "pack"表示打包生成系统固件,本质上就是在android源码里执行了pack命令,执行pack操作的前提条件是已经成功编译了lichee源码和android源码。
- "clean"表示清理lichee目录,会同时清理U-boot\Linux内核和一些临时文件。
- "all"表示编译整个lichee;
- fuse.sh脚本可用于烧写TF卡和fastboot烧写,用法如下:
$ ./fuse.sh
Usage: fuse.sh -d device[/dev/sd|fastboot] -p platform[android] -t target[u-boot|env.fex|boot.fex|system.fex]
参数 作用 d 指定烧写的设备,可指定TF卡设备节点或者"fastboot" p 目前仅支持android平台 t 指定本次操作的目标,对于Android平台: - "u-boot"表示烧写U-boot;
- "env.fex"表示烧写启动参数,lichee/tools/pack/out/env.fex是由lichee/tools/pack/chips/sun50iw2p1/configs/default/env.cfg转换而来;
- "boot.fex"表示烧写boot.img,lichee/tools/pack/out/boot.fex指向android/out/target/product/cheetah-p1/boot.img;
- "system.fex"表示烧写system.img,lichee/tools/pack/out/system.fex指向android/out/target/product/cheetah-p1/system.img;
- "u-boot"表示烧写U-boot;
- format_sd.sh脚本用于格式化TF卡,用法如下:
$ ./format_sd.sh /dev/sdX
/dev/sdX请替换为实际的TF卡设备文件名。
为了避免误将数据烧写到PC硬盘,超过32GB的设备将禁止写入。
9.3 编译Android
- 编译lichee源码,为Android系统编译好U-boot和Linux内核,为后面的打包生成Android系统固件做准备:
$ cd lichee/fa_tools/
$ ./build.sh -b nanopi-k1-plus -p android -t all
- 选择openJDK-8.0:
$ update-alternatives --config java
$ update-alternatives --config javac
Android7.0的编译依赖openJDK-8.0。
- 编译android源码,并且打包生成Android系统固件:
$ cd android
$ ./build.sh
编译完成后会在lichee/tools/pack/目录下打包生成Android系统固件sun50iw2p1_android_cheetah-p1_uart0.img。
10 Android系统定制开发
10.1 查看全志原厂文档
lichee/doc/allwinner-h5-doc.zip包含了全志原厂提供的开发文档,如果您想定制开发Android系统,请仔细阅读里面的文档资料,系统软件开发人员建议优先阅读文档:
- 《H5 SDK Quick Start Guide V1.0.pdf》
- 《H5 Android定制化文档V1.0.pdf》
- 《H5 Lichee使用说明书V1.0.pdf》
- 《H5 sys_config.fex使用配置说明V1.0.pdf》
10.2 编译和更新U-boot
注意: 必须先完整地编译整个lichee目录后,才能进行单独编译U-boot的操作。 如果你想单独编译U-boot,可以执行命令:
$ cd lichee/fa_tools/
$ ./build.sh -b nanopi-k1-plus -p android -t u-boot
该命令会编译brandy/u-boot-2014.07源码,并执行一些全志原厂的定制化操作pack(将内核的dtb文件、sys_config.fex文件和U-boot打包在一起),最终会在tools/pack/out/目录生成boot0_sdcard.fex和boot_package.fex。
使用下列命令烧写boot0_sdcard.fex和boot_package.fex到TF卡上:
$ cd lichee/fa_tools/
$ ./fuse.sh -d /dev/sdX -p android -t u-boot
/dev/sdX请替换为实际的TF卡设备文件名。
上述操作同时也会更新TF卡上的dtb和sys_config.fex。
10.3 编译和更新Linux内核
注意: 必须先完整地编译整个lichee目录后,才能进行单独编译Linux内核的操作。 如果你想单独编译Linux内核,可以执行命令:
$ cd lichee/fa_tools/
$ ./build.sh -b nanopi-k1-plus -p android -t kernel
编译完成后内核bImage和驱动模块均位于linux-3.10/output目录下,当编译Android系统固件时,build.sh会执行extract-bsp命令来output目录下提取bImage和驱动模块。
如果你想更新TF卡上的Linux内核,还需要在Android源码里重新生成boot.img,操作如下:
$ cd android
$ build.sh bootimage
编译完成后,会生成文件lichee/tools/pack/out/boot.fex,它指向android/out/target/product/cheetah-p1/boot.img,执行下列操作烧写boot.fex:
$ cd lichee/fa_tools
$ ./fuse.sh -d /dev/sdX -p android -t boot.fex
/dev/sdX请替换为实际的TF卡设备文件名。
10.4 fastboot烧写
如果你已经成功在开发板上运行U-boot,可以选择通过USB单独烧写Android系统的各个组件:
(1) 使用MicroUSB线连接开发板和电脑;
(2) 启动开发板,串口终端输入任意按键进入U-boot命令行模式;
(3) 在U-boot里执行"fastboot"命令;
(4) 执行下列命令通过USB更新Android系统核心组件到开发板上:
$ cd lichee/fa_tools/
$ ./fuse.sh -d fastboot -p android -t u-boot
$ ./fuse.sh -d fastboot -p android -t env.fex
$ ./fuse.sh -d fastboot -p android -t boot.fex
$ ./fuse.sh -d fastboot -p android -t system.fex
11 Work with External Modules
11.1 Matrix - 2'8 SPI Key TFT LCD Module
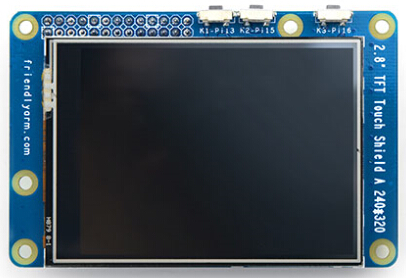
The Matrix-2'8_SPI_Key_TFT LCD module is a 2.8' TFT LCD module with resistive touch. It uses the ST7789S IC and XPT2046 resistive touch IC. The LCD's resolution is 240 * 320. Its interface is SPI. The module has three independent buttons which are user-configurable. For more details refer to:Matrix - 2'8 SPI Key TFT
12 3D Printed Housing
13 Resources
13.1 Datasheet and Schematics
- Schematic: Schematic_NanoPi-K1_Plus-1712_20171214.pdf
- Dimensions: Dimensions_NanoPi_K1_Plus-V1.0-1712_pcb(dxf).rar
- H5 Datasheet: Allwinner_H5_Datasheet_V1.0.pdf
- article
14 Update Log
14.1 April-19-2018
- Released English Version
