Difference between revisions of "BakeBit - NanoHat Hub"
(→Hardware Spec) |
(→Resources) |
||
| (27 intermediate revisions by 3 users not shown) | |||
| Line 1: | Line 1: | ||
| − | [[BakeBit - | + | [[BakeBit - NanoHat Hub/zh|查看中文]] |
==Introduction== | ==Introduction== | ||
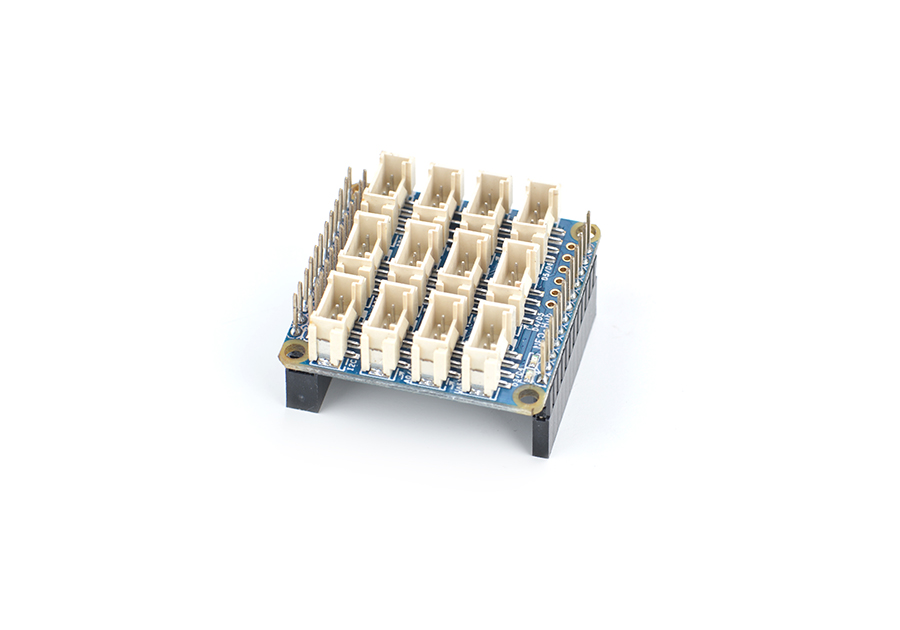
| − | * The | + | * The NanoHat Hub is a plug & play extension board.The NanoHat Hub communicate with the NanoPi NEO/AIR via its I2C interface. It acts as an interface between the NanoPi NEO/AIR and various external modules. The NanoHat Hub has 3 I2C interfaces,3 analog interfaces,2 UART interfaces and 4 digital interfaces (among which D3 and D5 support PWM).All the BakeBit modules can be connected to the NanoHat Hub with a 4-pin cable. |
| − | * The | + | * The NanoHat Hub can be mounted on the NanoPi NEO/AIR with male connectors.The NanoHat Hub communicates with various external modules via its I2C, serial and A/D interfaces. |
| − | * The | + | * The NanoHat Hub has 3 I2C interfaces,3 analog interfaces,2 UART interfaces and 4 digital interfaces (among which D3 and D5 support PWM). |
| − | [[File:BakeBit - NEO Hub.jpg|thumb|BakeBit - | + | [[File:BakeBit - NEO Hub.jpg|thumb|BakeBit - NanoHat Hub]] |
==Hardware Spec== | ==Hardware Spec== | ||
| Line 15: | Line 15: | ||
* 4 x 2.0mm pitch Digital Interface | * 4 x 2.0mm pitch Digital Interface | ||
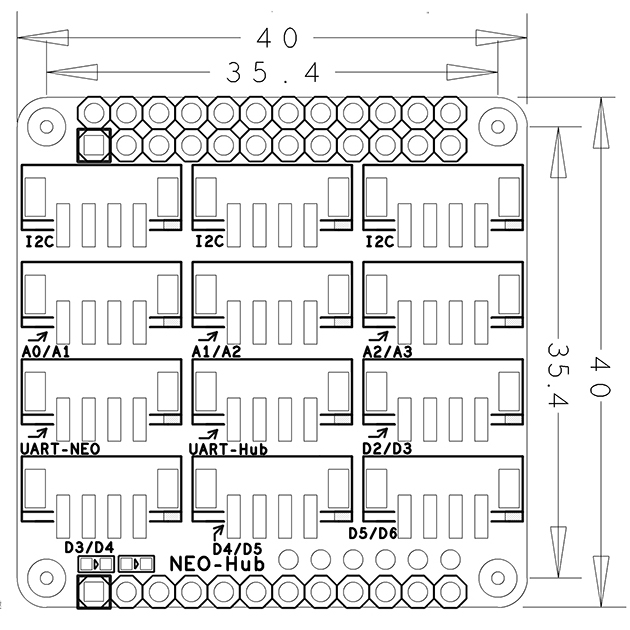
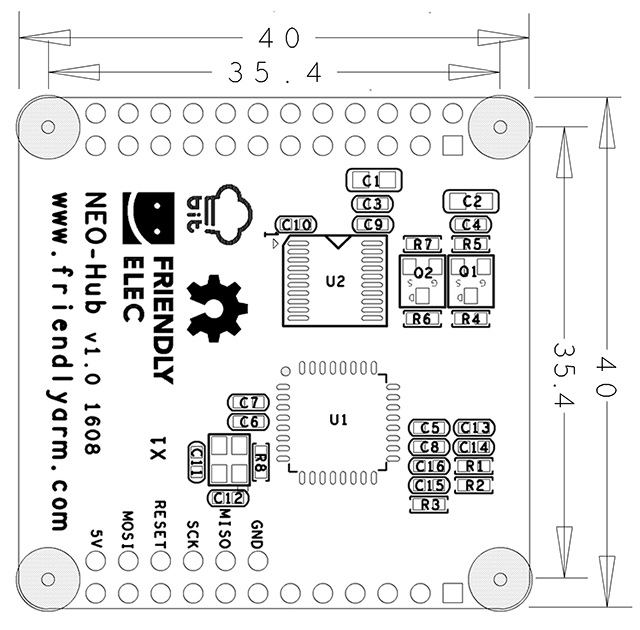
* PCB dimension (mm): 40 x 40 | * PCB dimension (mm): 40 x 40 | ||
| − | [[File:BakeBit - NEO Hub_Top_PCB.png | frameless|350px|BakeBit - | + | * [http://wiki.friendlyarm.com/wiki/images/a/ad/2.0mm_smt_4pin.jpg 2.0mm pitch 4Pin Connector Pin File in PDF] |
| − | [[File:BakeBit - NEO Hub_Bottom_PCB.png | frameless|350px|BakeBit - | + | [[File:BakeBit - NEO Hub_Top_PCB.png | frameless|350px|BakeBit - NanoHat Hub_Top]] |
| + | [[File:BakeBit - NEO Hub_Bottom_PCB.png | frameless|350px|BakeBit - NanoHat Hub_Bottom]] | ||
* Pin Spec: | * Pin Spec: | ||
| Line 61: | Line 62: | ||
|} | |} | ||
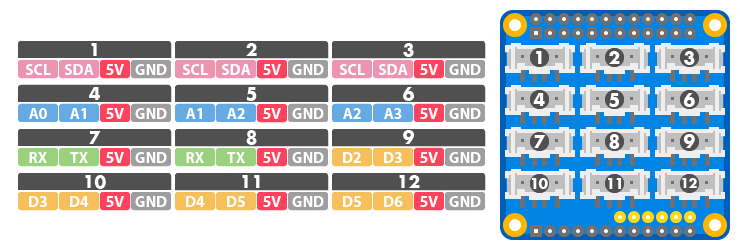
| − | [[File:BakeBit - NEO Hub1.jpg|thumb|BakeBit - | + | [[File:BakeBit - NEO Hub1.jpg|thumb|600px|BakeBit - NanoHat Hub Interface]] |
* Each BakeBit interface is a 2.0mm pitch 4pin connector. Here is its specification: | * Each BakeBit interface is a 2.0mm pitch 4pin connector. Here is its specification: | ||
* '''I2C Interface''' | * '''I2C Interface''' | ||
| − | There three 5V I2C interfaces on the top row. The first pin | + | There three 5V I2C interfaces on the top row. The first pin from the left is SCL and the second pin is SDA. |
{| class="wikitable" | {| class="wikitable" | ||
|- | |- | ||
| Line 78: | Line 79: | ||
|4 || GND || Ground | |4 || GND || Ground | ||
|} | |} | ||
| − | * ''' | + | * '''Analog Interface''' |
| − | + | There are three analog interfaces on the second row. The first pin from the left is An and the second pin is An+1. For example A0/A1 stands for the first pin A0 and the second pin A1 from the left. Usually it is abbreviated as A0. | |
{| class="wikitable" | {| class="wikitable" | ||
|- | |- | ||
| − | | | + | |Pin ||Name || Description |
|- | |- | ||
| − | |1 || An || | + | |1 || An || Analog An |
|- | |- | ||
| − | |2 || An+1 || | + | |2 || An+1 || Analog An+1 |
|- | |- | ||
| − | |3 || 5V || | + | |3 || 5V || 5V supply voltage |
|- | |- | ||
| − | |4 || GND || | + | |4 || GND || Ground |
|} | |} | ||
| − | * ''' | + | * '''UART Interface''' |
| − | NEO | + | The NanoHat Hub has two UART interfaces. When you connect the NanoHat Hub to the NanoPi NEO/AIR the first UART on the third row from the left is directly connected to the NEO/AIR's UART1. The second UART is the UART populated from NanoHat Hub's chipset and this UART can be used as D0/D1. |
{| class="wikitable" | {| class="wikitable" | ||
|- | |- | ||
| − | | | + | |Pin ||Name || Description |
|- | |- | ||
| − | |1 ||Rx || | + | |1 ||Rx || Receiver |
|- | |- | ||
| − | |2 || Tx || | + | |2 || Tx || Transmitter |
|- | |- | ||
| − | |3 || 5V || | + | |3 || 5V || 5V supply voltage |
|- | |- | ||
| − | |4 || GND || | + | |4 || GND || Ground |
|} | |} | ||
| − | * ''' | + | * '''Digital Interface''' |
| − | + | The remaining four are digital interfaces. The fist from the left is Dn and the second is Dn+1. For example D2/D3 stands for the first pin D2 and the second pin D3 from the left. Usually it is abbreviated as D2. | |
| − | + | Among these 5 digital interfaces D2-D6 D3, D5 and D6 can be used as PWM. | |
{| class="wikitable" | {| class="wikitable" | ||
|- | |- | ||
| − | | | + | |Pin ||Name || Description |
|- | |- | ||
| − | |1 || Dn || | + | |1 || Dn || Digital Interface Dn |
|- | |- | ||
| − | |2 || Dn+1 || | + | |2 || Dn+1 || Digital Interface Dn+1 |
|- | |- | ||
| − | |3 || 5V || | + | |3 || 5V || 5V supply voltage |
|- | |- | ||
| − | |4 || GND || | + | |4 || GND || Ground |
|} | |} | ||
| − | == | + | ==How To== |
| − | BakeBit - NEO | + | BakeBit - Refer to this link for more details on how to connect the NanoHat Hub to the NanoPi NEO/AIR:[http://wiki.friendlyarm.com/wiki/index.php/BakeBit BakeBit - How to Connect NanoHat Hub to NanoPi NEO/AIR] |
| − | == | + | ==BakeBit Modules== |
| − | + | Here is a list of BakeBit modules that can work with the NanoHat Hub: | |
| − | * 1、[http://wiki.friendlyarm.com/wiki/index.php/BakeBit_-_Button | + | * 1、[http://wiki.friendlyarm.com/wiki/index.php/BakeBit_-_Button Button] |
| − | * 2、[http://wiki.friendlyarm.com/wiki/index.php/BakeBit_-_Buzzer | + | * 2、[http://wiki.friendlyarm.com/wiki/index.php/BakeBit_-_Buzzer Buzzer] |
| − | * 3、[http://wiki.friendlyarm.com/wiki/index.php/BakeBit_-_Green_LED | + | * 3、[http://wiki.friendlyarm.com/wiki/index.php/BakeBit_-_Green_LED Green LED] |
| − | * 4、[http://wiki.friendlyarm.com/wiki/index.php/BakeBit_-_JoyStick | + | * 4、[http://wiki.friendlyarm.com/wiki/index.php/BakeBit_-_JoyStick Joystick] |
| − | * 5、[http://wiki.friendlyarm.com/wiki/index.php/BakeBit_-_LED_Bar | + | * 5、[http://wiki.friendlyarm.com/wiki/index.php/BakeBit_-_LED_Bar LED Bar] |
| − | * 6、[http://wiki.friendlyarm.com/wiki/index.php/BakeBit_-_Light_Sensor | + | * 6、[http://wiki.friendlyarm.com/wiki/index.php/BakeBit_-_Light_Sensor Light Sensor] |
| − | * 7、[http://wiki.friendlyarm.com/wiki/index.php/BakeBit_-_OLED_128x64 | + | * 7、[http://wiki.friendlyarm.com/wiki/index.php/BakeBit_-_OLED_128x64 OLED] |
| − | * 8、[http://wiki.friendlyarm.com/wiki/index.php/BakeBit_-_Red_LED | + | * 8、[http://wiki.friendlyarm.com/wiki/index.php/BakeBit_-_Red_LED Red LED] |
| − | * 9、[http://wiki.friendlyarm.com/wiki/index.php/BakeBit_-_Rotary_Angle_Sensor | + | * 9、[http://wiki.friendlyarm.com/wiki/index.php/BakeBit_-_Rotary_Angle_Sensor Rotary Angle Module] |
| − | * 10、[http://wiki.friendlyarm.com/wiki/index.php/BakeBit_-_Servo | + | * 10、[http://wiki.friendlyarm.com/wiki/index.php/BakeBit_-_Servo servo] |
| − | * 11、[http://wiki.friendlyarm.com/wiki/index.php/BakeBit_-_Sound_Sensor | + | * 11、[http://wiki.friendlyarm.com/wiki/index.php/BakeBit_-_Sound_Sensor Sound] |
| − | * 12、[http://wiki.friendlyarm.com/wiki/index.php/BakeBit_-_Ultrasonic_Ranger | + | * 12、[http://wiki.friendlyarm.com/wiki/index.php/BakeBit_-_Ultrasonic_Ranger Ultrasonic Ranger] |
| − | == | + | ==Update NanoHat Hub's Firmware== |
| − | + | You can update the chipset's firmware(bakebit_firmware.hex) of the NanoHat Hub by following the instructions below:<br /> | |
| − | + | Install avrdude on NanoPi NEO/AIR's system: | |
<syntaxhighlight lang="bash"> | <syntaxhighlight lang="bash"> | ||
apt-get install avrdude | apt-get install avrdude | ||
</syntaxhighlight> | </syntaxhighlight> | ||
| − | + | Append the following lines in the "/etc/avrdude.conf" file: | |
<syntaxhighlight lang="bash"> | <syntaxhighlight lang="bash"> | ||
# Linux GPIO configuration for avrdude. | # Linux GPIO configuration for avrdude. | ||
| Line 163: | Line 164: | ||
</syntaxhighlight> | </syntaxhighlight> | ||
| − | + | Enter the "Firmware" directory and run the "firmware_update.sh" script to update the firmware: | |
<syntaxhighlight lang="bash"> | <syntaxhighlight lang="bash"> | ||
cd ~/BakeBit/Firmware | cd ~/BakeBit/Firmware | ||
./firmware_update.sh | ./firmware_update.sh | ||
</syntaxhighlight> | </syntaxhighlight> | ||
| − | + | After a prompt shows up select "y". If the update is done successfully you will see the following messages:<br /> | |
[[File:BakeBit-UpdateFirmware.jpg|frameless|500px]]<br /> | [[File:BakeBit-UpdateFirmware.jpg|frameless|500px]]<br /> | ||
| − | + | The firmware is a ".hex" binary file and you can check the latest version by running the "new_fw_search.sh" script.<br /> | |
| − | == | + | ==Compile Firmware with Arduino IDE== |
| − | 1) | + | 1) Download the Arduino IDE from the following link and install it on your host PC:<br /> |
https://www.arduino.cc/en/Main/Software<br /> | https://www.arduino.cc/en/Main/Software<br /> | ||
<br /> | <br /> | ||
| − | 2) | + | 2) The Arduino IDE's installation directory has a "libraries" directory. Copy the whole "BakeBit/Firmware/Source/FastLED-FastLED3.1" directory to the "libraries" directory. In MacOS the libraries directory is "/Applications/Arduino.app/Contents/Java/libraries/"<br /> |
<br /> | <br /> | ||
| − | 3) | + | 3) Open the BakeBit project file in Arduino IDE:<br /> |
BakeBit/Firmware/Source/bakebit_v1.0.0/bakebit_v1.0.0.ino<br /> | BakeBit/Firmware/Source/bakebit_v1.0.0/bakebit_v1.0.0.ino<br /> | ||
<br /> | <br /> | ||
| − | 4) | + | 4) In the main Arduino GUI open the "Tools" menu and change the Board model to "Arduino Nano":<br /> |
[[File:BakeBit-ArduinoBoardType.jpg|frameless|500px]]<br /> | [[File:BakeBit-ArduinoBoardType.jpg|frameless|500px]]<br /> | ||
| − | 5) | + | 5) In the main Arduino GUI open the "Sketch" menu, select "Export Compiled Binary" to start compilation.<br /> <br /> |
| − | 6) | + | 6) If the compilation succeeds a binary file "bakebit_v1.0.0.ino.eightanaloginputs.hex" will be generated. Rename the file to "bakebit_firmware.hex", upload it to "NanoPi NEO" and replace the file with the same name under the "BakeBit/Firmware/" directory. Follow the instructions in the previous section to run the firmware_update.sh script to flash the firmware.<br /> |
| + | |||
| + | ==Resources== | ||
| + | *[Schematic]([http://wiki.friendlyarm.com/wiki/images/6/60/SCHEMATIC_NanoHat-Hub.pdf SCHEMATIC_NanoHat Hub.pdf]) | ||
| + | *[Dimensional]([http://wiki.friendlyarm.com/wiki/index.php/File:Dimensional_NanoHat_Hub.dxf Dimensional_NanoHat Hub.dxf]) | ||
| + | *[Dimensional]([http://wiki.friendlyarm.com/wiki/images/a/ad/2.0mm_smt_4pin.jpg 2.0mm pitch 4Pin Connector Pin File in PDF]) | ||
| + | |||
| + | ==Update Log== | ||
| + | ===Dec-09-2016=== | ||
| + | * Released English Version | ||
| + | |||
| + | ===Jan-19-2017=== | ||
| + | * Renamed "NEO-Hub" to "NanoHat-Hub" | ||
| − | == | + | ===Jan-20-2017=== |
| − | * | + | * Renamed "NanoHat-Hub" to "NanoHat Hub" |
Latest revision as of 01:56, 5 July 2018
Contents
1 Introduction
- The NanoHat Hub is a plug & play extension board.The NanoHat Hub communicate with the NanoPi NEO/AIR via its I2C interface. It acts as an interface between the NanoPi NEO/AIR and various external modules. The NanoHat Hub has 3 I2C interfaces,3 analog interfaces,2 UART interfaces and 4 digital interfaces (among which D3 and D5 support PWM).All the BakeBit modules can be connected to the NanoHat Hub with a 4-pin cable.
- The NanoHat Hub can be mounted on the NanoPi NEO/AIR with male connectors.The NanoHat Hub communicates with various external modules via its I2C, serial and A/D interfaces.
- The NanoHat Hub has 3 I2C interfaces,3 analog interfaces,2 UART interfaces and 4 digital interfaces (among which D3 and D5 support PWM).
2 Hardware Spec
- Compatible with NanoPi NEO/AIR
- 3 x 2.0mm pitch 4Pin I2C Interface
- 3 x 2.0mm pitch 4Pin Analog Interface
- 1 x 2.0mm pitch URAT-NEO Interface
- 1 x 2.0mm pitch URAT-Hub Interface
- 4 x 2.0mm pitch Digital Interface
- PCB dimension (mm): 40 x 40
- 2.0mm pitch 4Pin Connector Pin File in PDF
- Pin Spec:
- 24 Pin Spec
| Pin# | Name | Pin# | Name |
| 1 | SYS_3.3V | 2 | VDD_5V |
| 3 | I2C0_SDA | 4 | VDD_5V |
| 5 | I2C0_SCL | 6 | GND |
| 7 | GPIOG11 | 8 | UART1_TX/GPIOG6 |
| 9 | GND | 10 | UART1_RX/GPIOG7 |
| 11 | UART2_TX/GPIOA0 | 12 | PWM1/GPIOA6 |
| 13 | UART2_RTS/GPIOA2 | 14 | GND |
| 15 | UART2_CTS/GPIOA3 | 16 | UART1_RTS/GPIOG8 |
| 17 | SYS_3.3V | 18 | UART1_CTS/GPIOG9 |
| 19 | SPI0_MOSI/GPIOC0 | 20 | GND |
| 21 | SPI0_MISO/GPIOC1 | 22 | UART2_RX/GPIOA1 |
| 23 | SPI0_CLK/GPIOC2 | 24 | SPI0_CS/GPIOC3 |
- 12 Pin Spec
| Pin# | Name | Description |
| 1 | VDD_5V | 5V Power In/Out |
| 2---11 | NC | Not Connected |
| 12 | GND | 0V |
- Each BakeBit interface is a 2.0mm pitch 4pin connector. Here is its specification:
- I2C Interface
There three 5V I2C interfaces on the top row. The first pin from the left is SCL and the second pin is SDA.
| Pin | Name | Description |
| 1 | SCL | SCL |
| 2 | SDA | SDA |
| 3 | 5V | 5V supply voltage |
| 4 | GND | Ground |
- Analog Interface
There are three analog interfaces on the second row. The first pin from the left is An and the second pin is An+1. For example A0/A1 stands for the first pin A0 and the second pin A1 from the left. Usually it is abbreviated as A0.
| Pin | Name | Description |
| 1 | An | Analog An |
| 2 | An+1 | Analog An+1 |
| 3 | 5V | 5V supply voltage |
| 4 | GND | Ground |
- UART Interface
The NanoHat Hub has two UART interfaces. When you connect the NanoHat Hub to the NanoPi NEO/AIR the first UART on the third row from the left is directly connected to the NEO/AIR's UART1. The second UART is the UART populated from NanoHat Hub's chipset and this UART can be used as D0/D1.
| Pin | Name | Description |
| 1 | Rx | Receiver |
| 2 | Tx | Transmitter |
| 3 | 5V | 5V supply voltage |
| 4 | GND | Ground |
- Digital Interface
The remaining four are digital interfaces. The fist from the left is Dn and the second is Dn+1. For example D2/D3 stands for the first pin D2 and the second pin D3 from the left. Usually it is abbreviated as D2.
Among these 5 digital interfaces D2-D6 D3, D5 and D6 can be used as PWM.
| Pin | Name | Description |
| 1 | Dn | Digital Interface Dn |
| 2 | Dn+1 | Digital Interface Dn+1 |
| 3 | 5V | 5V supply voltage |
| 4 | GND | Ground |
3 How To
BakeBit - Refer to this link for more details on how to connect the NanoHat Hub to the NanoPi NEO/AIR:BakeBit - How to Connect NanoHat Hub to NanoPi NEO/AIR
4 BakeBit Modules
Here is a list of BakeBit modules that can work with the NanoHat Hub:
- 1、Button
- 2、Buzzer
- 3、Green LED
- 4、Joystick
- 5、LED Bar
- 6、Light Sensor
- 7、OLED
- 8、Red LED
- 9、Rotary Angle Module
- 10、servo
- 11、Sound
- 12、Ultrasonic Ranger
5 Update NanoHat Hub's Firmware
You can update the chipset's firmware(bakebit_firmware.hex) of the NanoHat Hub by following the instructions below:
Install avrdude on NanoPi NEO/AIR's system:
apt-get install avrdudeAppend the following lines in the "/etc/avrdude.conf" file:
# Linux GPIO configuration for avrdude.
# Change the lines below to the GPIO pins connected to the AVR.
programmer
  id    = "nanopineo";
  desc  = "Use the Linux sysfs interface to bitbang GPIO lines";
  type  = "linuxgpio";
  reset = 67;
  sck   = 66;
  mosi  = 64;
  miso  = 65;
;
Enter the "Firmware" directory and run the "firmware_update.sh" script to update the firmware:
cd ~/BakeBit/Firmware
./firmware_update.sh
After a prompt shows up select "y". If the update is done successfully you will see the following messages:
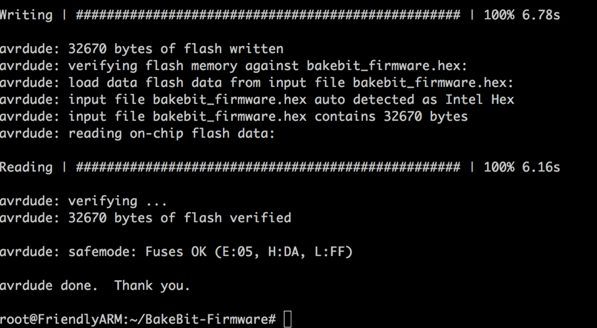
The firmware is a ".hex" binary file and you can check the latest version by running the "new_fw_search.sh" script.
6 Compile Firmware with Arduino IDE
1) Download the Arduino IDE from the following link and install it on your host PC:
https://www.arduino.cc/en/Main/Software
2) The Arduino IDE's installation directory has a "libraries" directory. Copy the whole "BakeBit/Firmware/Source/FastLED-FastLED3.1" directory to the "libraries" directory. In MacOS the libraries directory is "/Applications/Arduino.app/Contents/Java/libraries/"
3) Open the BakeBit project file in Arduino IDE:
BakeBit/Firmware/Source/bakebit_v1.0.0/bakebit_v1.0.0.ino
4) In the main Arduino GUI open the "Tools" menu and change the Board model to "Arduino Nano":
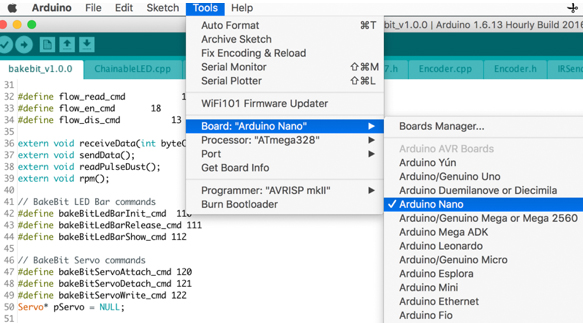
5) In the main Arduino GUI open the "Sketch" menu, select "Export Compiled Binary" to start compilation.
6) If the compilation succeeds a binary file "bakebit_v1.0.0.ino.eightanaloginputs.hex" will be generated. Rename the file to "bakebit_firmware.hex", upload it to "NanoPi NEO" and replace the file with the same name under the "BakeBit/Firmware/" directory. Follow the instructions in the previous section to run the firmware_update.sh script to flash the firmware.
7 Resources
- [Schematic](SCHEMATIC_NanoHat Hub.pdf)
- [Dimensional](Dimensional_NanoHat Hub.dxf)
- [Dimensional](2.0mm pitch 4Pin Connector Pin File in PDF)
8 Update Log
8.1 Dec-09-2016
- Released English Version
8.2 Jan-19-2017
- Renamed "NEO-Hub" to "NanoHat-Hub"
8.3 Jan-20-2017
- Renamed "NanoHat-Hub" to "NanoHat Hub"
