APITestPage
Contents
- 1 Debian11 桌面系统的使用
- 1.1 Debian11桌面系统简介
- 1.2 帐户与密码
- 1.3 查看IP地址
- 1.4 通过ssh登录Debian
- 1.5 更新软件包
- 1.6 安装x11vnc远程桌面
- 1.7 安装内核头文件
- 1.8 更改时区
- 1.9 更换开机LOGO和桌面墙纸
- 1.10 开机自动启动程序(例如Kodi)
- 1.11 取消USB存储设备自动挂载
- 1.12 设置中文语言与输入法
- 1.13 安装Plex多媒体服务器
- 1.14 在Debian系统上安装Docker
- 1.15 如何测试NPU
- 1.16 如何测试VPU
- 1.17 设置WiFi无线链接
- 1.18 取消自动登录
- 1.19 测试OpenGL ES性能
- 1.20 设置HDMI/DP屏幕分辨率
- 1.21 调节HDMI边界
- 1.22 Chromium网页浏览器
- 1.23 测试mpp视频硬件编码
- 2 FriendlyCore的使用
- 3 Work with Debian11 Desktop
- 3.1 Introduction to Debian11 Desktop
- 3.2 Account & Password
- 3.3 View IP address
- 3.4 Connect to Debian via SSH
- 3.5 Update Software Packages
- 3.6 Install x11vnc Server on Debian for Remote Access
- 3.7 Install the kernel-header package
- 3.8 Change time zone
- 3.9 Change startup LOGO and Wallpaper
- 3.10 Soft Factory Reset
- 3.11 Start the program automatically at startup(For example Kodi)
- 3.12 Disable auto-mounting
- 3.13 Setup Chinese language and Input method
- 3.14 Installing Plex Multimedia Server
- 3.15 Install Docker on Debian
- 3.16 How to test NPU
- 3.17 WiFi Connection
- 3.18 Cancel auto-login
- 3.19 Test OpenGL ES
- 3.20 HDMI/DP LCD Resolution
- 3.21 Adjust HDMI overscan
- 3.22 Chromium web browser
- 3.23 Test hardware encoding
- 4 Work with FriendlyCore
1 Debian11 桌面系统的使用
1.1 Debian11桌面系统简介
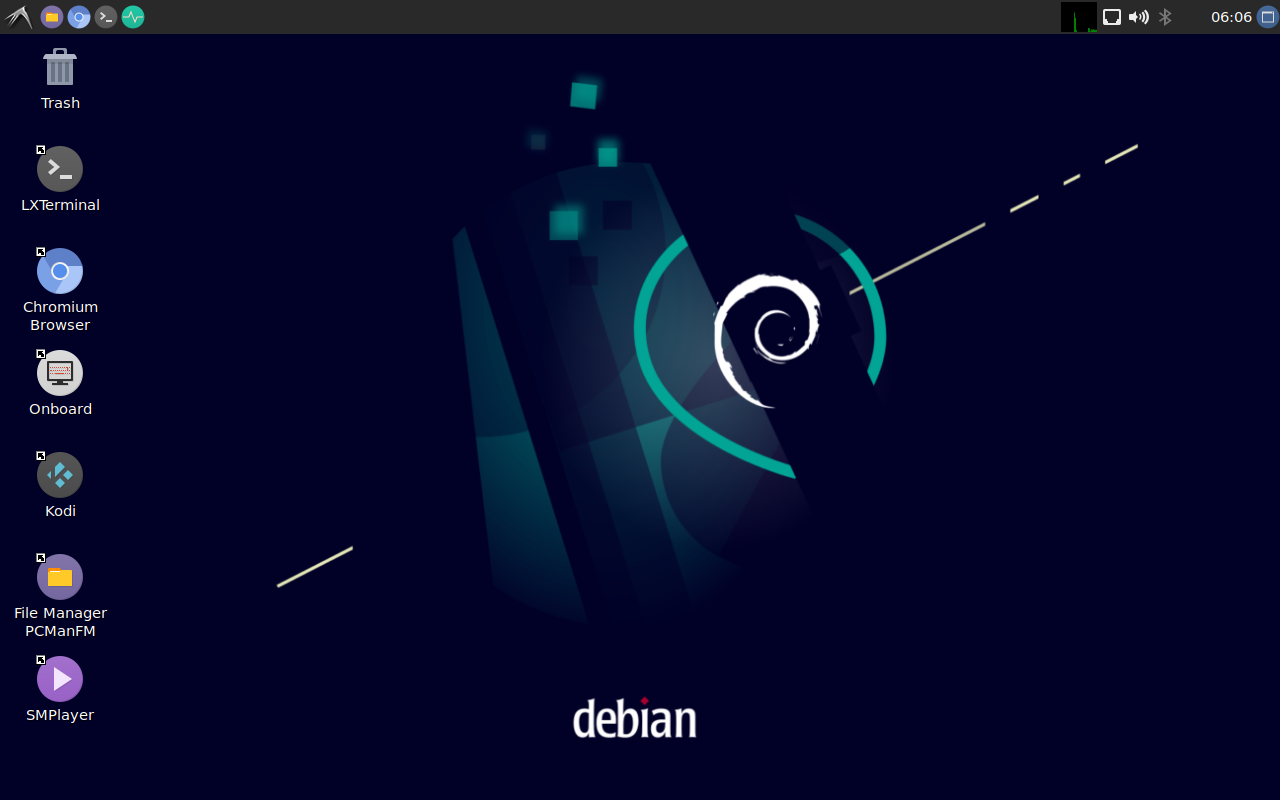
Debian11 Desktop 是一个轻量级的Debian桌面环境,具有如下特点:
- 桌面环境采用 LXDE, 多种主题可选, 简洁美观, 占用资源少;
- 提供基于 Mali GPU 的 OpenGL 支持;
- 支持Rockhip MPP视频硬编和硬解码;
- 预装基于mpv的Kodi, SMPlayer播放器, 均支持4K视频硬解码;
- 预装Chromium浏览器, 支持vpu/gpu硬件加速 (视频硬解限h264/mp4格式);
- 支持安装Plex Server, Docker与wps等应用, 玩法丰富;
1.2 帐户与密码
普通用户:
用户名: pi
密码: pi
Root用户:
默认没有设置root密码,可通过sudo passwd root命令配置root密码
1.3 查看IP地址
由于Debian主机名默认为硬件型号, 所以可以使用ping命令来获得IP地址: ping NanoPi-R6S
1.4 通过ssh登录Debian
使用以下命令:ssh pi@NanoPi-R6S
默认密码为pi
1.5 更新软件包
1.5.1 更换软件源为国内镜像源
sudo sed -i -e 's/deb.debian.org/mirrors.cloud.tencent.com/g' /etc/apt/sources.list
sudo sed -i -e 's/security.debian.org/mirrors.cloud.tencent.com/g' /etc/apt/sources.list
sudo apt update
1.6 安装x11vnc远程桌面
x11vnc是一个VNC服务器, 安装后我们可以不依赖外部的显示设备, 通过网络远程登录Debian桌面。
1.6.1 安装x11vnc
sudo apt-get install x11vnc
1.6.2 设置VNC登录密码
sudo x11vnc -storepasswd /etc/x11vnc.pwd
1.6.3 设置x11vnc在开机时自动启动
新建如下文件:
sudo vi /lib/systemd/system/x11vnc.service
内容如下:
[Unit]
Description=Start x11vnc at startup.
Requires=display-manager.service
After=syslog.target network-online.target
Wants=syslog.target network-online.target

[Service]
Type=simple
ExecStart=/usr/bin/x11vnc -display :0 -forever -loop -noxdamage -repeat -rfbauth /etc/x11vnc.pwd -rfbport 5900 -shared -capslock -nomodtweak
ExecStop=/usr/bin/x11vnc -R stop
Restart=on-failure

[Install]
WantedBy=multi-user.target
设置systemd服务:
sudo systemctl daemon-reload
sudo systemctl enable x11vnc.service
sudo systemctl start x11vnc
1.6.4 测试远程桌面
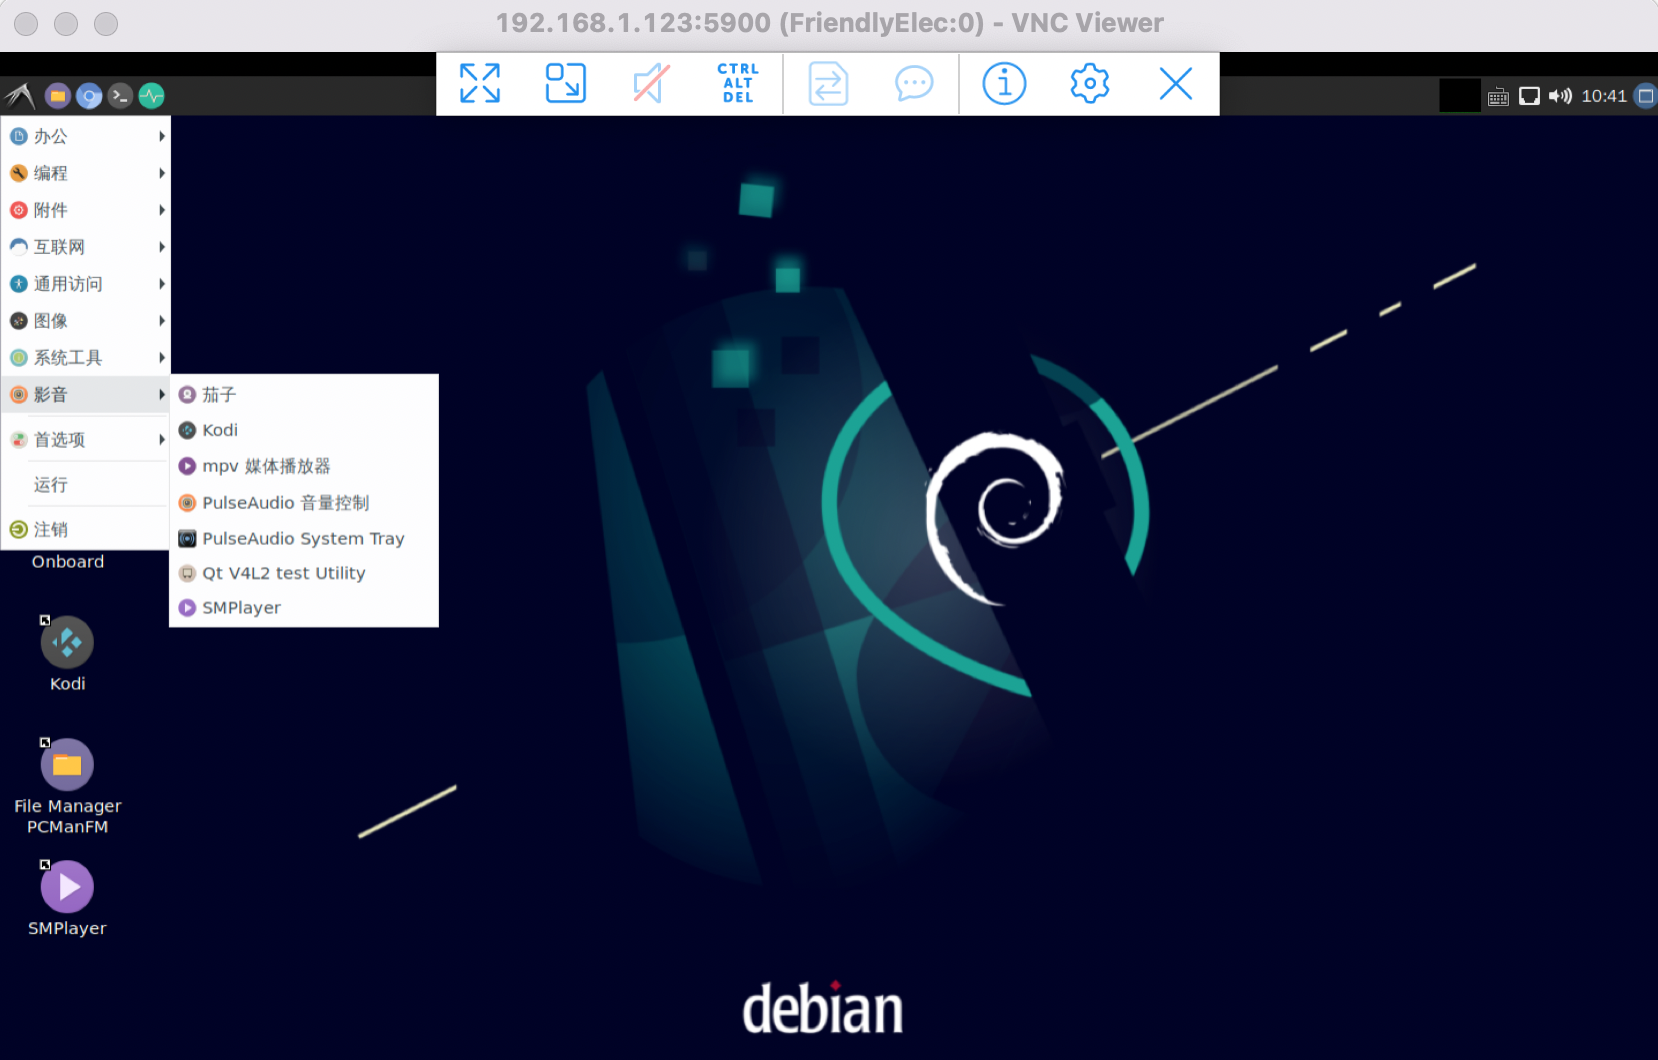
在电脑上启动VNC客户端软件, 在地址栏输入: IP地址:5900 连接即可, 效果如下图所示, 图中设备IP地址为192.168.1.123, 使用端口5900进行连接:

1.7 安装内核头文件
sudo dpkg -i /opt/linux-headers-*.deb
测试编译内核模块:
sudo apt update
sudo apt install git gcc make bc
git clone https://github.com/RinCat/RTL88x2BU-Linux-Driver.git
cd RTL88x2BU-Linux-Driver
make -j$(nproc)
sudo make install
sudo modprobe 88x2bu
1.8 更改时区
1.8.1 检查当前时区
timedatectl
1.8.2 列出所有时区
timedatectl list-timezones
1.8.3 设置时区 (比如上海)
sudo timedatectl set-timezone Asia/Shanghai
1.9 更换开机LOGO和桌面墙纸
1.9.1 更换开机LOGO
替换内核下面的两个文件,重新编译内核:
kernel/logo.bmp
kernel/logo_kernel.bmp
或者使用脚本来操作,如下所示:
- 下载脚本
git clone https://github.com/friendlyarm/sd-fuse_rk3588.git -b kernel-6.1.y --single-branch
cd sd-fuse_rk3588
- 编译内核并重新打包固件
convert files/logo.jpg -type truecolor /tmp/logo.bmp
convert files/logo.jpg -type truecolor /tmp/logo_kernel.bmp
sudo LOGO=/tmp/logo.bmp KERNEL_LOGO=/tmp/logo_kernel.bmp ./build-kernel.sh debian-bullseye-desktop-arm64
sudo ./mk-sd-image.sh debian-bullseye-desktop-arm64
sudo ./mk-emmc-image.sh debian-bullseye-desktop-arm64
注: 如果你的系统不是debian-bullseye-desktop-arm64,请根据实际情况指定
1.9.2 更换桌面墙纸
修改如下配置文件:
/home/pi/.config/pcmanfm/LXDE/desktop-items-0.conf
1.9.3 恢复出厂设置
在终端上执行如下命令:
sudo firstboot && sudo reboot
1.10 开机自动启动程序(例如Kodi)
把要开机启动的程序的desktop文件放入~/.config/autostart/目录即可,例如:
mkdir ~/.config/autostart/
cp /usr/share/applications/kodi.desktop ~/.config/autostart/
1.11 取消USB存储设备自动挂载
sudo systemctl mask udisks2
sudo reboot
1.12 设置中文语言与输入法
1.12.1 设置中文语言
输入以下命令,用空格选中 'zh_CN.UTF-8'
sudo dpkg-reconfigure locales添加环境变量到 .bashrc:
echo "export LC_ALL=zh_CN.UTF-8" >> ~/.bashrc
echo "export LANG=zh_CN.UTF-8" >> ~/.bashrc
echo "export LANGUAGE=zh_CN.UTF-8" >> ~/.bashrc
重启确认一下设置是否生效:
sudo reboot1.12.2 安装中文输入法
输入如下命令安装fcitx和拼音输入法:
sudo apt update
sudo apt-get install fcitx fcitx-pinyin
sudo apt-get install im-config
sudo apt-get install fcitx-table*
sudo apt-get install fcitx-ui-classic fcitx-ui-light
sudo apt-get install fcitx-frontend-gtk2 fcitx-frontend-gtk3 fcitx-frontend-qt4
sudo apt-get remove --purge scim* ibus*
sudo reboot
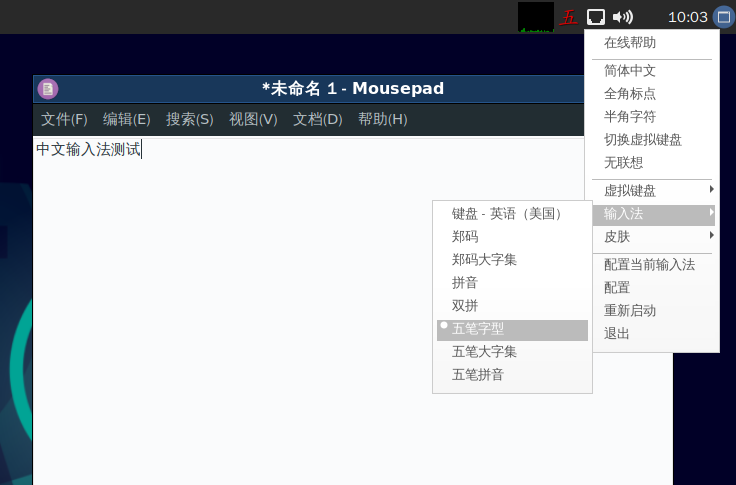
重启后, 按Ctrl+Space即可切换中英文输入法, 右上角也出现了输入法图标, 右击右上角的输入法图标, 在弹出菜单中可以切换输入法, 如下图所示:

1.13 安装Plex多媒体服务器
访问 Plex官网的如下地址: https://www.plex.tv/media-server-downloads/
在下载页面上, 选择 ”Plex Media Server” 分类, 平台选择 ”Linux“, 版本选择 "Ubuntu(16.04+)/Debian(8+) - ARMv8",
下载得到deb包后, 使用 dpkg 命令安装软件包即可:
sudo dpkg -i plexmediaserver_1.31.0.6654-02189b09f_arm64.deb
安装完成后, 在电脑浏览器上输入以下地址登录Plex服务器后台: http://IP地址:32400/web/
1.14 在Debian系统上安装Docker
请参考此链接: How to Install Docker on Debian/zh
1.15 如何测试NPU
请参考此链接: NPU/zh
1.16 如何测试VPU
请参考此链接: VPU/zh
1.17 设置WiFi无线链接
1.17.1 图形界面操作
点击右上角的网络图标,选择你要连接的WiFi热点,按界面提示操作即可。
1.17.2 命令行操作
请参考 Use NetworkManager to configure network settings/zh
1.18 取消自动登录
编辑文件:
sudo vim /etc/lightdm/lightdm.conf
注释掉如下两行内容 (在前面插入#):
autologin-user=pi
autologin-user-timeout=0
1.19 测试OpenGL ES性能
在系统菜单 System Tools 中点击 Terminator 打开命令行终端,输入以下命令即可测试:
glmark2-es2
1.20 设置HDMI/DP屏幕分辨率
进入系统菜单 Perferences -> Monitor Settings界面进行设置即可。
推荐分辨率:1920x1080@60Hz
1.21 调节HDMI边界
打开命令行终端,输入命令进行操作,有几个注意事项:
1) 需要登录桌面才能操作,如果Desktop停留在Login是无法设置的;
2) 如果你是在 ssh 登录的终端,请使用与桌面登录相同的用户名,默认是 pi,不能使用root用户,同时,你需要赋值 DISPLAY 变量:
export DISPLAY=:0.0
1.21.1 查询显示器支持哪些分辨率
xrandr -q输出示例:
Screen 0: minimum 320 x 200, current 1920 x 1080, maximum 8192 x 8192
eDP-1 disconnected primary (normal left inverted right x axis y axis)
HDMI-1 connected 1920x1080+0+0 (normal left inverted right x axis y axis) 0mm x 0mm
   1920x1080     60.00*+  50.00
   1280x720      60.00    50.00
   720x576       50.00
   720x480       59.94
1.21.2 设置分辨率
例如设置为 1920X1080@60Hz:
xrandr --output HDMI-1 --mode 1920x1080 --refresh 60
1.21.3 设节HDMI输出边界
For example, the transformation scaling horizontal coordinates by 0.8, vertical coordinates by 1.04 and moving the screen by 35 pixels right and 19 pixels down:
xrandr --output HDMI-1 --transform 0.80,0,-35,0,1.04,-19,0,0,1
1.21.4 开机自动调整
编辑~/.config/autostart/lxrandr-autostart.desktop,将完整的xrandr命令写入到Exec=开头的键中,如下所示:
[Desktop Entry]
Type=Application
Name=LXRandR autostart
Comment=Start xrandr with settings done in LXRandR
Exec=sh -c 'xrandr --output HDMI-1 --mode 1920x1080 --refresh 50 --transform 1.04,0,-35,0,1.05,-30,0,0,1'
OnlyShowIn=LXDE
1.22 Chromium网页浏览器
1.22.1 GPU支持情况
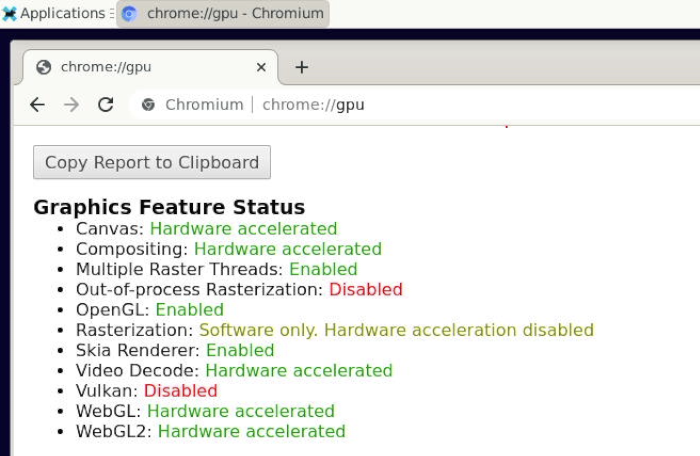
系统预装的Chromium网页浏览器已经默认启用硬件加速,支持WebGL,可以通过输入网址 chrome://gpu 了解硬件加速情况,如下图所示:

1.22.2 VPU支持情况
在浏览器上播放一个视频,然后在命令行使用fuser查看mpp设备节点的使用情况来确认已经调用了vpu:
pi@FriendlyElec:~$ fuser /dev/mpp_service
/dev/mpp_service:     3258
如果fuser命令没有内容输出, 则表示当前是软解.
1.22.3 查看支持的硬解格式
在浏览器地址栏输入 about://gpu,翻页到页面最底部,查看 "Video Acceleration Information" 表格;
播放一个视频后,再在浏览器地址栏输入 about://media-internals, 可以查看最近播放的视频是否启用了硬解;
1.23 测试mpp视频硬件编码
mpi_enc_test -w 1920 -h 1080 -t 7 -f 0 -o test.h264 -n 300
export XDG_RUNTIME_DIR=/run/user/0
ffplay test.h264
2 FriendlyCore的使用
2.1 FriendlyCore默认帐户
- 普通用户:
   用户名: pi
   密码: pi
- Root用户:
   用户名: Root用户:
   密码: fa
2.2 更新软件包
$ sudo apt-get update
2.3 配置网络
2.3.1 设置静态IP地址
默认已将 eth0 配置成 dhcp 自动获取IP地址,要更改配置,可以修改这个文件:
vi /etc/network/interfaces.d/eth0
比如修改成静态IP地址,如下所示:
auto eth0
iface eth0 inet static
    address 192.168.1.231
    netmask 255.255.255.0
    gateway 192.168.1.1
另外两个网口设置了静态IP地址, 设置如下:
eth1: 192.168.2.1
eth2: 192.168.3.1 (注:如果有第三个网口的话)
2.3.2 设置DNS
还需要修改如下文件加入DNS的配置:
vi /etc/systemd/resolved.conf
例如设置为192.168.1.1:
[Resolve]
DNS=192.168.1.1
再用以下命令重新启动systemd-resolved服务:
sudo systemctl restart systemd-resolved.service
sudo systemctl enable systemd-resolved.service
2.3.3 设置使用另一个网络接口
要配置另一个网口, 例如eth1,可以在 /etc/network/interfaces.d/ 下复制 eth0 成 eth1,然后编辑eth1, 把其中的eth0改为eth1, 根据需要指定网络配置:
cp /etc/network/interfaces.d/eth0 /etc/network/interfaces.d/eth1
vi /etc/network/interfaces.d/eth1
2.4 连接WiFi
先用以下命令检查一下系统是否有安装Network-Manager:
which nmcli如果有安装Network-Manager, 则参考此链接的方法连接WiFi: Use NetworkManager to configure network settings/zh, 如果没有安装, 则参考如下方法配置WiFi,
输入以下命令查询一下WiFi的网络接口,wlan开头的就是WiFi:
ifconfig -a
默认情况下是wlan0,在/etc/network/interfaces.d/目录下新建一个与网络接口同名的配置文件 ,以wlan0为例,用vi命令新建以下文件:
sudo vi /etc/network/interfaces.d/wlan0
wlan0文件的内容如下:
auto lo
iface lo inet loopback
auto wlan0
iface wlan0 inet dhcp
wpa-driver wext
wpa-ssid YourWiFiESSID
wpa-ap-scan 1
wpa-proto RSN
wpa-pairwise CCMP
wpa-group CCMP
wpa-key-mgmt WPA-PSK
wpa-psk YourWiFiPassword
其中,YourWiFiESSID和YourWiFiPassword请替换成你要连接的无线AP名称和密码, 保存文件后输入以下命令, 或者重启以应用配置:
sudo systemctl daemon-reload
sudo systemctl restart networking
需要注意的是,如果你的SD卡在多个硬件上运行,WiFi的网络接口可能会被重命名为wlan1, wlan2等,你可以通过清空这个文件的内容并重启让它恢复为默认值:/etc/udev/rules.d/70-persistent-net.rules。
2.4.1 重点支持的WIFI型号
2.4.1.1 M.2 WiFi Module
- RTL8822CE
2.4.1.2 Usb Dongle
- RTL8821CU (Vid: 0BDA, Pid: C811) (测试样品:TP-Link TL-WDN5200H)
- RTL8812AU (Vid: 0BDA, Pid: 8812)
- MediaTek MT7662 (Vid: 0E8D, Pid: 7612) (测试样品:COMFAST CF-WU782AC V2)
2.5 安装内核头文件
sudo dpkg -i /opt/linux-headers-*.deb
2.6 配置状态灯
先确定一下系统是否已经存在leds初始化的服务:
sudo systemctl status leds如果已经存在leds服务, 则通过编辑如下文件改变状态灯的默认行为:
/etc/init.d/leds.sh
早期的固件由于没有leds服务, 需要参考以下指南手动配置状态灯, 首先, 设置开机自动加载以下内核模块:
modprobe ledtrig-netdev
echo ledtrig-netdev > /etc/modules-load.d/ledtrig-netdev.conf
下面的脚本代码将状态灯与网卡相关联, 需要加入到开机自动运行的脚本中:
echo netdev > /sys/class/leds/wan_led/trigger
echo eth0 > /sys/class/leds/wan_led/device_name
echo 1 > /sys/class/leds/wan_led/link

echo netdev > /sys/class/leds/lan1_led/trigger
echo eth1 > /sys/class/leds/lan1_led/device_name
echo 1 > /sys/class/leds/lan1_led/link

echo netdev > /sys/class/leds/lan2_led/trigger
echo eth2 > /sys/class/leds/lan2_led/device_name
echo 1 > /sys/class/leds/lan2_led/link
3 Work with Debian11 Desktop
3.1 Introduction to Debian11 Desktop
Debian11 Desktop is a light-weighted debian desktop system,it has the following features:
- Uses LXDE as default desktop;
- Mali GPU-based OpenGL support;
- Support Rockhip MPP video hard coding and hard decoding;
- Pre-installed mpv and smplayer, both support 4K video hardware decoding;
- Pre-installed Chromium browser, support vpu/gpu hardware acceleration (video hard decoding limited to h264/mp4 format);
- Compatible with Plex Server and Docker;
3.2 Account & Password
Regular Account:
User Name: pi
Password: pi
Root:
the root user account is disabled by default, you may configure the root password through the 'sudo passwd root' command.
3.3 View IP address
Since the Debian Bullseye hostname is the hardware model by default, you can use the ping command to get the IP address:ping NanoPi-R6S
3.4 Connect to Debian via SSH
Run the following commandssh pi@NanoPi-R6S
The default password is: pi
3.5 Update Software Packages
$ sudo apt-get update
3.6 Install x11vnc Server on Debian for Remote Access
3.6.1 Install x11vnc server
The following command to install x11vnc server:
sudo apt-get install x11vnc
3.6.2 Set your password
sudo x11vnc -storepasswd /etc/x11vnc.pwd
3.6.3 Setup x11vnc server with systemd auto start up
Create service configuration file:
sudo vi /lib/systemd/system/x11vnc.service
Let’s copy and paste the following configuration into our newly create service file:
[Unit]
Description=Start x11vnc at startup.
Requires=display-manager.service
After=syslog.target network-online.target
Wants=syslog.target network-online.target

[Service]
Type=simple
ExecStart=/usr/bin/x11vnc -display :0 -forever -loop -noxdamage -repeat -rfbauth /etc/x11vnc.pwd -rfbport 5900 -shared -capslock -nomodtweak
ExecStop=/usr/bin/x11vnc -R stop
Restart=on-failure

[Install]
WantedBy=multi-user.target
The following commands to reload the systmd system and to enable and start the x11vnc service:
sudo systemctl daemon-reload
sudo systemctl enable x11vnc.service
sudo systemctl start x11vnc
3.6.4 Testing remote access
Start the VNC client software, input IP:5900 to connect:

3.7 Install the kernel-header package
sudo dpkg -i /opt/linux-headers-*.deb
try to compile a kernel module:
sudo apt update
sudo apt install git gcc make bc
git clone https://github.com/RinCat/RTL88x2BU-Linux-Driver.git
cd RTL88x2BU-Linux-Driver
make -j$(nproc)
sudo make install
sudo modprobe 88x2bu
3.8 Change time zone
3.8.1 Check the current time zone
timedatectl
3.8.2 List all available time zones
timedatectl list-timezones
3.8.3 Set the time zone (e.g. Shanghai)
sudo timedatectl set-timezone Asia/Shanghai
3.9 Change startup LOGO and Wallpaper
3.9.1 Change startup LOGO
Replace the following two files in the kernel source code directory and recompile the kernel:
kernel/logo.bmp
kernel/logo_kernel.bmp
Or use the script to operate, as shown below:
- Download scripts:
git clone https://github.com/friendlyarm/sd-fuse_rk3588.git -b kernel-6.1.y --single-branch
cd sd-fuse_rk3588
- Compile kernel and repackage firmware
convert files/logo.jpg -type truecolor /tmp/logo.bmp
convert files/logo.jpg -type truecolor /tmp/logo_kernel.bmp
sudo LOGO=/tmp/logo.bmp KERNEL_LOGO=/tmp/logo_kernel.bmp ./build-kernel.sh debian-bullseye-desktop-arm64
sudo ./mk-sd-image.sh debian-bullseye-desktop-arm64
sudo ./mk-emmc-image.sh debian-bullseye-desktop-arm64
Note: If your system is not debian-bullseye-desktop-arm64, please specify according to the actual situation
3.9.2 Change Wallpaper
Modify the following configuration file:
/home/pi/.config/pcmanfm/LXDE/desktop-items-0.conf
3.10 Soft Factory Reset
Execute the following command in a terminal:
sudo firstboot && sudo reboot
3.11 Start the program automatically at startup(For example Kodi)
Put the desktop file in the ~/.config/autostart/ directory, for example:
mkdir ~/.config/autostart/
cp /usr/share/applications/kodi.desktop ~/.config/autostart/
3.12 Disable auto-mounting
sudo systemctl mask udisks2
sudo reboot
3.13 Setup Chinese language and Input method
3.13.1 Setup Chinese language
Enter the following command and select 'zh_CN.UTF-8':
sudo dpkg-reconfigure localesAdd environment variables to .bashrc:
echo "export LC_ALL=zh_CN.UTF-8" >> ~/.bashrc
echo "export LANG=zh_CN.UTF-8" >> ~/.bashrc
echo "export LANGUAGE=zh_CN.UTF-8" >> ~/.bashrc
Reboot device:
sudo reboot3.13.2 Installing Chinese input method
Enter the following command to install fcitx and Pinyin input method:
sudo apt update
sudo apt-get install fcitx fcitx-pinyin
sudo apt-get install im-config
sudo apt-get install fcitx-table*
sudo apt-get install fcitx-ui-classic fcitx-ui-light
sudo apt-get install fcitx-frontend-gtk2 fcitx-frontend-gtk3 fcitx-frontend-qt4
sudo apt-get remove --purge scim* ibus*
sudo reboot
After reboot, press Ctrl+Space to switch between Chinese and English input methods, and the input method icon will appear in the upper right corner, right-click the input method icon in the upper right corner to switch input methods in the pop-up menu, as shown below:

3.14 Installing Plex Multimedia Server
Visit the Plex website: https://www.plex.tv/media-server-downloads/
On the download page, select the category "Plex Media Server", choose "Linux" for the platform and "Ubuntu(16.04+)/Debian(8+) - ARMv8" for the version,
After downloading the deb package, use the dpkg command to install the package:
sudo dpkg -i plexmediaserver_1.31.0.6654-02189b09f_arm64.deb
After installation, login to the Plex server by typing the following URL into your computer browser: http://IP地址:32400/web/
3.15 Install Docker on Debian
Please refer to: How to Install Docker on Debian
3.16 How to test NPU
Please refer to: NPU
3.17 WiFi Connection
3.17.1 Gui
Click on the icon on the top right in the Debian's main window, select your wanted WiFi hotspot and proceed with prompts
3.17.2 Console
Please visit: Use NetworkManager to configure network settings
3.18 Cancel auto-login
Edit file:
sudo vim /etc/lightdm/lightdm.conf
Comment out the following two lines (insert # in front of them):
autologin-user=pi
autologin-user-timeout=0
3.19 Test OpenGL ES
You can test it by clicking on the Terminator icon to start a commandline utility in the System Tools and run the following commands:
glmark2-es2
3.20 HDMI/DP LCD Resolution
Open the system's menu and go to Perferences -> Monitor Settings to customize your settings.
Recommended resolution: 1920x1080@60Hz
3.21 Adjust HDMI overscan
Open the command line terminal and enter the command to operate, Note:
1) You need to login to the desktop;
2) If you are using ssh terminal, please use the same username as the desktop login. The default is pi. You cannot use the root user. you also need to assign the DISPLAY variable:
export DISPLAY=:0.0
3.21.1 Query which resolutions the display supports
xrandr -q3.21.2 Set resolution
For example set to 1920X1080@60Hz:
xrandr --output HDMI-1 --mode 1920x1080 --refresh 60
3.21.3 Adjust the HDMI overscan
For example, the transformation scaling horizontal coordinates by 0.8, vertical coordinates by 1.04 and moving the screen by 35 pixels right and 19 pixels down:
xrandr --output HDMI-1 --transform 0.80,0,-35,0,1.04,-19,0,0,1
3.21.4 Automatic adjustment at boot
Edit ~/.config/autostart/lxrandr-autostart.desktop,Write the full xrandr command to the key at the beginning of "Exec= as shown below:
[Desktop Entry]
Type=Application
Name=LXRandR autostart
Comment=Start xrandr with settings done in LXRandR
Exec=sh -c 'xrandr --output HDMI-1 --mode 1920x1080 --refresh 50 --transform 1.04,0,-35,0,1.05,-30,0,0,1'
OnlyShowIn=LXDE
3.22 Chromium web browser
3.22.1 GPU
Chromium web browser has enabled hardware acceleration by default, supports WebGL, and can view hardware acceleration details by entering the URL chrome://gpu, as shown below:

3.22.2 VPU
Play a video in the browser, then use fuser on the command line to view the mpp device node to confirm that the vpu interface is being called:
pi@FriendlyElec:~$ fuser /dev/mpp_service
/dev/mpp_service:     3258
If there is no content output from the fuser command, it means software decoding.
3.23 Test hardware encoding
mpi_enc_test -w 1920 -h 1080 -t 7 -f 0 -o test.h264 -n 300
export XDG_RUNTIME_DIR=/run/user/0
ffplay test.h264
3.23.1 Check Supported Hardware Decoding Formats
Enter about://gpu in your browser's address bar and scroll to the bottom of the page to view the "Video Acceleration Information" table.
After playing a video, enter about://media-internals in your browser's address bar to check if hardware decoding was enabled for the most recent playback.
4 Work with FriendlyCore
4.1 FriendlyCore User Account
- Non-root User:
   User Name: pi
   Password: pi
- Root:
   User Name: root
   Password: fa
4.2 Update Software Packages
$ sudo apt-get update
4.3 Setup Network Configurations
4.3.1 Set static IP address
By default "eth0" is assigned an IP address obtained via dhcp. If you want to change the setting you need to change the following file:
vi /etc/network/interfaces.d/eth0
For example if you want to assign a static IP to it you can run the following commands:
auto eth0
iface eth0 inet static
    address 192.168.1.231
    netmask 255.255.255.0
    gateway 192.168.1.1
The other two ethernet ports are set up with static IP addresses, as follows:
eth1: 192.168.2.1
eth2: 192.168.3.1 (Note: if there are three network ports)
4.3.2 Set a DNS
You also need to modify the following file to add the DNS configuration:
vi /etc/systemd/resolved.conf
For example, set to 192.168.1.1:
[Resolve]
DNS=192.168.1.1
Restart the systemd-resolved service with the following command:
sudo systemctl restart systemd-resolved.service
sudo systemctl enable systemd-resolved.service
4.3.3 Set up to use another network interface
To change the setting of "eth1" you can add a new file similar to eth0's configuration file under the /etc/network/interfaces.d/ directory.
4.4 Setup Wi-Fi
First, use the following command to check if Network-Manager is installed on your system:
which nmcliIf you have installed it, refer to this link to connect to WiFi: Use NetworkManager to configure network settings, If you do not have Network-Manager installed on your system, please refer to the following method to configure WiFi,
By default the WiFi device is "wlan0". You need to create a configuration file under "/etc/network/interfaces.d/" for WiFi:
vi /etc/network/interfaces.d/wlan0
Here is a sample wlan0 file:
auto lo
iface lo inet loopback
auto wlan0
iface wlan0 inet dhcp
wpa-driver wext
wpa-ssid YourWiFiESSID
wpa-ap-scan 1
wpa-proto RSN
wpa-pairwise CCMP
wpa-group CCMP
wpa-key-mgmt WPA-PSK
wpa-psk YourWiFiPassword
Please replace "YourWiFiESSID" and "YourWiFiPassword" with your WiFiESSID and password. After save and close the file you can connect to your WiFi source by running the following command:
sudo systemctl daemon-reload
sudo systemctl restart networking
After you power on your board it will automatically connect to your WiFi source.
Please note that if you use one TF card to boot multiple boards the WiFi device name will likely be named to "wlan1", "wlan2" and etc. You can reset it to "wlan0" by deleting the contents of the following file and reboot your board:
/etc/udev/rules.d/70-persistent-net.rules
4.4.1 WiFi models supported
4.4.1.1 M.2 WiFi Module
- RTL8822CE
4.4.1.2 Usb Dongle
- RTL8821CU (Vid: 0BDA, Pid: C811) (Test sample:TP-Link TL-WDN5200H)
- RTL8812AU (Vid: 0BDA, Pid: 8812)
- MediaTek MT7662 (Vid: 0E8D, Pid: 7612) (Test sample:COMFAST CF-WU782AC V2)
4.5 Install the kernel-header package
sudo dpkg -i /opt/linux-headers-*.deb
4.6 Config status LEDs
First determine whether the system already exists the leds initialization service:
sudo systemctl status ledsIf the leds service already exists, change the default behavior of the LEDs by editing the following file:
/etc/init.d/leds.sh
Since there is no leds service in the early firmware, you need to refer to the following guide to manually configure the LEDs. First, set the following kernel modules to be automatically loaded at boot:
modprobe ledtrig-netdev
echo ledtrig-netdev > /etc/modules-load.d/ledtrig-netdev.conf
Put the following into the autorun script to associate the status leds with the ethernet interface, and you can configure it to behave in other ways by referring to these content:
echo netdev > /sys/class/leds/wan_led/trigger
echo eth0 > /sys/class/leds/wan_led/device_name
echo 1 > /sys/class/leds/wan_led/link

echo netdev > /sys/class/leds/lan1_led/trigger
echo eth1 > /sys/class/leds/lan1_led/device_name
echo 1 > /sys/class/leds/lan1_led/link

echo netdev > /sys/class/leds/lan2_led/trigger
echo eth2 > /sys/class/leds/lan2_led/device_name
echo 1 > /sys/class/leds/lan2_led/link
