APITestPage
From FriendlyELEC WiKi
Contents
[hide]1 Earlier version RKNPU2 SDK
Link to → v1.5.2
2 Check NPU driver version
$ sudo cat /sys/kernel/debug/rknpu/version
RKNPU driver: v0.9.8
3 运行RKNN示例程序
3.1 OS
Tested on the following OS:
3.1.1 Debian11 (bullseye)
- rk3588-sd-debian-bullseye-desktop-6.1-arm64-20250117.img.gz
3.1.2 Ubuntu20 (focal)
- rk3588-sd-ubuntu-focal-desktop-6.1-arm64-20250117.img.gz
3.2 Installing RKNN Runtime
cd ~
export GIT_SSL_NO_VERIFY=1
git clone https://github.com/airockchip/rknn-toolkit2.git
cd rknn-toolkit2/rknpu2
sudo cp ./runtime/Linux/librknn_api/aarch64/* /usr/lib
sudo cp ./runtime/Linux/rknn_server/aarch64/usr/bin/* /usr/bin/
sudo cp ./runtime/Linux/librknn_api/include/* /usr/include/
3.3 Check rknn version
$ strings /usr/bin/rknn_server |grep 'build@'
2.3.2 (1842325 build@2025-03-30T09:54:34)
rknn_server version: 2.3.2 (1842325 build@2025-03-30T09:54:34)
$ strings /usr/lib/librknnrt.so |grep 'librknnrt version:'
librknnrt version: 2.3.2 (429f97ae6b@2025-04-09T09:09:27)
3.4 C++示例程序: 编译并运行YOLOv5示例
sudo apt-get update
sudo apt-get install -y gcc g++ make cmake

# fix broken link
cd ~/rknn-toolkit2/rknpu2/examples/3rdparty/mpp/Linux/aarch64
rm -f librockchip_mpp.so librockchip_mpp.so.1
ln -s librockchip_mpp.so.0 librockchip_mpp.so
ln -s librockchip_mpp.so.0 librockchip_mpp.so.1

cd ~/rknn-toolkit2/rknpu2/examples/rknn_yolov5_demo
chmod +x ./build-linux.sh
sudo ln -s /usr/bin/gcc /usr/bin/aarch64-gcc
sudo ln -s /usr/bin/g++ /usr/bin/aarch64-g++
export GCC_COMPILER=aarch64
./build-linux.sh -t rk3588 -a aarch64 -b Release
cd install/rknn_yolov5_demo_Linux
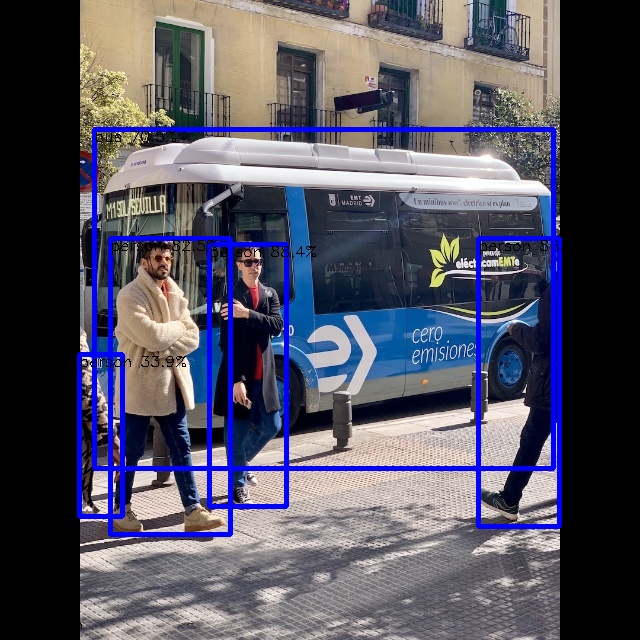
./rknn_yolov5_demo model/RK3588/yolov5s-640-640.rknn model/bus.jpg
Transfer the generated out.jpg to PC to view the result:
scp out.jpg xxx@YourIP:/tmp/
3.5 Python示例: Debian11下安装并测试RKNN Toolkit Lite2
3.5.1 Install RKNN Toolkit Lite2
sudo apt-get update
sudo apt-get install -y python3-dev python3-numpy python3-opencv python3-pip
cd ~/rknn-toolkit2
pip3 install ./rknn-toolkit-lite2/packages/rknn_toolkit_lite2-2.3.2-cp39-cp39-manylinux_2_17_aarch64.manylinux2014_aarch64.whl -i https://pypi.tuna.tsinghua.edu.cn/simple/
3.5.2 Run the python example
$ cd ~/rknn-toolkit2/rknn-toolkit-lite2/examples/resnet18/
$ python3 test.py
W rknn-toolkit-lite2 version: 2.3.2
--> Load RKNN model
done
--> Init runtime environment
I RKNN: [06:29:43.602] RKNN Runtime Information, librknnrt version: 2.3.2 (c949ad889d@2024-11-07T11:35:33)
I RKNN: [06:29:43.602] RKNN Driver Information, version: 0.9.8
I RKNN: [06:29:43.602] RKNN Model Information, version: 6, toolkit version: 2.3.2(compiler version: 2.3.2 (c949ad889d@2024-11-07T11:39:30)), target: RKNPU v2, target platform: rk3588, framework name: PyTorch, framework layout: NCHW, model inference type: static_shape
W RKNN: [06:29:43.617] query RKNN_QUERY_INPUT_DYNAMIC_RANGE error, rknn model is static shape type, please export rknn with dynamic_shapes
W Query dynamic range failed. Ret code: RKNN_ERR_MODEL_INVALID. (If it is a static shape RKNN model, please ignore the above warning message.)
done
--> Running model
resnet18
-----TOP 5-----
[812] score:0.999680 class:"space shuttle"
[404] score:0.000249 class:"airliner"
[657] score:0.000013 class:"missile"
[466] score:0.000009 class:"bullet train, bullet"
[895] score:0.000008 class:"warplane, military plane"

done
3.6 Python示例: Ubuntu 20.04 (Focal)下安装并测试RKNN Toolkit Lite2
3.6.1 通过编译源代码安装Python 3.9
sudo apt install build-essential libssl-dev libffi-dev software-properties-common \
    libbz2-dev libncurses-dev libncursesw5-dev libgdbm-dev liblzma-dev libsqlite3-dev \
    tk-dev libgdbm-compat-dev libreadline-dev

wget https://www.python.org/ftp/python/3.9.21/Python-3.9.21.tar.xz
tar -xvf Python-3.9.21.tar.xz
cd Python-3.9.21/
./configure --enable-optimizations
make -j$(nproc)
sudo make install
3.6.2 Install RKNN Toolkit Lite2
python3.9 -m pip install --upgrade pip
python3.9 -m pip install opencv-python

cd ~
[ -d rknn-toolkit2 ] || git clone https://github.com/airockchip/rknn-toolkit2.git \
    --depth 1 -b master
cd rknn-toolkit2
python3.9 -m pip install \
    ./rknn-toolkit-lite2/packages/rknn_toolkit_lite2-2.3.2-cp39-cp39-manylinux_2_17_aarch64.manylinux2014_aarch64.whl \
    -i https://pypi.tuna.tsinghua.edu.cn/simple/
3.6.3 Run the python example
cd ~/rknn-toolkit2/rknn-toolkit-lite2/examples/resnet18/
python3.9 test.py
output:
W rknn-toolkit-lite2 version: 2.3.2
--> Load RKNN model
done
--> Init runtime environment
I RKNN: [07:08:29.756] RKNN Runtime Information, librknnrt version: 2.3.2 (c949ad889d@2024-11-07T11:35:33)
I RKNN: [07:08:29.757] RKNN Driver Information, version: 0.9.8
I RKNN: [07:08:29.762] RKNN Model Information, version: 6, toolkit version: 2.3.2(compiler version: 2.3.2 (c949ad889d@2024-11-07T11:39:30)), target: RKNPU v2, target platform: rk3588, framework name: PyTorch, framework layout: NCHW, model inference type: static_shape
W RKNN: [07:08:29.814] query RKNN_QUERY_INPUT_DYNAMIC_RANGE error, rknn model is static shape type, please export rknn with dynamic_shapes
W Query dynamic range failed. Ret code: RKNN_ERR_MODEL_INVALID. (If it is a static shape RKNN model, please ignore the above warning message.)
done
--> Running model
resnet18
-----TOP 5-----
[812] score:0.999680 class:"space shuttle"
[404] score:0.000249 class:"airliner"
[657] score:0.000013 class:"missile"
[466] score:0.000009 class:"bullet train, bullet"
[895] score:0.000008 class:"warplane, military plane"

done
4 RKLLM的使用与大语言模型
4.1 转换模型 (PC端)
需要将Hugging Face格式的大语言模型转换为RKLLM 模型,使其能够在Rockchip NPU平台上加载使用, 转换操作需要在PC端运行,建议使用的操作系统为Ubuntu20.04,可以使用Docker容器。
4.1.1 安装RKLLM-Toolkit
sudo apt-get update
sudo apt-get install -y python3-dev python3-numpy python3-opencv python3-pip
cd ~
git clone https://github.com/airockchip/rknn-llm
cd rknn-llm
git reset 8623edd0559a07e7127876d685f2b7ca8b83590c --hard
pip3 install rkllm-toolkit/packages/rkllm_toolkit-1.1.4-cp38-cp38-linux_x86_64.whl
4.1.2 下载并转换模型
使用git clone命令从Hugging Face站点下载所需模型,并修改test.py指向该模型,最后调用test.py开始模型转换:
cd ~/rknn-llm/rkllm-toolkit/examples/
git lfs install
git clone https://huggingface.co/deepseek-ai/DeepSeek-R1-Distill-Qwen-1.5B
sed -i 's|^modelpath\s*=.*|modelpath = "./DeepSeek-R1-Distill-Qwen-1.5B"|' test.py
sed -i 's|^dataset\s*=.*|dataset = None|' test.py
# 如果CPU不是RK3588,比如是RK3576,还需要进行如下修改:
sed -i "s/target_platform='rk3588'/target_platform='rk3576'/g" test.py
sed -i "s/num_npu_core=3/num_npu_core=2/g" test.py
执行test.py开始转换模型:
python3 test.py
模型转换的输出信息如下:
ubuntu@20de568f4011:~/rknn-llm/rkllm-toolkit/examples$ python3 test.py
INFO: rkllm-toolkit version: 1.1.4
The argument `trust_remote_code` is to be used with Auto classes. It has no effect here and is ignored.
Optimizing model: 100%|██████████████████████████████████████████████████████████████████████████████████████| 28/28 [01:33<00:00,  3.35s/it]
Building model: 100%|█████████████████████████████████████████████████████████████████████████████████████| 399/399 [00:03<00:00, 102.43it/s]
WARNING: The bos token has two ids: 151646 and 151643, please ensure that the bos token ids in config.json and tokenizer_config.json are consistent!
INFO: The token_id of bos is set to 151646
INFO: The token_id of eos is set to 151643
INFO: The token_id of pad is set to 151643
Converting model: 100%|███████████████████████████████████████████████████████████████████████████████| 339/339 [00:00<00:00, 5642337.52it/s]
INFO: Exporting the model, please wait ....
[=================================================>] 597/597 (100%)
INFO: Model has been saved to ./qwen.rkllm!
成功的话会生成文件qwen.rkllm,我们将其改名为DeepSeek-R1-Distill-Qwen-1.5B.rkllm并上传到开发板:
mv qwen.rkllm DeepSeek-R1-Distill-Qwen-1.5B.rkllm
scp DeepSeek-R1-Distill-Qwen-1.5B.rkllm root@NanoPC-T6:/home/pi
4.2 编译运行大模型推理示例 (开发板端)
4.3 编译运行大模型推理示例 (开发板端)
pip3 install flask

# get rknn-llm
cd ~
[ -d rknn-llm ] || git clone https://github.com/airockchip/rknn-llm
cd rknn-llm
4.4 有用的资源
5 Doc
https://github.com/rockchip-linux/rknpu2/tree/master/doc
6 Other
6.1 查看NPU占有率
sudo cat /sys/kernel/debug/rknpu/load
6.2 Set NPU freq
echo userspace | sudo tee /sys/class/devfreq/fdab0000.npu/governor > /dev/null
echo 800000000 | sudo tee /sys/class/devfreq/fdab0000.npu/min_freq > /dev/null
echo 1000000000 | sudo tee /sys/class/devfreq/fdab0000.npu/max_freq > /dev/null
6.3 查看NPU频率
cat /sys/class/devfreq/fdab0000.npu/cur_freq
