NanoPi NEO Plus2
Contents
1 Introduction
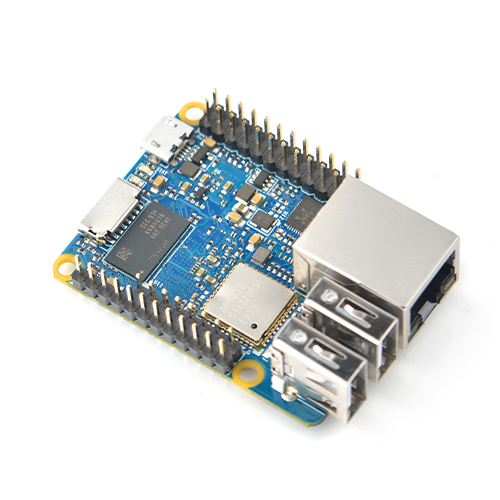
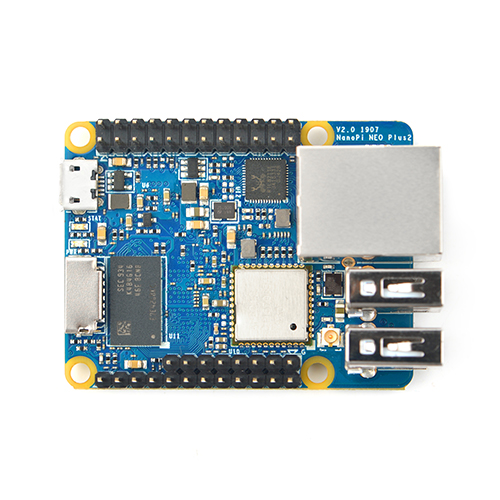
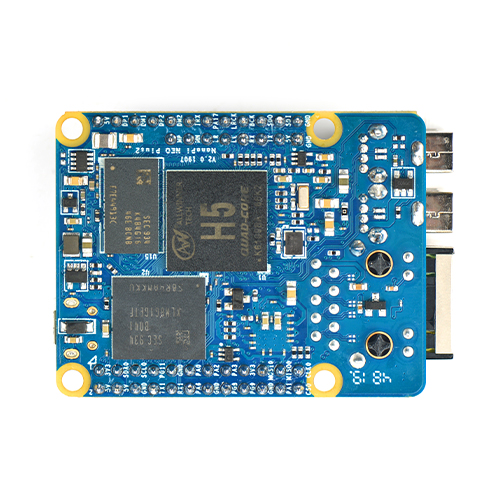
- The NanoPi NEO Plus2 is another Allwinner based ARM board developed by FriendlyElec. It uses Allwinner's 64-bit quad-core A53 SoC with hexa-core Mali450 GPU and features 1GB of DDR3 RAM and 8GB eMMC.
- With a small size of only 40 x 52mm the NanoPi NEO Plus2 has rich on-board resources: AP6212A WiFi & Bluetooth module, Gbps Ethernet and two USB hosts. It supports system-boot from a MicroSD card.
- The NanoPi NEO Plus2 has a carefully designed power system and 6-layer PCB layout. These features enhance the board's heat dissipation.
- The NanoPi NEO Plus2 meets popular IOT applications requirements for small size, high-speed and large throughput data transmission and high performance computing.
2 Hardware Spec
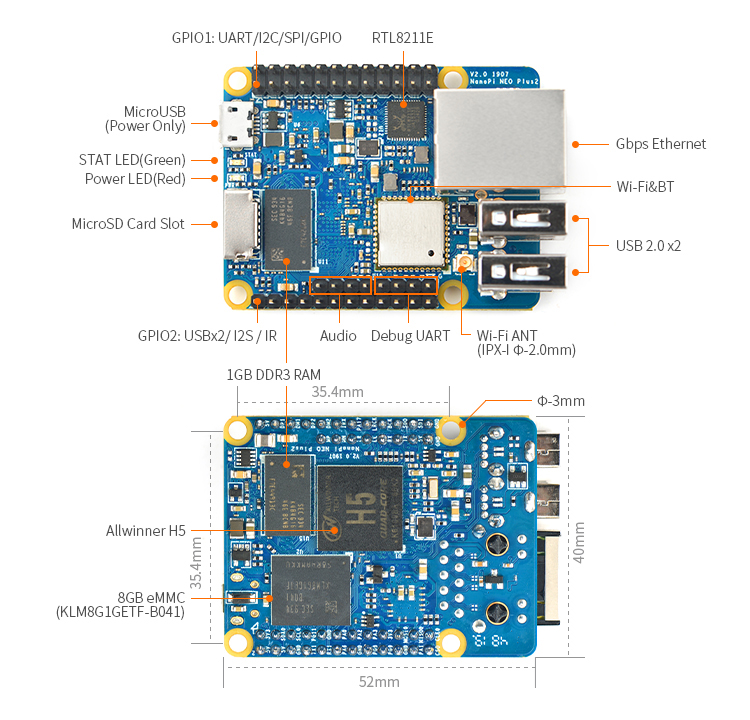
- SoC: Allwinner H5,Quad-core 64-bit high-performance Cortex A53
- DDR3 RAM:1GB
- Storage: 8GB eMMC
- Network: 10/100/1000M Ethernet based on RTL8211E-VB-CG
- WiFi: 802.11b/g/n
- Bluetooth: 4.0 dual mode
- MicroSD Slot: 1 x Slot. It supports system booting or is used to hold a storage card
- Audio Input/Output: 5-Pin, 2.0mm pitch pin-header
- MicroUSB: power input
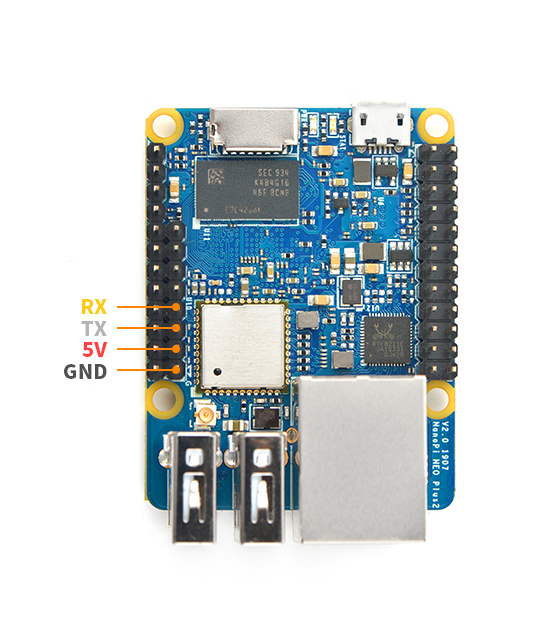
- Debug Serial: 4Pin, 2.54mm pitch pin-header
- GPIO1:24Pin, 2.51mm pitch double-row pin-header containing UART, SPI, I2C and IO
- GPIO2:12Pin, 2.54mm pitch pin-header containing USB, IR receiver,I2S and IO
- Power Supply: DC 5V/2A
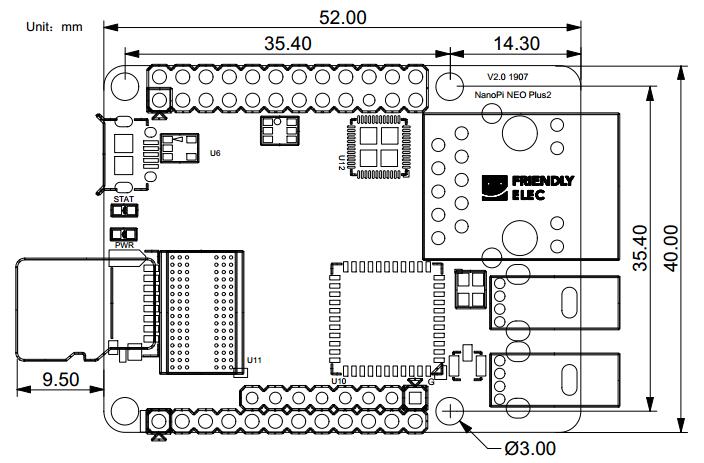
- PCB Dimension: 40 x 52mm
- PCB Layer: 6-Layer
3 Software Features
3.1 UbuntuCore
- mainline kernel: Linux-4.x.y
- npi-config: system configuration utility for setting passwords, language, timezone, hostname, SSH and auto-login.
- auto-login with user account "pi" with access to npi-config
- supports Gbps Ethernet
- supports WiFi and Bluetooth
- supports FriendlyElec's FA-CAM202 USB camera
- supports audio recording and playing
4 Diagram, Layout and Dimension
4.1 Layout
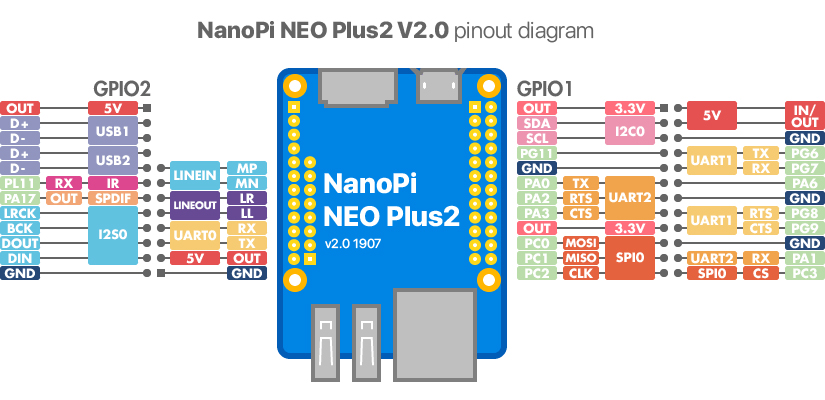
- GPIO Pin Description
Pin# Name Linux gpio Pin# Name Linux gpio 1 SYS_3.3V 2 VDD_5V 3 I2C0_SDA / GPIOA12 12 4 VDD_5V 5 I2C0_SCL / GPIOA11 11 6 GND 7 GPIOG11 203 8 UART1_TX / GPIOG6 198 9 GND 10 UART1_RX / GPIOG7 199 11 UART2_TX / GPIOA0 0 12 GPIOA6 6 13 UART2_RTS / GPIOA2 2 14 GND 15 UART2_CTS / GPIOA3 3 16 UART1_RTS / GPIOG8 200 17 SYS_3.3V 18 UART1_CTS / GPIOG9 201 19 SPI0_MOSI / GPIOC0 64 20 GND 21 SPI0_MISO / GPIOC1 65 22 UART2_RX / GPIOA1 1 23 SPI0_CLK / GPIOC2 66 24 SPI0_CS / GPIOC3 67
- USB/Audio/IR Pin Description
NanoPi NEO Plus2 Pin# Name Description 1 VDD_5V 5V Power Out 2 USB-DP1 USB1 DP Signal 3 USB-DM1 USB1 DM Signal 4 USB-DP2 USB2 DP Signal 5 USB-DM2 USB2 DM Signal 6 GPIOL11 / IR-RX GPIOL11 or IR Receive 7 SPDIF-OUT / GPIOA17 GPIOA17 or SPDIF-OUT 8 PCM0_SYNC / I2S0_LRC I2S / PCM Sample Rate Clock/Sync 9 PCM0_CLK / I2S0_BCK I2S / PCM Sample Rate Clock 10 PCM0_DOUT / I2S0_SDOUT I2S / PCM Serial Data Output 11 PCM0_DIN / I2S0_SDIN I2S / PCM Serial Data Input 12 GND 0V
- Audio
Pin# Name Description 1 MICIN1P Microphone Positive Input 2 MICIN1N Microphone Negative Input 3 LINEOUTR LINE-OUT Right Channel Output 4 GND 0V 5 LINEOUTL LINE-OUT Left Channel Output
- Debug Port(UART0)
Pin# Name 1 GND 2 VDD_5V 3 UART_TXD0 / GPIOA4 4 UART_RXD0 / GPIOA5 / PWM0
- Note:
- SYS_3.3V: 3.3V power output
- VVDD_5V: 5V power input/output. The input range is 4.7V ~ 5.6V
- All pins are 3.3V, output current is 5mA
- For more details refer to the document: NanoPi-NEO-Plus2-1704-Schematic.pdf
4.2 Dimensional Diagram
- For more details refer to: [Dimensions_NanoPi-NEO-Plus2-1704]
5 Get Started
5.1 Essentials You Need
Before starting to use your NanoPi NEO Plus2 get the following items ready:
- NanoPi NEO Plus2
- microSD Card/TFCard: Class 10 or Above, minimum 8GB SDHC
- microUSB power. A 5V/2A power is a must
- A Host computer running Ubuntu 14.04 64 bit system
5.2 TF Cards We Tested
To make your NanoPi NEO Plus2 boot and run fast we highly recommend you use a Class10 8GB SDHC TF card or a better one. The following cards are what we used in all our test cases presented here:
- SanDisk TF 8G Class10 Micro/SD TF card:
- SanDisk TF128G MicroSDXC TF 128G Class10 48MB/S:
- 川宇 8G C10 High Speed class10 micro SD card:
5.3 Make an Installation TF Card
5.3.1 Get Image Files
Visit this link download link to download image files(under the "official-ROMs" directory) and the flashing utility(under the "tools" directory):
Image Files: nanopi-neo-plus2_ubuntu-core-xenial_4.x.y_YYYYMMDD.img.zip Ubuntu-Core with Qt-Embedded image file, kernel:Linux-4.x nanopi-neo-plus2_debian-nas-jessie_4.x.y_YYYYMMDD.img.zip NAS image file, kernel:Linux-4.x, for 1-bay NAS Dock nanopi-neo-plus2_ubuntu-oled_4.x.y_YYYYMMDD.img.zip OLED image file, kernel:Linux-4.x, for NanoHat OLED nanopi-neo-plus2_eflasher_4.x.y_YYYYMMDD.img.zip eflasher image file, kernel:Linux-4.x Flash Utility: win32diskimager.rar Windows utility for flashing Debian image. Under Linux users can use "dd"
5.3.2 Make Installation MicroSD Card
- Extract the nanopi-neo-plus2_ubuntu-core-xenial_4.x.y_YYYYMMDD.img.zip and win32diskimager.rar. Insert a MicroSD card(at least 8G) into a Windows PC and run the win32diskimager utility as administrator. On the utility's main window select your card's drive, the wanted image file and click on "write" to start flashing the card till it is done.
- Insert this card into your NEO Plus2's MicroSD card slot and power on (with a 5V/2A power source). If the blue LED blinks this indicates your NEO Plus2 has successfully booted.
5.3.3 Flash Image to eMMC
- Extract the nanopi-neo-plus2_eflasher_4.x.y_YYYYMMDD.img.zip package and win32diskimager.rar. Insert a MicroSD card(at least 8G) into a Windows PC and run the win32diskimager utility as administrator. On the utility's main window select your SD card's drive, the wanted image file and click on "write" to start flashing the MicroSD card.
- Insert this card into your NEO Plus2 and power on (with a 5V/2A power source) the board. If the green LED is on and blue LED is blinks it indicates your eflasher has started successfully.
- Run the following command on a terminal:
$ eflasherSelect your wanted OS and type "yes" to start flashing. After it is done take off the card, reboot your board it will boot from eMMC.
6 Work with Ubuntu-Core with Qt-Embedded
6.1 Run Ubuntu-Core with Qt-Embedded
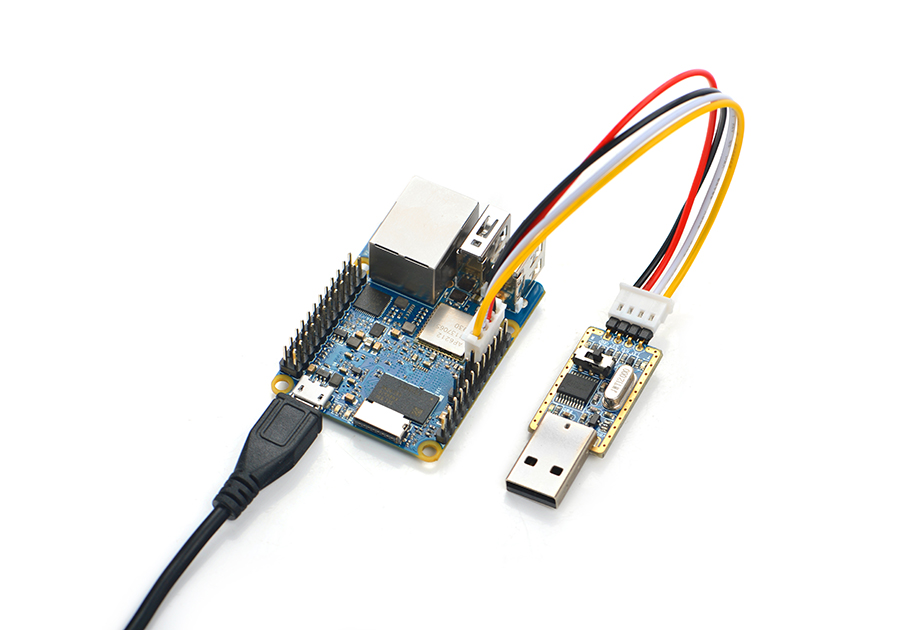
- If you want to do kernel development you need to use a serial communication board, ie a PSU-ONECOM board, which will allow you to operate the board via a serial terminal.Here is a setup where we connect a NanoPi NEO Plus2 to a PC via the PSU-ONECOM and you can power on your NEO Plus2 from either the PSU-ONECOM or its MicroUSB:
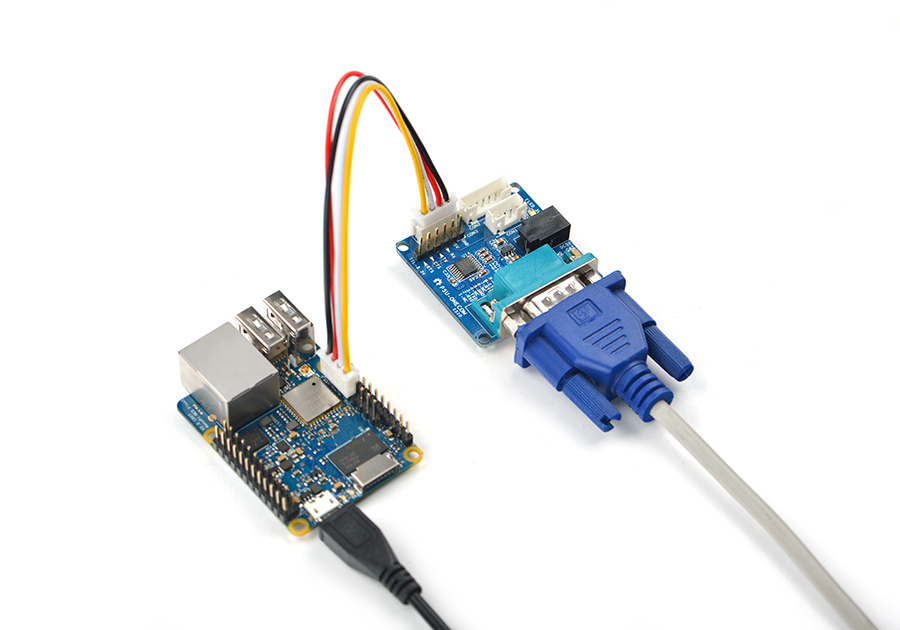
You can use a USB to Serial conversion board too. Make sure you use a 5V/2A power to power your NEO Plus2 from its MicroUSB port:
- Default Login Account:
Regular User:
   User Account: pi
   Password: pi
Root:
   User Account: root
   Password: fa
By default pi logs in automatically. You can disable its auto-login by using "sudo npi-config".
- Update Software Packages:
sudo apt-get update
6.2 Configure System with npi-config
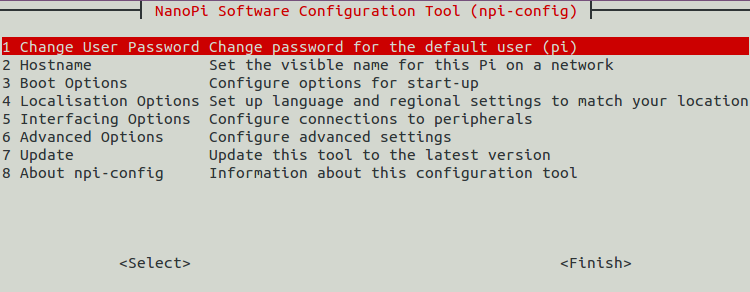
The npi-config is a commandline utility which can be used to initialize system configurations such as user password, system language, time zone, Hostname, SSH switch , Auto login and etc. Type the following command to run this utility.
$ sudo npi-config
Here is how npi-config's GUI looks like:
6.3 连接有线网络
NanoPi NEO Plus2在加电开机前如果已正确的连接网线,则系统启动时会自动获取IP地址,如果没有连接网线、没有DHCP服务或是其它网络问题,则会导致获取IP地址失败,同时系统启动会因此等待约15~60秒的时间。 手动获取IP地址
dhclient eth0
6.4 SSH登录
NanoPi NEO Plus2没有任何图形界面输出的接口,如果你没有串口模块,可以通过SSH协议登录NanoPi NEO Plus2。假设通过路由器查看到NanoPi NEO Plus2的IP地址为192.168.1.230,你可以在PC机上执行如下命令登录NanoPi NEO Plus2:
ssh root@192.168.1.230
密码为fa。
6.5 扩展TF卡文件系统
第一次启动系统时,系统会自动扩展文件系统分区,请耐心等待,TF卡的容量越大,需要等待的时间越长,进入系统后执行下列命令查看文件系统分区大小:
df -h
6.6 连接无线网络
NanoPi NEO Plus使用无线网络或者蓝牙的时候,需要接上天线使用。以下是 NEO Plus2连接使用IPX天线的图片:
NanoPi NEO Plus2 上电启动后,通过串口登录到系统,敲入以下命令可以查看到系统是否识别到 WiFi,如果出现“wlan0”,则证明WiFi已被识别到:
sudo ifconfig -a
用vi打开文件 /etc/wpa_supplicant/wpa_supplicant.conf:
sudo vi /etc/wpa_supplicant/wpa_supplicant.conf
在文件末尾填入路由器信息如下所示:
network={
        ssid="YourWiFiESSID"
        psk="YourWiFiPassword"
}
其中,YourWiFiESSID和YourWiFiPassword请替换成你要连接的无线AP名称和密码。
保存退出后,执行以下命令即可连接WiFi:
$ sudo ifdown wlan0
$ sudo ifup wlan0
如果你的WiFi密码中有特殊字符,或者你不希望明文存放密码,你可以使用wpa_passphrase命令为WiFi密码生成一个密钥(psk),用密钥来代替密码 ,在命令行下,可输入以下命令生成密钥:
$ sudo wpa_passphrase YourWiFiESSID
在提示输入密码时,输入你的WiFi密码,再打开 /etc/wpa_supplicant/wpa_supplicant.conf 文件你会发现密钥已经被更新,你可以删除明文的密码了。
6.7 连接USB摄像头模块(FA-CAM202)使用
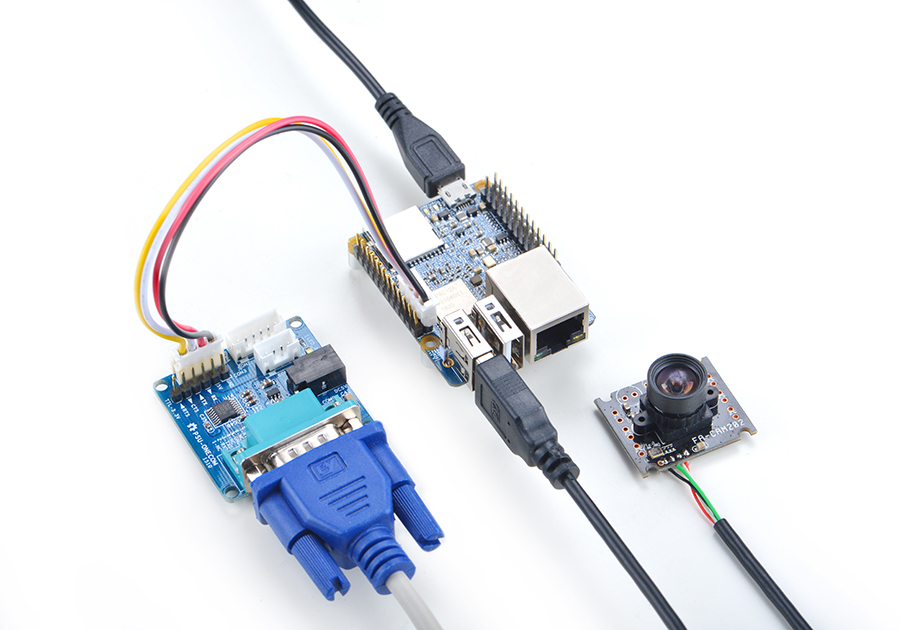
FA-CAM202是一款200万像素的USB摄像头模块,参考维基Matrix - USB_Camera(FA-CAM202)
启动系统,连接网络,以root用户登录终端并编译运行mjpg-streamer:
cd /root/mjpg-streamer
make
./start.sh
mjpg-streamer是一个开源的网络视频流服务器,在板子上成功运行mjpg-streamer后会打印下列信息:
 i: Using V4L2 device.: /dev/video0
 i: Desired Resolution: 1280 x 720
 i: Frames Per Second.: 30
 i: Format............: YUV
 i: JPEG Quality......: 90
 o: www-folder-path...: ./www/
 o: HTTP TCP port.....: 8080
 o: username:password.: disabled
 o: commands..........: enabled
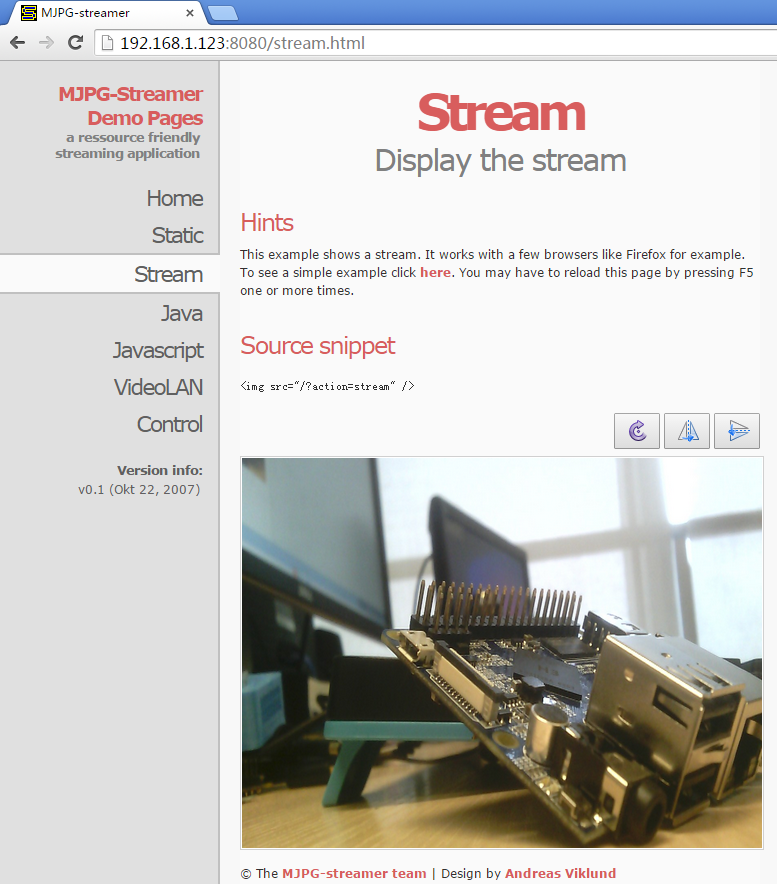
假设NEO Plus2的IP地址为192.168.1.123,在PC的浏览器中输入 192.168.1.123:8080 就能浏览摄像头采集的画面了,效果如下:
6.8 播放和录制音频
NEO Plus2只提供了音频硬件接口(2.0mm 5pin 排针),引脚的定义如下:
Pin# Name Description 1 MICIN1P Microphone Positive Input 2 MICIN1N Microphone Negative Input 3 LINEOUTR LINE-OUT Right Channel Output 4 GND 地 5 LINEOUTL LINE-OUT Left Channel Output
用户需自行转接音频设备,参考下图:
耳麦标注
只有在已外接音频设备的前提下,才可以进行下列步骤测试播放和录制音频。
查看系统里的声卡设备:
$ aplay -l
**** List of PLAYBACK Hardware Devices ****
card 0: audiocodec [audiocodec], device 0: SUNXI-CODEC sun50iw2codec-0 []
  Subdevices: 1/1
  Subdevice #0: subdevice #0
播放音频:
$ aplay /root/Music/test.wav -D plughw:0
录制音频:
$ arecord -f cd -d 5 test.wav
6.9 通过WiringNP测试GPIO
wiringPi库最早是由Gordon Henderson所编写并维护的一个用C语言写成的类库,除了GPIO库,还包括了I2C库、SPI库、UART库和软件PWM库等,由于wiringPi的API函数和arduino非常相似,这也使得它广受欢迎。
wiringPi库除了提供wiringPi类库及其头文件外,还提供了一个命令行工具gpio:可以用来设置和读写GPIO管脚,以方便在Shell脚本中控制GPIO管脚。
Ubuntu-Core系统中集成了这个工具以便客户测试GPIO管脚。详细信息请参看 WiringNP
7 如何编译Ubuntu-Core with Qt-Embedded系统
7.1 使用开源社区主线BSP
NEO Plus2现已支持使用64位Linux内核,并使用64位Ubuntu Core 16.04,关于H5芯片系列开发板使用主线U-boot和Linux-4.x.y的方法,请参考维基:Mainline U-boot & Linux
8 资源链接
8.1 手册原理图等开发资料
- Schematic: NanoPi-NEO-Plus2-1704-Schematic.pdf
- Dimensions: NanoPi-NEO-Plus2-1704_pcb的dxf文件
- H5 Datasheet: Allwinner_H5_Datasheet_V1.0.pdf
