Difference between revisions of "APITestPage"
(updated by API) |
(updated by API) |
||
| Line 59: | Line 59: | ||
Go to '''System''' -> '''Install''', choose '''Boot from eMMC - system on eMMC''', and complete the subsequent operations as needed. After installation, power off, remove the NVMe SSD, and power on to boot Armbian from eMMC. | Go to '''System''' -> '''Install''', choose '''Boot from eMMC - system on eMMC''', and complete the subsequent operations as needed. After installation, power off, remove the NVMe SSD, and power on to boot Armbian from eMMC. | ||
--> | --> | ||
| + | === Related information === | ||
| + | * https://github.com/armbian/build/pull/5573 | ||
Revision as of 03:17, 4 June 2024
Contents
1 Introduction
This is a simple guide to install Armbian on NanoPC-T6 and boot through SPI Nor Flash and NVMe SSD, covering the following contents:
- Erase SPI Nor Flash and eMMC
- Flash BootLoader to SPI Nor Flash
- Boot Armbian system from NVMe
2 Prerequisites
Before starting, please ensure you have the following:
- A NanoPC T6 development board with SPI Nor Flash
- A USB-C data cable
- An NVMe SSD
- A PC running Windows
- A power adapter, etc.
All steps in this guide are currently applicable only to Windows systems.
3 Download Required Files
- Get the necessary tools: Visit here, find RKDevTool_v3.19_for_window.zip, DriverAssitant_v5.1.1.zip and win32diskimager.rar in the 05_Tools directory, and download them locally.
- Get Armbian firmware: Visit here to download the Armbian firmware file.
- Get RK3588 loader and SPI Images: Visit here to download MiniLoaderAll.bin and rkspi_loader.img.zip.
The downloaded files are in compressed packages, and need to be extracted.
4 Install Rockchip USB Driver and RKDevTool
- Extract DriverAssitant_v5.1.1.zip to install Rockchip USB driver.
- Extract RKDevTool_v3.19_for_window.zip to obtain the Rockchip flashing tool RKDevTool.
5 Flashing Steps
5.1 Put NanoPC-T6 into Maskrom Mode
- Connect NanoPC-T6 to the computer using a USB Type-C cable.
- Launch RKDevTool on the computer (Note: use version 2.96 or later).
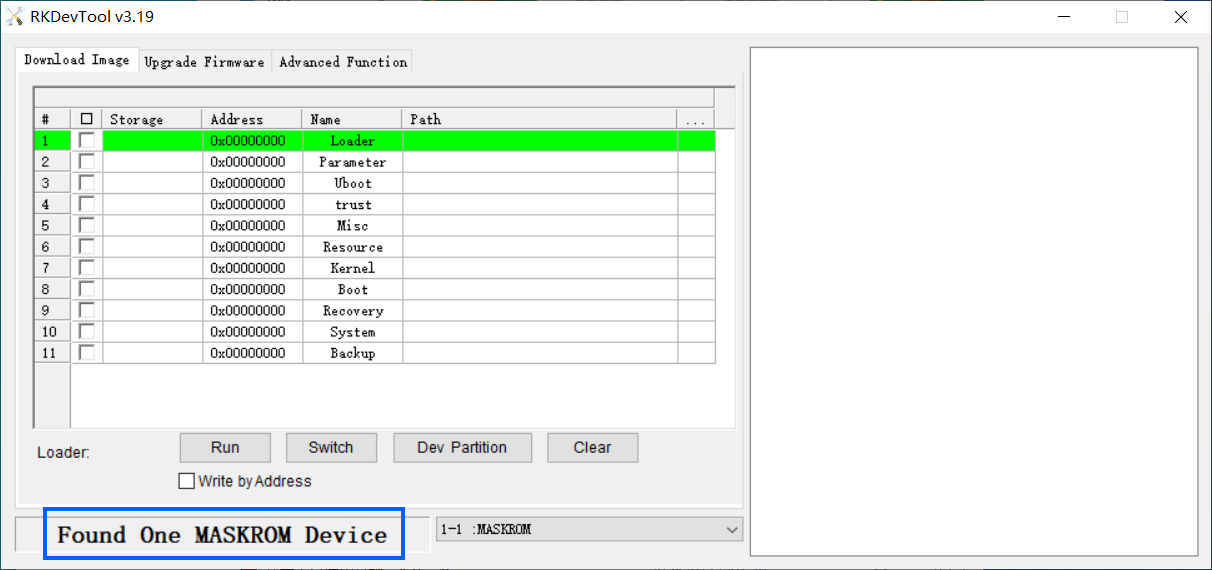
- Disconnect the power from NanoPC-T6, hold down the MASK button, connect the power, and release the button when you see Found One MASKROM Device at the bottom of the screen, as shown below:
5.2 Erase SPI Nor Flash and eMMC
Remove the SD card from the development board (if any). To avoid any residual boot data interfering with the Armbian startup, it is recommended to erase the SPI Nor Flash and eMMC once (optional). The method is as follows:
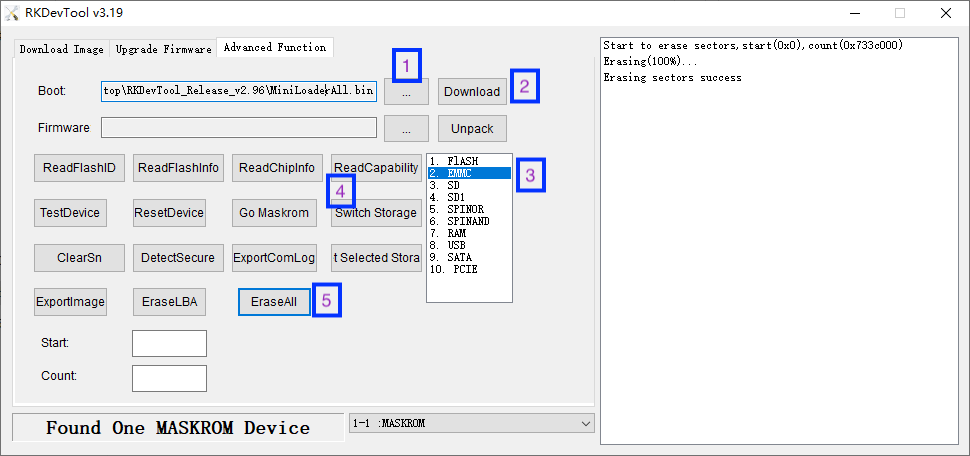
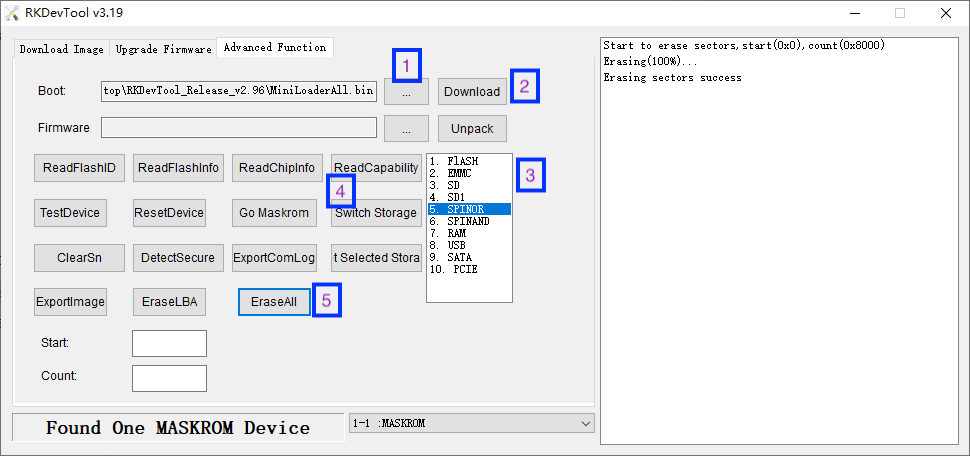
- In the RKDevTool interface, click the Advanced Function tab.
- Select MiniLoaderAll.bin in the Boot text box, then click the Download button.
- Select EMMC, click Switch Storage, and then click the EraseAll button to erase eMMC.
- Select SPINOR, click Switch Storage, and then click the EraseAll button to erase SPI Nor Flash.
5.3 Flash BootLoader to SPI Nor Flash
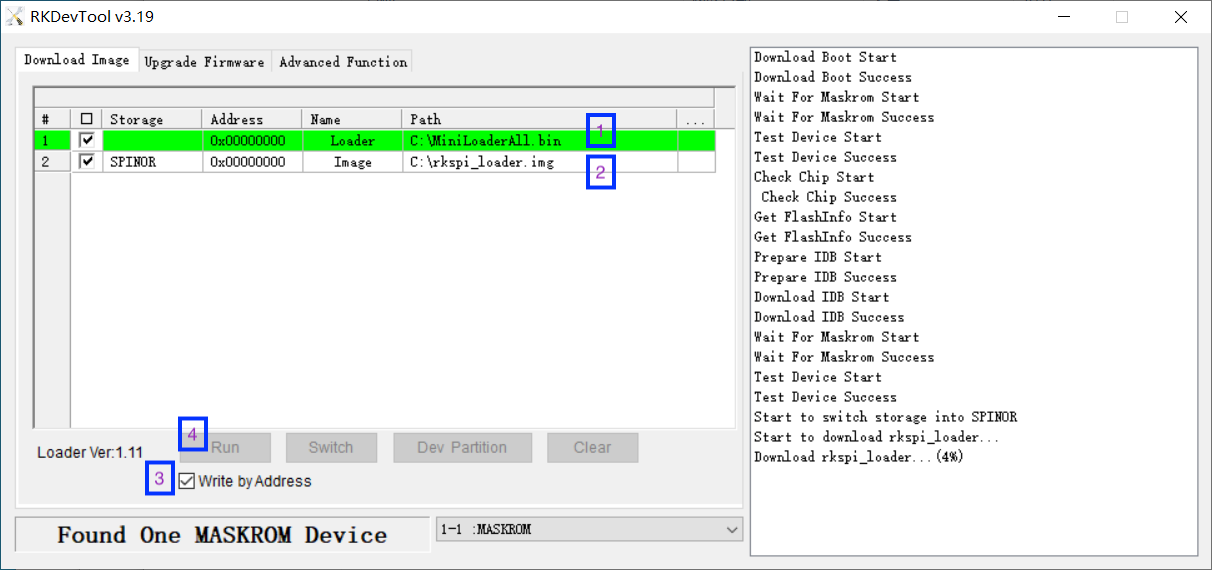
Refer to the demonstration image below to set the flashing content in the RKDevTool interface:

You can right-click in the interface, choose Load Config, select friendlyelec-spinor-config.cfg to load the preset settings, then check Write by Address (important). Finally, click the Run button and wait for the process to complete.
5.4 Flash Armbian Firmware to NVMe SSD
Extract the firmware file with the .img extension, and use the win32diskimager tool on Windows to write the .img format Armbian firmware to the NVMe SSD.
5.5 Run Armbian
Install the NVMe SSD on NanoPC-T6, power on, and follow the Armbian wizard to configure the system.


