Difference between revisions of "NanoPC-T1"
(→Ubuntu Variants) |
(→Update Log) |
||
| (12 intermediate revisions by the same user not shown) | |||
| Line 12: | Line 12: | ||
|PCB Features || | |PCB Features || | ||
*PCB Dimension: 100 x 80 mm | *PCB Dimension: 100 x 80 mm | ||
| − | * | + | *PCB ENIG |
|- | |- | ||
| − | | | + | |Key Features || |
| − | * | + | *CPU Clock: 1.5GHz |
*CPU:Samsung Exynos4412 | *CPU:Samsung Exynos4412 | ||
| − | *GPU: Mali-400MP(4+1) | + | *GPU: Mali-400MP(4+1) Multi-Core GPU |
| − | *1GB | + | *1GB DDR3 RAM |
| − | *8GB | + | *8GB eMMC High Speed Flash |
*HDMI 1080P(1920x1080) | *HDMI 1080P(1920x1080) | ||
| − | * | + | *Supports HDMI to VGA |
| − | * | + | *Supports MPEG-4/H.263/H.264/VC1/Xvid up to 1080P@30 frames/s |
| − | * | + | *LCD Interface: RGB888 mode, resistive touch, capacitive touch, LVDS conversion |
|- | |- | ||
| − | | | + | |Standard Interface || |
| − | *HDMI: | + | *HDMI: Standard HDMI1.4a |
| − | * | + | *Audio Output: 3.5mm audio jack |
| − | *USB 2.0 Host: USB | + | *USB 2.0 Host: 2 x USB Type A, 1 x USB Pin Header |
| − | *MicroUSB 2. | + | *MicroUSB 2.0 |
| − | * | + | *SD Slot |
| − | * | + | *Ethernet: RJ45, adaptive 100/10M Ethernet |
| − | * | + | *Power Interface 1: 4.0/1.7 mm |
| − | * | + | *Power Interface 2: 1 x 2.54mm pitch pin header |
*USB Host 2.0x2 | *USB Host 2.0x2 | ||
|- | |- | ||
| − | | | + | |Extended Interfaces & Ports || |
| − | *GPIO1: 30pin 2. | + | *GPIO1: 30pin 2.0mm pitch double row pin header containing UART x 1, SPI x 1, I2C x 1, GPIO x 20,5V, 3.3V |
| − | *GPIO2: 16pin, 2. | + | *GPIO2: 16pin, 2.0mm pitch pin header containing UART x 1, GPIO x 2, SDIO x 1, USB Host2.0 x 1 |
| − | * | + | *UART Serial: 4 x 2.0mm pitch pin header |
| − | *CMOS Camera: 20pin, 2. | + | *CMOS Camera: 20pin, 2.0mm pitch double row pin header, for regular cameras whose resolution is up to 500M |
| − | *MIPI Camera: 15pin, 1. | + | *MIPI Camera: 15pin, 1.0mm pitch FPC seat, for high definition cameras whose resolution is greater than 500M |
| − | * | + | *LCD Interface: 40pin, 0.5mm pitch FPC seat, RGB888 mode, supports resistive and capacitive touch |
| − | *Digital Sensor | + | *Digital Sensor: 6 x 2.54mm pitch 3-pin header |
|- | |- | ||
| − | | | + | |Other Resources || |
| − | * | + | *User Key: 2 x |
| − | * | + | *Programmable LED: 2 x |
| − | * | + | *Reset key: 1 x |
| − | * | + | *Encoding Chip: AT88SC0104C-SH |
| − | * | + | *RTC Battery |
| − | * | + | *Fuse (2A) |
|- | |- | ||
| − | | | + | |Additional Functions || |
| − | * | + | *USB 3G |
*WiFi | *WiFi | ||
| − | * | + | *Bluetooth |
| − | * | + | *Camera |
|} | |} | ||
| − | + | Software Features | |
| − | *Android 4. | + | *Android 4.1 |
| − | *Android4. | + | *Android4.2 |
| − | *Android5.0 | + | *Android5.0 |
| − | *Ubuntu13. | + | *Ubuntu13.10 |
| − | *Linux+Qt/embedded-4.8. | + | *Linux+Qt/embedded-4.8.5 |
| − | * | + | *uboot(Open Source) |
| − | == | + | ==Layout & Pin Spec== |
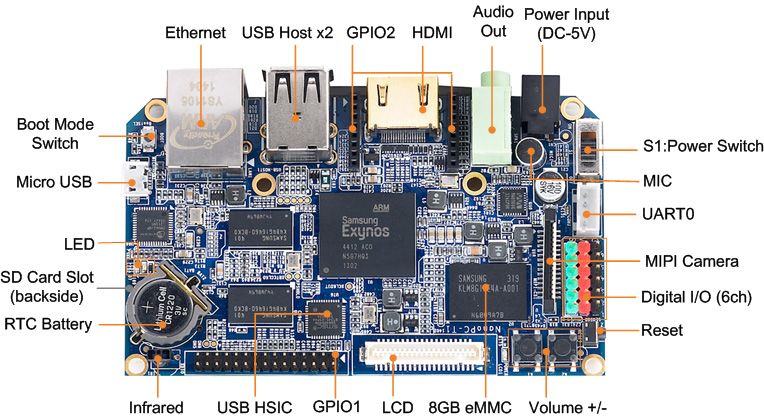
| − | [[File:NanoPC-T01.png|thumb|400px|NanoPC- | + | [[File:NanoPC-T01.png|thumb|400px|NanoPC-T1 Ports & Interfaces]] |
* SENSOR | * SENSOR | ||
| Line 91: | Line 91: | ||
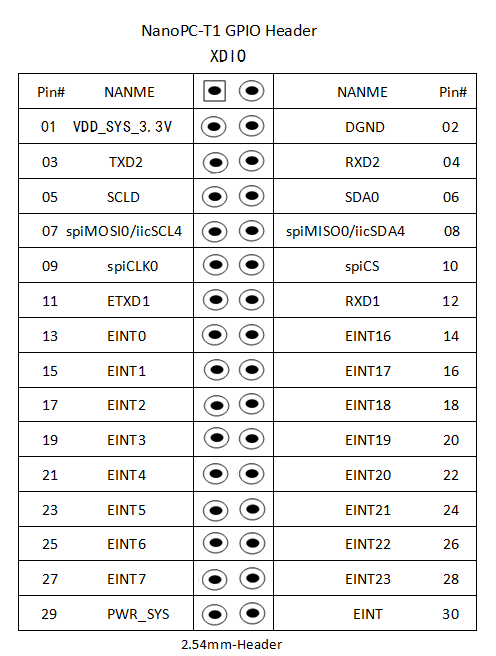
::[[File:NanoPC-T102.png| frameless|400px|NanoPC-T1 XDIO]] | ::[[File:NanoPC-T102.png| frameless|400px|NanoPC-T1 XDIO]] | ||
| − | == | + | ==Board Dimension== |
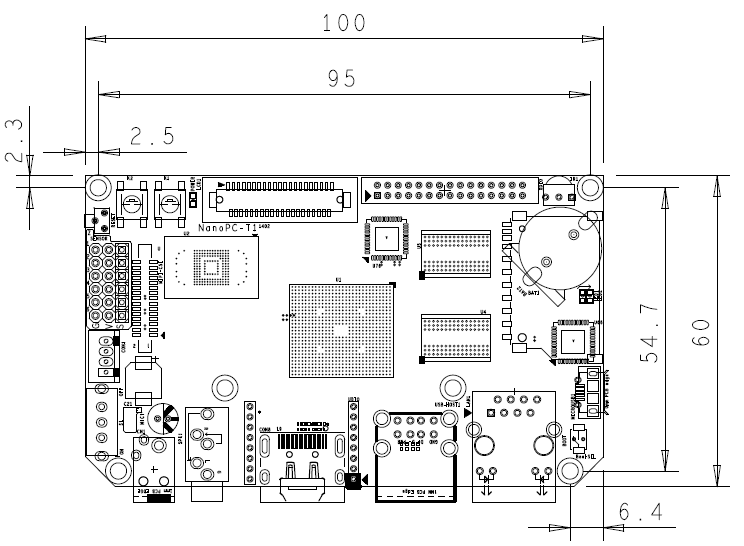
| − | [[File:NanoPC-1507-dimensions.png|frameless|600px|NanoPC | + | [[File:NanoPC-1507-dimensions.png|frameless|600px|NanoPC Dimensional Diagram]] |
==Ubuntu Systems== | ==Ubuntu Systems== | ||
| Line 136: | Line 136: | ||
|} | |} | ||
| − | === | + | ===Install & Run Ubuntu=== |
| − | *Ubuntu | + | *Install & Run Ubuntu Core |
<syntaxhighlight lang="bash"> | <syntaxhighlight lang="bash"> | ||
| − | * | + | *Uncompress the Ubuntu Core image file, insert a Minimum 4G SD card to a Host PC. |
| − | * | + | *Flash the Ubuntu image to the SD card under either Windows or LINUX. Here we took LINUX as an example(Note: please refer to the appendix on how to do it under Windows). We have a flashing script "hc_fuse_ubuntu.sh" which can be obtained from our official CD or our home site. |
</syntaxhighlight> | </syntaxhighlight> | ||
| − | + | Our Host PC runs under Ubuntu and the SD card is mounted as /dev/sdb, the ubuntucore-4g.raw image is under the current directory. Please run the following commands to flash the image to the SD card: | |
<syntaxhighlight lang="bash"> | <syntaxhighlight lang="bash"> | ||
# chmod 777 hc_fuse_ubuntu.sh | # chmod 777 hc_fuse_ubuntu.sh | ||
| Line 148: | Line 148: | ||
</syntaxhighlight> | </syntaxhighlight> | ||
| − | + | After it is done please insert the SD card to your NanoPC-T1 and boot your board from the SD card: | |
<syntaxhighlight lang="bash"> | <syntaxhighlight lang="bash"> | ||
| − | + | 1)If this is a Tiny4412 board, please switch S2 to "SDBOOT"; | |
| − | + | 2)If this is a NanoPC-T1 please press and hold the "Boot" key and power on; | |
</syntaxhighlight> | </syntaxhighlight> | ||
| − | + | After the command line prompt shows up please run the following commands: | |
<syntaxhighlight lang="bash"> | <syntaxhighlight lang="bash"> | ||
# cd /UBUNTU_INSTALL/ | # cd /UBUNTU_INSTALL/ | ||
# ./Install-UbuntuCore | # ./Install-UbuntuCore | ||
</syntaxhighlight> | </syntaxhighlight> | ||
| − | Ubuntu | + | For both Ubuntu Core and Ubuntu desktop the password for "root" is "123456". |
| − | *Ubuntu | + | *Install & Run Ubuntu Desktop |
| − | + | The installation method for Ubuntu Desktop is the same as that of the Ubuntu Core. After you get the Ubuntu desktop image files please follow the same steps to flash it to your board. | |
| − | == | + | ==Resources== |
| − | * [Exynos | + | * [Exynos 4412 Datasheet]( [http://www.mediafire.com/view/8ly2fqls3c9c31c/Exynos_4412_SCP_Users_Manual_Ver.0.10.00_Preliminary0.pdf Exynos_4412_SCP_Users_Manual_Ver.0.10.00_Preliminary0.pdf]) |
| − | *[ | + | *[Ubuntu User's Manua;]([http://www.mediafire.com/download/5hqdtq5hsyulhza/InstallUbuntu-4412-NanoPC-061015.pdf <<How to Install Ubuntu on NanoPC-T1/4412>>]) |
| − | *[ | + | *[Source Code & Image Files] |
| − | **[ | + | **[https://www.mediafire.com/folder/ddrt2zd6q95nc/UbuntuCore Ubuntu-CoreSD Card Image(2015-07-23)] <br> [https://www.mediafire.com/folder/kdtv330di2035/UbuntuCore Ubuntu-Core File System(2015-07-23)] <br> |
| − | **[ | + | **[https://www.mediafire.com/folder/sqa2fu1ax0ui9/UbuntuDesktop Ubuntu-DesktopSD Card Image(2015-07-23)] <br>[https://www.mediafire.com/folder/6wm0evmymfc45/UbuntuDeskto Ubuntu-Desktop File System(2015-07-23)] <br> |
| + | |||
| + | ==Update Log== | ||
| + | ===March-14-2016=== | ||
| + | * Released English version | ||
| + | |||
| + | ===March-15-2016=== | ||
| + | * Corrected two resource links | ||
Latest revision as of 02:23, 15 March 2016
Contents
1 Introduction
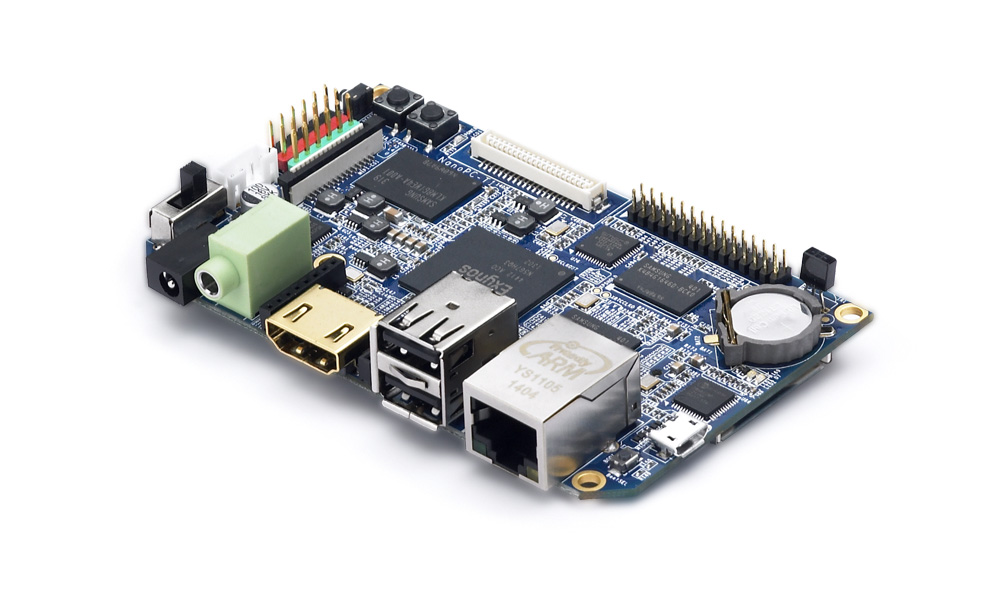
The NanoPC-T1 quad core Cortex A9 single board computer is designed and developed by FriendlyARM for professional and enterprise users. It uses Samsung Quad Core Cortex-A9 Exynos 4412 SoC with dynamic frequency scaling up to 1.5GHz. The NanoPC-T1 has 1GB DDR3 RAM and 8G eMMC onboard. It supports HDMI 1080P(1920 x 1080), IR receiver, 100/10M adaptive Ethernet, USB WiFi,USB 3G, 1080P hard coded video play and excellent 2D/3D acceleration.
2 Features
Hardware Resources
PCB Features - PCB Dimension: 100 x 80 mm
- PCB ENIG
Key Features - CPU Clock: 1.5GHz
- CPU:Samsung Exynos4412
- GPU: Mali-400MP(4+1) Multi-Core GPU
- 1GB DDR3 RAM
- 8GB eMMC High Speed Flash
- HDMI 1080P(1920x1080)
- Supports HDMI to VGA
- Supports MPEG-4/H.263/H.264/VC1/Xvid up to 1080P@30 frames/s
- LCD Interface: RGB888 mode, resistive touch, capacitive touch, LVDS conversion
Standard Interface - HDMI: Standard HDMI1.4a
- Audio Output: 3.5mm audio jack
- USB 2.0 Host: 2 x USB Type A, 1 x USB Pin Header
- MicroUSB 2.0
- SD Slot
- Ethernet: RJ45, adaptive 100/10M Ethernet
- Power Interface 1: 4.0/1.7 mm
- Power Interface 2: 1 x 2.54mm pitch pin header
- USB Host 2.0x2
Extended Interfaces & Ports - GPIO1: 30pin 2.0mm pitch double row pin header containing UART x 1, SPI x 1, I2C x 1, GPIO x 20,5V, 3.3V
- GPIO2: 16pin, 2.0mm pitch pin header containing UART x 1, GPIO x 2, SDIO x 1, USB Host2.0 x 1
- UART Serial: 4 x 2.0mm pitch pin header
- CMOS Camera: 20pin, 2.0mm pitch double row pin header, for regular cameras whose resolution is up to 500M
- MIPI Camera: 15pin, 1.0mm pitch FPC seat, for high definition cameras whose resolution is greater than 500M
- LCD Interface: 40pin, 0.5mm pitch FPC seat, RGB888 mode, supports resistive and capacitive touch
- Digital Sensor: 6 x 2.54mm pitch 3-pin header
Other Resources - User Key: 2 x
- Programmable LED: 2 x
- Reset key: 1 x
- Encoding Chip: AT88SC0104C-SH
- RTC Battery
- Fuse (2A)
Additional Functions - USB 3G
- WiFi
- Bluetooth
- Camera
Software Features
- Android 4.1
- Android4.2
- Android5.0
- Ubuntu13.10
- Linux+Qt/embedded-4.8.5
- uboot(Open Source)
3 Layout & Pin Spec
- SENSOR
Pin# Name 1 EINT11 2 EINT12 3 EINT13 4 EINT25 5 EINT28 6 EINT29
- XDIO
4 Board Dimension
5 Ubuntu Systems
5.1 Ubuntu Variants
We make two Ubuntu variants ready:
- 1) Ubuntu Desktop: this is a system with X GUI. Minimum 8G eMMC is recommended to run this system.
- 2) Ubuntu Core: this is a basic server which only contains basic commands and shares the same libraries as the Ubuntu Desktop. Users can install packages with "apt-get".
- Ubuntu Desktop Features
Ubuntu Desktop Feature - Version: Xubuntu Desktop 13.10
- Kernel: Linux 3.8
Main Features - Xfce GUI
- 1080p HDMI output
- Synchronized LCD and HDMI output
- Supports both resistive and capacitive touch
- Supports USB keyboards and mouses
- Ethernet
- USB WiFi dongle(e.g. AP6210 WiFi module)
- Preinstalled SSH and FTP
- Standard Ubuntu Libraries, users can install them with apt-get
- Ubuntu Core Features
Ubuntu Core Features - Version: Xubuntu Core 14.04
- Kernel: Linux 3.8
Main Features - LCD output
- Supports USB keyboards and mouses
- Ethernet
- USB WiFi dongle(e.g. AP6210 WiFi module)
- Preinstalled Python3
- Standard Ubuntu Libraries, users can install them with apt-get
5.2 Install & Run Ubuntu
- Install & Run Ubuntu Core
*Uncompress the Ubuntu Core image file, insert a Minimum 4G SD card to a Host PC.
*Flash the Ubuntu image to the SD card under either Windows or LINUX. Here we took LINUX as an example(Note: please refer to the appendix on how to do it under Windows). We have a flashing script "hc_fuse_ubuntu.sh" which can be obtained from our official CD or our home site.
Our Host PC runs under Ubuntu and the SD card is mounted as /dev/sdb, the ubuntucore-4g.raw image is under the current directory. Please run the following commands to flash the image to the SD card:
# chmod 777 hc_fuse_ubuntu.sh
# sudo ./hc_fuse_ubuntu.sh /dev/sdb ./ubuntucore-4g.raw
After it is done please insert the SD card to your NanoPC-T1 and boot your board from the SD card:
1)If this is a Tiny4412 board, please switch S2 to "SDBOOT";
2)If this is a NanoPC-T1 please press and hold the "Boot" key and power on;
After the command line prompt shows up please run the following commands:
# cd /UBUNTU_INSTALL/
# ./Install-UbuntuCore
For both Ubuntu Core and Ubuntu desktop the password for "root" is "123456".
- Install & Run Ubuntu Desktop
The installation method for Ubuntu Desktop is the same as that of the Ubuntu Core. After you get the Ubuntu desktop image files please follow the same steps to flash it to your board.
6 Resources
- [Exynos 4412 Datasheet]( Exynos_4412_SCP_Users_Manual_Ver.0.10.00_Preliminary0.pdf)
- [Ubuntu User's Manua;](<<How to Install Ubuntu on NanoPC-T1/4412>>)
- [Source Code & Image Files]
7 Update Log
7.1 March-14-2016
- Released English version
7.2 March-15-2016
- Corrected two resource links


