Difference between revisions of "APITestPage"
From FriendlyELEC WiKi
(updated by API) |
(updated by API) |
||
| (115 intermediate revisions by the same user not shown) | |||
| Line 1: | Line 1: | ||
| − | |||
| − | + | {{RockchipUnbrick|NanoPC-T4}} | |
| − | + | ||
| − | + | ||
| − | + | ||
| − | + | ||
| − | + | ||
| − | + | ||
| − | + | ||
| − | + | ||
| − | + | ||
| − | + | ||
| − | + | ||
| − | + | ||
| − | + | ||
| − | + | ||
| − | + | ||
| − | + | ||
| − | + | ||
| − | + | ||
| − | + | ||
| − | + | ||
| − | + | ||
| − | + | ||
| − | + | ||
| − | + | ||
| − | + | ||
| − | + | ||
| − | + | ||
| − | + | ||
| − | + | ||
| − | + | ||
| − | + | ||
| − | + | ||
| − | + | ||
| − | + | ||
| − | + | ||
| − | + | ||
| − | + | ||
| − | + | ||
| − | + | ||
| − | + | ||
| − | + | ||
| − | + | ||
| − | + | ||
| − | + | ||
| − | + | ||
| − | + | ||
| − | + | ||
| − | + | ||
| − | + | ||
| − | + | ||
| − | + | ||
| − | + | ||
| − | + | ||
| − | + | ||
| − | + | ||
| − | + | ||
| − | + | ||
| − | + | ||
| − | + | ||
| − | + | ||
| − | + | ||
| − | + | ||
| − | + | ||
| − | + | ||
| − | + | ||
| − | + | ||
| − | + | ||
| − | + | ||
| − | + | ||
| − | + | ||
| − | + | ||
| − | + | ||
| − | + | ||
| − | + | ||
| − | + | ||
| − | + | ||
| − | + | ||
| − | + | ||
| − | + | ||
| − | + | ||
| − | + | ||
| − | + | ||
| − | + | ||
| − | + | ||
| − | + | ||
| − | + | ||
| − | + | ||
| − | + | ||
| − | + | ||
| − | + | ||
| − | + | ||
| − | + | ||
| − | + | ||
| − | + | ||
| − | + | ||
| − | + | ||
| − | + | ||
| − | + | ||
| − | + | ||
| − | + | ||
| − | + | ||
| − | + | ||
| − | + | ||
| − | + | ||
| − | + | ||
| − | + | ||
| − | + | ||
| − | + | ||
| − | + | ||
| − | + | ||
Latest revision as of 09:23, 4 June 2024
Contents
1 Unbricking Method
If the ROM is not installed correctly, causing the development board to become bricked, and you might not have the opportunity to reinstall the ROM via an SD card, you need to enter Maskrom mode to unbrick it by erasing the storage device.
1.1 Windows Users
1.1.1 Download Required Files
- Get the necessary tools: Visit here, find RKDevTool_v3.19_for_window.zip and DriverAssitant_v5.12.zip in the 05_Tools directory, and download them to your local machine.
- Install Rockchip USB driver and RKDevTool: Extract DriverAssitant_v5.12.zip to install the Rockchip USB driver, and extract RKDevTool_v3.19_for_window.zip to obtain the Rockchip flashing tool RKDevTool.
- Get the loader: Visit here, enter the tools directory corresponding to your CPU model, and download MiniLoaderAll.bin.
1.1.2 Enter Maskrom Mode to Erase the Storage Device
- Connect NanoPC-T4 to your computer using a USB data cable.
- Start RKDevTool on your computer.
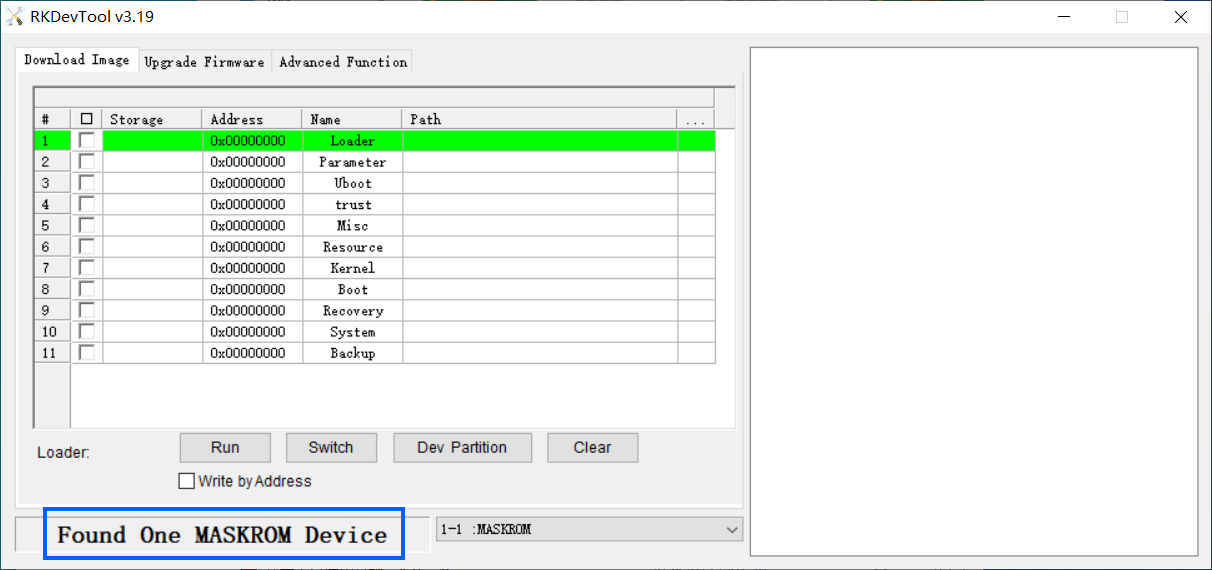
- Disconnect the power from NanoPC-T4, hold down the MASK button, connect the power, and release the button when you see Found One MASKROM Device displayed at the bottom of the interface, as shown below:
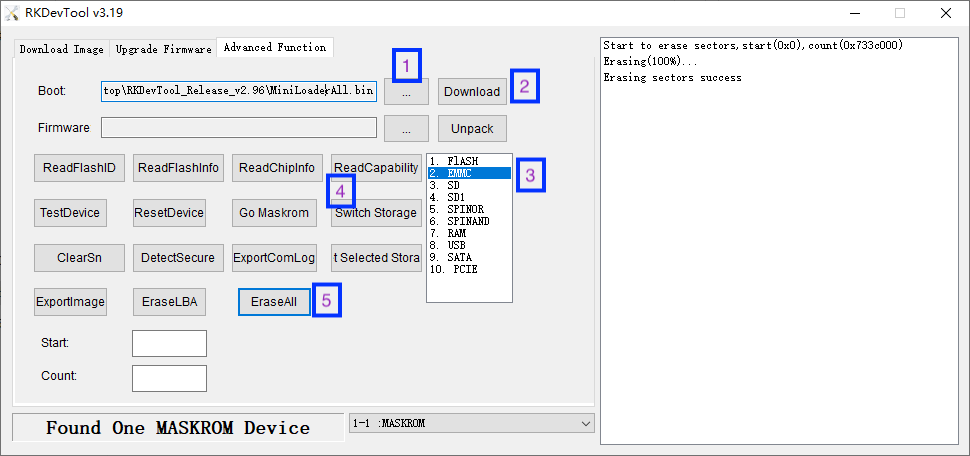
- Click the Advanced Function tab in the RKDevTool interface.
- In the Boot text box, select MiniLoaderAll.bin, then click the Download button.
- Select EMMC, click Switch Storage, then click the EraseAll button to erase the eMMC.
- At this point, NanoPC-T4 is restored to its initial state and can be normally booted via SD card or eMMC.
1.2 Linux/Mac Users
1.2.1 Download the Required Files
- Get the necessary tools: Visit here and find upgrade_tool_v2.30_for_linux.tgz (or for Mac users, select upgrade_tool_v2.25_for_mac.tgz) in the 05_Tools directory and download it locally.
- Get the loader: Visit here, enter the tools directory corresponding to your CPU model, and download MiniLoaderAll.bin.
1.2.2 Installation for upgrade_tool
The following commands are for Linux, with only slight differences in file and directory names for Mac users:
tar xzf upgrade_tool_v2.30_for_linux.tgz
cd upgrade_tool_v2.30_for_linux
sudo cp upgrade_tool /usr/local/sbin/
sudo chmod 755 /usr/local/sbin/upgrade_tool
1.2.3 Enter Maskrom Mode to Erase the Storage Device
- Connect NanoPC-T4 to the computer using a USB data cable.
- Disconnect the power from NanoPC-T4, hold down the MASK button, connect the power, and release the button after 4 seconds.
- Check the connection with the following command:
upgrade_tool LD
A result similar to "DevNo=1 Vid=0x2207,Pid=0x350b,LocationID=13 Mode=Maskrom SerialNo=" indicates that the device has been detected.
- Erase the eMMC with the following command:
upgrade_tool EF MiniLoaderAll.bin
- At this point, NanoPC-T4 has been restored to its initial state and can boot the system normally via SD card or eMMC.

