Ubuntu Jammy Desktop
Contents
[hide]- 1 Work with Ubuntu 22.04 Desktop
- 1.1 Introduction to Ubuntu 22.04 Desktop
- 1.2 Account & Password
- 1.3 View IP address
- 1.4 Connect to Ubuntu via SSH
- 1.5 Update Software Packages
- 1.6 Install Ubuntu software center
- 1.7 Install the kernel-header package
- 1.8 Change time zone
- 1.9 Change startup LOGO and Wallpaper
- 1.10 Soft Factory Reset
- 1.11 Start the program automatically at startup(For example Firefox)
- 1.12 Disable auto-mounting
- 1.13 Setup Chinese language and Input method
- 1.14 Video playback with hardware decoding
- 1.15 How to Install Plex Media Server
- 1.16 Install Docker Engine
- 1.17 Disable Automatic Login
- 1.18 WiFi Connection
- 1.19 Test OpenGL ES
- 1.20 Chromium web browser
1 Work with Ubuntu 22.04 Desktop
1.1 Introduction to Ubuntu 22.04 Desktop
Ubuntu 22.04 Desktop has the following features:
- Uses GNOME 42 as default desktop;
- Uses Wayland as default display server;
- Mali GPU-based OpenGL ES support;
- Support Rockhip MPP video hard coding and hard decoding;
- Pre-installed mpv and kodi, support video hardware decoding;
- Compatible with Docker and Plex server;
1.2 Account & Password
Regular Account:
User Name: pi
Password: pi
Root:
User Name: root
Password: fa
1.3 View IP address
Since the hostname is FriendlyElec.lan by default, you can use the ping command to get the IP address:
ping FriendlyElec.lan1.4 Connect to Ubuntu via SSH
ssh pi@FriendlyElec.lan
The default password is: pi
1.5 Update Software Packages
$ sudo apt-get update
1.6 Install Ubuntu software center
$ sudo apt-get install snapd
$ sudo snap install snap-store
1.7 Install the kernel-header package
sudo dpkg -i /opt/linux-headers-*.deb
try to compile a kernel module:
sudo apt update
sudo apt install git gcc make bc
git clone https://github.com/RinCat/RTL88x2BU-Linux-Driver.git
cd RTL88x2BU-Linux-Driver
make -j$(nproc)
sudo make install
sudo modprobe 88x2bu
1.8 Change time zone
1.8.1 Check the current time zone
timedatectl
1.8.2 List all available time zones
timedatectl list-timezones
1.8.3 Set the time zone (e.g. Shanghai)
sudo timedatectl set-timezone Asia/Shanghai
1.9 Change startup LOGO and Wallpaper
1.9.1 Change startup LOGO
Replace the following two files in the kernel source code directory and recompile the kernel:
kernel/logo.bmp
kernel/logo_kernel.bmp
Or use the script to operate, as shown below:
- Download scripts:
git clone https://github.com/friendlyarm/sd-fuse_rk3588.git -b kernel-6.1.y
cd sd-fuse_rk3588
- Compile kernel and repackage firmware
convert files/logo.jpg -type truecolor /tmp/logo.bmp
convert files/logo.jpg -type truecolor /tmp/logo_kernel.bmp
LOGO=/tmp/logo.bmp KERNEL_LOGO=/tmp/logo_kernel.bmp ./build-kernel.sh ubuntu-jammy-desktop-arm64
./mk-emmc-image.sh ubuntu-jammy-desktop-arm64
1.10 Soft Factory Reset
Execute the following command in a terminal:
sudo firstboot && sudo reboot
1.11 Start the program automatically at startup(For example Firefox)
Put the desktop file in the ~/.config/autostart/ directory, for example:
mkdir ~/.config/autostart/
cp /usr/share/applications/firefox.desktop ~/.config/autostart/
1.12 Disable auto-mounting
sudo systemctl mask udisks2
sudo reboot
1.13 Setup Chinese language and Input method
1.13.1 Setup Chinese language
Enter the following command and select 'zh_CN.UTF-8':
sudo dpkg-reconfigure localesAdd environment variables to .bashrc:
echo "export LC_ALL=zh_CN.UTF-8" >> ~/.bashrc
echo "export LANG=zh_CN.UTF-8" >> ~/.bashrc
echo "export LANGUAGE=zh_CN.UTF-8" >> ~/.bashrc
Reboot device:
sudo reboot1.14 Video playback with hardware decoding
1.14.1 GUI
- Locate the video file in the file browser, right click and select "Play with mpv media player"
- Using Kodi player
- Using Chromium web browser, you can play videos on the web with hardware decoding (limited to the video formats supported by the CPU)
1.14.2 Command line
- Play local video file
export DISPLAY=:0.0
mpv --fs /home/pi/Videos/demo.mp4
- Play web-video
export DISPLAY=:0.0
mpv --fs https://www.youtube.com/watch?v=lK-nYDmC1Dk
1.15 How to Install Plex Media Server
Run the following command to install:
echo deb https://downloads.plex.tv/repo/deb public main | sudo tee /etc/apt/sources.list.d/plexmediaserver.list
curl https://downloads.plex.tv/plex-keys/PlexSign.key | sudo apt-key add -
sudo apt update
sudo apt install plexmediaserver
After successful installation, enable Plex (starts automatically at system startup):
sudo systemctl enable plexmediaserver
sudo systemctl start plexmediaserver
sudo systemctl status plexmediaserver
After installation, login to Plex server by entering the following address in your computer browser: http://IPAddress:32400/web/
1.16 Install Docker Engine
1.16.1 Install Docker Engine
sudo apt install apt-transport-https ca-certificates curl software-properties-common gnupg lsb-release
curl -fsSL https://download.docker.com/linux/ubuntu/gpg | sudo gpg --dearmor -o /usr/share/keyrings/docker-archive-keyring.gpg
echo "deb [arch=$(dpkg --print-architecture) signed-by=/usr/share/keyrings/docker-archive-keyring.gpg] https://download.docker.com/linux/ubuntu $(lsb_release -cs) stable" | sudo tee /etc/apt/sources.list.d/docker.list > /dev/null
sudo apt update
sudo apt install docker-ce docker-ce-cli containerd.io docker-compose-plugin
Let’s verify:
sudo docker info1.16.2 Run Docker as a non-root user
sudo groupadd docker
sudo gpasswd -a ${USER} docker
sudo systemctl restart docker
sudo chmod a+rw /var/run/docker.sock
Let’s verify:
docker images
1.16.3 Testing Docker: Installing Nextcloud with docker
mkdir ~/nextcloud -p
docker run -d -p 8888:80  --name nextcloud  -v ~/nextcloud/:/var/www/html/ --restart=always --privileged=true  arm64v8/nextcloud
After installation, visit: http://Device-IP-Address:8888 on your computer browser to view the nextcloud web page.
1.17 Disable Automatic Login
Edit the /etc/gdm3/custom.conf file, set AutomaticLoginEnable to false:
[daemon]
AutomaticLoginEnable = false
1.18 WiFi Connection
1.18.1 Gui
Click on the icon on the top right in the FriendlyDesktop's main window, select your wanted WiFi hotspot and proceed with prompts
1.18.2 Console
Please visit: Use NetworkManager to configure network settings
1.19 Test OpenGL ES
First, change the CPU governor to performance:
sudo sh -c 'echo performance > /sys/devices/system/cpu/cpufreq/policy0/scaling_governor'
sudo sh -c 'echo performance > /sys/devices/system/cpu/cpufreq/policy4/scaling_governor'
sudo sh -c 'echo performance > /sys/devices/system/cpu/cpufreq/policy6/scaling_governor'
Start glmark2-es2-wayland:
glmark2-es2-wayland
1.20 Chromium web browser
1.20.1 GPU
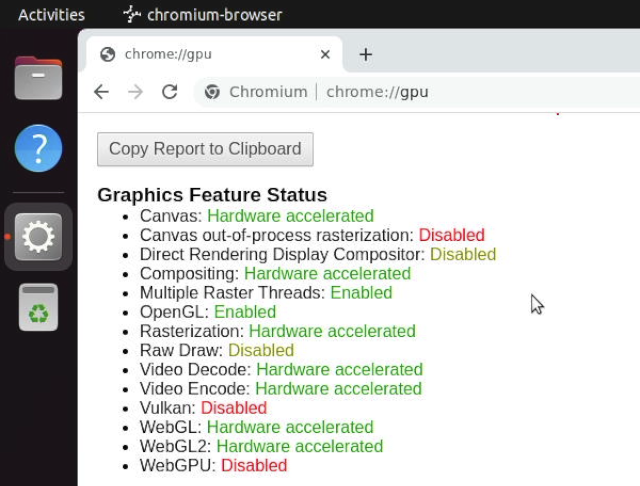
Chromium web browser has enabled hardware acceleration by default, supports WebGL, and can view hardware acceleration details by entering the URL chrome://gpu, as shown below:

1.20.2 VPU
Play a video in the browser, then use fuser on the command line to view the mpp device node to confirm that the vpu interface is being called:
pi@FriendlyElec:~$ fuser /dev/mpp_service
/dev/mpp_service:     3258
If there is no content output from the fuser command, it means software decoding.
1.20.3 Check Supported Hardware Decoding Formats
Enter about://gpu in your browser's address bar and scroll to the bottom of the page to view the "Video Acceleration Information" table.
After playing a video, enter about://media-internals in your browser's address bar to check if hardware decoding was enabled for the most recent playback.
