Difference between revisions of "Template:BurnAndroidToSD-Allwinner"
From FriendlyELEC WiKi
(updated by API) |
(updated by API) |
||
| (3 intermediate revisions by 2 users not shown) | |||
| Line 1: | Line 1: | ||
====Android==== | ====Android==== | ||
| − | ===== | + | =====Flash to TF===== |
Note:before make a MicroSD card to an Android image card you need to format this card. | Note:before make a MicroSD card to an Android image card you need to format this card. | ||
* On a Windows PC run the HDDLLF.4.40 utility as administrator. Insert a TF card(at least 8G) into this PC and format it. After formatting is done take out the TF card, insert it into the PC again and format it with Windows internal format utility to format it to FAT32. After this formatting is done take out the card. | * On a Windows PC run the HDDLLF.4.40 utility as administrator. Insert a TF card(at least 8G) into this PC and format it. After formatting is done take out the TF card, insert it into the PC again and format it with Windows internal format utility to format it to FAT32. After this formatting is done take out the card. | ||
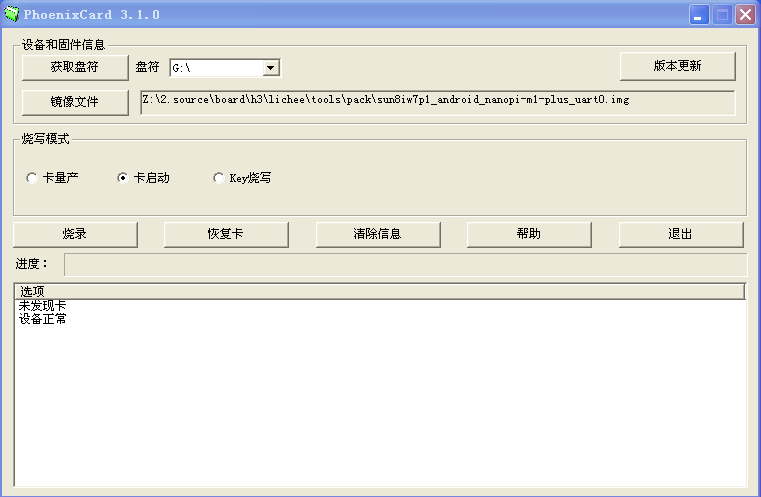
* Extract the the Android image and PhoenixCard_V310.rar . Insert the TF card you made in the previous step into a Windows PC and run the PhoenixCard_V310 utility as administrator. On the utility's main window select your TF card's drive, the wanted image file and click on "write" to start flashing the TF card. | * Extract the the Android image and PhoenixCard_V310.rar . Insert the TF card you made in the previous step into a Windows PC and run the PhoenixCard_V310 utility as administrator. On the utility's main window select your TF card's drive, the wanted image file and click on "write" to start flashing the TF card. | ||
| − | [[File:PhoenixCard_boot.png|frameless| | + | [[File:PhoenixCard_boot.png|frameless|600px|]] <br> |
| − | ( | + | (In the screenshot an Android image file for the NanoPi M1 Plus was selected. You need to select a correct image file for your board.) |
* Insert this card into your board' BOOT slot and power on (with a 5V/2A power source). If the green LED is on and the blue LED is blinking this indicates your board has successfully booted.<br/> | * Insert this card into your board' BOOT slot and power on (with a 5V/2A power source). If the green LED is on and the blue LED is blinking this indicates your board has successfully booted.<br/> | ||
Latest revision as of 08:41, 6 May 2019
1 Android
1.1 Flash to TF
Note:before make a MicroSD card to an Android image card you need to format this card.
- On a Windows PC run the HDDLLF.4.40 utility as administrator. Insert a TF card(at least 8G) into this PC and format it. After formatting is done take out the TF card, insert it into the PC again and format it with Windows internal format utility to format it to FAT32. After this formatting is done take out the card.
- Extract the the Android image and PhoenixCard_V310.rar . Insert the TF card you made in the previous step into a Windows PC and run the PhoenixCard_V310 utility as administrator. On the utility's main window select your TF card's drive, the wanted image file and click on "write" to start flashing the TF card.

(In the screenshot an Android image file for the NanoPi M1 Plus was selected. You need to select a correct image file for your board.)
- Insert this card into your board' BOOT slot and power on (with a 5V/2A power source). If the green LED is on and the blue LED is blinking this indicates your board has successfully booted.