Difference between revisions of "Matrix - RTC/zh"
From FriendlyELEC WiKi
(→特性) |
(→C语言读写RTC) |
||
| (20 intermediate revisions by 3 users not shown) | |||
| Line 3: | Line 3: | ||
==介绍== | ==介绍== | ||
[[File:Matrix-RTC.png|thumb|]] | [[File:Matrix-RTC.png|thumb|]] | ||
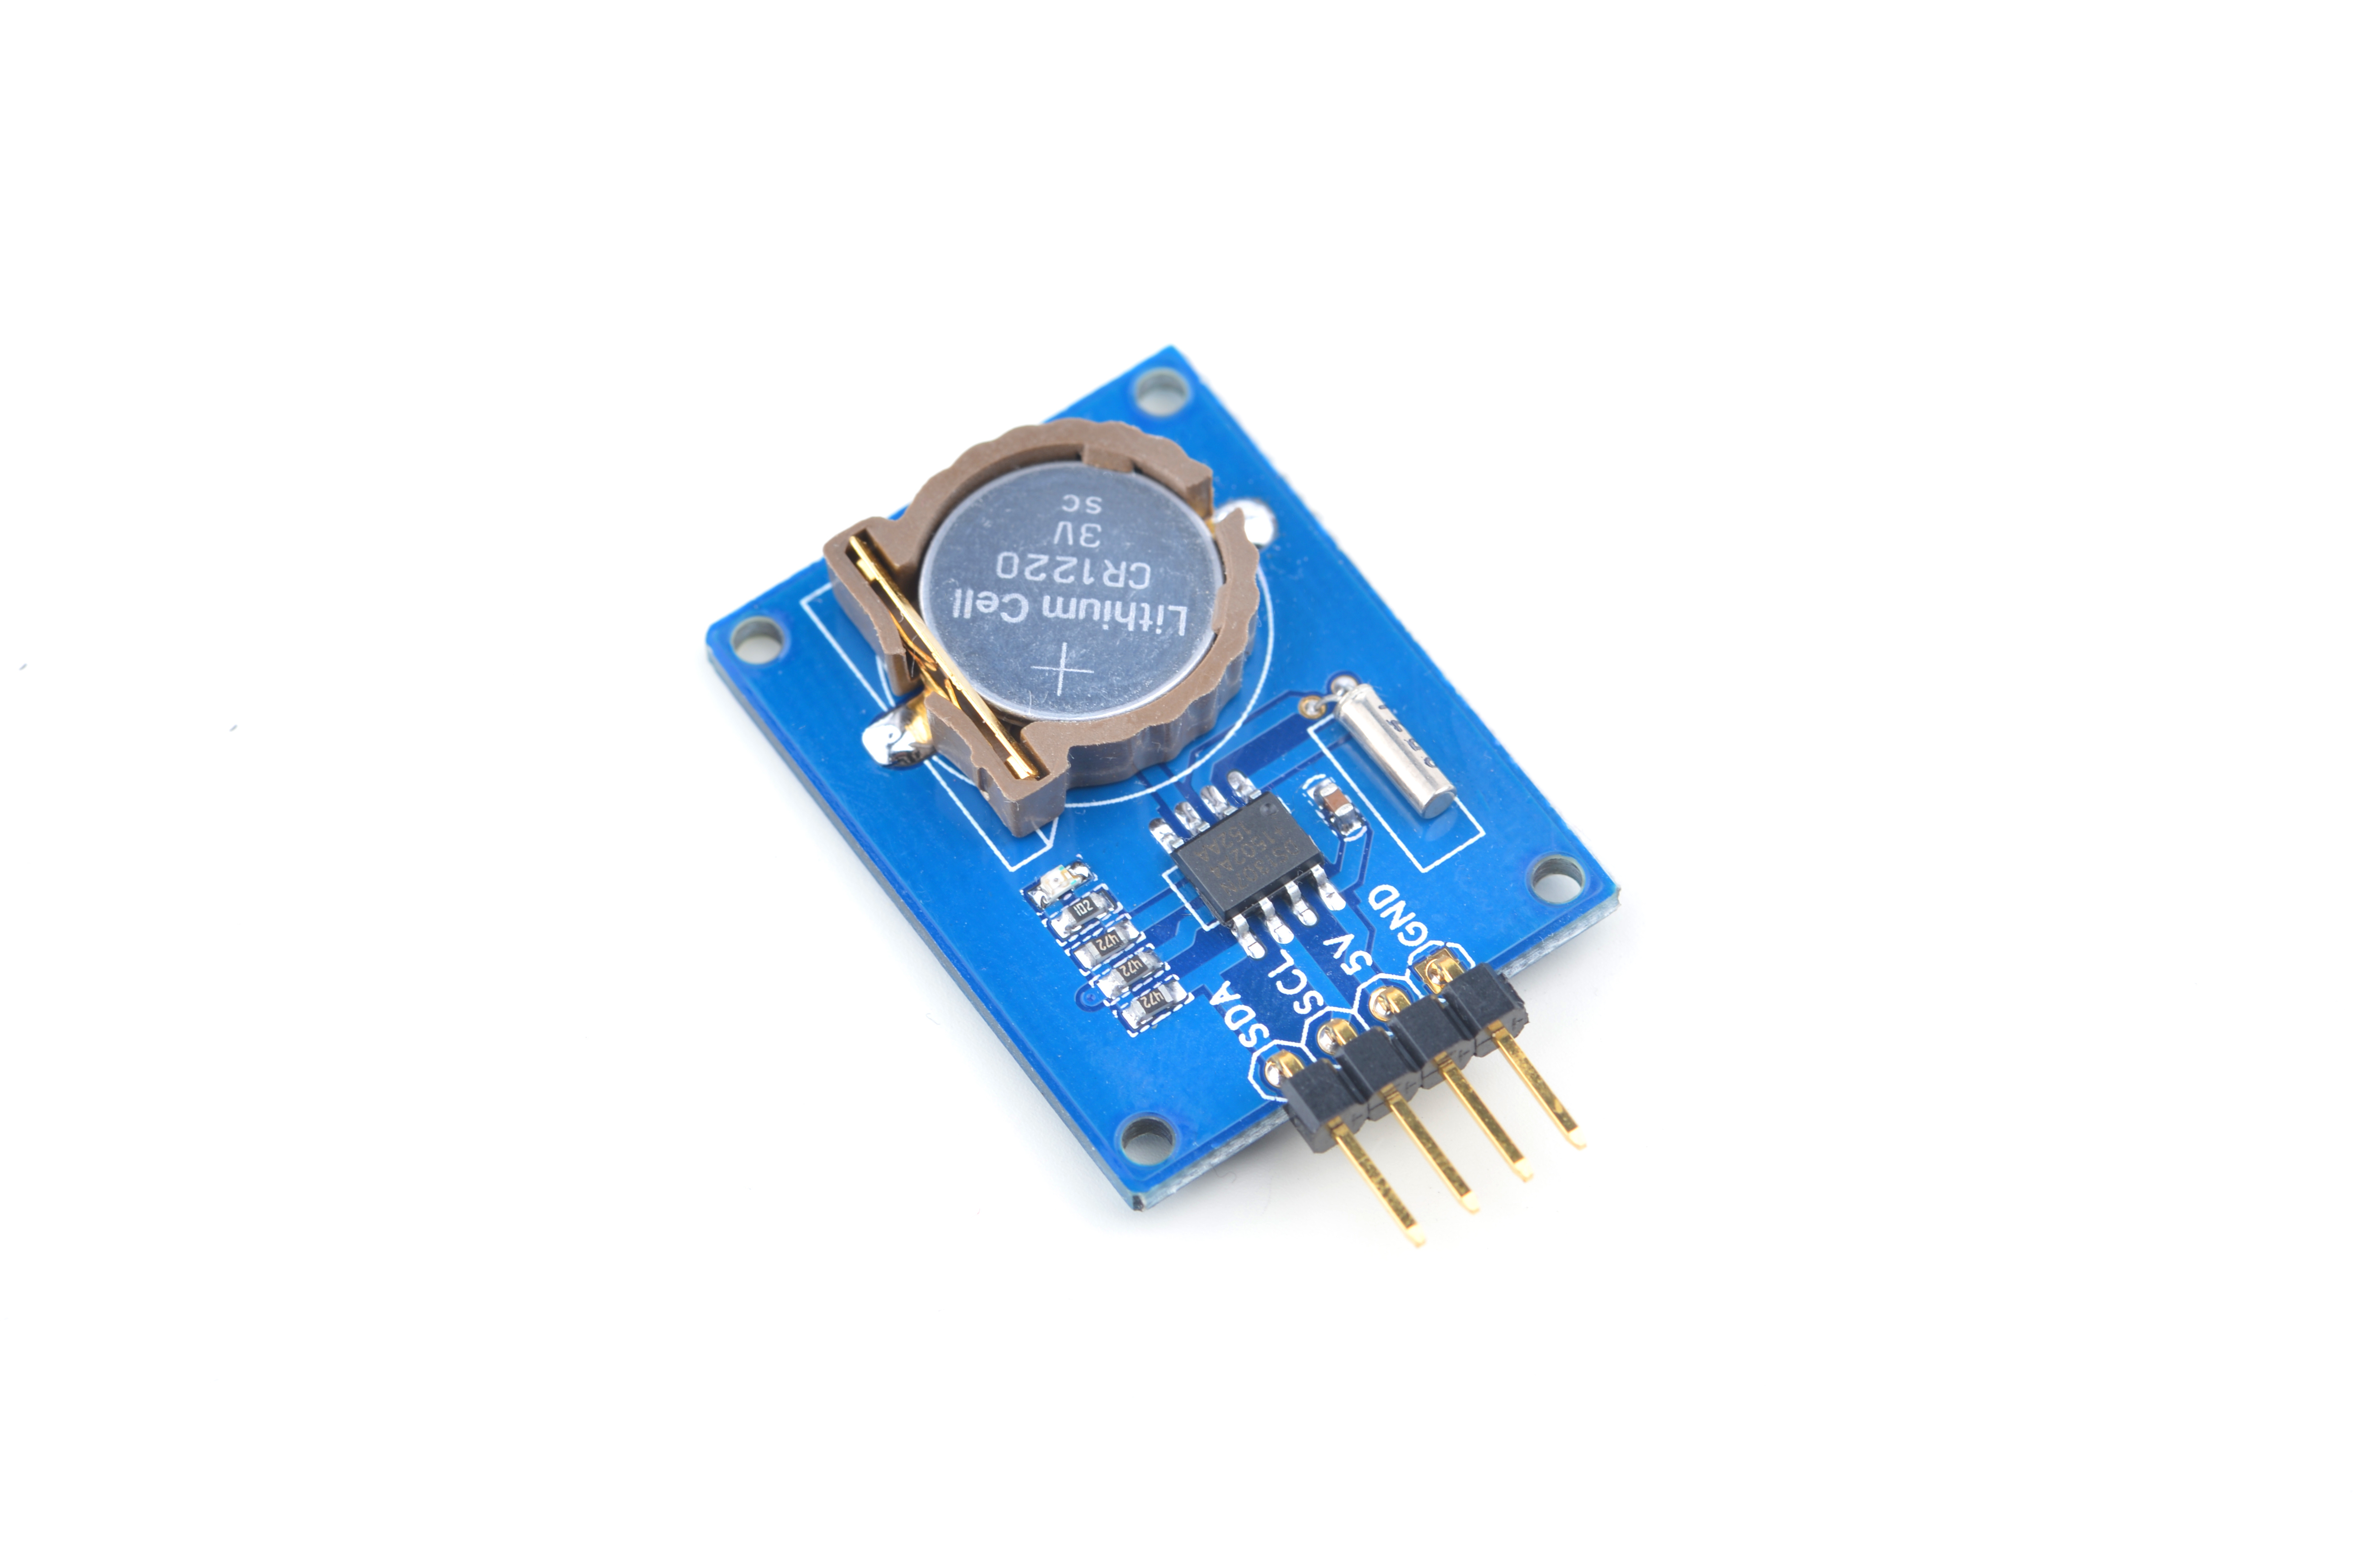
| − | * | + | *DS1307串行实时时钟是一种低功耗,完整的二进制编码的十进制(BCD)时钟/日历加56位字节的NV SRAM。地址和数据通过IIC串行传输,双向总线。 |
| + | *时钟/日历提供秒、分、时、日、星期、月和年的信息。月的最后一天自动调整月的日数少于31天,包括闰年的修正。时钟运行24小时或者12小时格式与AM/PM指标。 | ||
==特性== | ==特性== | ||
| − | * | + | * I2C串口接口 |
| − | * | + | * 56字节、电池支持、通用的RAM和无限写道 |
| − | * | + | * 8-Pin DIP和8-Pin SO |
| − | + | ||
* 操作温度在-40度到85度 | * 操作温度在-40度到85度 | ||
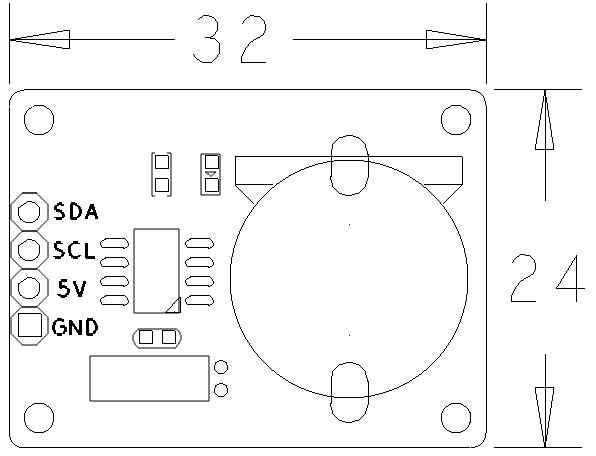
* PCB尺寸(mm):24x32 | * PCB尺寸(mm):24x32 | ||
| Line 28: | Line 28: | ||
|} | |} | ||
| − | == | + | ==硬件连接== |
| − | + | ===连接NanoPi NEO/NanoPi NEO Air=== | |
| − | + | NanoPi M1和NanoPi NEO以及NanoPi NEO Air的前24Pin引脚定义是一模一样的,所以它们操作Matrix配件的步骤是一样的,并且使用同一份代码。<br> | |
| − | + | ||
| − | + | ||
| − | + | ||
| − | + | ||
| − | + | 参考下图连接模块:<br> | |
| − | + | [[File:Matrix-RTC_nanopi_NEO.jpg|frameless|600px|Matrix-RTC_nanopi_NEO]] | |
| − | + | ||
| − | + | ||
| − | + | ||
| − | + | ||
| − | + | ||
| − | + | 连接说明: | |
| − | + | {| class="wikitable" | |
| − | + | |- | |
| − | + | |Matrix-RTC || NanoPi NEO | |
| + | |- | ||
| + | |SDA || Pin3 | ||
| + | |- | ||
| + | |SCL || Pin5 | ||
| + | |- | ||
| + | |5V || Pin4 | ||
| + | |- | ||
| + | |GND || Pin6 | ||
| + | |} | ||
| − | + | ===连接NanoPi M1=== | |
| − | < | + | 参考下图连接模块:<br> |
| − | + | [[File:Matrix-RTC_nanopi_m1.jpg|frameless|600px|Matrix-RTC_nanopi_m1]] | |
| − | + | ||
| − | + | ||
| − | = | + | 连接说明: |
| − | === | + | {| class="wikitable" |
| − | + | |- | |
| + | |Matrix-RTC || NanoPi M1 | ||
| + | |- | ||
| + | |SDA || Pin3 | ||
| + | |- | ||
| + | |SCL || Pin5 | ||
| + | |- | ||
| + | |5V || Pin4 | ||
| + | |- | ||
| + | |GND || Pin6 | ||
| + | |} | ||
| + | |||
| + | ===连接NanoPi 2=== | ||
| + | 参考下图连接模块:<br> | ||
[[File:Matrix-RTC_nanopi_2.jpg|frameless|600px|Matrix-RTC_nanopi_2]] | [[File:Matrix-RTC_nanopi_2.jpg|frameless|600px|Matrix-RTC_nanopi_2]] | ||
| Line 74: | Line 85: | ||
|} | |} | ||
| − | === | + | ===连接NanoPi M2 / NanoPi 2 Fire=== |
| − | + | NanoPi M2和NanoPi 2 Fire的40 Pin引脚定义是一模一样的,所以它们操作Matrix配件的步骤是一样的,这里仅以NanoPi M2为例。<br> | |
| − | < | + | 参考下图连接模块:<br> |
| − | + | [[File:Matrix-RTC_nanopi_M2.jpg|frameless|600px|Matrix-RTC_nanopi_M2]] | |
| − | + | ||
| − | < | + | |
| − | + | 连接说明: | |
| − | + | {| class="wikitable" | |
| − | + | |- | |
| − | + | | || NanoPi M2 | |
| − | + | |- | |
| − | + | |SDA || Pin3 | |
| − | + | |- | |
| − | + | |SCL || Pin5 | |
| − | + | |- | |
| − | + | |5V || Pin4 | |
| − | + | |- | |
| − | + | |GND || Pin6 | |
| − | + | |} | |
| − | + | ||
| − | + | ||
| − | + | ||
| − | + | ||
| − | + | ||
| − | + | ||
| − | + | ||
| − | + | ||
| − | + | ||
| − | + | ||
| − | + | ||
| − | + | ||
| − | + | ||
| − | + | ||
| − | + | ||
| − | + | ||
| − | + | ||
| − | + | ||
| − | + | ||
| − | + | ||
| − | + | ||
| − | + | ||
| − | + | ||
| − | + | ||
| − | + | ||
| − | + | ||
| − | + | ||
| − | + | ||
| − | + | ||
| − | + | ||
| − | + | ||
| − | + | ||
| − | + | ||
| − | + | ||
| − | + | ||
| − | + | ||
| − | + | ||
| − | + | ||
| − | + | ||
| − | + | ||
| − | + | ||
| − | + | ||
| − | + | ||
| − | + | ||
| − | + | ||
| − | + | ||
| − | + | ||
| − | + | ||
| − | + | ||
| − | + | ||
| − | + | ||
| − | + | ||
| − | + | ||
| − | + | ||
| − | + | ||
| − | + | ||
| − | + | ||
| − | + | ||
| − | + | ||
| − | + | ||
| − | + | ||
| − | + | ||
| − | + | ||
| − | + | ||
| − | + | ||
| − | + | ||
| − | + | ||
| − | + | ||
| − | + | ||
| − | + | ||
| − | + | ||
| − | + | ||
| − | + | ||
| − | + | ||
| − | + | ||
| − | + | ||
| − | + | ||
| − | + | ||
| − | + | ||
| − | + | ||
| − | + | ||
| − | + | ||
| − | + | ||
| − | + | ||
| − | + | ||
| − | + | ||
| − | + | ||
| − | + | ||
| − | + | ||
| − | + | ||
| − | + | ||
| − | + | ||
| − | + | ||
| − | + | ||
| − | + | ||
| − | + | ||
| − | + | ||
| − | + | ||
| − | + | ||
| − | + | ||
| − | + | ||
| − | + | ||
| − | + | ||
| − | + | ||
| − | + | ||
| − | + | ||
| − | === | + | ===连接NanoPi M3=== |
| − | + | 参考下图连接模块:<br> | |
| − | [[File:Matrix- | + | [[File:Matrix-RTC_nanopi_M3.jpg|frameless|600px|Matrix-RTC_nanopi_M3]] |
连接说明: | 连接说明: | ||
{| class="wikitable" | {| class="wikitable" | ||
|- | |- | ||
| − | | | + | | || NanoPi M3 |
|- | |- | ||
|SDA || Pin3 | |SDA || Pin3 | ||
| Line 219: | Line 122: | ||
|} | |} | ||
| − | === | + | ===连接NanoPC-T2=== |
| − | + | 参考下图连接模块:<br> | |
| − | < | + | [[File:Matrix-RTC_NanoPC-T2.jpg|frameless|600px|Matrix-RTC_NanoPC-T2]] |
| − | + | ||
| − | + | ||
| − | + | ||
| − | + | 连接说明: | |
| − | + | {| class="wikitable" | |
| − | + | |- | |
| − | + | |Matrix-RTC || NanoPC-T2 | |
| − | + | |- | |
| − | + | |SDA || Pin6 | |
| − | + | |- | |
| − | + | |SCL || Pin5 | |
| + | |- | ||
| + | |5V || Pin29 | ||
| + | |- | ||
| + | |GND || Pin30 | ||
| + | |} | ||
| − | === | + | ==H3平台== |
| − | + | ===Linux-4.14 / Linux-3.4=== | |
| − | + | ====C程序读写RTC==== | |
| + | 启动开发板,进入系统后克隆Matrix代码仓库: | ||
<syntaxhighlight lang="bash"> | <syntaxhighlight lang="bash"> | ||
| − | $ | + | $ apt-get update && apt-get install git |
| − | + | $ git clone https://github.com/friendlyarm/matrix.git | |
| − | $ | + | |
</syntaxhighlight> | </syntaxhighlight> | ||
| + | 克隆完成后会得到一个名为matrix的目录。 | ||
| − | + | 编译并安装Matrix: | |
<syntaxhighlight lang="bash"> | <syntaxhighlight lang="bash"> | ||
| − | $ cd | + | $ cd matrix |
| − | $ | + | $ make && make install |
</syntaxhighlight> | </syntaxhighlight> | ||
| − | + | 运行测试程序: | |
<syntaxhighlight lang="bash"> | <syntaxhighlight lang="bash"> | ||
$ matrix-rtc | $ matrix-rtc | ||
</syntaxhighlight> | </syntaxhighlight> | ||
注意:此模块并不支持热插拔,启动系统前需要确保硬件连接正确。<br> | 注意:此模块并不支持热插拔,启动系统前需要确保硬件连接正确。<br> | ||
| − | + | 运行效果如下:<br> | |
| − | + | ||
| − | + | ||
| − | + | ||
| − | + | ||
<syntaxhighlight lang="bash"> | <syntaxhighlight lang="bash"> | ||
| − | + | RTC Driver Test Example. | |
| − | + | Set RTC date/time is 9-15-2015, 01:01:01. | |
| + | Read RTC date/time is 9-15-2015, 01:01:01. | ||
| + | Test complete | ||
</syntaxhighlight> | </syntaxhighlight> | ||
| − | + | 该程序只是简单的读写硬件RTC | |
| − | === | + | ====使用hwclock命令读写RTC==== |
| − | <syntaxhighlight lang=" | + | * 读取当前时间 |
| − | + | <syntaxhighlight lang="bash"> | |
| − | + | $ sudo modprobe rtc-ds1307 | |
| − | + | sudo hwclock -r -f /dev/rtc-ds1307 | |
| − | + | ||
| − | + | ||
| − | + | ||
| − | + | ||
| − | + | ||
| − | + | ||
| − | + | ||
| − | + | ||
| − | + | ||
| − | + | ||
| − | + | ||
| − | + | ||
| − | + | ||
| − | + | ||
| − | + | ||
| − | + | ||
| − | + | ||
| − | + | ||
| − | + | ||
| − | + | ||
| − | + | ||
| − | + | ||
| − | + | ||
| − | + | ||
| − | + | ||
| − | + | ||
| − | + | ||
| − | + | ||
| − | + | ||
| − | + | ||
| − | + | ||
| − | + | ||
| − | + | ||
| − | + | ||
| − | + | ||
| − | + | ||
| − | + | ||
| − | + | ||
| − | + | ||
| − | + | ||
| − | + | ||
| − | + | ||
| − | + | ||
| − | + | ||
| − | + | ||
| − | + | ||
| − | + | ||
| − | + | ||
| − | + | ||
| − | + | ||
| − | + | ||
| − | + | ||
| − | + | ||
| − | + | ||
| − | + | ||
| − | + | ||
| − | + | ||
| − | + | ||
</syntaxhighlight> | </syntaxhighlight> | ||
| − | + | * 设置时间并保存 | |
| − | + | ||
| − | + | ||
| − | + | ||
| − | + | ||
| − | + | ||
| − | + | ||
| − | + | ||
| − | + | ||
| − | + | ||
| − | + | ||
| − | + | ||
| − | + | ||
| − | + | ||
| − | + | ||
| − | + | ||
| − | + | ||
| − | + | ||
| − | + | ||
| − | + | ||
| − | + | ||
| − | + | ||
| − | + | ||
| − | + | ||
| − | + | ||
<syntaxhighlight lang="bash"> | <syntaxhighlight lang="bash"> | ||
| − | + | sudo date -s "2019-10-09 17:00:00" | |
| − | + | sudo hwclock -w -f /dev/rtc-ds1307 | |
</syntaxhighlight> | </syntaxhighlight> | ||
| − | + | ==S5P4418/S5P6818平台== | |
| + | 启动开发板,进入系统后克隆Matrix代码仓库: | ||
<syntaxhighlight lang="bash"> | <syntaxhighlight lang="bash"> | ||
| − | $ | + | $ apt-get update && apt-get install git |
| − | $ | + | $ git clone https://github.com/friendlyarm/matrix.git |
| − | + | ||
</syntaxhighlight> | </syntaxhighlight> | ||
| − | + | 克隆完成后会得到一个名为matrix的目录。 | |
| − | + | ||
| − | + | 编译并安装Matrix: | |
| − | + | ||
| − | + | ||
<syntaxhighlight lang="bash"> | <syntaxhighlight lang="bash"> | ||
| − | $ | + | $ cd matrix |
| − | $ | + | $ make && make install |
</syntaxhighlight> | </syntaxhighlight> | ||
| − | + | 运行测试程序: | |
<syntaxhighlight lang="bash"> | <syntaxhighlight lang="bash"> | ||
$ matrix-rtc | $ matrix-rtc | ||
</syntaxhighlight> | </syntaxhighlight> | ||
| − | 注意:此模块并不支持热插拔,启动系统前需要确保硬件连接正确。 | + | 注意:此模块并不支持热插拔,启动系统前需要确保硬件连接正确。<br> |
| − | + | 运行效果如下:<br> | |
| − | + | ||
| − | + | ||
| − | + | ||
| − | + | ||
<syntaxhighlight lang="bash"> | <syntaxhighlight lang="bash"> | ||
| + | RTC Driver Test Example. | ||
| + | Set RTC date/time is 9-15-2015, 01:01:01. | ||
| + | Read RTC date/time is 9-15-2015, 01:01:01. | ||
| + | Test complete | ||
| + | </syntaxhighlight> | ||
| + | 该程序只是简单的读写硬件RTC,如果想设置Debian的系统时间并将其保持在Matrix-RTC模块里,可执行以下命令,假设当前时间为"2016-11-17 17:26:01": | ||
| + | <syntaxhighlight lang="bash"> | ||
| + | $ modprobe rtc-ds1307 | ||
$ date -s "2016-11-17 17:26:01" | $ date -s "2016-11-17 17:26:01" | ||
| − | $ hwclock -w -f /dev/ | + | $ hwclock -w -f /dev/rtc-ds1307 |
</syntaxhighlight> | </syntaxhighlight> | ||
| − | + | 然后修改/etc/modprobe.d/matrix-blacklist.conf,在"blacklist rtc_ds1307"前加上一个#,表示注释该行,这样下次开机就会自动加载驱动了。<br> | |
| − | + | 重启系统,可以看到时间仍然是准确的: | |
| − | + | <syntaxhighlight lang="bash"> | |
| − | + | $ hwclock -r -f /dev/rtc-ds1307 | |
| − | + | 2016年11月18日 星期五 08时29分48秒 -0.492649 seconds | |
| − | + | ||
| − | + | ||
| − | + | ||
| − | + | ||
| − | + | ||
| − | + | ||
| − | + | ||
| − | + | ||
| − | + | ||
| − | + | ||
| − | + | ||
| − | + | ||
| − | + | ||
| − | + | ||
| − | + | ||
| − | + | ||
| − | + | ||
| − | + | ||
| − | + | ||
| − | + | ||
| − | + | ||
| − | + | ||
| − | + | ||
| − | + | ||
| − | + | ||
| − | + | ||
| − | + | ||
| − | + | ||
| − | + | ||
| − | + | ||
| − | + | ||
| − | + | ||
| − | + | ||
| − | + | ||
| − | + | ||
| − | + | ||
| − | + | ||
| − | + | ||
| − | + | ||
| − | + | ||
| − | + | ||
| − | + | ||
| − | + | ||
| − | + | ||
| − | + | ||
| − | + | ||
| − | + | ||
| − | + | ||
| − | + | ||
| − | + | ||
| − | + | ||
| − | + | ||
| − | + | ||
| − | + | ||
| − | + | ||
| − | + | ||
| − | + | ||
| − | + | ||
| − | + | ||
| − | + | ||
| − | + | ||
| − | + | ||
</syntaxhighlight> | </syntaxhighlight> | ||
| − | |||
| − | |||
| − | |||
| − | |||
==相关资料== | ==相关资料== | ||
[http://datasheets.maximintegrated.com/en/ds/DS1307.pdf DS1307.pdf] | [http://datasheets.maximintegrated.com/en/ds/DS1307.pdf DS1307.pdf] | ||
Latest revision as of 02:54, 17 December 2019
Contents
1 介绍
- DS1307串行实时时钟是一种低功耗,完整的二进制编码的十进制(BCD)时钟/日历加56位字节的NV SRAM。地址和数据通过IIC串行传输,双向总线。
- 时钟/日历提供秒、分、时、日、星期、月和年的信息。月的最后一天自动调整月的日数少于31天,包括闰年的修正。时钟运行24小时或者12小时格式与AM/PM指标。
2 特性
- I2C串口接口
- 56字节、电池支持、通用的RAM和无限写道
- 8-Pin DIP和8-Pin SO
- 操作温度在-40度到85度
- PCB尺寸(mm):24x32
- 引脚说明:
| 名称 | 描述 |
| SDA | I2C SDA |
| SCL | I2C SCL |
| 5V | 电源5V |
| GND | 地 |
3 硬件连接
3.1 连接NanoPi NEO/NanoPi NEO Air
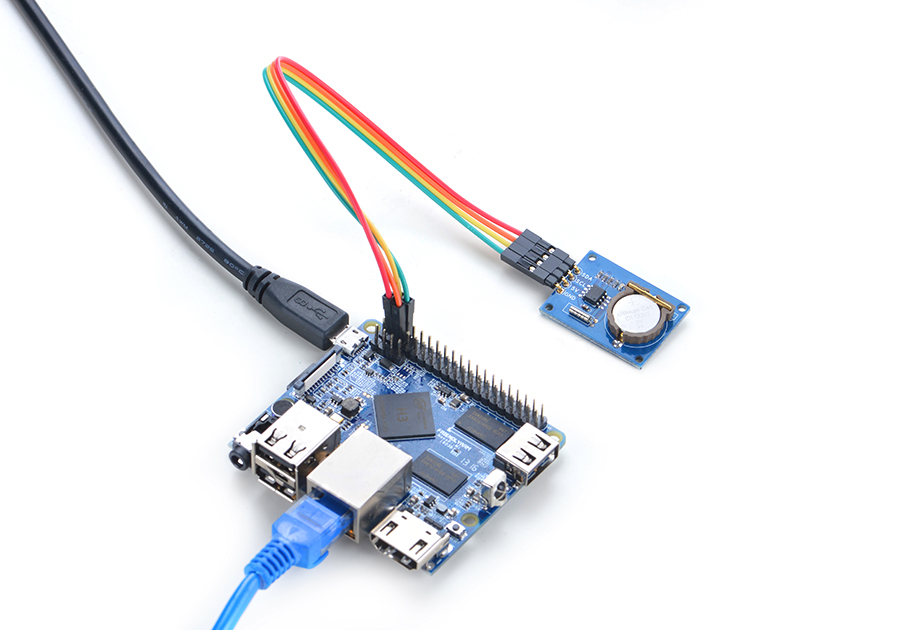
NanoPi M1和NanoPi NEO以及NanoPi NEO Air的前24Pin引脚定义是一模一样的,所以它们操作Matrix配件的步骤是一样的,并且使用同一份代码。
参考下图连接模块:
Matrix-RTC_nanopi_NEO
连接说明:
| Matrix-RTC | NanoPi NEO |
| SDA | Pin3 |
| SCL | Pin5 |
| 5V | Pin4 |
| GND | Pin6 |
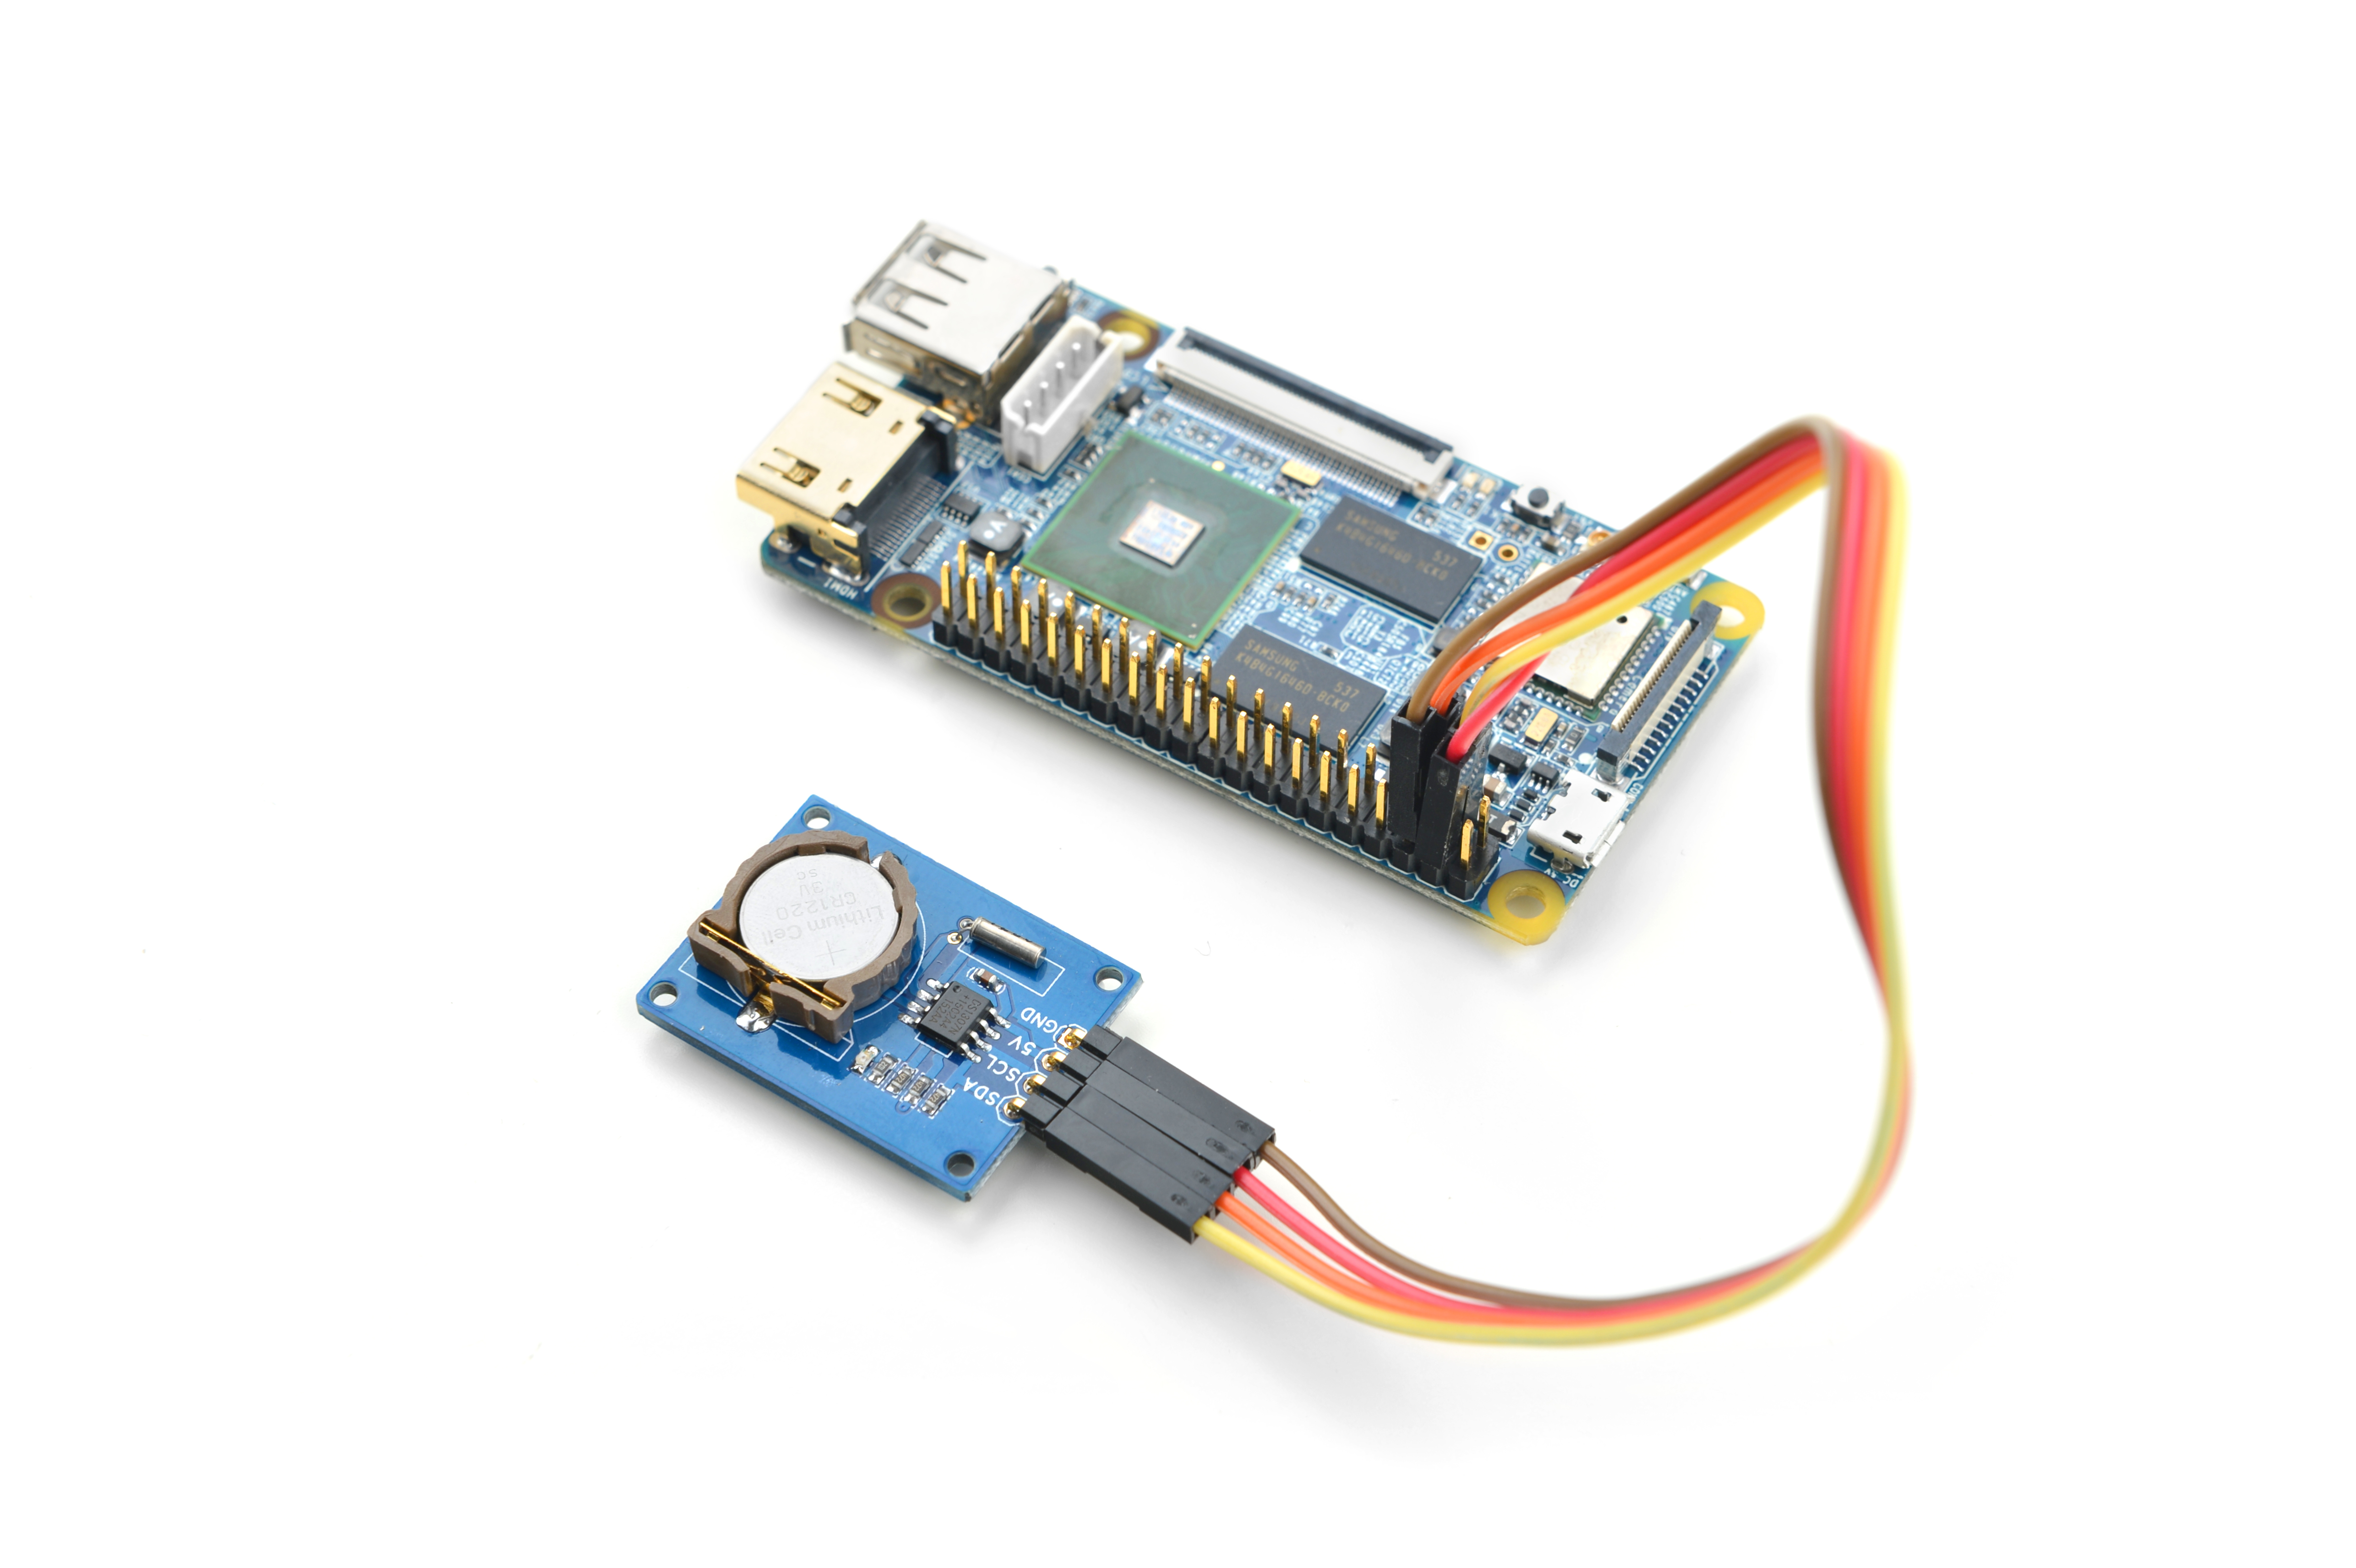
3.2 连接NanoPi M1
连接说明:
| Matrix-RTC | NanoPi M1 |
| SDA | Pin3 |
| SCL | Pin5 |
| 5V | Pin4 |
| GND | Pin6 |
3.3 连接NanoPi 2
连接说明:
| Matrix-RTC | NanoPi 2 |
| SDA | Pin3 |
| SCL | Pin5 |
| 5V | Pin4 |
| GND | Pin6 |
3.4 连接NanoPi M2 / NanoPi 2 Fire
NanoPi M2和NanoPi 2 Fire的40 Pin引脚定义是一模一样的,所以它们操作Matrix配件的步骤是一样的,这里仅以NanoPi M2为例。
参考下图连接模块:
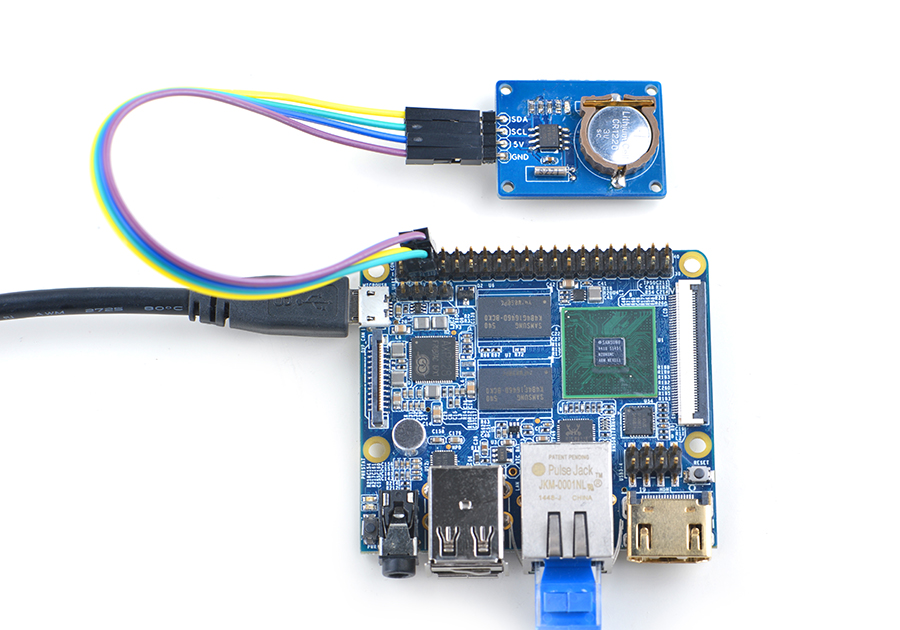
连接说明:
| NanoPi M2 | |
| SDA | Pin3 |
| SCL | Pin5 |
| 5V | Pin4 |
| GND | Pin6 |
3.5 连接NanoPi M3
参考下图连接模块:
Matrix-RTC_nanopi_M3
连接说明:
| NanoPi M3 | |
| SDA | Pin3 |
| SCL | Pin5 |
| 5V | Pin4 |
| GND | Pin6 |
3.6 连接NanoPC-T2
参考下图连接模块:
Matrix-RTC_NanoPC-T2
连接说明:
| Matrix-RTC | NanoPC-T2 |
| SDA | Pin6 |
| SCL | Pin5 |
| 5V | Pin29 |
| GND | Pin30 |
4 H3平台
4.1 Linux-4.14 / Linux-3.4
4.1.1 C程序读写RTC
启动开发板,进入系统后克隆Matrix代码仓库:
$ apt-get update && apt-get install git
$ git clone https://github.com/friendlyarm/matrix.git
克隆完成后会得到一个名为matrix的目录。
编译并安装Matrix:
$ cd matrix
$ make && make install
运行测试程序:
$ matrix-rtc注意:此模块并不支持热插拔,启动系统前需要确保硬件连接正确。
运行效果如下:
RTC Driver Test Example.
Set RTC date/time is 9-15-2015, 01:01:01.
Read RTC date/time is 9-15-2015, 01:01:01.
Test complete
该程序只是简单的读写硬件RTC
4.1.2 使用hwclock命令读写RTC
- 读取当前时间
$ sudo modprobe rtc-ds1307
sudo hwclock -r -f /dev/rtc-ds1307
- 设置时间并保存
sudo date -s "2019-10-09 17:00:00"
sudo hwclock -w -f /dev/rtc-ds1307
5 S5P4418/S5P6818平台
启动开发板,进入系统后克隆Matrix代码仓库:
$ apt-get update && apt-get install git
$ git clone https://github.com/friendlyarm/matrix.git
克隆完成后会得到一个名为matrix的目录。
编译并安装Matrix:
$ cd matrix
$ make && make install
运行测试程序:
$ matrix-rtc注意:此模块并不支持热插拔,启动系统前需要确保硬件连接正确。
运行效果如下:
RTC Driver Test Example.
Set RTC date/time is 9-15-2015, 01:01:01.
Read RTC date/time is 9-15-2015, 01:01:01.
Test complete
该程序只是简单的读写硬件RTC,如果想设置Debian的系统时间并将其保持在Matrix-RTC模块里,可执行以下命令,假设当前时间为"2016-11-17 17:26:01":
$ modprobe rtc-ds1307
$ date -s "2016-11-17 17:26:01"
$ hwclock -w -f /dev/rtc-ds1307
然后修改/etc/modprobe.d/matrix-blacklist.conf,在"blacklist rtc_ds1307"前加上一个#,表示注释该行,这样下次开机就会自动加载驱动了。
重启系统,可以看到时间仍然是准确的:
$ hwclock -r -f /dev/rtc-ds1307
2016年11月18日 星期五 08时29分48秒  -0.492649 seconds
