RK3399-Android7
Contents
[hide]1 Work with Android7.1
FriendlyElec provides a full Android7.1 BSP for RK3399 board. The source code is hosted at gitlab.com and is open source. The BSP supports GPU and VPU hardware acceleration.
1.1 Connect MIPI Camera to {{{1}}}
FriendlyElec developed a MIPI camera CAM1320 for board and it works under Android. You can use this camera to take pictures and record video. The operation is straightforward. You just need to connect the camera at your board's MIPI interface, boot your board to Android and start Android's camera app.
1.2 Set HDMI Display
If your board is connected to an HDMI monitor and it runs Android you can go to "Settings -> Display -> HDMI" to make your setting.
HDMI Resolution By default it is "Auto". You can set its resolution up to 4K Screen Zoom There will be four arrows you can click on to zoom in/out HDMI Rotation Set it landscape or portrait.
1.3 Rotate Display
Enter Android's Settings -> Display -> HDMI -> HDMI Rotation. It supports both landscape and portrait.
1.4 Android7 hardware access
You can use the FriendlyThings SDK to access and control hardware resources on the motherboard in the Android App, such as Uart, SPI, I2C, GPIO and other interfaces. For details, please refer to the following two documents.:
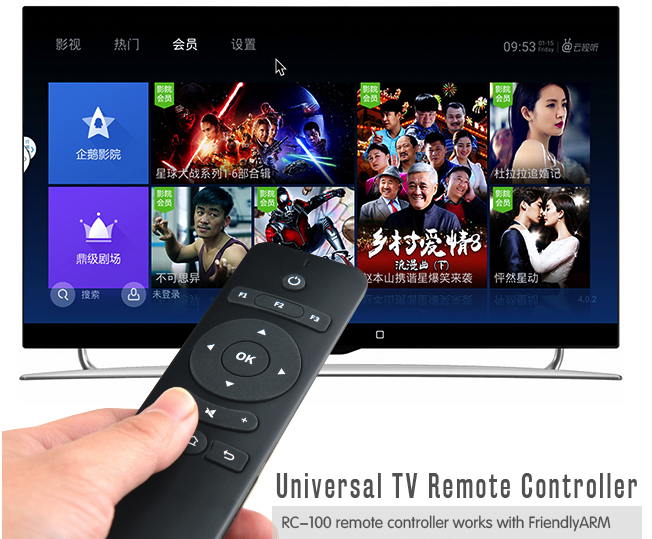
The {{{1}}} supports the FriendlyARM RC-100 remote control under Android. To get a better experience your can connect your T4 to an HDMI monitor and navigate Android.

Here is a table for the remote control's keys and corresponding functions:
Key Function Up Navigate - Up Down Navigate - Down Left Navigate - Left Right Navigate - Right OK Confirm - Volume - + Volume + Mute Mute Menu Android Menu Home Android Home Return Android Return F1 Pull-Down Android Message Bar F2 Android Screenshot F3 Switch between mouse and key
1.6 Work with USB Camera to Take Pictures and Record Video
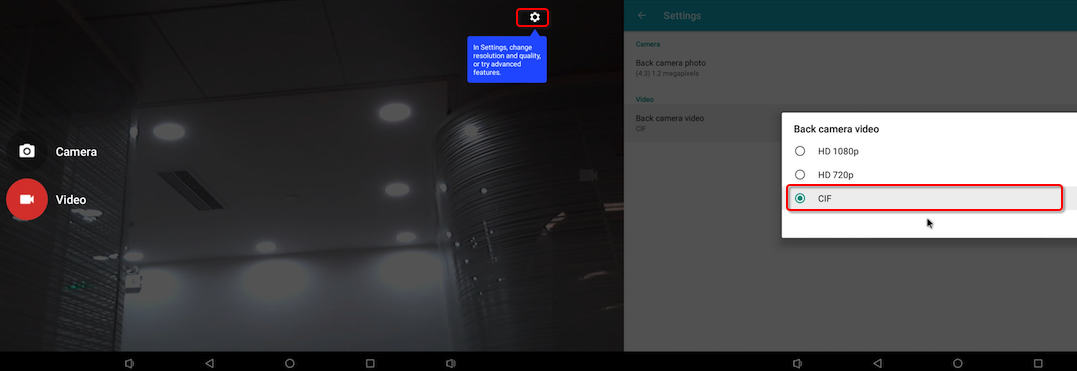
FriendlyELEC's Android system supports picture taking and video recording with a USB camera, Android's camera app has these functions. When you use the app to take pictures or record video you need to be aware of the following two things:
1) Make sure your camera's resolution works. We suggest you try a camera with a lower CIF resolution first. If it works you may switch to a camera with a higher resolution:
 ;
;
2)A USB camera cannot work simultaneously with a MIPI camera. Plug and play is not supporter for camera modules. After you connect a camera to a board you need to reboot your board to enable the camera.
Here are the camera modules we tested: Logitech C270 and LogitechC922 PRO
In our test the resolution was 1080P when we used a Logitech C922 PRO to take pictures or record video.
1.7 Using 4G Module EC20 on Android
1.7.1 Hardware Setup
Connect an EC20 module to a USB to miniPCIe board and connect the board to an ARM board's USB Host. Here is a hardware setup:
Power on the board and you will be able to surf the internet with the 4G module like using an Android phone.
1.7.2 Activate EC20's GPS Functions
By default GPS functions are disabled in Android. If GPS functions are enabled in Android but no GPS module is detected Android will continuously output log messages. After an EC20 module is connected you can enable GPS functions.
To enable the GPS functions open the "vendor/quectel/ec20/BoardConfigPartial.mk" file and change the following line:
BOARD_HAS_GPS := falseto
BOARD_HAS_GPS := trueand recompile Android。
