Difference between revisions of "Matrix - Buzzer"
(→硬件连接) |
|||
| Line 47: | Line 47: | ||
==Connect to NanoPi 2== | ==Connect to NanoPi 2== | ||
| − | === | + | ===Hardware Connection=== |
| − | + | Please refer to the following connection diagram to connect the Matrix-Buzzer to the NanoPi 2:<br> | |
[[File:Matrix-Buzzer_nanopi_2.jpg|frameless|600px|Matrix-Buzzer_nanopi_2]] | [[File:Matrix-Buzzer_nanopi_2.jpg|frameless|600px|Matrix-Buzzer_nanopi_2]] | ||
| − | + | Connection Details: | |
{| class="wikitable" | {| class="wikitable" | ||
|- | |- | ||
Revision as of 08:32, 23 February 2016
Contents
1 Introduction
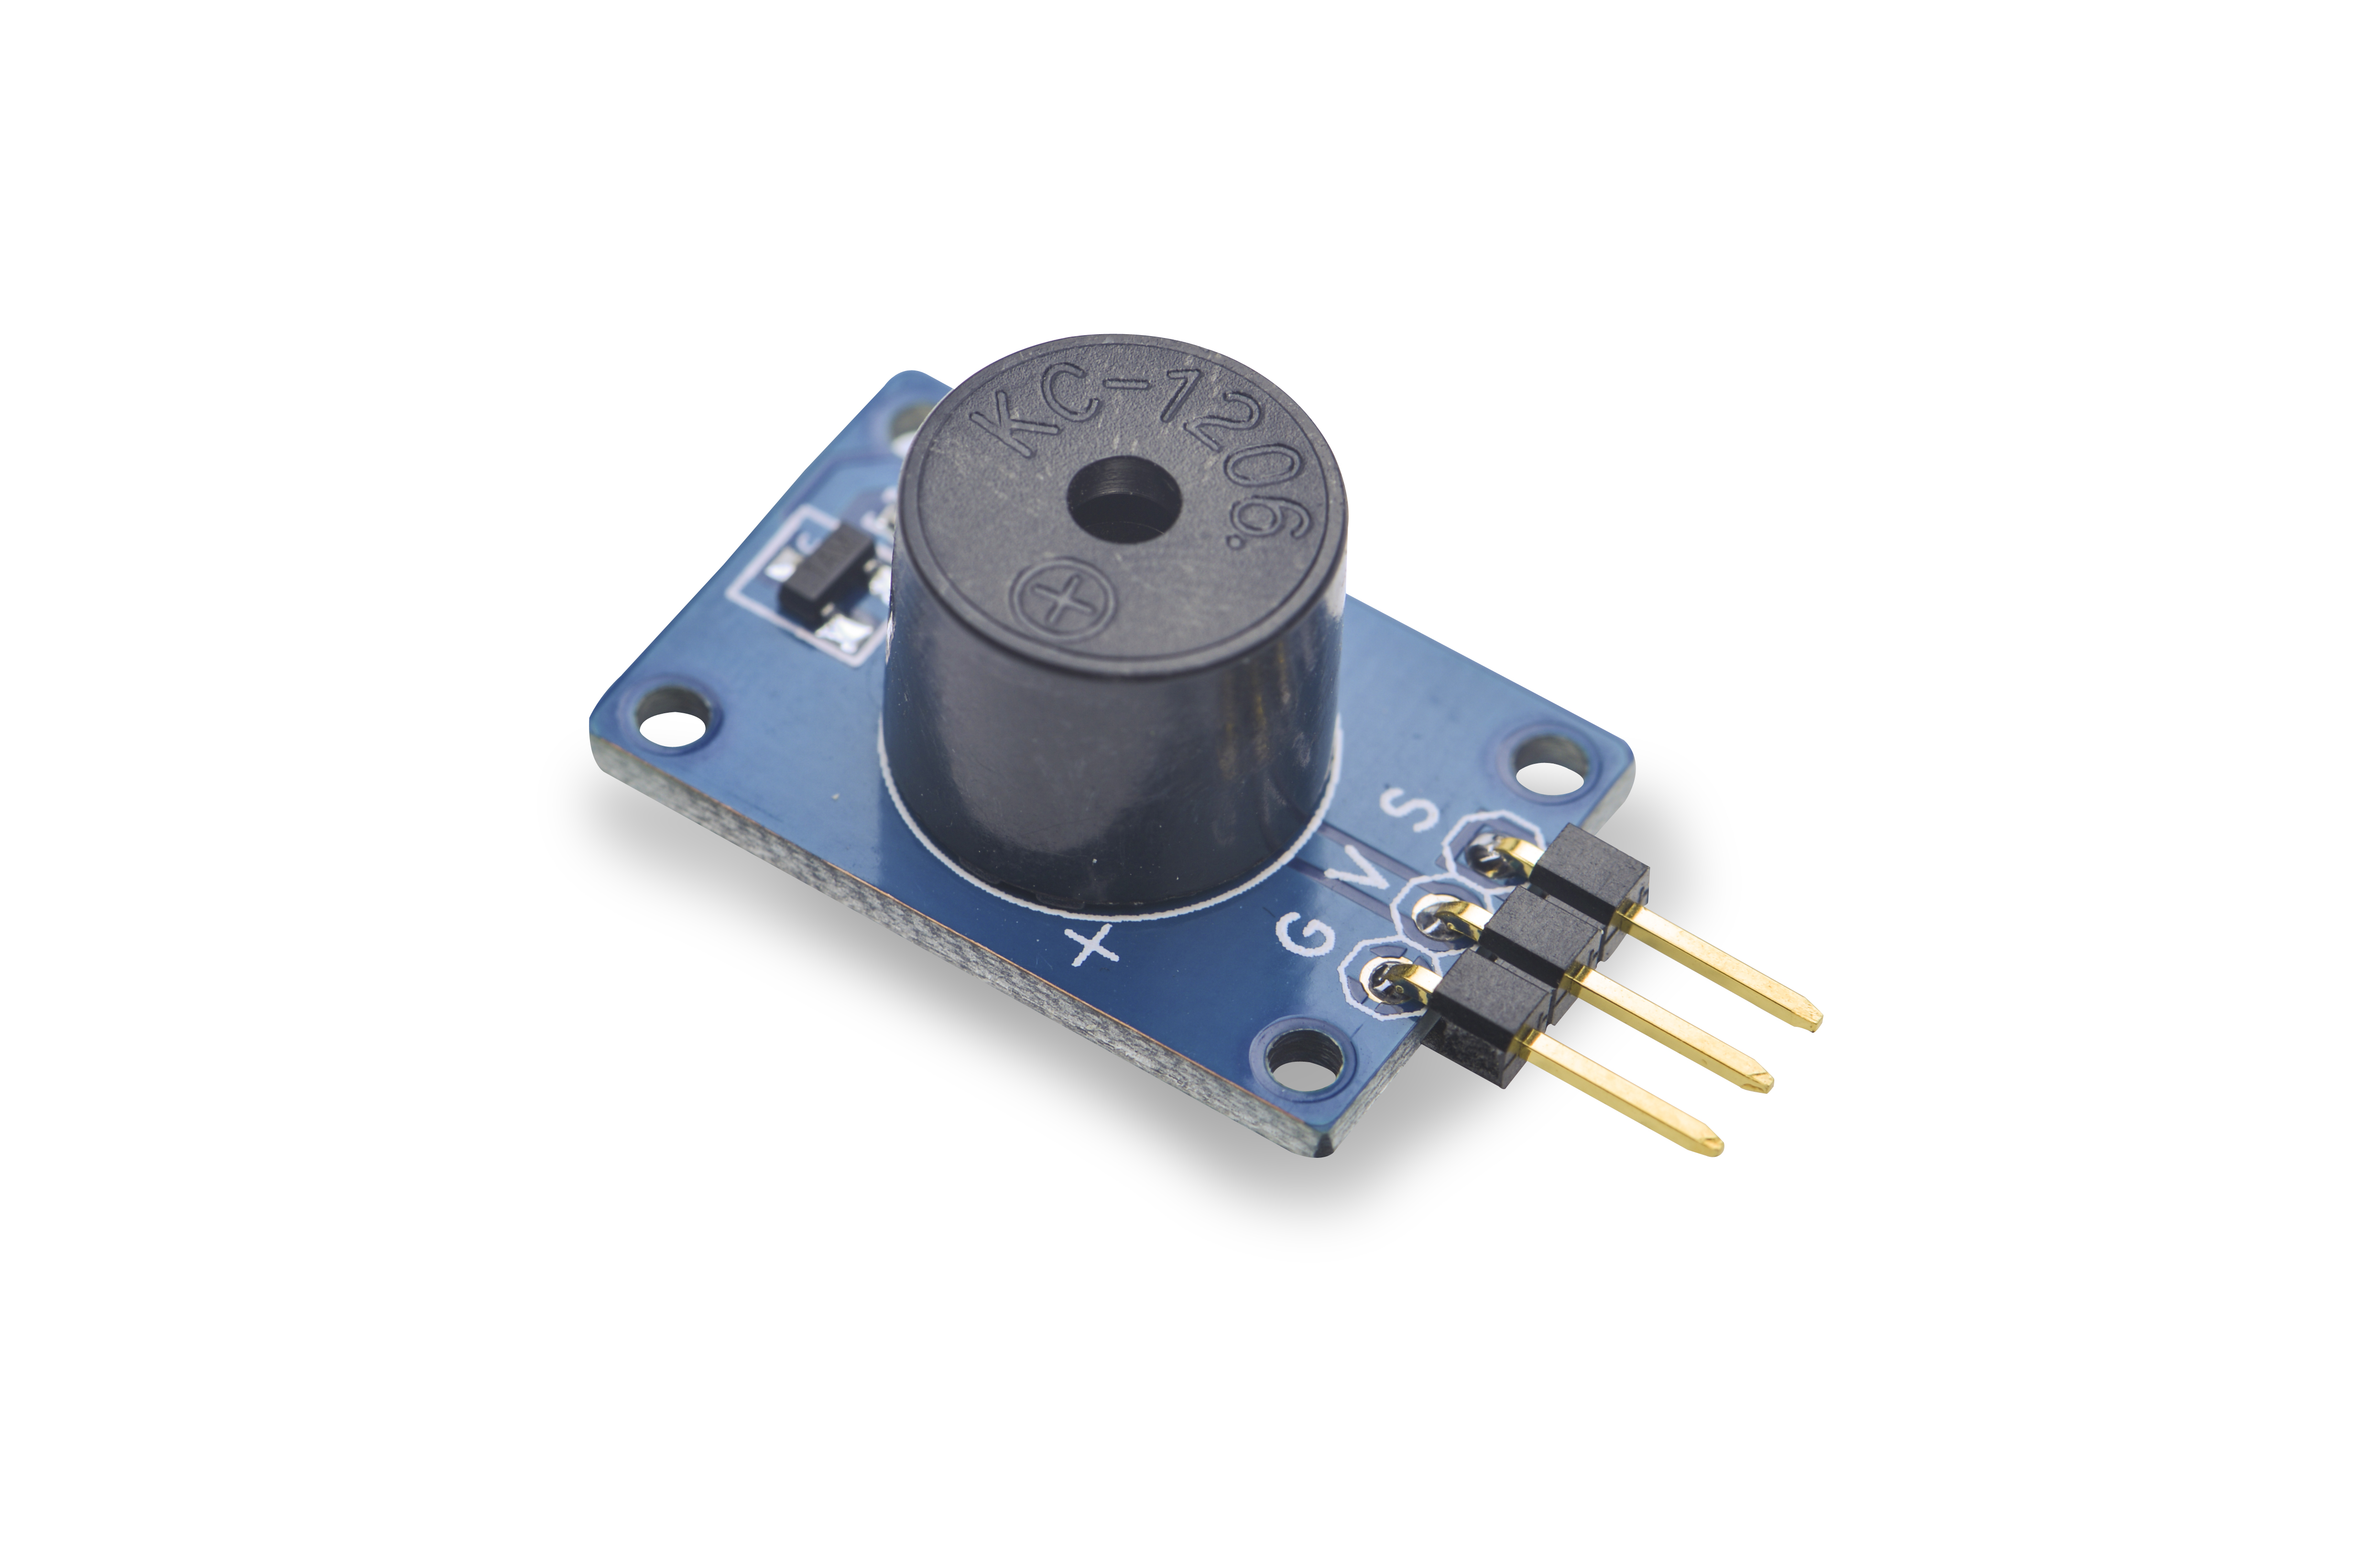
- The Matrix-Buzzer is a passive buzzer. To drive this buzzer an oscillating source generating 2K - 5K square waves is needed.
- It can be used in electronic devices that need sound generators.
2 Features
- 3 PIN interface
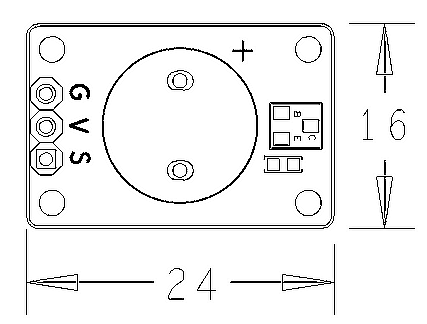
- PCB dimension (mm): 16 x 24
- Pin Description:
| Pin | Description |
| V | Supply Voltage 5V |
| G | Ground |
| S | PWM Input |
3 Basic Device Operation
A passive buzzer will not tweet if DC signals are used; instead, you need to use square waves whose frequency is between 2K and 5K to drive it. If you use GPIO signals to drive it you need to pull the GPIO high first and then low to generate oscillation. The oscillation frequency is generated by the time in which GPIO signals turn from high to low. The buzzer will generate different sounds based on different frequencies.
4 Download Matrix Source Code
All the matrix modules' code samples are open source. They are maintained on GitHub - https://github.com/friendlyarm/matrix.git
Each branch in this hub contains the matrix modules' code samples for a board that the matrix modules can work with.
- The nanopi branch contains the matrix modules' code samples for the NanoPi
- The nanopi 2 branch contains the matrix modules' code samples for the NanoPi 2
- The tiny4412 branch contains the matrix modules' code samples for the Tiny4412
- The raspberrypi branch contains the matrix modules' code samples for the RaspberryPi
Please follow the steps below to get the source code:
Install the git utility on a PC running Ubuntu14.04
$ sudo apt-get install git
Clone the matrix code from GitHub
$ git clone https://github.com/friendlyarm/matrix.git
If this is successful a "matrix" directory will be generated, which will contain all the matrix modules' code samples.
5 Connect to NanoPi 2
5.1 Hardware Connection
Please refer to the following connection diagram to connect the Matrix-Buzzer to the NanoPi 2:
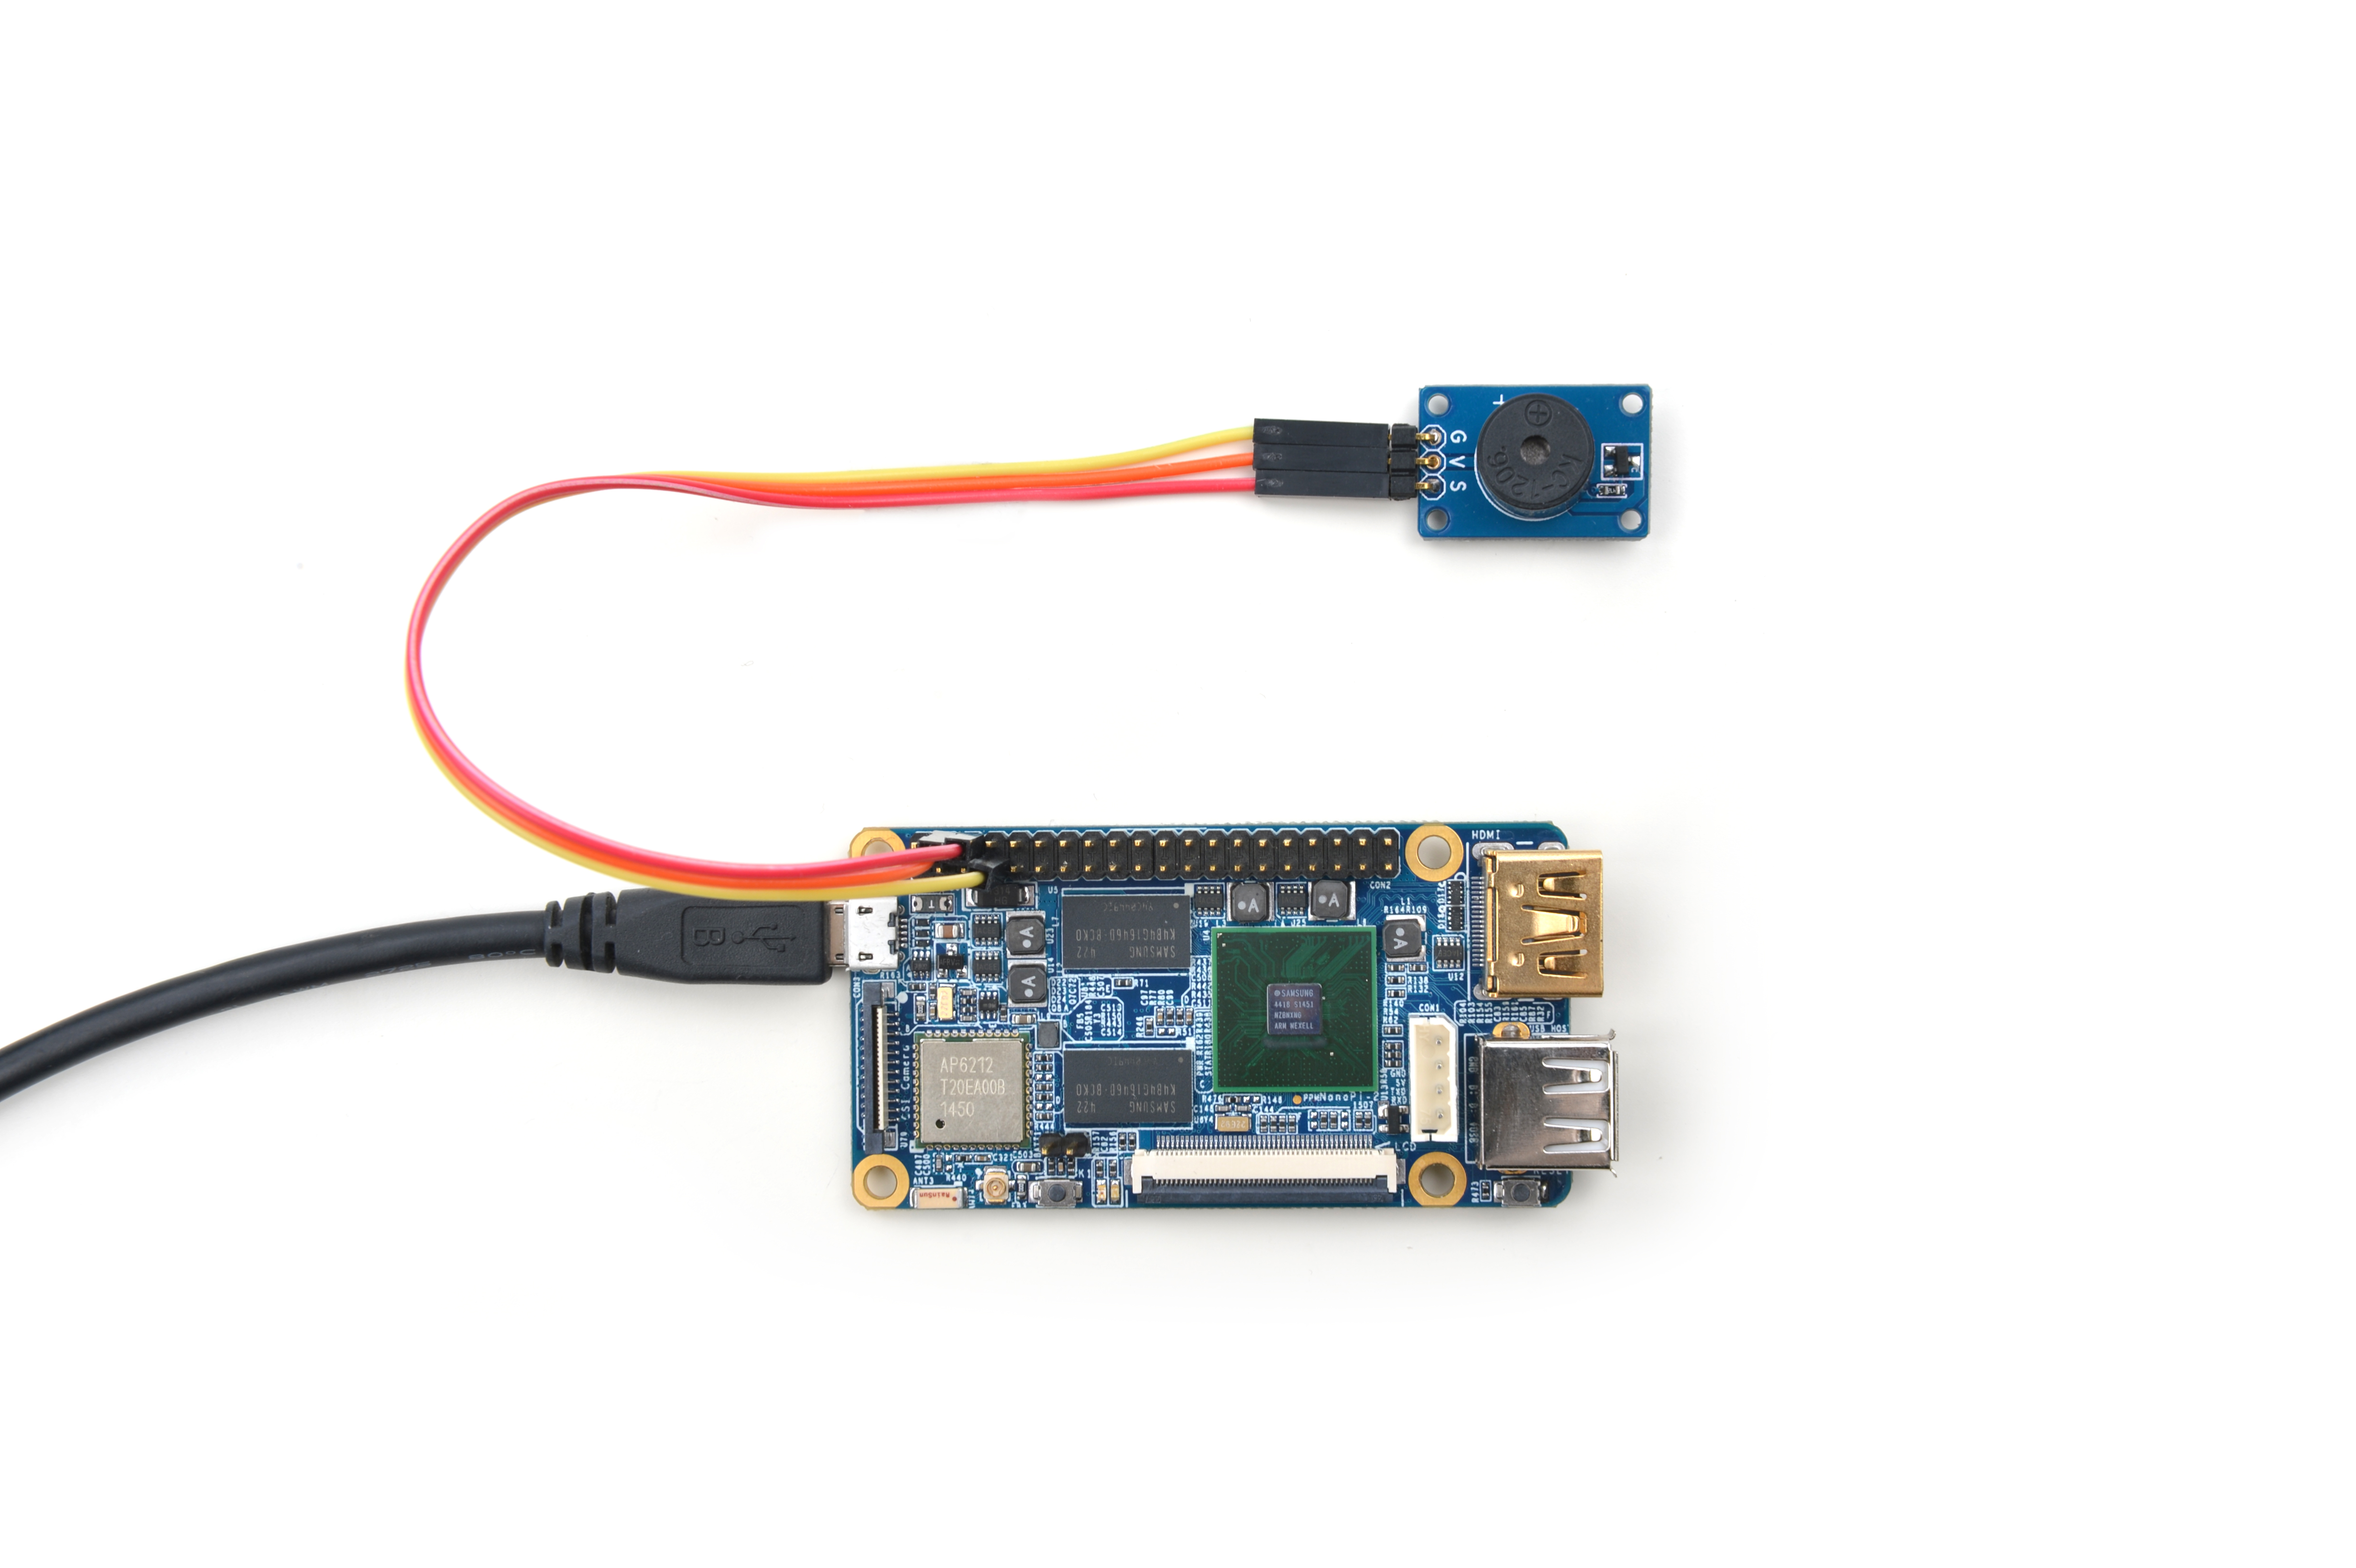
Connection Details:
| Matrix-Buzzer | NanoPi 2 |
| G | Pin6 |
| V | Pin4 |
| S | Pin22 |
5.2 编译测试程序
进入Matrix代码仓库,切换到nanopi2分支
$ cd matrix
$ git checkout nanopi2
编译Matrix配件代码
$ make CROSS_COMPILE=arm-linux- clean
$ make CROSS_COMPILE=arm-linux-
$ make CROSS_COMPILE=arm-linux- install
注意:请确保你的主机PC当前使用的交叉编译器为NanoPi 2配套的arm-linux-gcc.4.8.5。
编译成功后库文件位于install/lib目录下,而测试程序则位于install/usr/bin目录下,模块Matrix-Buzzer对应的测试程序为matrix-buzzer。
硬件驱动模块位于modules目录下,对应的驱动源码都包含在在NanoPi 2的Linux内核仓库里:https://github.com/friendlyarm/linux-3.4.y.git
5.3 运行测试程序
将带有Debian系统的SD卡插入一台运行Linux的电脑,可以挂载SD卡上的boot和rootfs分区。
假设rootfs分区的挂载路径为/media/rootfs,执行以下命令将Matrix的硬件驱动、库文件和测试程序拷贝到NanoPi 2的文件系统上。
$ cp modules /media/rootfs/ -r
$ cp install/lib/* /media/rootfs/lib/ -d
$ cp install/usr/bin/* /media/rootfs/usr/bin/
将SD卡重新插入NanoPi 2,上电启动,在Debian的shell终端中执行以下命令加载硬件驱动。
$ cd /modules
$ insmod matrix_pwm.ko
运行模块Matrix-Buzzer的测试程序。
$ matrix-buzzer运行效果如下:

可以听到蜂鸣器在响,默认输出的PWM频率为1KHz,占用比为50%。
5.4 Code Sample
int main(int argc, char ** argv)
{
    int pin = PWM0;
    int Hz;
    int duty;

    if (argc == 4) {
        if (parseCmd(argc, argv, &pin, &Hz, &duty) == -1) {
            return -1;
        }
    } else {
        Hz = 1000;
        duty = 500;
        printf("Usage:%s PWM[0~2] freq duty[0~1000]\n", argv[0]);
        printf("Using default config: pin=PWM0 freq=%dHz duty=%d\n", Hz, duty);
    }

    if (PWMPlay(pin, Hz, duty) == -1) {
        printf("Fail to output PWM\n");
    }
    printf("Press enter to stop PWM\n");
    getchar();
    PWMStop(pin);
    printf("Stopped PWM\n");
    return 0;
}
6 Connect to NanoPi
6.1 Preparations
Please install a Debian on a NanoPi and an appropriate cross compiler on a PC. Please refer to wiki: NanoPi
Compile a NanoPi kernel. Note: please use the kernel's source code from the nanopi-v4.1.y-matrix branch.
$ git clone https://github.com/friendlyarm/linux-4.x.y.git
$ cd linux-4.x.y
$ git checkout nanopi-v4.1.y-matrix
$ make nanopi_defconfig
$ touch .scmversion
$ make
6.2 Hardware Connection
Please refer to the following connection diagram to connect the Matrix-Buzzer to the NanoPi
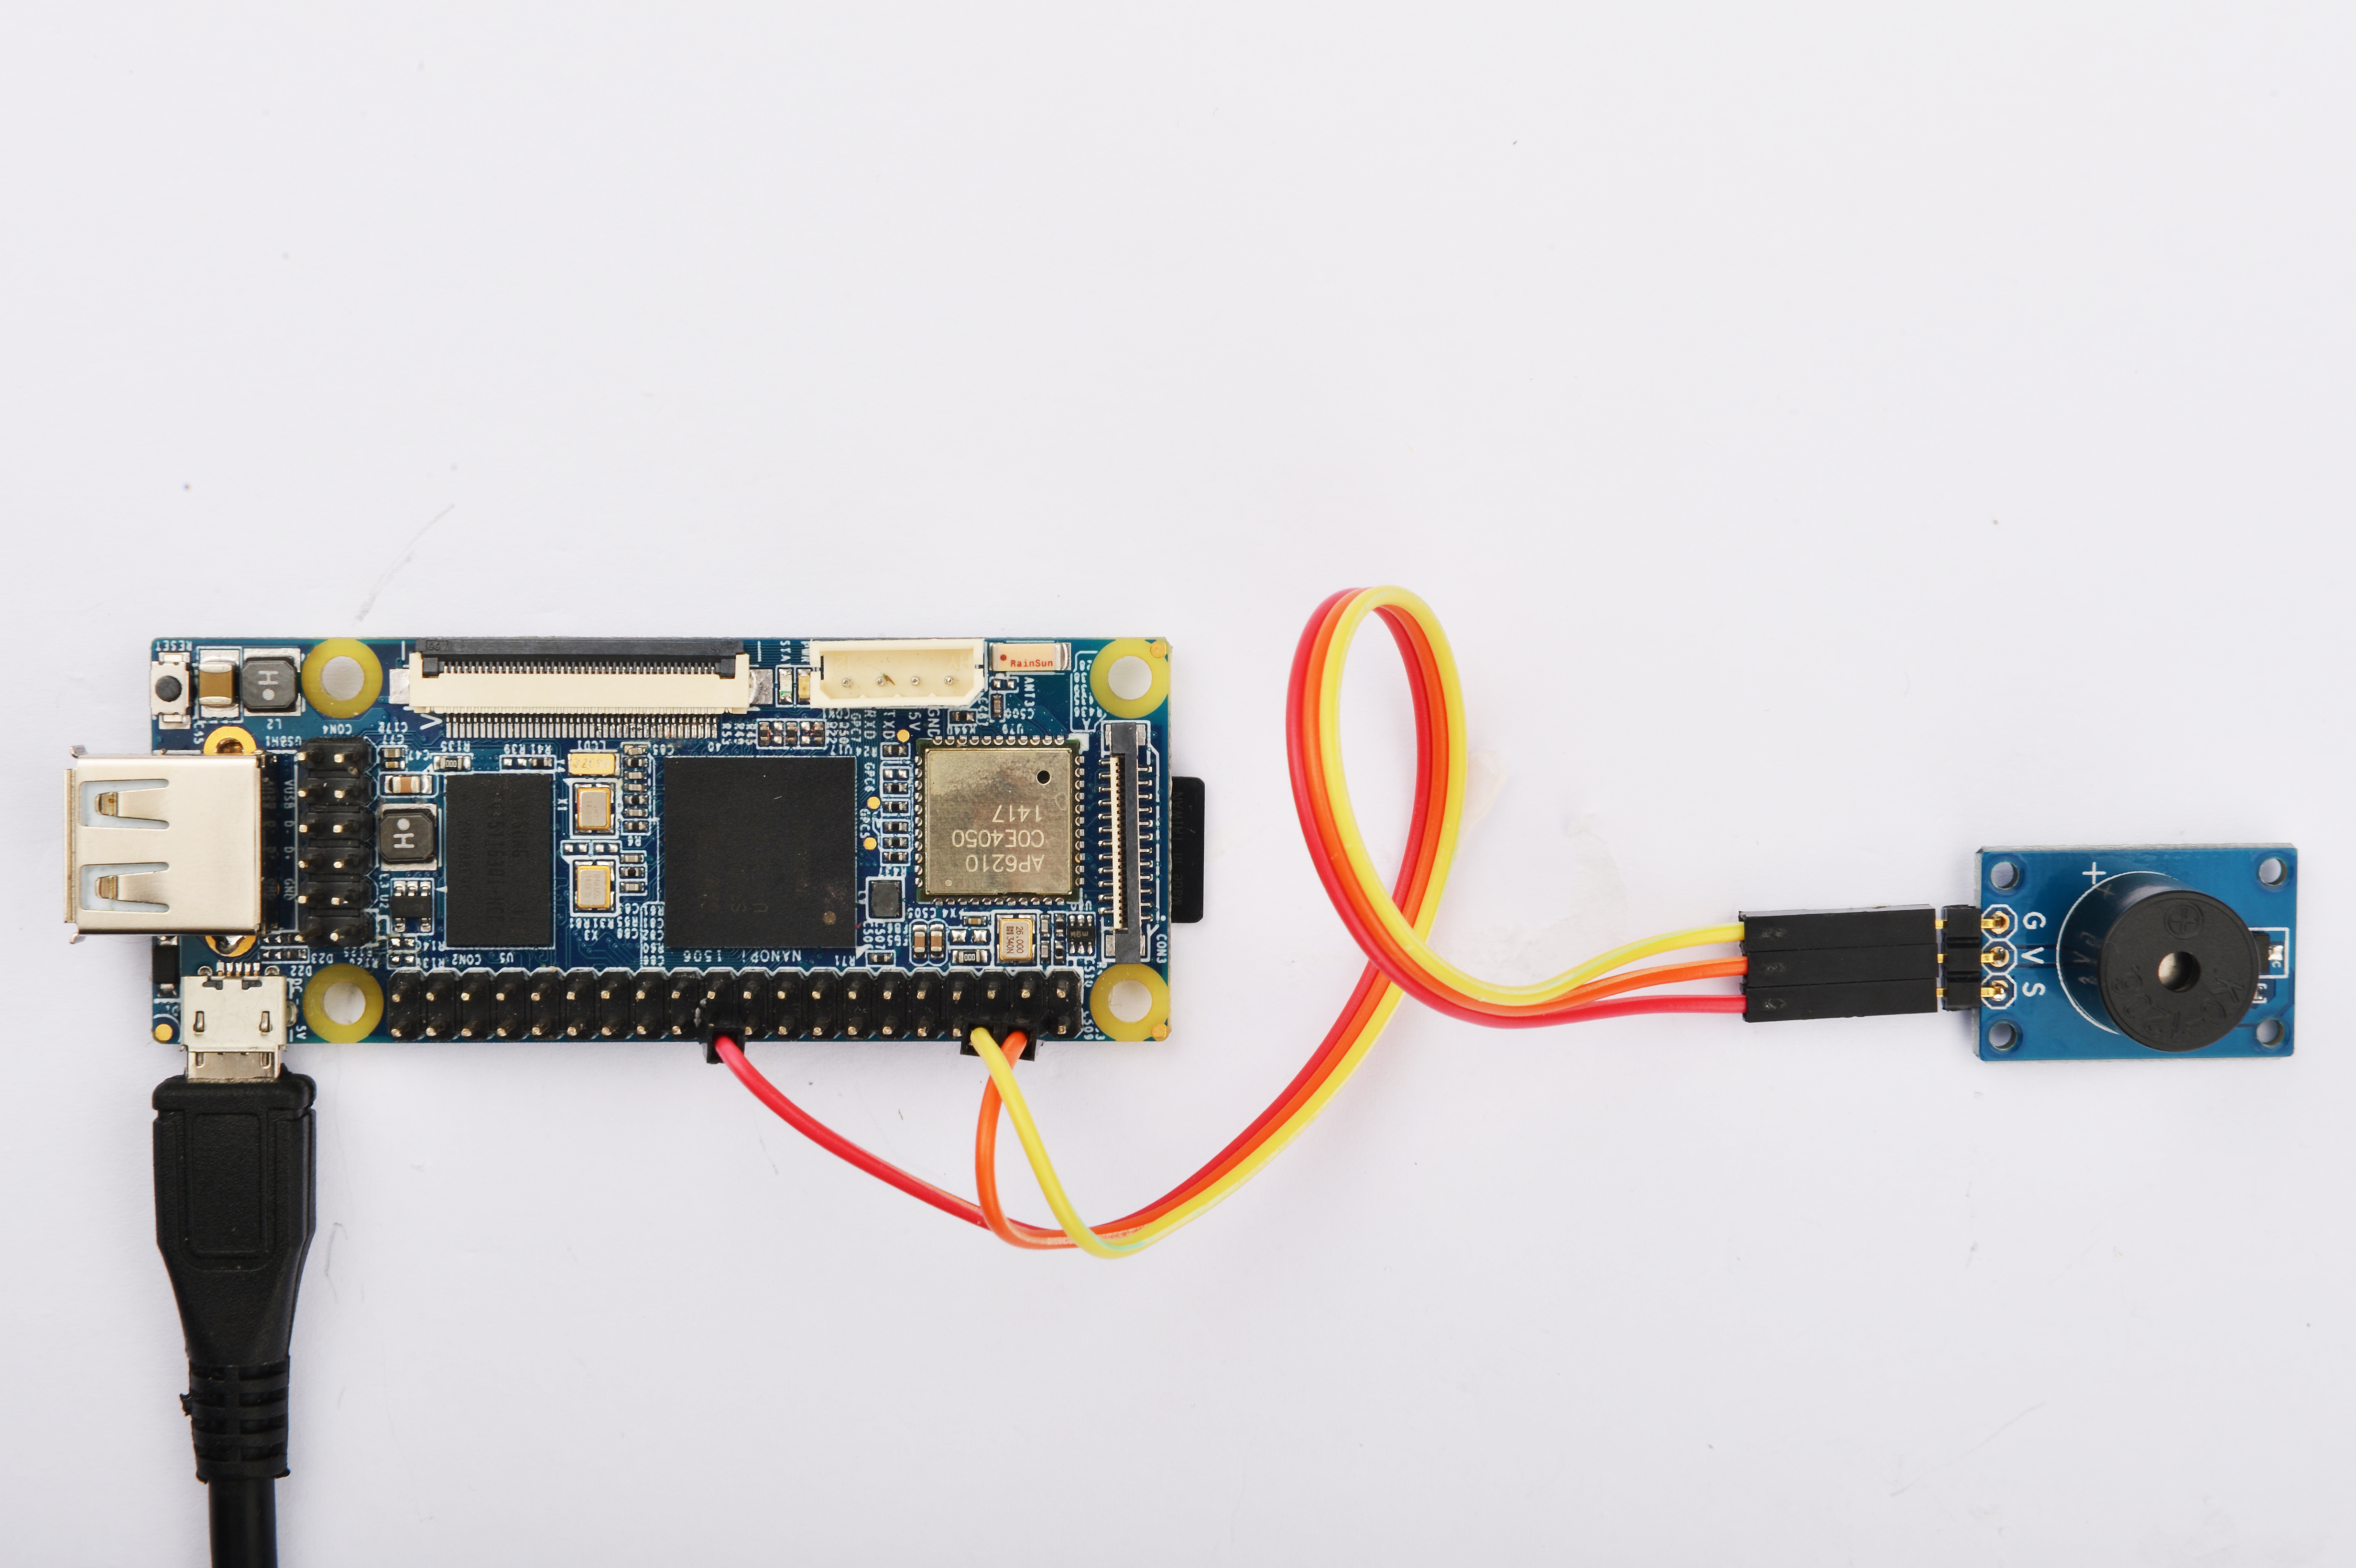
Connection Details:
| Matrix-Buzzer | NanoPi |
| G | Pin6 |
| V | Pin4 |
| S | Pin22 |
6.3 Compile Test Program
Please login the matrix hub and enter the nanopi branch
$ cd matrix
$ git checkout nanopi
Compile the matrix code
$ make CROSS_COMPILE=arm-linux- clean
$ make CROSS_COMPILE=arm-linux-
$ make CROSS_COMPILE=arm-linux- install
Note: please make sure to install the cross compiler "arm-linux-gcc-4.4.3" on your PC, which is used to compile files for the NanoPi-Debian.
Generated library files are under the "install/lib" directory. Applications are under the "install/usr/bin" directory. The test program for the "Matrix-Buzzer" module is "matrix-buzzer".
6.4 Run Test Program
Please copy the library files and test program to the NanoPi
$ cp install/usr/bin/* nanopi_rootfs/usr/bin/
$ cp install/lib/* nanopi_rootfs/lib/ -d
Power on the NanoPi and run the following command in Debian's terminal
$ matrix-buzzer6.5 Code Sample
int main(int argc, char ** argv)
{
    int pin = PWM_PIN1;
    int Hz;
    int duty;

    if (argc == 4) {
        if (parseCmd(argc, argv, &pin, &Hz, &duty) == -1) {
            return -1;
        }
    } else {
        Hz = 1000;
        duty = 500;
        printf("Usage:%s PWM[0~1] freq duty[0~1000]\n", argv[0]);
        printf("Using default config: pin=PWM0 freq=%dHz duty=%d\n", Hz, duty);
    }

    if (PWMPlay(pin, Hz, duty) == -1) {
        printf("Fail to output PWM\n");
    }
    printf("Press enter to stop PWM\n");
    getchar();
    PWMStop(pin);
    printf("Stopped PWM\n");
    return 0;
}
7 Connect to Tiny4412
7.1 Preparations
Please refer to the Tiny4412's user's manual to install a UbuntuCore on the Tiny4412 and install an appropriate cross compiler on a PC.
Note: only the Tiny4412SDK-1506 carrier board can work with this module.
7.2 Hardware Connection
Please refer to the following diagram to connect the Matrix-Buzzer to the Tiny4412
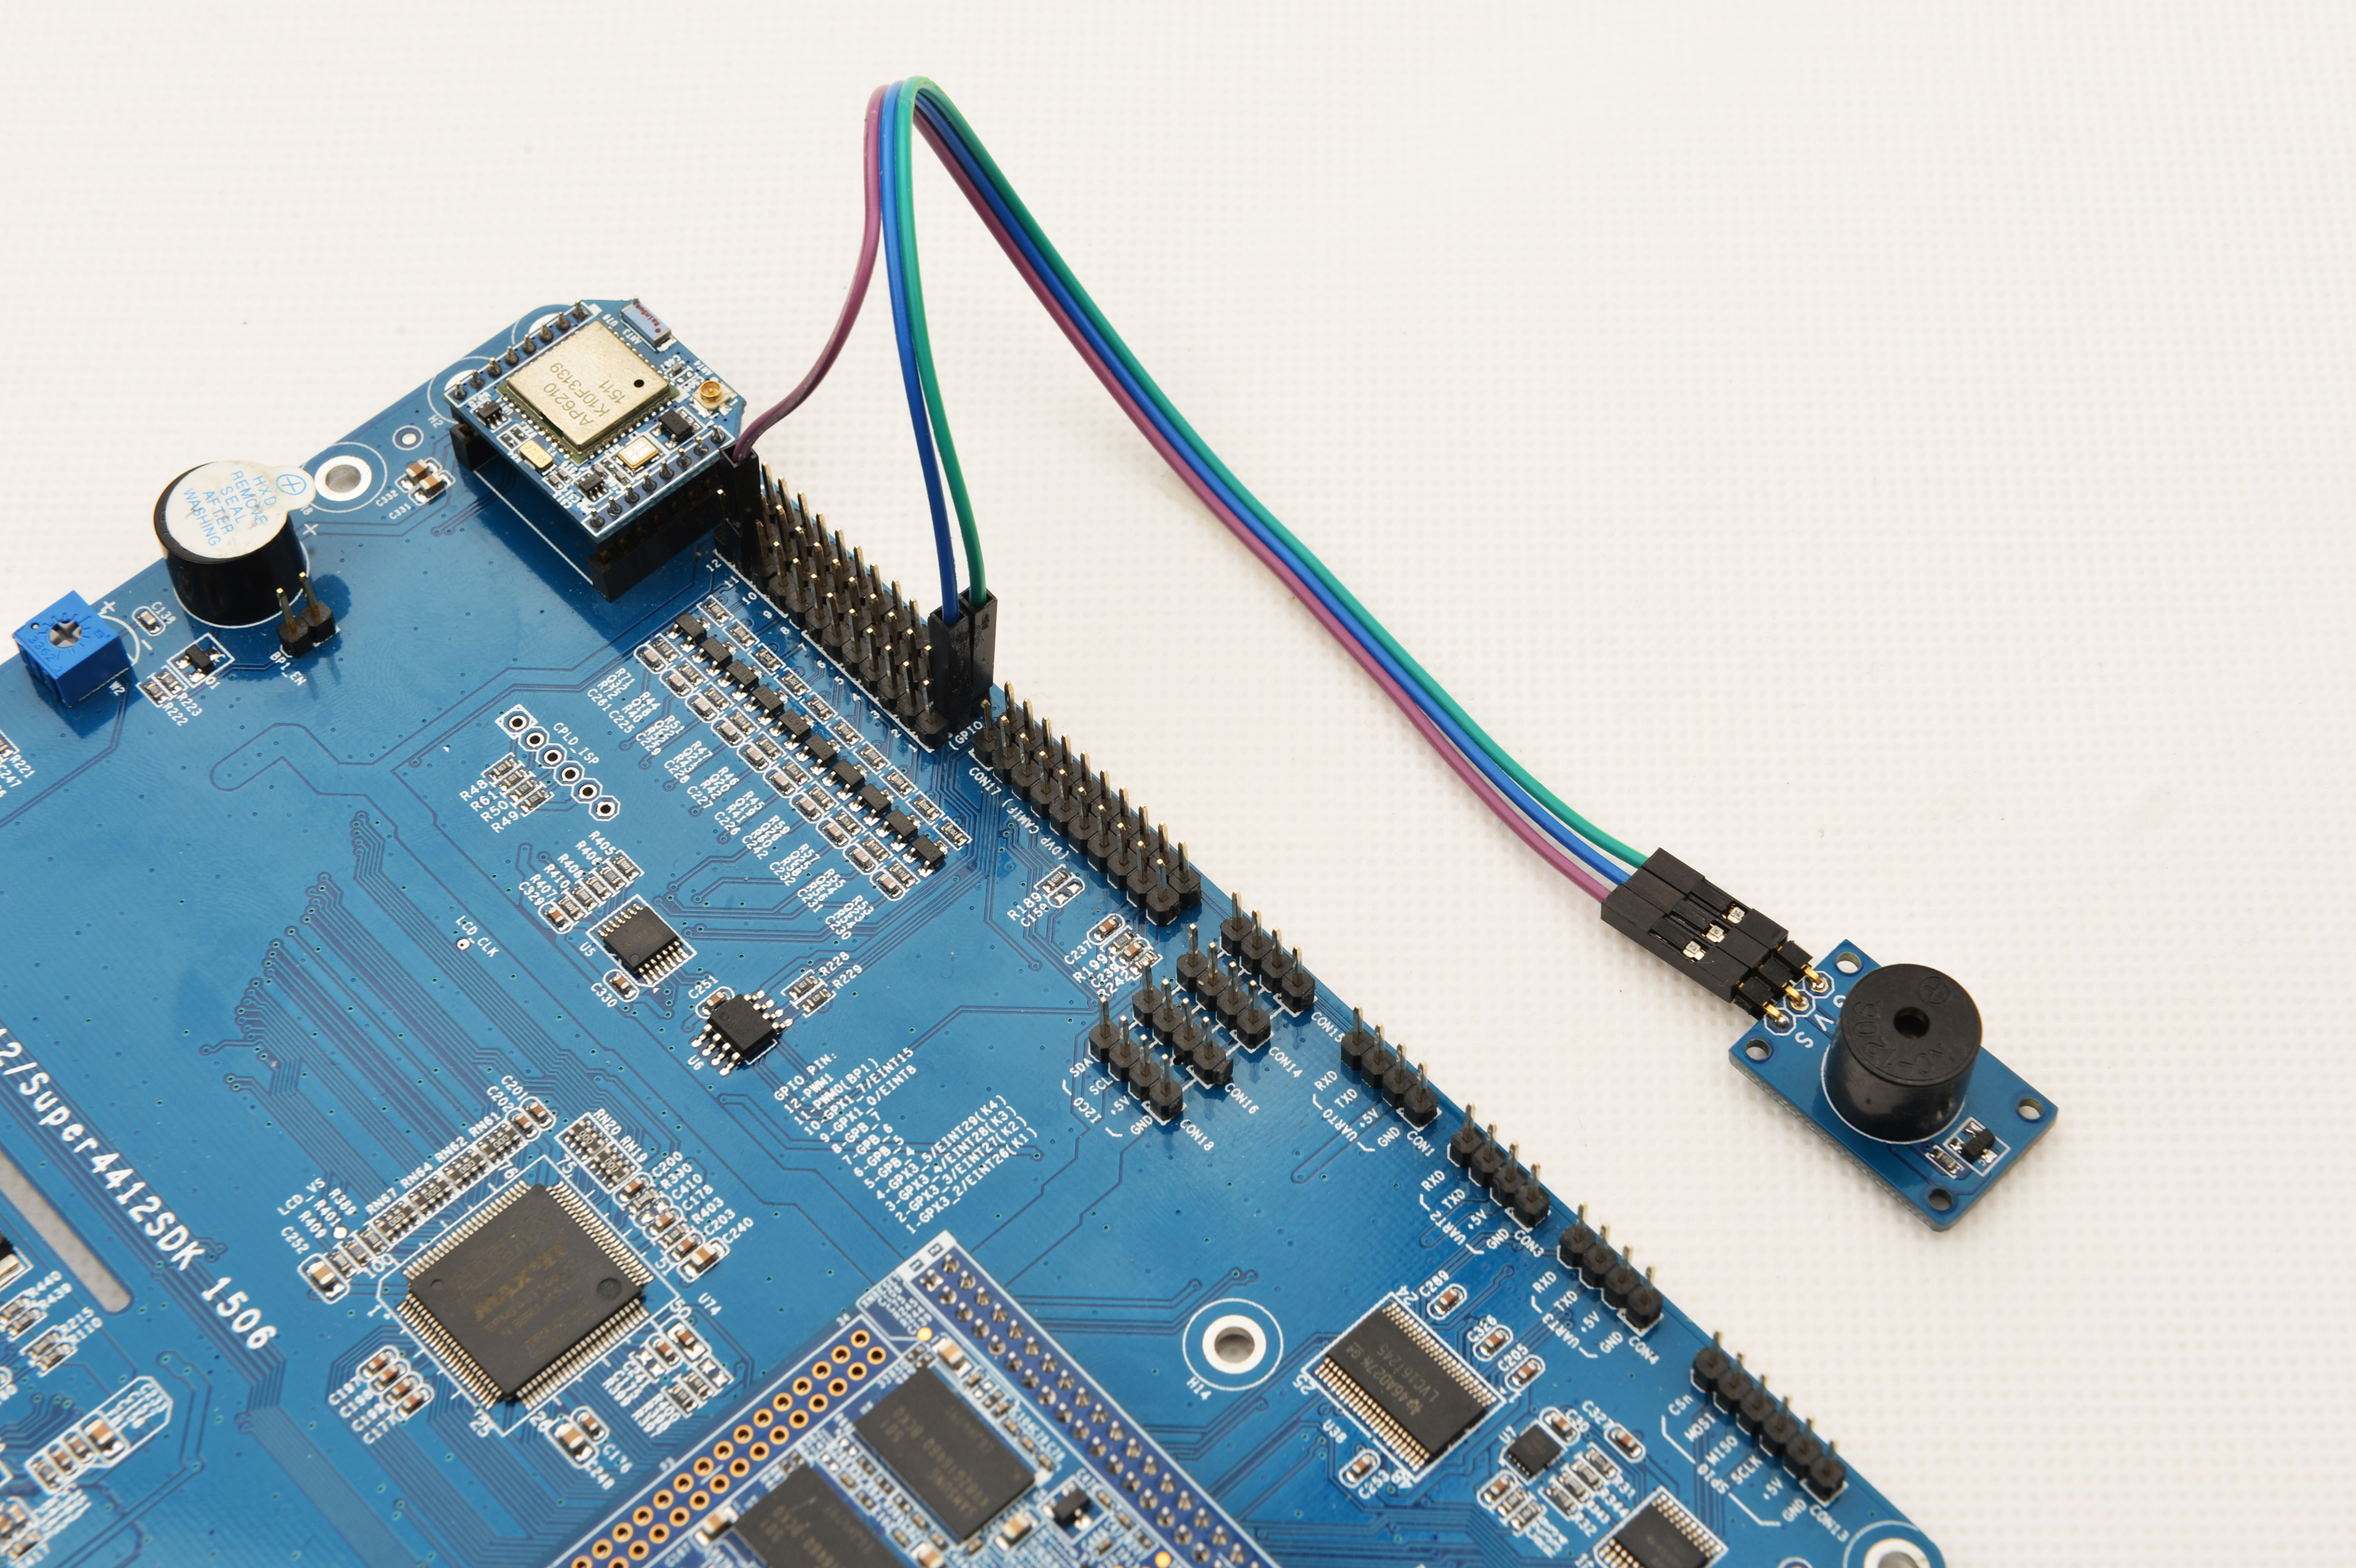
Connection Details:
| Matrix-Buzzer | Tiny4412 |
| G | GPIO1 GND |
| V | GPIO1 5V |
| S | GPIO11 S |
7.3 Compile Test Program
Please login the Matrix hub and enter the matrix-tiny4412 branch
$ cd matrix
$ git checkout tiny4412
Compile the matrix code
$ make CROSS_COMPILE=arm-linux-gnueabihf- clean
$ make CROSS_COMPILE=arm-linux-gnueabihf-
$ make CROSS_COMPILE=arm-linux-gnueabihf- install
Note: please make sure to install the cross compiler "arm-linux-gnueabihf-gcc-4.7.3" on your PC, which is used to compile files for the Tiny4412-UbuntuCore.
Generated library files are under the "install/lib" directory. Applications are under the "install/usr/bin" directory. The test program for the "Matrix-Buzzer" module is "matrix-buzzer".
7.4 Run Test Program
Please copy the library files and test program to the Tiny4412
$ cp install/usr/bin/* tiny4412_rootfs/usr/bin/
$ cp install/lib/* tiny4412_rootfs/lib/ -d
Power on the Tiny4412 and run the following command in UbuntuCore's terminal
$ matrix-buzzer7.5 Code Sample
int main(int argc, char ** argv)
{
    int pin = PWM_PIN1;
    int Hz;
    int duty;

    if (argc == 4) {
        if (parseCmd(argc, argv, &pin, &Hz, &duty) == -1) {
            return -1;
        }
    } else {
        Hz = 1000;
        duty = 500;
        printf("Usage:%s PWM[0~1] freq duty[0~1000]\n", argv[0]);
        printf("Using default config: pin=PWM0 freq=%dHz duty=%d\n", Hz, duty);
    }

    if (PWMPlay(pin, Hz, duty) == -1) {
        printf("Fail to output PWM\n");
    }
    printf("Press enter to stop PWM\n");
    getchar();
    PWMStop(pin);
    printf("Stopped PWM\n");
    return 0;
}
8 Connect to RaspberryPi
9 Connect to Arduino
10 Resources
11 Update Log
11.1 Feb-23-2016
- Added the description for "NanoPi 2 branch" in Section 4
- Added Section 5: Connect to NanoPi 2
