Difference between revisions of "Template:BurnLinuxToSD-Allwinner/zh"
From FriendlyELEC WiKi
(→烧写Linux系统) |
(→Install Linux) |
||
| Line 6: | Line 6: | ||
{{#switch: {{{2}}} | {{#switch: {{{2}}} | ||
| h3 = | | h3 = | ||
| − | + | Take {{#replace:{{lc:{{{1}}}}}|category:|}}_sd_friendlycore-xenial_4.14_armhf_YYYYMMDD.img as an example here is the installation window. Other image files are installed on the similar window:<br> | |
[[File:win32disk-h3.jpg|frameless|600px|win32disk-h3]]<br> | [[File:win32disk-h3.jpg|frameless|600px|win32disk-h3]]<br> | ||
| h5 = | | h5 = | ||
| − | + | Take {{#replace:{{lc:{{{1}}}}}|category:|}}_sd_friendlycore-xenial_4.14_arm64_YYYYMMDD.img as an example here is the installation window. Other image files are installed on the similar window:<br> | |
[[File:win32disk-h5.jpg|frameless|600px|win32disk-h5]]<br> | [[File:win32disk-h5.jpg|frameless|600px|win32disk-h5]]<br> | ||
}} | }} | ||
| − | + | After it is installed you will see the following window:<br> | |
[[File:win32disk-finish.jpg|frameless|600px|win32disk-finish]]<br> | [[File:win32disk-finish.jpg|frameless|600px|win32disk-finish]]<br> | ||
| − | * | + | * Insert this card into your board's BOOT slot and power on (with a 5V/2A power source). If the PWR LED is on and the STAT LED is blinking this indicates your board has successfully booted. |
Revision as of 03:42, 7 February 2020
1 Install Linux
1.1 Flash to TF Card
- FriendlyCore / FriendlyWrt are both based on Linux distributions and their installation methods are the same.
- Extract the Linux image and win32diskimager.rar files. Insert a TF card(at least 8G) into a Windows PC and run the win32diskimager utility as administrator. On the utility's main window select your TF card's drive, the wanted image file and click on "write" to start flashing the TF card.
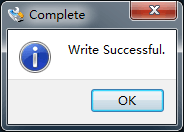
After it is installed you will see the following window:

- Insert this card into your board's BOOT slot and power on (with a 5V/2A power source). If the PWR LED is on and the STAT LED is blinking this indicates your board has successfully booted.