Difference between revisions of "NanoPC-T1"
(→Ubuntu系统说明) |
(→Ubuntu Variants) |
||
| Line 123: | Line 123: | ||
::{| class="wikitable" | ::{| class="wikitable" | ||
|- | |- | ||
| − | |Ubuntu | + | |Ubuntu Core Features || |
| − | * | + | *Version: Xubuntu Core 14.04 |
| − | * | + | *Kernel: Linux 3.8 |
|- | |- | ||
| − | | | + | |Main Features || |
| − | * | + | *LCD output |
| − | * | + | *Supports USB keyboards and mouses |
| − | * | + | *Ethernet |
| − | * | + | *USB WiFi dongle(e.g. AP6210 WiFi module) |
| − | * | + | *Preinstalled Python3 |
| − | * | + | *Standard Ubuntu Libraries, users can install them with apt-get |
|} | |} | ||
Revision as of 07:40, 14 March 2016
Contents
1 Introduction
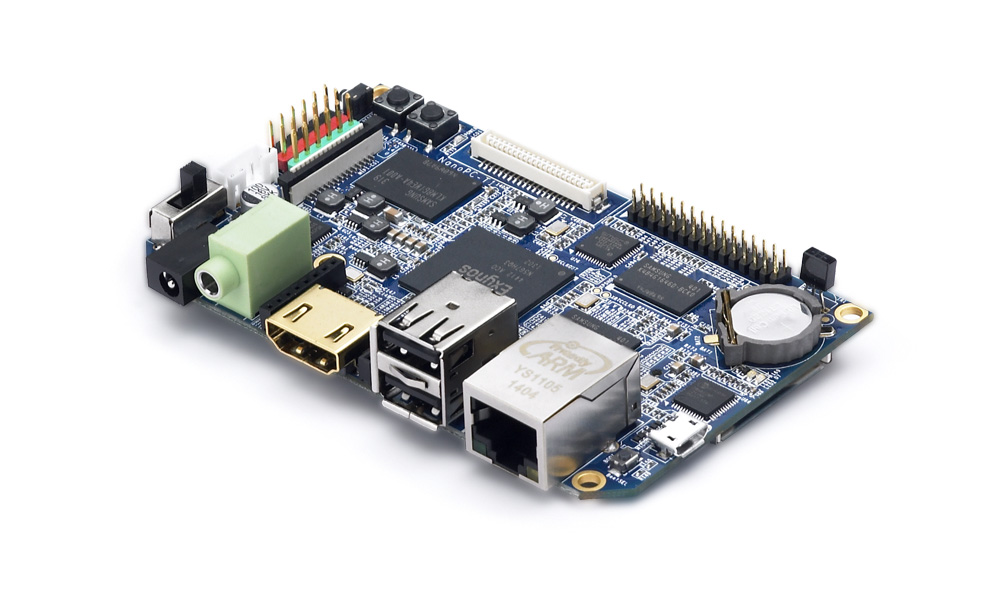
The NanoPC-T1 quad core Cortex A9 single board computer is designed and developed by FriendlyARM for professional and enterprise users. It uses Samsung Quad Core Cortex-A9 Exynos 4412 SoC with dynamic frequency scaling up to 1.5GHz. The NanoPC-T1 has 1GB DDR3 RAM and 8G eMMC onboard. It supports HDMI 1080P(1920 x 1080), IR receiver, 100/10M adaptive Ethernet, USB WiFi,USB 3G, 1080P hard coded video play and excellent 2D/3D acceleration.
2 Features
Hardware Resources
PCB Features - PCB Dimension: 100 x 80 mm
- 沉金工艺
基本配置 - CPU运行主频: 1.5GHz
- CPU:Samsung Exynos4412
- GPU: Mali-400MP(4+1)多核GPU
- 1GB DDR3内存
- 8GB eMMC高速闪存
- HDMI 1080P(1920x1080)
- 支持HDMI转VGA
- 支持MPEG-4/H.263/H.264/VC1/Xvid 等视频编码格式最大至1080P@30帧每秒
- LCD接口:支持RGB888模式,支持电阻/电容触摸,支持 LVDS 转接
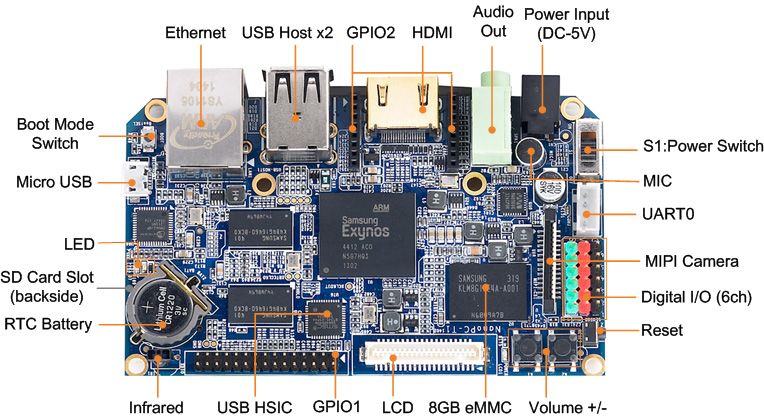
标准接口 - HDMI: 标准HDMI1.4a
- 音频输出: 3.5mm音频座
- USB 2.0 Host: USB A型口2 个,扩展排针1路
- MicroUSB 2.0接口
- SD卡座
- 以太网: RJ45接口,支持100/10M 自适应
- 电源接口1:规格4.0/1.7mm
- 电源接口2:1个2.54mm间距插座,可直接连接使用个人电脑主板电源线
- USB Host 2.0x2
扩展接口 - GPIO1: 30pin 2.0mm间距双排针,含UARTx1,SPIx1,I2Cx1, GPIOx20,5V, 3.3V 等信号
- GPIO2: 16pin, 2.0mm间距单排针孔座,含UARTx1,GPIOx2, SDIOx1,USB Host2.0x1
- UART串口: 4路,2.0mm间距针座
- CMOS Camera: 20pin, 2.0mm间距双排针,用于接500万像素以内的普通摄像头
- MIPI Camera: 15pin, 1.0mm间距贴片座,用于接500万像素以上的高清摄像头
- LCD接口: 40pin, 0.5mm 间距贴片座,支持RGB88模式,支持电阻/电容触摸
- Digital Sensor(数字传感器): 6路2.54mm间距3pin排针
其他资源 - 用户可编程按键:2个
- 用户可编程LED: 2个
- 复位按键: 1个
- 加密芯片: AT88SC0104C-SH
- 板载RTC 时钟电池
- 带过流自熔断保险丝(2A)
功能扩展 - 3G上网
- WiFi
- 蓝牙
- 摄像头
软件资源特性
- Android 4.1(支持)
- Android4.2(支持)
- Android5.0(预装)
- Ubuntu13.10(支持)
- Linux+Qt/embedded-4.8.5(支持)
- uboot(开源)
3 接口和定义
- SENSOR
Pin# Name 1 EINT11 2 EINT12 3 EINT13 4 EINT25 5 EINT28 6 EINT29
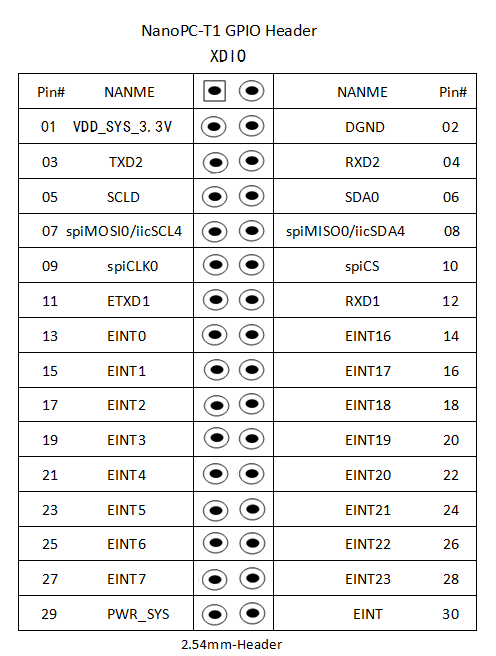
- XDIO
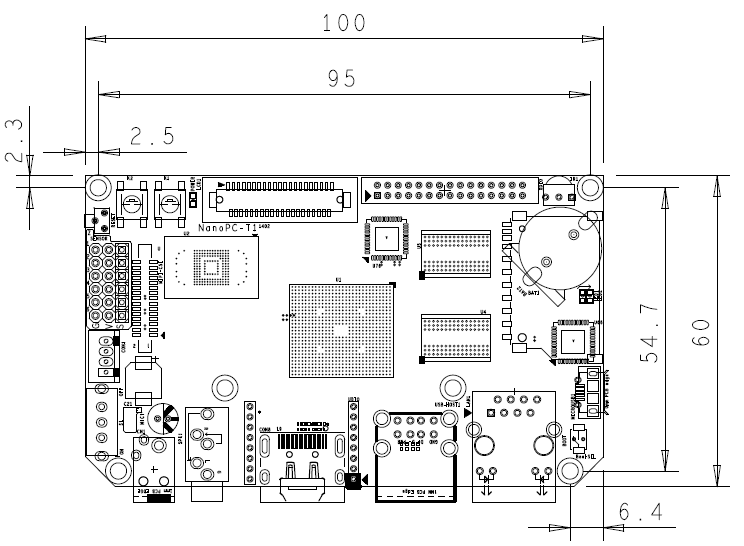
4 机械尺寸
5 Ubuntu Systems
5.1 Ubuntu Variants
We make two Ubuntu variants ready:
- 1) Ubuntu Desktop: this is a system with X GUI. Minimum 8G eMMC is recommended to run this system.
- 2) Ubuntu Core: this is a basic server which only contains basic commands and shares the same libraries as the Ubuntu Desktop. Users can install packages with "apt-get".
- Ubuntu Desktop Features
Ubuntu Desktop Feature - Version: Xubuntu Desktop 13.10
- Kernel: Linux 3.8
Main Features - Xfce GUI
- 1080p HDMI output
- Synchronized LCD and HDMI output
- Supports both resistive and capacitive touch
- Supports USB keyboards and mouses
- Ethernet
- USB WiFi dongle(e.g. AP6210 WiFi module)
- Preinstalled SSH and FTP
- Standard Ubuntu Libraries, users can install them with apt-get
- Ubuntu Core Features
Ubuntu Core Features - Version: Xubuntu Core 14.04
- Kernel: Linux 3.8
Main Features - LCD output
- Supports USB keyboards and mouses
- Ethernet
- USB WiFi dongle(e.g. AP6210 WiFi module)
- Preinstalled Python3
- Standard Ubuntu Libraries, users can install them with apt-get
5.2 安装与运行Ubuntu
- Ubuntu Core的安装与运行
*解压Ubuntu Core系统镜像文件;准备一张大小为4G及以上的SD卡,将其插入电脑中。
*这一步将烧写Ubuntu系统镜像文件到SD卡, 可在Windows系统和Linux系统下操作,这里以Linux系统为例(注: Windows下的烧写方法可参考文档附录),我们在为Linux系统的烧写提供了一个烧写脚本hc_fuse_ubuntu.sh,可从光盘tools目录或者官网下载获得该脚本。
假设在PC Ubuntu系统下,SD卡的设备节点为/dev/sdb, ubuntucore-4g.raw 位于当前目录下,执行如下命令开始烧写img文件到SD卡中:
# chmod 777 hc_fuse_ubuntu.sh
# sudo ./hc_fuse_ubuntu.sh /dev/sdb ./ubuntucore-4g.raw
烧写完成后,将SD卡插到开发板上,将开发板的启动开关切换到SD卡启动:
1)在Tiny4412底板上,切换S2开关到SDBOOT一侧;
2)在NanoPC-T1上,按下Boot键不动然后上电开机;
在进入系统命令行后,可执行以下命令即将系统烧写到eMMC上:
# cd /UBUNTU_INSTALL/
# ./Install-UbuntuCore
Ubuntu Core、Ubuntu desktop登录时使用帐号 root,默认密码是123456,密码可以在进入系统后使用passwd root命令进行更改。
- Ubuntu Desktop的安装与运行
使用Ubuntu Desktop跟Ubuntu Core的烧录方式一样,只需要下载Ubuntu desktop的镜像文件,按照上面介绍的Ubuntu Core的方式把UbuntuCore改成UbuntuDesktop即可。
6 资源链接
- [Exynos 4412芯片手册]( Exynos_4412_SCP_Users_Manual_Ver.0.10.00_Preliminary0.pdf)
- [Ubuntu用户手册](《友善之臂Ubuntu使用手册》)
- [源代码和ROM]


