Difference between revisions of "Template:DebianBullseyeDesktop-WithHDMI"
(updated by API) |
(updated by API) |
||
| Line 4: | Line 4: | ||
====Console==== | ====Console==== | ||
Please visit: [[Use NetworkManager to configure network settings]] | Please visit: [[Use NetworkManager to configure network settings]] | ||
| + | |||
| + | ===Cancel auto-login=== | ||
| + | Edit file: | ||
| + | <syntaxhighlight lang="bash"> | ||
| + | sudo vim /etc/lightdm/lightdm.conf | ||
| + | </syntaxhighlight> | ||
| + | Comment out the following two lines (insert # in front of them): | ||
| + | <syntaxhighlight lang="bash"> | ||
| + | autologin-user=pi | ||
| + | autologin-user-timeout=0 | ||
| + | </syntaxhighlight> | ||
===Test OpenGL ES=== | ===Test OpenGL ES=== | ||
| Line 59: | Line 70: | ||
</syntaxhighlight> | </syntaxhighlight> | ||
If there is no content output from the fuser command, it means software decoding. | If there is no content output from the fuser command, it means software decoding. | ||
| + | |||
===Test hardware encoding=== | ===Test hardware encoding=== | ||
<syntaxhighlight lang="bash"> | <syntaxhighlight lang="bash"> | ||
Revision as of 08:54, 19 June 2023
Contents
1 WiFi Connection
1.1 Gui
Click on the icon on the top right in the Debian's main window, select your wanted WiFi hotspot and proceed with prompts
1.2 Console
Please visit: Use NetworkManager to configure network settings
2 Cancel auto-login
Edit file:
sudo vim /etc/lightdm/lightdm.conf
Comment out the following two lines (insert # in front of them):
autologin-user=pi
autologin-user-timeout=0
3 Test OpenGL ES
You can test it by clicking on the Terminator icon to start a commandline utility in the System Tools and run the following commands:
glmark2-es2
4 HDMI/DP LCD Resolution
Open the system's menu and go to Perferences -> Monitor Settings to customize your settings.
Recommended resolution: 1920x1080@60Hz
5 Adjust HDMI overscan
Open the command line terminal and enter the command to operate, Note:
1) You need to login to the desktop;
2) If you are using ssh terminal, please use the same username as the desktop login. The default is pi. You cannot use the root user. you also need to assign the DISPLAY variable:
export DISPLAY=:0.0
5.1 Query which resolutions the display supports
xrandr -q5.2 Set resolution
For example set to 1920X1080@60Hz:
xrandr --output HDMI-1 --mode 1920x1080 --refresh 60
5.3 Adjust the HDMI overscan
For example, the transformation scaling horizontal coordinates by 0.8, vertical coordinates by 1.04 and moving the screen by 35 pixels right and 19 pixels down:
xrandr --output HDMI-1 --transform 0.80,0,-35,0,1.04,-19,0,0,1
5.4 Automatic adjustment at boot
Edit ~/.config/autostart/lxrandr-autostart.desktop,Write the full xrandr command to the key at the beginning of "Exec= as shown below:
[Desktop Entry]
Type=Application
Name=LXRandR autostart
Comment=Start xrandr with settings done in LXRandR
Exec=sh -c 'xrandr --output HDMI-1 --mode 1920x1080 --refresh 50 --transform 1.04,0,-35,0,1.05,-30,0,0,1'
OnlyShowIn=LXDE
6 Chromium web browser
6.1 GPU
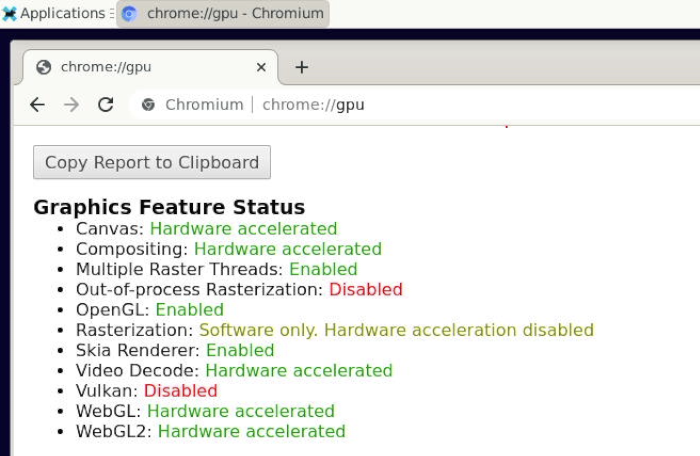
Chromium web browser has enabled hardware acceleration by default, supports WebGL, and can view hardware acceleration details by entering the URL chrome://gpu, as shown below:

6.2 VPU
Play a video in the browser, then use fuser on the command line to view the mpp device node to confirm that the vpu interface is being called:
pi@FriendlyElec:~$ fuser /dev/mpp_service
/dev/mpp_service:     3258
If there is no content output from the fuser command, it means software decoding.
7 Test hardware encoding
mpi_enc_test -w 1920 -h 1080 -t 7 -f 0 -o test.h264 -n 300
export XDG_RUNTIME_DIR=/run/user/0
ffplay test.h264