Difference between revisions of "NanoPi R2S"
(→Diagram, Layout and Dimension) |
|||
| Line 96: | Line 96: | ||
|- | |- | ||
|} | |} | ||
| − | {{BurnOS-Allwinner | + | {{BurnOS-Allwinner|NanoPi-R2S}} |
| − | {{FriendlyWrt19 | + | {{FriendlyWrt19|NanoPi-R2S}} |
| − | {{OfficialUbuntuCore | + | {{OfficialUbuntuCore|NanoPi-R2S}} |
==Resources== | ==Resources== | ||
Revision as of 14:43, 10 February 2020
Contents
- 1 Introduction
- 2 Hardware Spec
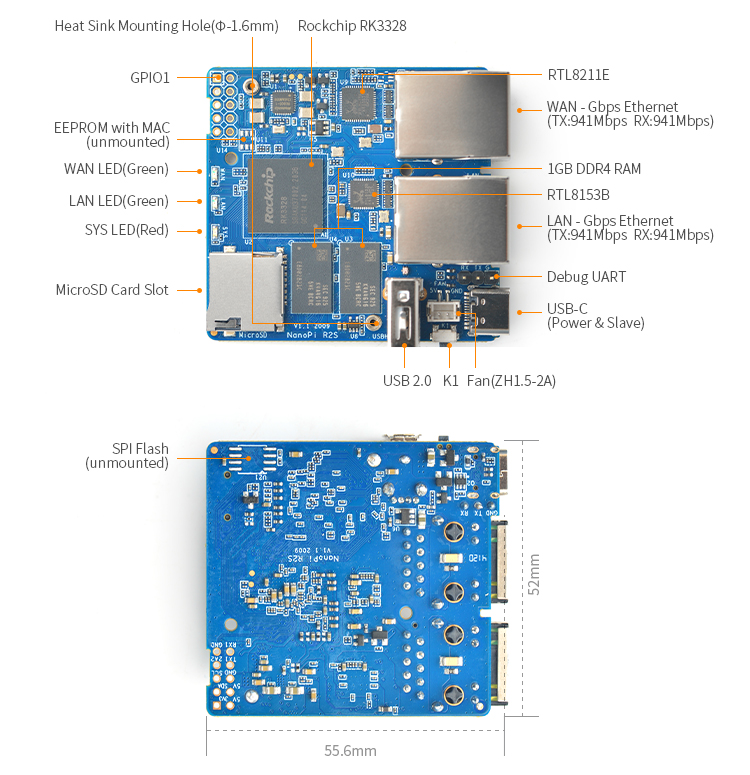
- 3 Diagram, Layout and Dimension
- 4 Get Started
- 5 Work with FriendlyWrt
- 5.1 Introduction to FriendlyWrt
- 5.2 First boot
- 5.3 Account & Password
- 5.4 Network Connection
- 5.5 Login FriendlyWrt
- 5.6 Recommended security settings
- 5.7 Safe shutdown operation
- 5.8 Install Software Packages
- 5.9 Disable IPv6
- 5.10 Configure the function of the user button
- 5.11 Some common issues of FriendlyWrt
- 5.12 Let FriendlyWrt regenerate network settings
- 5.13 Use USB2LCD to view IP and temperature
- 5.14 Work with USB WiFi Device
- 5.15 Work with Docker Applications
- 5.16 Mount smbfs
- 5.17 Use sdk to compile the package
- 6 Work with FriendlyCore
- 7 Resources
- 8 Update Logs
- 8.1 2024-04-21
- 8.2 2024-01-31
- 8.3 2023-12-01
- 8.4 2023-10-31
- 8.5 2023-05-29
- 8.6 2023-05-26
- 8.7 2023-04-26
- 8.8 2023-02-10
- 8.9 2023-01-09
- 8.10 2022-12-04
- 8.11 2022-09-06
- 8.12 2022-08-03
- 8.13 2022-08-01
- 8.14 2022-07-27
- 8.15 2021-12-02
- 8.16 2021-10-29
- 8.17 2021-08-30
- 8.18 2021-03-05
- 8.19 2021-01-15
- 8.20 2020-09-04
- 8.21 2020-08-31
- 8.22 2020-07-10
- 8.23 2020-05-14
- 8.24 2020-02-28
- 8.25 2020-02-25
- 8.26 2020-02-20
1 Introduction
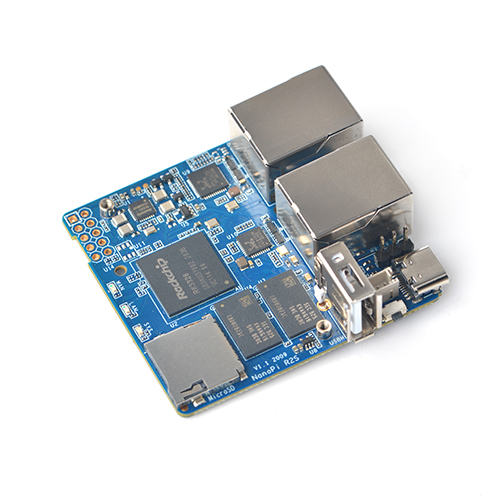
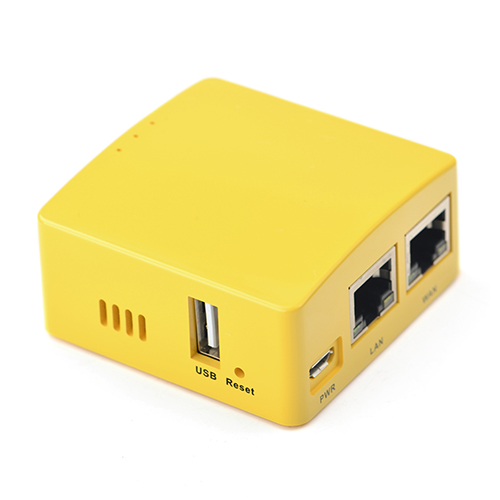
- The NanoPi R2S(as "R2S") is an open source platform with dual-Gbps Ethernet ports designed and developed by FriendlyElec for IoT applications.
- The NanoPi R2S uses the RK3328 SoC. It has two Gbps Ethernet ports and 1G DDR4 RAM. FriendlyElec ported an OpenWrt system for it. It works with Docker CE. It is a good platform for developing IoT applications, NAS applications, smart home gateways etc.
2 Hardware Spec
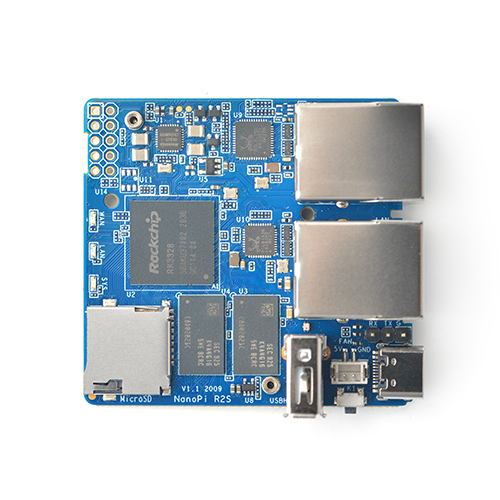
- CPU: Rockchip RK3328, Quad-core Cortex-A53
- DDR4 RAM: 1GB
- Network:
- Internal 10/100/1000M Ethernet Port x 1
- USB3.0 converted 10/100/1000M Ethernet Port x 1
- USB2.0 Host: Type-A x1
- MicroSD Slot x 1
- MicroUSB: power input and USB Slave
- Debug Serial Port: 3.3V TTL, 3-pin 2.54mm pitch connector
- LED: LED x 3
- KEY: KEY x 1 programmable
- PC Size: 55.6 x 52mm
- Power Supply: DC 5V/2A
- Temperature measuring range: 0℃ to 80℃
- OS/Software: U-boot,Ubuntu-Core,OpenWrt
- Network Transmission Rates
TX RX WAN 941 Mbps 941 Mbps LAN 941 Mbps 941 Mbps Notes: 1. test utility: iperf
2. use indepedent IP address section and test with a PC in simplex communication mode
3 Diagram, Layout and Dimension
3.1 Layout
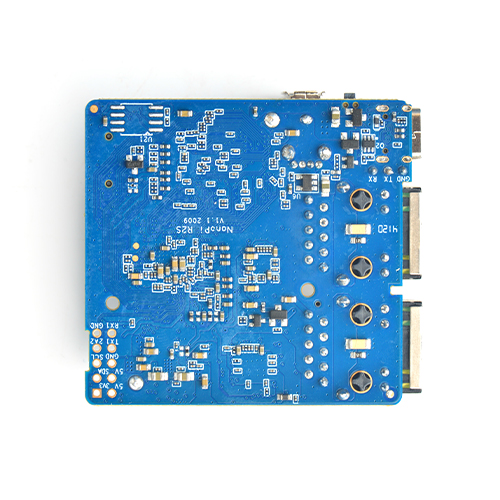
- GPIO 24-Pin Spec
Pin# Name Linux gpio Pin# Name Linux gpio 1 SYS_3.3V 2 VDD_5V 3 I2C0_SDA / GPIO2_D1 89 4 VDD_5V 5 I2C0_SCL / GPIO2_D0 88 6 GND 7 GPIO2_A2 / IR_RX 66 8 UART1_TX / GPIO3_A4 100 9 GND 10 UART1_RX / GPIOG3_A6 102
- For more details refer to:NanoPi_R2S_V1.0_1912-Schematic.pdf
- Dimensional Diagram:NanoPi R2S PCB file in dxf format
4 Get Started
4.1 Essentials You Need
Before starting to use your NanoPi R2S get the following items ready
- NanoPi R2S
- MicroSD Card/TF Card: Class 10 or Above, minimum 8GB SDHC
- MicroUSB 5V/2A power adapter
- A host computer running Ubuntu 16.04 64-bit system
4.2 TF Cards We Tested
To make your NanoPi R2S boot and run fast we highly recommend you use a Class10 8GB SDHC TF card or a better one. The following cards are what we used in all our test cases presented here:
- SanDisk TF 8G Class10 Micro/SD High Speed TF card:
- SanDisk TF128G MicroSDXC TF 128G Class10 48MB/S:
- 川宇 8G C10 High Speed class10 micro SD card:
4.3 Install OS
4.3.1 Download Image Files
Go to download link to download the image files under the officail-ROMs directory and the flashing utility under the tools directory:
Image Files: rk3328-sd-friendlycore-bionic-5.4-arm64-YYYYMMDD.img.zip Based on UbuntuCore 18.04 and Linux-5.4.12 Kernel rk3328-sd-friendlywrt-5.4-YYYYMMDD.img.zip Based on OpenWrt and Linux-5.4.12 Kernel Flashing Utility: win32diskimager.rar Windows utility. Under Linux users can use "dd"
4.3.2 Linux
4.3.2.1 Flash to TF
- FriendlyCore / Debian / Ubuntu / OpenWrt / DietPi are all based on a same Linux distribution and their installation methods are the same.
- Extract the Linux image and win32diskimager.rar files. Insert a TF card(at least 8G) into a Windows PC and run the win32diskimager utility as administrator. On the utility's main window select your TF card's drive, the wanted image file and click on "write" to start flashing the TF card.
After it is installed you will see the following window:

- Insert this card into your board's BOOT slot and power on (with a 5V/2A power source). If the PWR LED is on and the STAT LED is blinking this indicates your board has successfully booted.
;
5 Work with FriendlyWrt
5.1 Introduction to FriendlyWrt
FriendlyWrt is a customized system made by FriendlyElec based on an OpenWrt distribution. It is open source and well suitable for developing IoT applications, NAS applications etc.
5.2 First boot
For the first boot, the system needs to do the following initialization work:
1)Extended root file system
2)Initial setup(will execute /root/setup.sh)
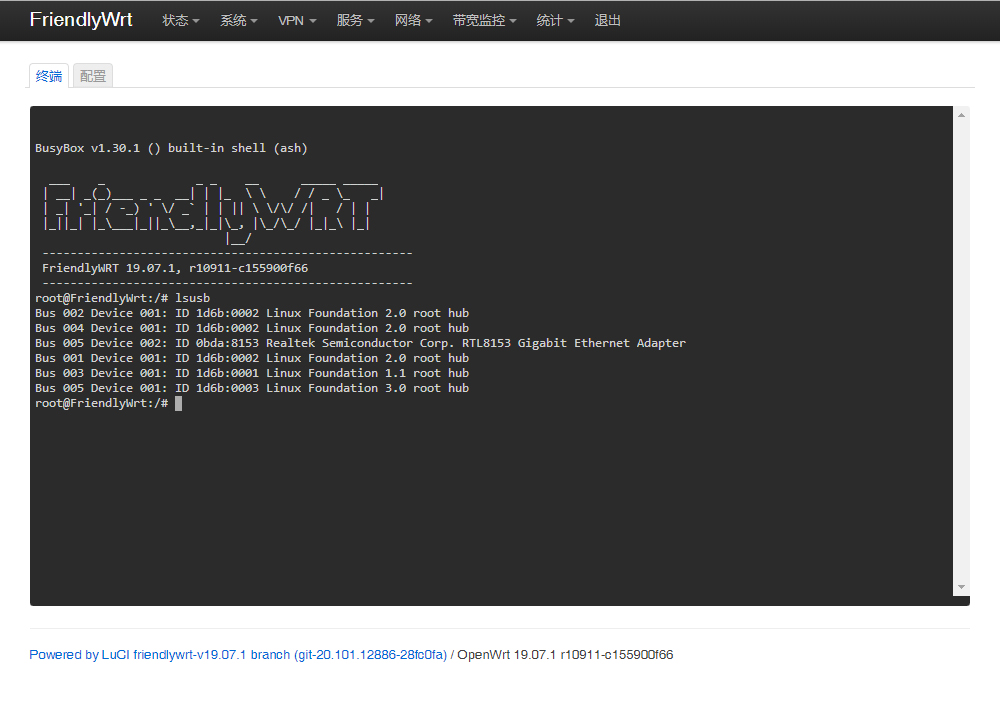
So you need to wait for a while (about 2~3 minutes) to boot up for the first time, and then set FriendlyWrt, you can enter the ttyd terminal on the openwrt webpage, when the prompt is displayed as root@FriendlyWrt, it means the system has been initialized.
root@FriendlyWrt
5.3 Account & Password
The default password is password (empty password in some versions). Please set or change a safer password for web login and ssh login. It is recommended to complete this setting before connecting NanoPi-R2S to the Internet.
5.4 Network Connection
Use a network cable to connect NanoPi-R2S's WAN to a master router and the board will get an IP address via DHCP. Login into the router and check NanoPi-R2S's IP address.
5.5 Login FriendlyWrt
Connect the PC to the LAN port of NanoPi-R2S. If your PC without a built-in ethernet port, connect the LAN port of the wireless AP to the LAN port of NanoPi-R2S, and then connect your PC to the wireless AP via WiFi , Enter the following URL on your PC's browser to access the admin page:
- http://friendlywrt/
- http://192.168.2.1/
- http://[fd00:ab:cd::1]
The above is the LAN port address of NanoPi-R2S. The IP address of the WAN port will be dynamically obtained from your main router through DHCP.
5.6 Recommended security settings
The following settings are highly recommended to complete before connecting NanoPi-R2S to the Internet。
- Set a secure password
- Only allow access to ssh from lan, change the port
5.7 Safe shutdown operation
Enter the ttyd terminal, enter the poweroff command and hit enter, wait until the led light is off, and then unplug the power supply.
5.8 Install Software Packages
5.8.1 Update Package List
Before install software packages update the package list:
$ opkg update
5.8.2 List Available Packages
$ opkg list
5.8.3 List Installed Packages
$ opkg list-installed
5.8.4 Install Packages
$ opkg install <package names>
5.8.5 Remove Packages
$ opkg remove <package names>
5.9 Disable IPv6
sed -i -e "s/DISABLE_IPV6=0/DISABLE_IPV6=1/g" /root/setup.sh
rm -rf /etc/board.json /etc/config/system /etc/config/network /etc/config/wireless /etc/firstboot_* /root/.friendlyelec
reboot
5.10 Configure the function of the user button
By default, the user button is configured to reboot the device, as shown below:
echo 'BTN_1 1 /sbin/reboot' >> /etc/triggerhappy/triggers.d/example.conf
You can change its behavior by changing the configuration file above.
5.11 Some common issues of FriendlyWrt
- Unable to dial up
- Go to "Network" -> "Firewall" and set "Inbound Data", "Outbound Data" and "Forwarding" in "WAN Zone" to "Accept";
- If you still cannot access the Internet, you can try to turn off IPV6;
- Unable to power on
- Try to replace the power adapter and cable. It is recommended to use a power supply with specifications above 5V/2A;
- Note that some fast chargers with Type-C interface will have a delay, it may take a few seconds to start providing power;
- When doing secondary routing, the computer cannot connect to the Internet
- If your main network is IPv4, and NanoPi-R2S works in IPv6, the computer may not be able to connect to the Internet. It is recommended to turn off IPv6 (the method is described later in this WiKi), or switch the main route to IPv6;
- If you have questions or have better suggestions, please send an email to techsupport@friendlyarm.com;
5.12 Let FriendlyWrt regenerate network settings
This method will trigger FriendlyWrt to re-identify the hardware model and generate the network configuration under /etc/config, which is similar but not completely equivalent to restoring factory settings:
rm -rf /etc/board.json /etc/config/system /etc/config/network /etc/config/wireless /etc/firstboot_* /root/.friendlyelec
reboot
The /root/setup.sh initialization script will be executed again at the next boot, so you can debug the /root/setup.sh script through this method.
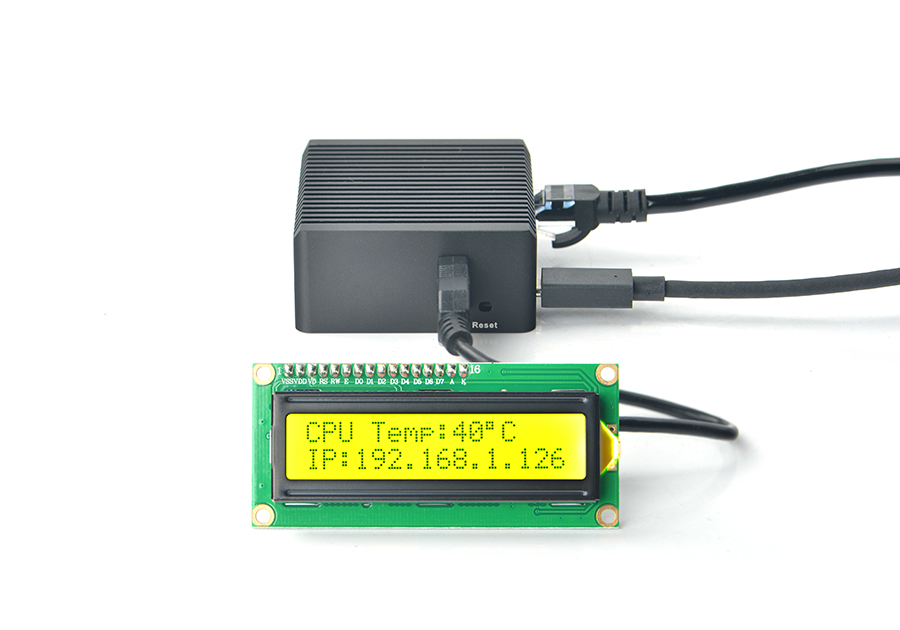
5.13 Use USB2LCD to view IP and temperature
Plug the USB2LCD module to the USB interface ofNanoPi-R2S and power on, the IP address and CPU temperature will be displayed on the LCD:
5.14 Work with USB WiFi Device
5.14.1 Check USB WiFi Device with Command Line Utility
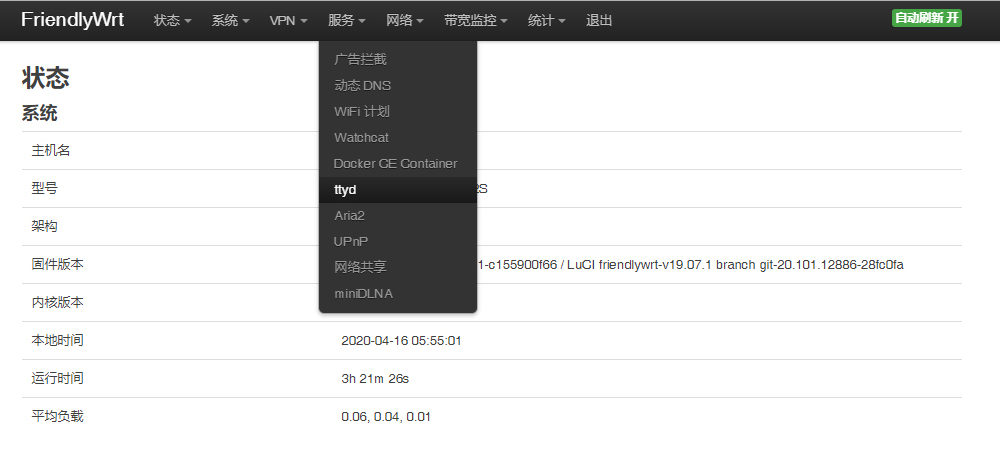
(1) Click on "services>ttyd" to start the command line utility
(2) Make sure no USB devices are connected to your board and run the following command to check if any USB devices are connected or not
lsusb
(3) Connect a USB WiFi device to the board and run the command again
lsusb
You will see a new device is detected. In our test the device's ID was 0BDA:C811
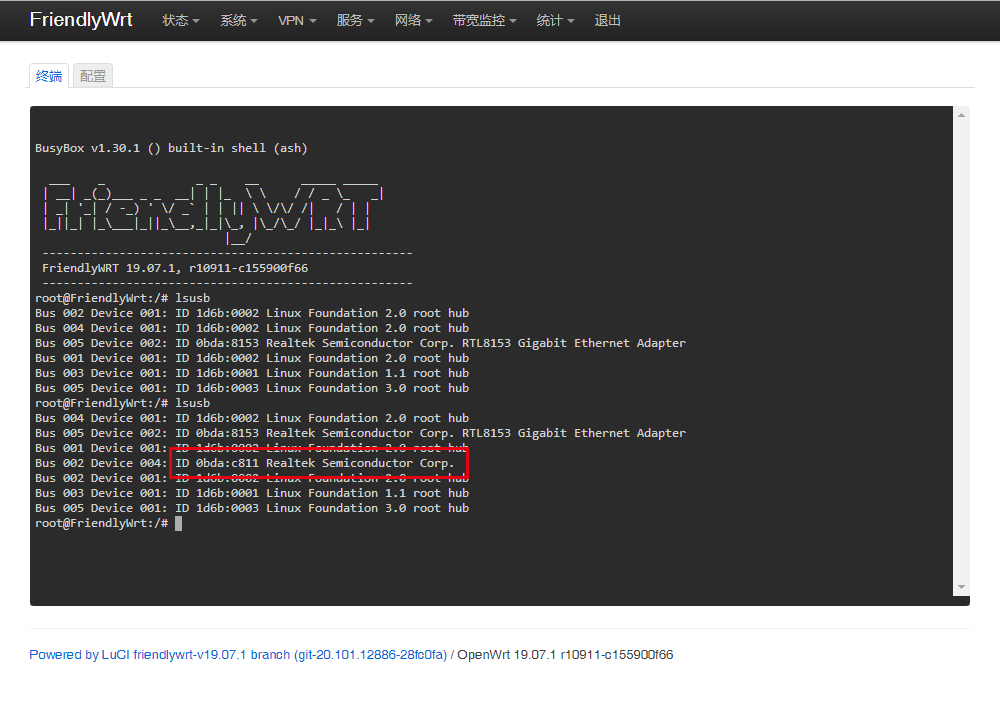
(4) Type your device's ID (in our case it was "0BDA:C811" or "VID_0BDA&PID_C811") in a search engine and you may find a device that matches the ID. In our case the device we got was Realtek 8811CU.
5.14.2 Configure a USB WiFi Device as AP
(1) Connect a USB WiFi device to the NanoPi-R2S. We recommend you to use the following devices:
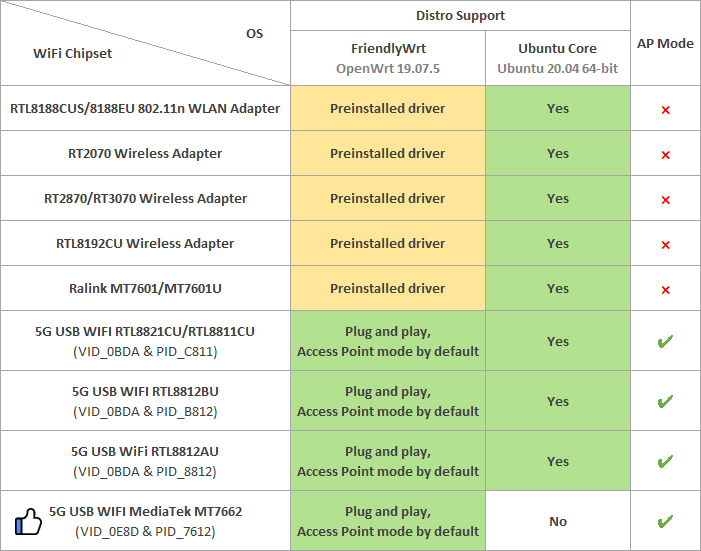
Note: devices that match these VID&PIDs would most likely work.
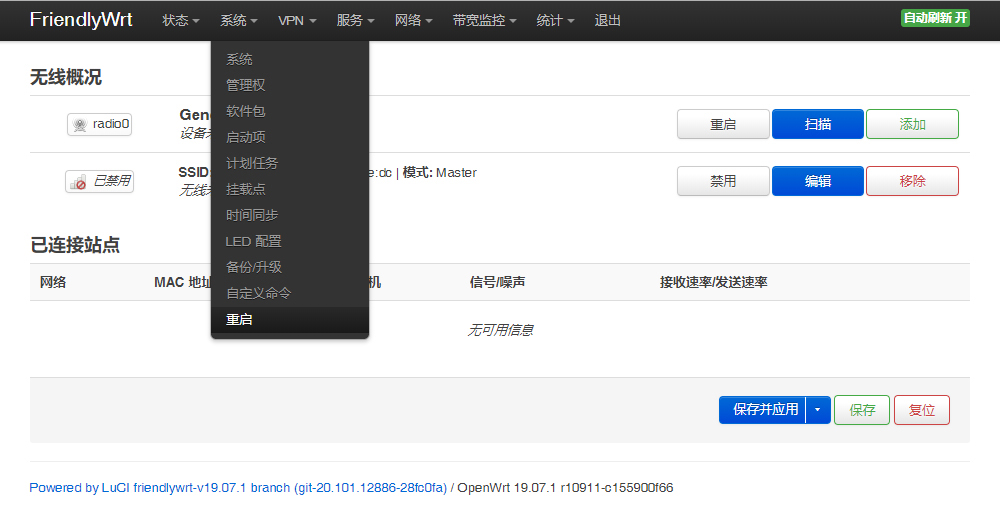
(2) Click on "System>Reboot" and reboot your NanoPi-R2S

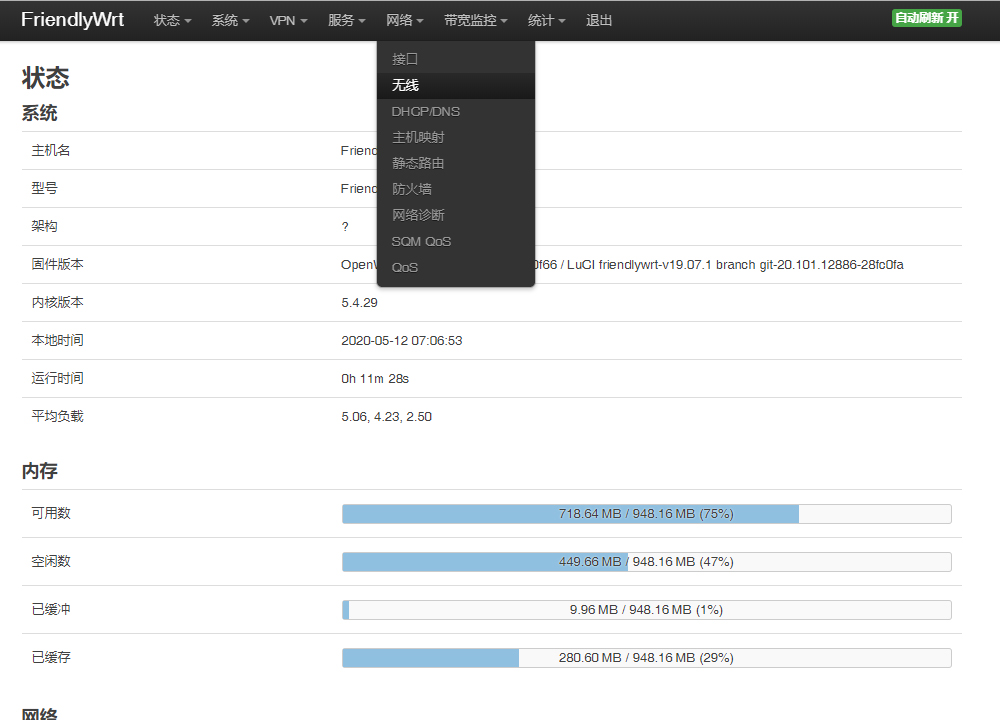
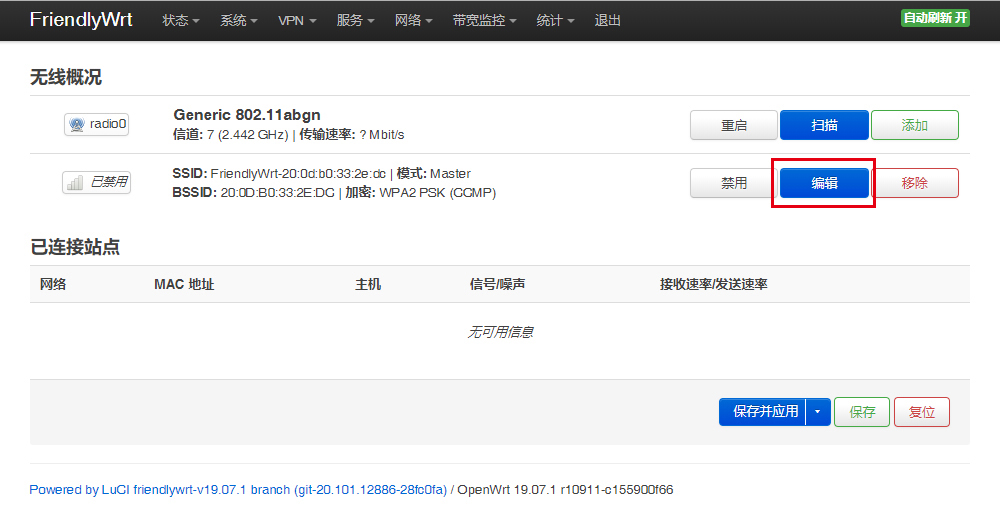
(3) Click on "Network>Wireless" to enter the WiFi configuration page
(4) Click on "Edit" to edit the configuration
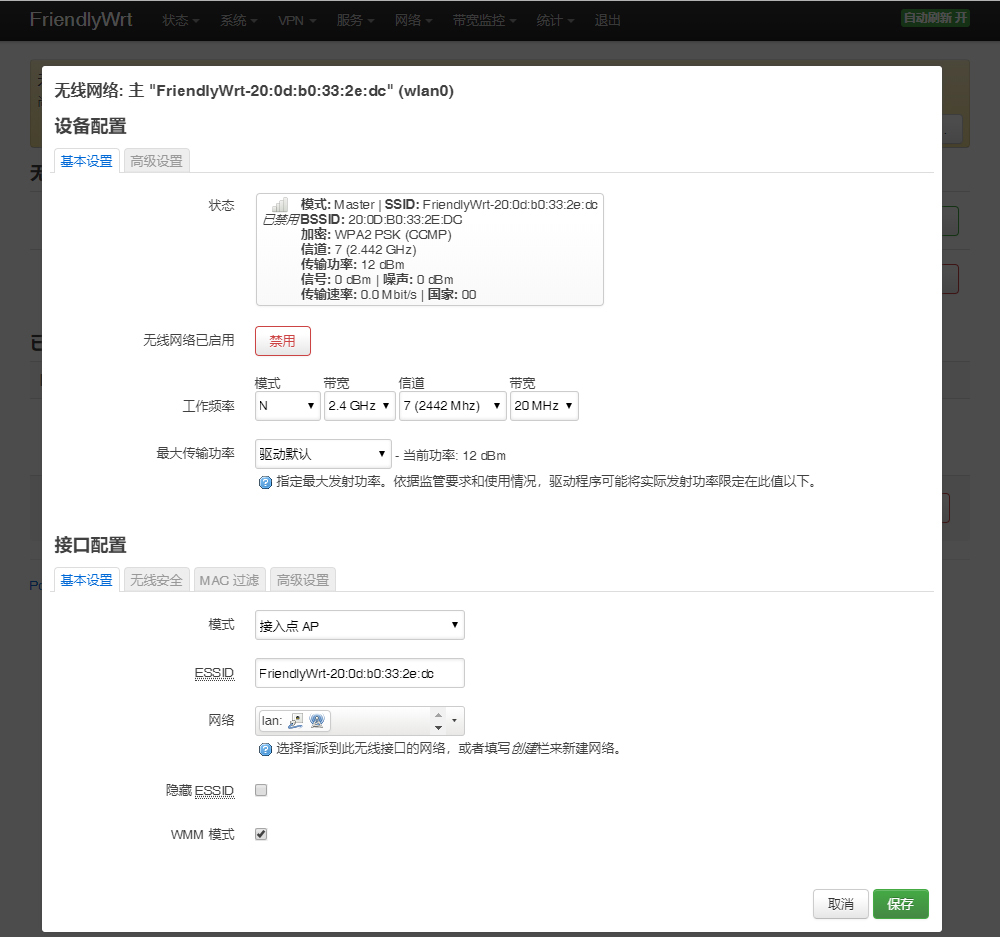
(5) On the "Interface Configuration" page you can set the WiFi mode and SSID, and then go to "Wireless Security" to change the password. By default the password is "password". After you make your changes click on "Save" to save
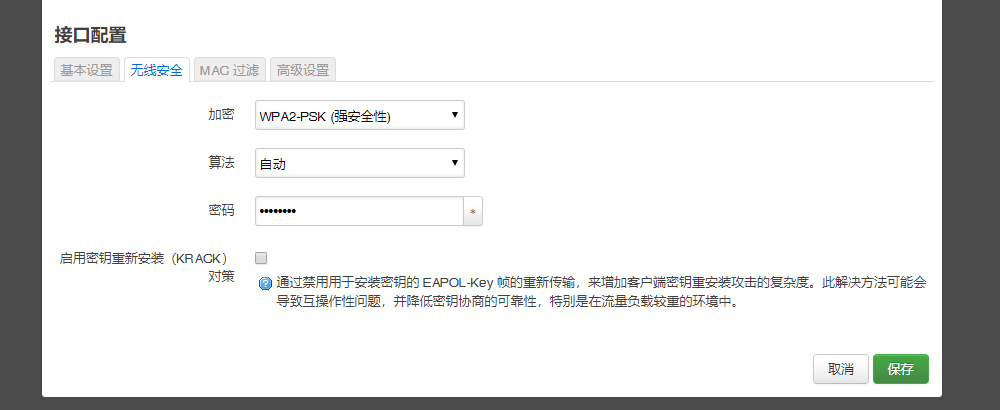
(6) After you change the settings you can use a smartphone or PC to search for WiFi

5.14.3 Common USB WiFi issues
1) It is recommended to plug in the usb wifi in the off state, then power it on, FriendlyWrt will automatically generate the configuration file /etc/config/wireless, if not, see if there is wlan0 by ifconfig -a, if there is no wlan0, usually there is no driver.
2) If ifconfig -a sees wlan0, but the hotspot is not working properly, try changing the channel and country code, an inappropriate country code can also cause the WiFi to not work.
3) Some USB WiFis (e.g. MTK MT7662) work in CD-ROM mode by default and need to be switched by usb_modeswitch, you can try to add usb_modeswitch configuration to the following directory: /etc/usb_modeswitch.d.
5.15 Work with Docker Applications
5.15.1 Work with Docker: Install JellyFin
mkdir -p /jellyfin/config
mkdir -p /jellyfin/videos
docker run --restart=always -d -p 8096:8096 -v /jellyfin/config:/config -v /jellyfin/videos:/videos jellyfin/jellyfin:10.1.0-arm64 -name myjellyfin
After installation, visit port 8096 and here is what you would find:

5.15.2 Work with Docker: Install Personal Nextcloud
mkdir /nextcloud -p
docker run -d -p 8888:80  --name nextcloud  -v /nextcloud/:/var/www/html/ --restart=always --privileged=true  arm64v8/nextcloud
After installtion, visit port 8888.
5.16 Mount smbfs
mount -t cifs //192.168.1.10/shared /movie -o username=xxx,password=yyy,file_mode=0644
5.17 Use sdk to compile the package
5.17.1 Install the compilation environment
Download and run the following script on 64-bit Ubuntu (version 18.04+): How to setup the Compiling Environment on Ubuntu bionic
5.17.2 Download and decompress sdk from the network disk
The sdk is located in the toolchain directory of the network disk:
tar xvf ~/dvd/RK3328/toolchain/friendlywrt/openwrt-sdk-19.07.5-rockchip-rk3328_gcc-7.5.0_musl.Linux-x86_64.tar.xz
# If the path is too long, it will cause some package compilation errors, so change the directory name here
mv openwrt-sdk-19.07.5-rockchip-rk3328_gcc-7.5.0_musl.Linux-x86_64 sdk
cd sdk
./scripts/feeds update -a
./scripts/feeds install -a
5.17.3 Compile the package
download the source code of the example (a total of 3 examples are example1, example2, example3), and copy to the package directory:
git clone https://github.com/mwarning/openwrt-examples.git
cp -rf openwrt-examples/example* package/
rm -rf openwrt-examples/
Then enter the configuration menu through the following command:
make menuconfigIn the menu, select the following packages we want to compile (actually selected by default):
"Utilities" => "example1"
"Utilities" => "example3"
"Network" => "VPN" => "example2"
execute the following commands to compile the three software packages:
make package/example1/compile V=99
make package/example2/compile V=99
make package/example3/compile V=99
After the compilation is successful, you can find the ipk file in the bin directory, as shown below:
$ find ./bin -name example*.ipk
./bin/packages/aarch64_cortex-a53/base/example2_0.1-1_aarch64_cortex-a53.ipk
./bin/packages/aarch64_cortex-a53/base/example3_0.1-1_aarch64_cortex-a53.ipk
./bin/packages/aarch64_cortex-a53/base/example1_0.1-1_aarch64_cortex-a53.ipk
5.17.4 Install the ipk to NanoPi
You can use the scp command to upload the ipk file to NanoPi:
cd ./bin/packages/aarch64_cortex-a53/base/
scp example*.ipk root@192.168.2.1:/root/
Then use the opkg command to install them:
cd /root/
opkg install example2_0.1-1_aarch64_cortex-a53.ipk
opkg install example3_0.1-1_aarch64_cortex-a53.ipk
opkg install example1_0.1-1_aarch64_cortex-a53.ipk
6 Work with FriendlyCore
6.1 FriendlyCore User Account
- Non-root User:
   User Name: pi
   Password: pi
- Root:
   User Name: root
   Password: fa
6.2 Update Software Packages
$ sudo apt-get update
6.3 Setup Network Configurations
6.3.1 Set static IP address
By default "eth0" is assigned an IP address obtained via dhcp. If you want to change the setting you need to change the following file:
vi /etc/network/interfaces.d/eth0
For example if you want to assign a static IP to it you can run the following commands:
auto eth0
iface eth0 inet static
    address 192.168.1.231
    netmask 255.255.255.0
    gateway 192.168.1.1
6.3.2 Set a DNS
You also need to modify the following file to add the DNS configuration:
vi /etc/systemd/resolved.conf
For example, set to 192.168.1.1:
[Resolve]
DNS=192.168.1.1
Restart the systemd-resolved service with the following command:
sudo systemctl restart systemd-resolved.service
sudo systemctl enable systemd-resolved.service
6.3.3 Set up to use another network interface
To change the setting of "eth1" you can add a new file similar to eth0's configuration file under the /etc/network/interfaces.d/ directory.
6.4 Setup Wi-Fi
First, use the following command to check if Network-Manager is installed on your system:
which nmcliIf you have installed it, refer to this link to connect to WiFi: Use NetworkManager to configure network settings, If you do not have Network-Manager installed on your system, please refer to the following method to configure WiFi,
By default the WiFi device is "wlan0". You need to create a configuration file under "/etc/network/interfaces.d/" for WiFi:
vi /etc/network/interfaces.d/wlan0
Here is a sample wlan0 file:
auto lo
iface lo inet loopback
auto wlan0
iface wlan0 inet dhcp
wpa-driver wext
wpa-ssid YourWiFiESSID
wpa-ap-scan 1
wpa-proto RSN
wpa-pairwise CCMP
wpa-group CCMP
wpa-key-mgmt WPA-PSK
wpa-psk YourWiFiPassword
Please replace "YourWiFiESSID" and "YourWiFiPassword" with your WiFiESSID and password. After save and close the file you can connect to your WiFi source by running the following command:
sudo systemctl daemon-reload
sudo systemctl restart networking
After you power on your board it will automatically connect to your WiFi source.
Please note that if you use one TF card to boot multiple boards the WiFi device name will likely be named to "wlan1", "wlan2" and etc. You can reset it to "wlan0" by deleting the contents of the following file and reboot your board:
/etc/udev/rules.d/70-persistent-net.rules
6.4.1 WiFi models supported
6.4.1.1 M.2 WiFi Module
- RTL8822CE
6.4.1.2 Usb Dongle
- RTL8821CU (Vid: 0BDA, Pid: C811) (Test sample:TP-Link TL-WDN5200H)
- RTL8812AU (Vid: 0BDA, Pid: 8812)
- MediaTek MT7662 (Vid: 0E8D, Pid: 7612) (Test sample:COMFAST CF-WU782AC V2)
6.5 Install the kernel-header package
sudo dpkg -i /opt/linux-headers-*.deb
6.6 Build kernel-header deb package
Please refre to: https://github.com/friendlyarm/sd-fuse_rk3328/blob/master/test/test-build-kernel-header-deb.sh
6.7 Config status LEDs
First determine whether the system already exists the leds initialization service:
sudo systemctl status ledsIf the leds service already exists, change the default behavior of the LEDs by editing the following file:
/etc/init.d/leds.sh
Since there is no leds service in the early firmware, you need to refer to the following guide to manually configure the LEDs. First, set the following kernel modules to be automatically loaded at boot:
modprobe ledtrig-netdev
echo ledtrig-netdev > /etc/modules-load.d/ledtrig-netdev.conf
Put the following into the autorun script to associate the status leds with the ethernet interface, and you can configure it to behave in other ways by referring to these content:
echo netdev > /sys/class/leds/wan_led/trigger
echo eth0 > /sys/class/leds/wan_led/device_name
echo 1 > /sys/class/leds/wan_led/link

echo netdev > /sys/class/leds/lan_led/trigger
echo eth1 > /sys/class/leds/lan_led/device_name
echo 1 > /sys/class/leds/lan_led/link
7 Resources
7.1 Datasheets and Schematics
- Schematics
- PCB Dimensional Diagram
- Datasheet
- RK3328 Datasheet Rockchip_RK3328_Datasheet.pdf
8 Update Logs
8.1 2024-04-21
8.1.1 OpenMediaVault
- 更新到 7.0.5-1
- 更新到 Debian12
8.2 2024-01-31
8.2.1 Debian/Ubuntu/FriendlyCore/Buildroot
- 增加adb支持
8.3 2023-12-01
8.3.1 FriendlyWrt
- 更新到 6.1.63 内核
- 更新到 OpenWrt 23.05.2
8.4 2023-10-31
8.4.1 增加新系统
- 增加NAS系统 OpenMediaVault,基于Debian11构建,使用6.1内核
8.4.2 Debian Core/FriendlyCore-Lite-Core
- 更新到 6.1 内核
8.4.3 FriendlyWrt
- 更新到 6.1 内核
- 更新到 OpenWrt 23.05
8.5 2023-05-29
8.5.1 Debian11 Core
- 修正在 R2C Plus 上无法启动的问题
8.6 2023-05-26
8.6.1 FriendlyWrt更新
- 更新 v22.03 到新版本 openwrt-22.03.5
- 更新 v21.02 到新版本 openwrt-21.02.7
8.7 2023-04-26
8.7.1 FriendlyWrt更新
- 更新 v22.03 到新版本 openwrt-22.03.4
- 更新 v21.02 到新版本 openwrt-21.02.6
8.8 2023-02-10
- 新增 Debian11 Core系统
8.9 2023-01-09
8.9.1 FriendlyCore更新说明:
- 优化了开机服务
8.10 2022-12-04
8.10.1 FriendlyWrt更新
- 修正存储空间某些情况下无法扩展的问题
- 加强eMMC刷机工具的刷机稳定性
8.11 2022-09-06
8.11.1 FriendlyWrt更新说明:
- 增加Fullcone NAT支持 (默认开启)
- 版本升级到 22.03.0 正式版
8.12 2022-08-03
8.12.1 FriendlyWrt更新说明:
- 升级FriendlyWrt至最新版本22.03-rc6
8.13 2022-08-01
8.13.1 FriendlyWrt更新说明:
- 防火墙设置调整: 单网口的设备(使如NEO3)默认设置为允许WAN入站流量以方便网页配置,多网口的设备仍然保持默认拒绝WAN入站流量
8.14 2022-07-27
8.14.1 FriendlyWrt更新说明:
- 提供docker与非docker两个版本,除了docker外其他特性相同
- 提供测试版22.03-rc3, 可根据软件包的需求情况进行选择, 推荐使用稳定版本 21.02.3
- 改善了第三方软件包的安装兼容性问题
- 增加支持 “恢复出厂设置” 功能
- 增加网页刷机工具 eMMC-Tools, 支持安装FriendlyElec及部分第三方固件到eMMC, 除了raw-image还支持rockchip打包格式的固件
- 其他一些细节调整: 默认设置时区设置为上海、新增NAS分类菜单、去掉lcd2usb、改进安全性设置、调优sysctl参数、修正docker防火墙设置等
8.15 2021-12-02
8.15.1 FriendlyWrt更新说明:
- 改进了FriendlyWrt系统上软件包安装的兼容性
- 修正某些sd卡会导致reboot命令无响应的问题 (更新了5.10内核)
- 将NanoPi-NEO3上的USB排针默认配置成Host模式
8.16 2021-10-29
8.16.1 FriendlyWrt更新说明:
- FriendlyWrt更新至官方稳定版本 21.02.1,特性与19.07.5基本保持一致,支持docker、usb wifi等
8.17 2021-08-30
8.17.1 FriendlyWrt更新说明:
- FriendlyWrt内核更新到 5.10.60
- 新增一款高速5G USB WiFi的支持,网卡型号为 Comfast CF-WU782AC V2,芯片型号为 MediaTek MT7662
- 改进了USB WiFi的兼容性
- 改进了首次启动的稳定性 (之前的版本,首次启动时,某些情况下会出现bpfilter错误)
8.17.2 FriendlyCore更新说明:
- FriendlyCore内核更新到 5.10.60
8.18 2021-03-05
- FriendlyCore更新到20.04 (基于ubuntu focal)
8.19 2021-01-15
- FriendlyWrt内核更新到 5.10
- FriendlyWrt升级到19.07.5
8.20 2020-09-04
- 提高了usb3.0驱动的稳定性 (整合了rockchip官方更新),以及r8153网卡的稳定性
- 更新8153以太网卡的驱动为主线内核中的,版本为v1.11.11
- 启用R2S和NEO3的串口UART1
8.21 2020-08-31
- 内核更新到 5.4.61
- 采用Realtek官网下载的驱动 r8152-2.13.0 (https://www.realtek.com/en/downloads)
- 改进usb网卡驱动,WLAN<->LAN桥接速度可达 700/500 Mbits/sec
- 增加rockhip rng(硬件随机数)驱动
8.22 2020-07-10
8.22.1 FriendlyWrt更新说明:
- 内核版本升至5.4.50
- 增加NanoPi-NEO3的支持
8.23 2020-05-14
8.23.1 FriendlyWrt更新说明:
- 内核升至5.4.40内核, 增强防火墙稳定性
- 增加usb wifi 的支持(rtl8812au)
- 加强了 overlayfs 的稳定性
8.24 2020-02-28
8.24.1 FriendlyWrt更新说明:
- 默认不启用 lan 口的dhcp ipv6
- 增加usb wifi 的支持(RTL8821CU)
8.25 2020-02-25
8.25.1 FriendlyWrt更新说明:
8.25.1.1 更新代码到 openwrt v19.07.1 版本,请使用 master-v19.07.1 分支的代码,下载方法:
mkdir friendlywrt-rk3328
cd friendlywrt-rk3328
repo init -u https://github.com/friendlyarm/friendlywrt_manifests -b master-v19.07.1 -m rk3328.xml --repo-url=https://github.com/friendlyarm/repo --no-clone-bundle
repo sync -c --no-clone-bundle
8.25.1.2 修复初版固件发现的一些issues,如下:
- 优化加载bpfilter 模块
- 设置 dist-feeds 指向最新版本, 解决opkg update 异常
- 缺省config中移除 modemmanager和mwan3 插件 (可自行添加)
- 优化 cpu 调频策略和开机速度
8.26 2020-02-20
8.26.1 FriendlyWrt
- 优化了 openssl 性能
- 增加pwm风扇的支持,支持温控 (平台: rk3328/rk3399)
