Difference between revisions of "Template:OpenWrt1"
(updated by API) |
(updated by API) |
||
| Line 5: | Line 5: | ||
===System Login=== | ===System Login=== | ||
* Login via Serial Communication | * Login via Serial Communication | ||
| − | Here is a | + | {{#switch: {{{1}}} |
| − | + | | NanoPC-T4 = | |
| + | | NanoPi-M4 = | ||
| + | | NanoPi-NEO4 = | ||
| + | | NanoPi-NEO2 = | ||
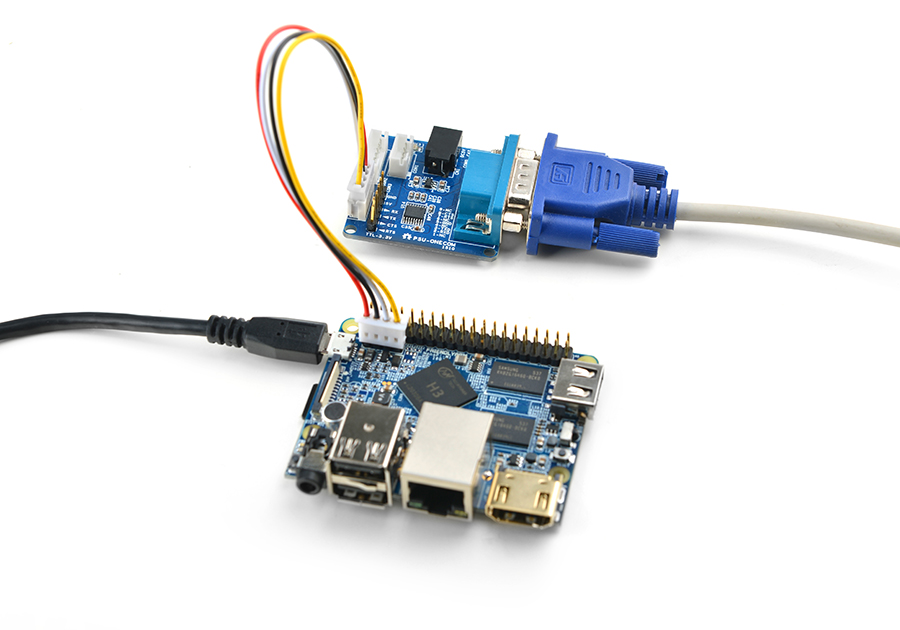
| + | allow you to operate the board via a serial terminal.Here is a setup where we connect a board to a PC via the PSU-ONECOM and you can power on your board from either the PSU-ONECOM or its MicroUSB: | ||
| + | [[File:PSU-ONECOM-NEO2.jpg|frameless|400px]]<br> | ||
| + | | NanoPi-NEO = | ||
| + | allow you to operate the board via a serial terminal.Here is a setup where we connect a board to a PC via the PSU-ONECOM and you can power on your board from either the PSU-ONECOM or its MicroUSB: | ||
| + | [[File:PSU-ONECOM-NEO.jpg|frameless|400px]]<br> | ||
| + | | NanoPi-NEO-Plus2 = | ||
| + | allow you to operate the board via a serial terminal.Here is a setup where we connect a board to a PC via the PSU-ONECOM and you can power on your board from either the PSU-ONECOM or its MicroUSB: | ||
| + | [[File:PSU-ONECOM-NEO-Plus2.jpg|frameless|400px]]<br> | ||
| + | | NanoPi-NEO-Core = | ||
| + | allow you to operate the board via a serial terminal.Here is a setup where we connect a board to a PC via the PSU-ONECOM and you can power on your board from either the PSU-ONECOM or its MicroUSB: | ||
| + | [[File:PSU-ONECOM-NEO-Core.jpg|frameless|400px]]<br> | ||
| + | | NanoPi-M1 = | ||
| + | allow you to operate the board via a serial terminal.Here is a setup where we connect a board to a PC via the PSU-ONECOM and you can power on your board from either the PSU-ONECOM or its MicroUSB: | ||
| + | [[File:PSU-ONECOM-M1.jpg|frameless|400px]]<br> | ||
| + | | NanoPi-M1-Plus = | ||
| + | allow you to operate the board via a serial terminal.Here is a setup where we connect a board to a PC via the PSU-ONECOM and you can power on your board from either the PSU-ONECOM or its MicroUSB: | ||
[[File:PSU-ONECOM-NanoPi-M1-Plus.jpg|frameless|400px]]<br> | [[File:PSU-ONECOM-NanoPi-M1-Plus.jpg|frameless|400px]]<br> | ||
| + | | NanoPi-A64 = | ||
| + | allow you to operate the board via a serial terminal.Here is a setup where we connect a board to a PC via the PSU-ONECOM and you can power on your board from either the PSU-ONECOM or its MicroUSB: | ||
| + | [[File:PSU-ONECOM-A64.jpg|frameless|400px]]<br> | ||
| + | | NanoPi-NEO-Air = | ||
| + | allow you to operate the board via a serial terminal.Here is a setup where we connect a board to a PC via the PSU-ONECOM and you can power on your board from either the PSU-ONECOM or its MicroUSB: | ||
| + | [[File:PSU-ONECOM-AIR.jpg|frameless|400px]]<br> | ||
| + | | NanoPi-Duo = | ||
| + | | NanoPi-Duo2 = | ||
| + | <!-- Duox not support ONECOM --> | ||
| + | | #default = | ||
| + | For example, NanoPi-M1:<br>[[File:PSU-ONECOM-M1.jpg|frameless|400px]]<br> | ||
| + | }} | ||
By default you will login as root without a password. You can set your password by commanding "passwd".<br /> | By default you will login as root without a password. You can set your password by commanding "passwd".<br /> | ||
Revision as of 10:27, 25 April 2019
Contents
[hide]1 Work with OpenWrt
1.1 Introduction
OpenWrt is a highly extensible GNU/Linux distribution for embedded devices.Unlike many other distributions for routers, OpenWrt is built from the ground up to be a full-featured, easily modifiable operating system for embedded devices. In practice, this means that you can have all the features you need with none of the bloat, powered by a modern Linux kernel. For more details you can refer to:OpenWrt Website.
1.2 System Login
- Login via Serial Communication
By default you will login as root without a password. You can set your password by commanding "passwd".
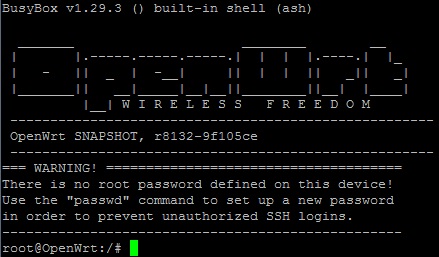
When your board loads OS for the first time the TF card's rootfs system in your board will be automatically partitioned to its max capacity:

Be patient for this process to be done.
- Login via SSH
Make sure you connect your board to the internet and your board's eth0 is set to WAN and wlan0 is set to LAN.
Before you proceed make sure you connect your board to a master router's LAN and your board can get an IP address via DHCP.
We assume the board's (eth0) IP address is 192.168.1.163. You can login via SSH by running the following command:
$ ssh root@192.168.1.163
By default you will login as root without a password.
- Login via Web
OpenWrt supports web login via the LuCI Web GUI. Configure your system following the steps in <Login via SSH>. In our test the board's IP address was 192.168.1.163. Type your IP address in a browser and you will be able to load the OpenWrt-LuCI page:
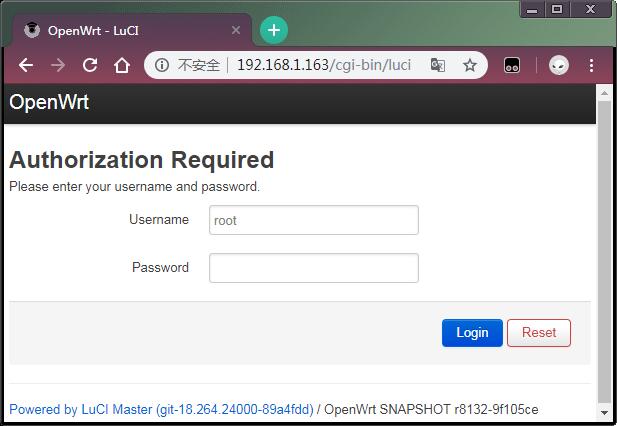
By default you will login as root without a password. After click on "Login" you will sign in.
1.3 Connect to WiFi Hotspot from Smart Phone
- Make sure you install a WiFi antenna on your board.
- By default the board with OpenWrt is configured as a secondary router and its WiFi module AP6212 is set to AP mode. The default WiFi AP hotspot's name is like "OpenWrt-10:d0:7a:de:3d:92" and it doesn't have a password. You can connect a smart phone or PC to it.
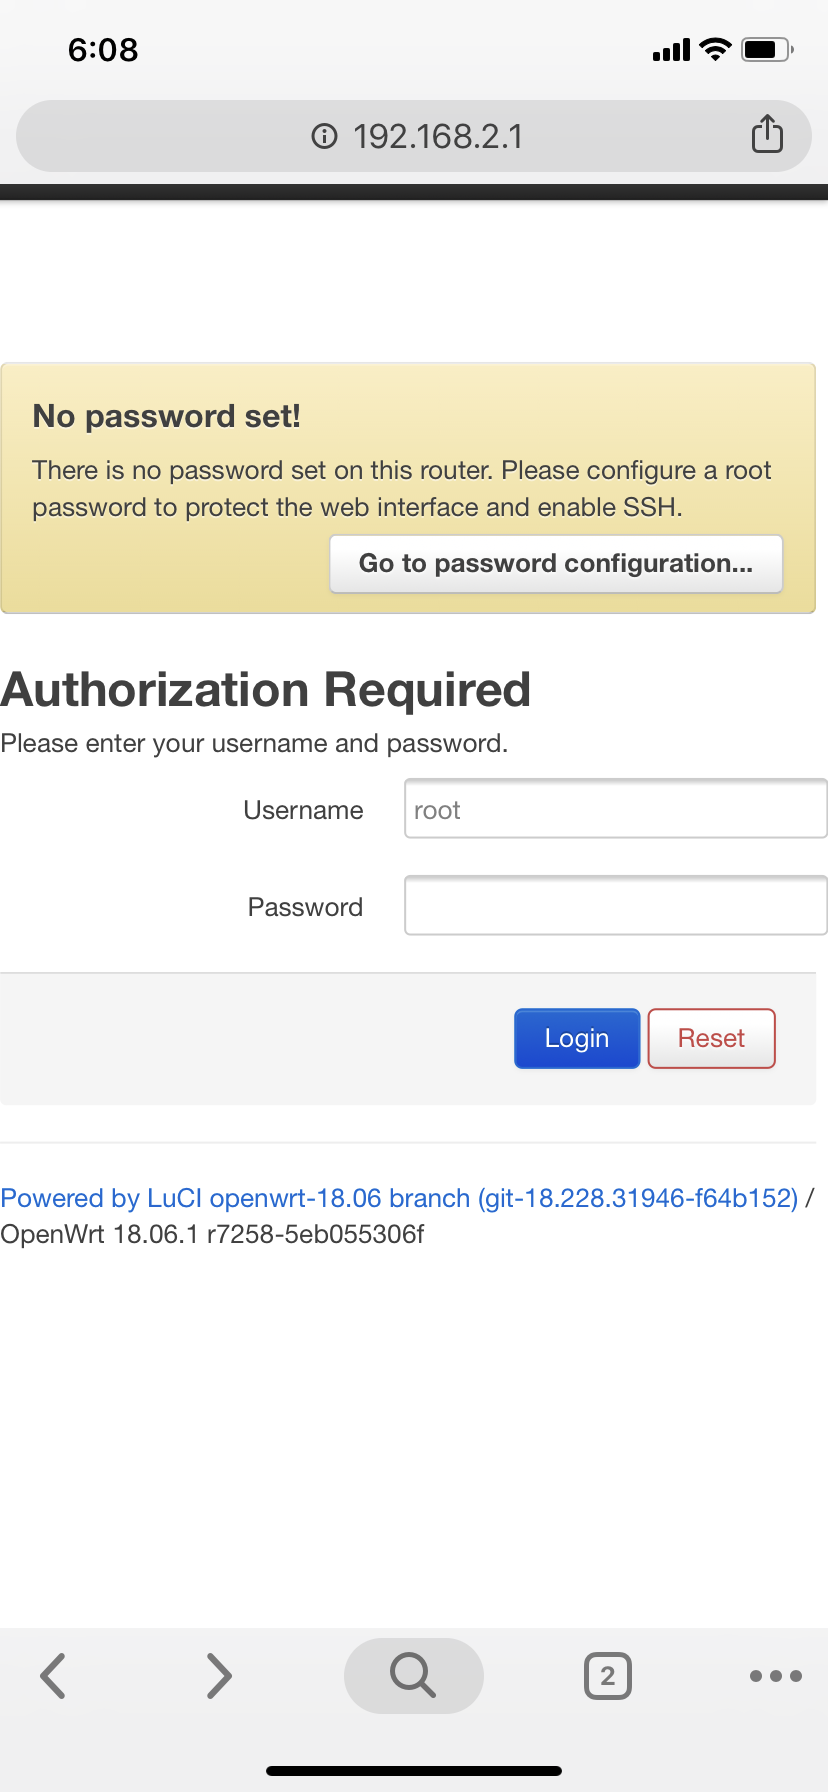
- The board's WiFi hotspot IP address falls into 192.168.2.x. Open a browser in your phone or PC, type 192.168.2.1 in the address bar and you will be able to visit the LuCI GUI:
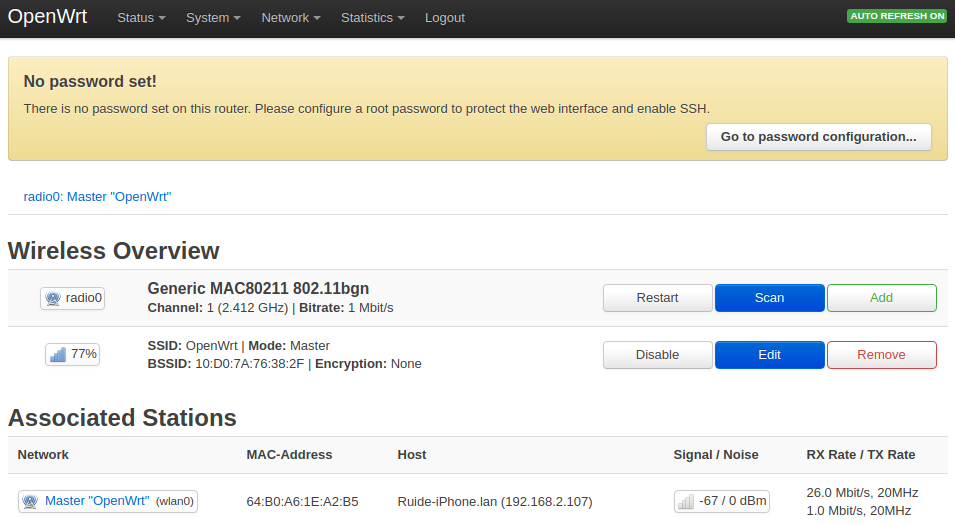
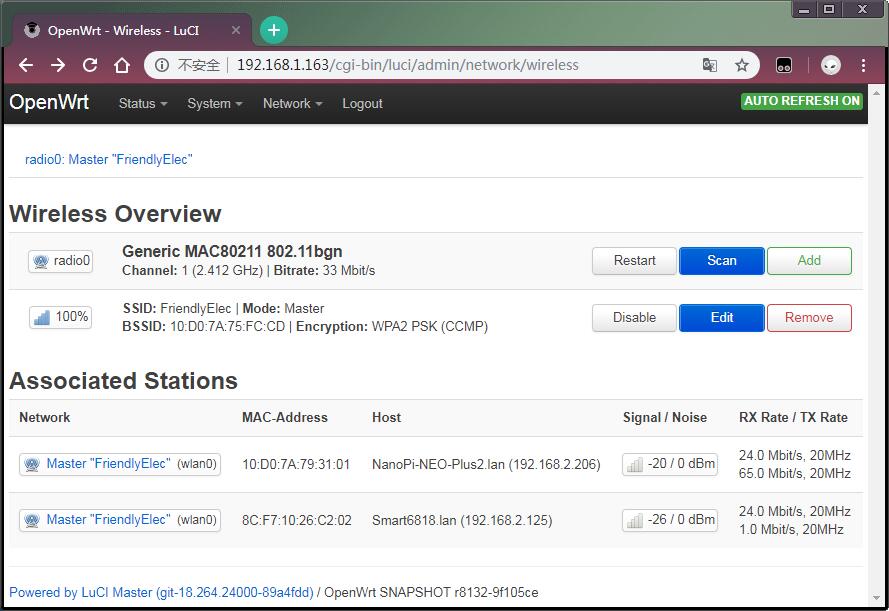
- After your phone is successfully connected to the board's WiFi hotspot, load the LuCI page, go to "Netwrok ---> Wireless" and you will see all connected devices:
1.4 Manage Software Packages
OpenWrt has a package management utility: opkg. You can get its details by running the following command:
$ opkg
Package Manipulation:
        update                  Update list of available packages
        upgrade <pkgs>          Upgrade packages
        install <pkgs>          Install package(s)
        configure <pkgs>        Configure unpacked package(s)
        remove <pkgs|regexp>    Remove package(s)
        flag <flag> <pkgs>      Flag package(s)
         <flag>=hold|noprune|user|ok|installed|unpacked (one per invocation)

Informational Commands:
        list                    List available packages
        list-installed          List installed packages
        list-upgradable         List installed and upgradable packages
        list-changed-conffiles  List user modified configuration files
        files <pkg>             List files belonging to <pkg>
        search <file|regexp>    List package providing <file>
        find <regexp>           List packages whose name or description matches <regexp>
        info [pkg|regexp]       Display all info for <pkg>
        status [pkg|regexp]     Display all status for <pkg>
        download <pkg>          Download <pkg> to current directory
...
These are just part of the manual. Here are some popular opkg commands.
- Update Package List
Before you install a package you'd better update the package list:
$ opkg update
- Check Available Packages
$ opkg list
At the time of writing there are 3241 packages available.
- Check Installed Packages:
$ opkg list-installed
At the time of writing 124 packages have been installed.
- Install/Delete Packages:
$ opkg install <pkgs>
$ opkg remove <pkgs>
- Check Files Contained in Installed Packages:
$ opkg files <pkg>
- Install Chinese Language Package for LuCI
$ opkg install luci-i18n-base-zh-cn
- Check Changed Files:
$ opkg list-changed-conffiles
- Reference Links:
1.5 Check System Status
- Check CPU Temperature & Frequency:
$ cpu_freq
CPU0 online=1 temp=26581 governor=ondemand cur_freq=480000
CPU1 online=1 temp=26581 governor=ondemand cur_freq=480000
CPU2 online=1 temp=26581 governor=ondemand cur_freq=480000
CPU3 online=1 temp=26581 governor=ondemand cur_freq=480000
These messages mean four CPU cores are working online. Each core's temperature is 26.5 degrees. Each core's governor is on demand and the frequency is 480 MHz.
- Check System Status on OpenWrt-LuCI Web Page:
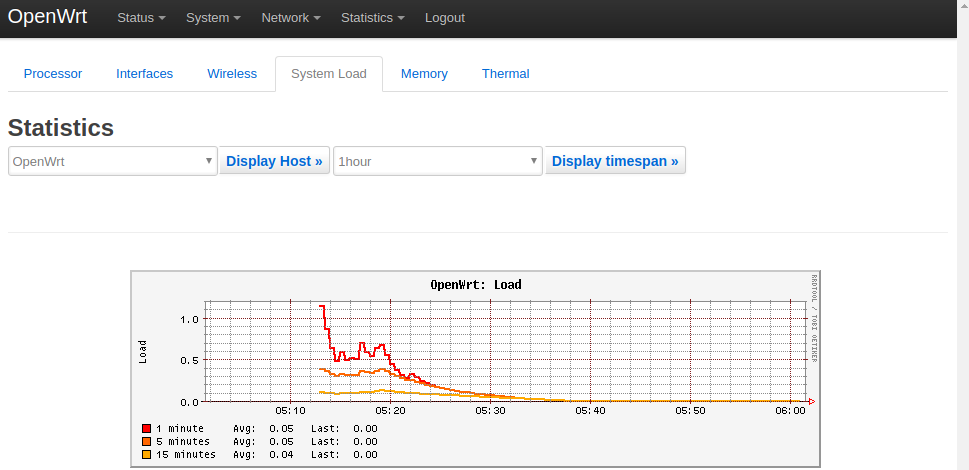
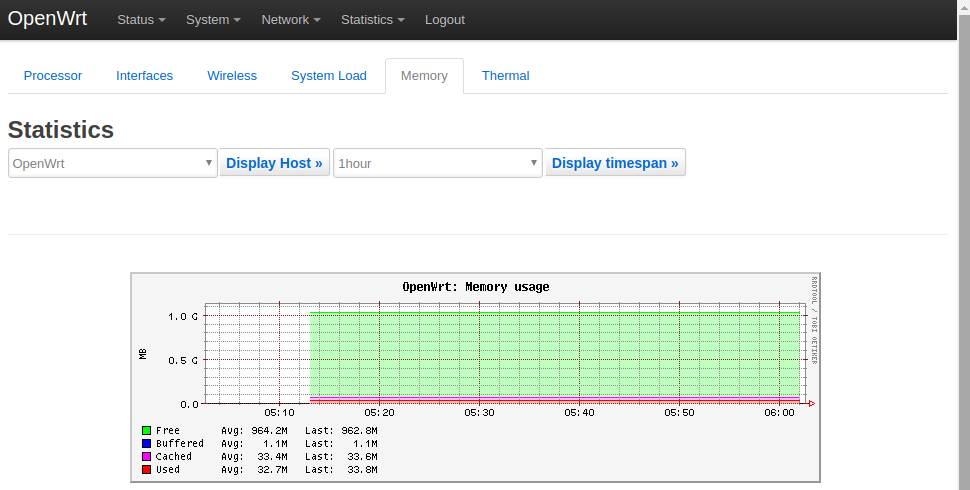
After you load the OpenWrt-LuCI page, click on "Statistics ---> Graphs" and you will be able to check all the statistics:
1) System Load:
2) RAM:
3) CPU Temperature:
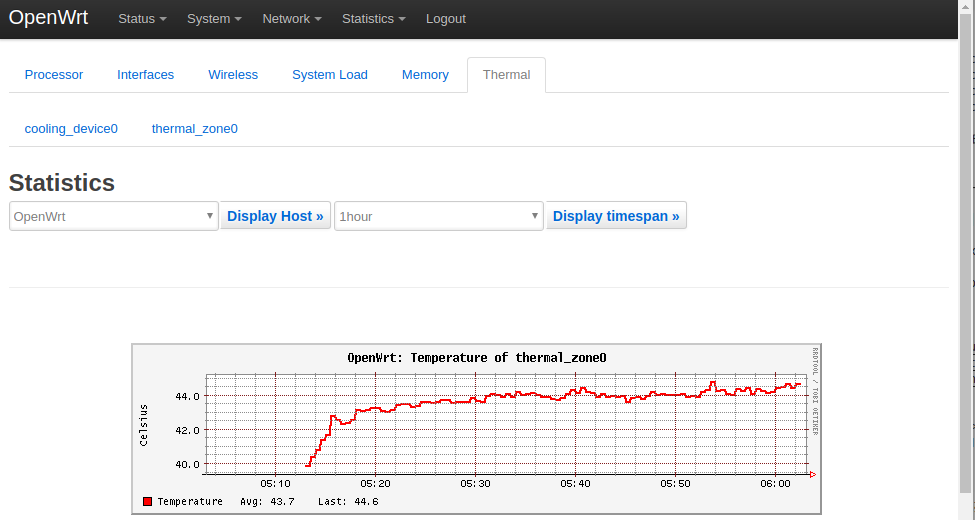
"Statistics" is collected by the luci-app-statistics package. The luci-app-statistics package uses the Collectd utility to collect statistics and presents them using the RRDtool utility.
If you want to get more statistics you can install various collectd-mod-* packages.
All collectd-mod-* packages use the same configuration file: /etc/config/luci_statistics.
- Reference Links:
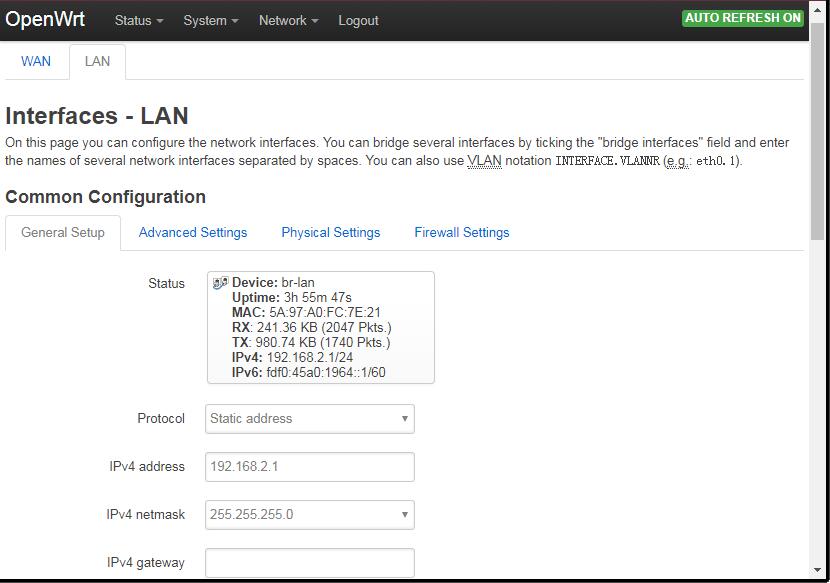
1.6 Check Network->Interfaces Configurations
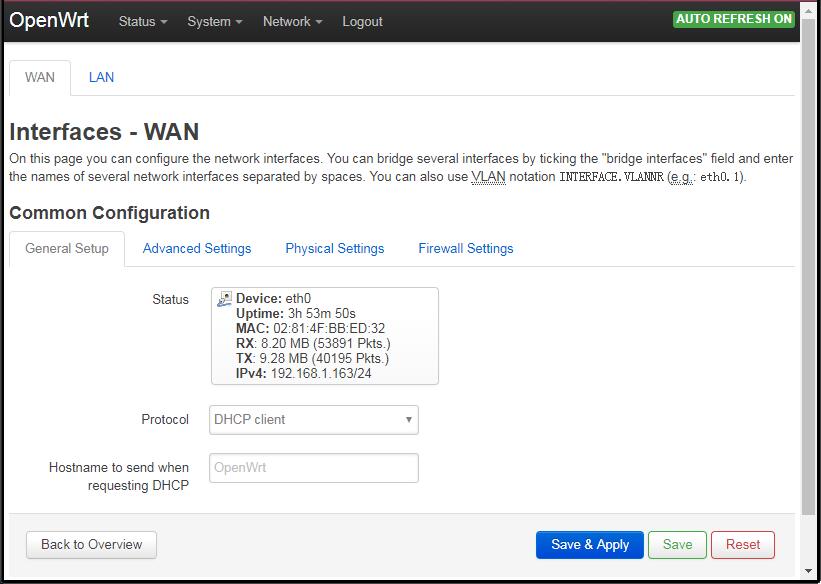
- Login OpenWrt-LuCI, go to "Network ---> Interfaces" and you will see all the configurations:
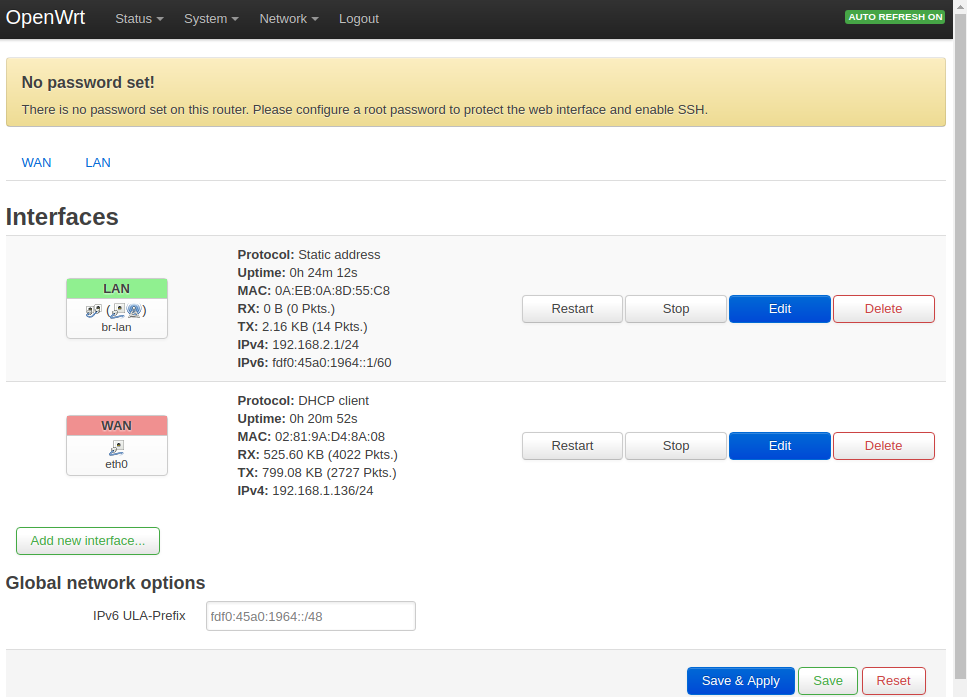
The Gbps Ethernet eth0 is configured as WAN and wlan0 is configured as LAN.
- You can set WAN or LAN by clicking on "WAN" or "LAN".
- All the configurations on the Network->Interfaces page will be saved in the "/etc/config/network" file.
1.7 Check Netwrok->Wireless Configurations
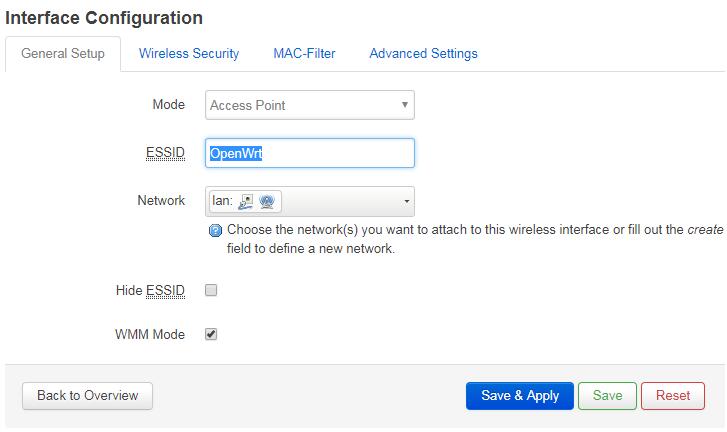
- Login OpenWrt-LuCI, go to "Network ---> Wireless" and you will see all the WiFi hotspot configurations:
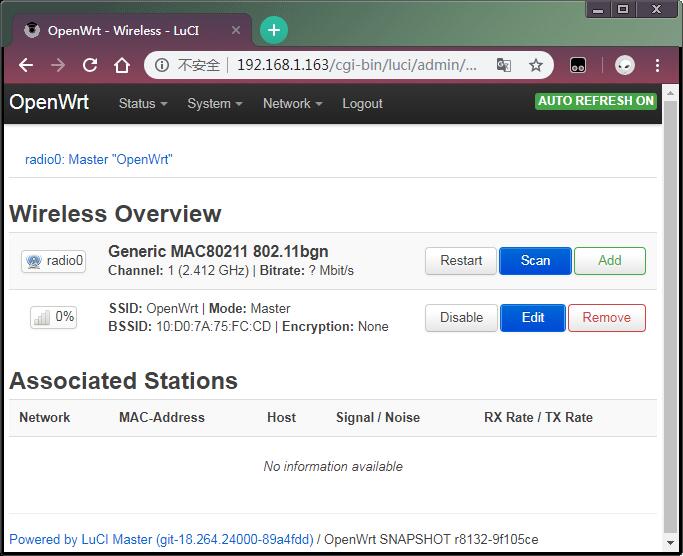
By default the WiFi AP's hotspot name is like "OpenWrt-10:d0:7a:de:3d:92" without a password. You can connect a smart phone to the WiFi hotspot.
- Click on "Edit", type a new name in Interface Configuration ---> General Setup ---> ESSID and click on Save & Apply.
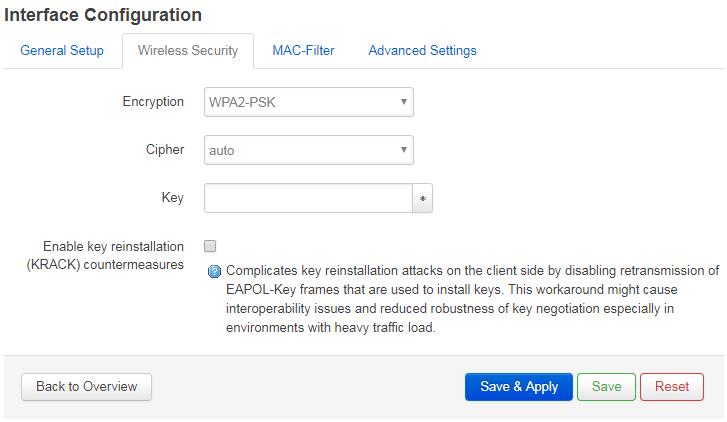
- You can set a new encryption in Interface Configuration ---> Wireless Security, a new password in Key and click on Save & Apply.
- You can see all the connected devices in Associated Stations on the Network ---> Wireless page.
- All the configurations on the Network->Wireless page will be saved in the /etc/config/wireless file.
