Difference between revisions of "Template:FriendlyCoreGeneral/zh"
(updated by API) |
(→FriendlyCore的使用) |
||
| Line 1: | Line 1: | ||
| − | == | + | ==Work with FriendlyCore== |
| − | === | + | ===Introduction=== |
| − | + | FriendlyCore is a light Linux system without X-windows, based on ubuntu core, It uses the Qt-Embedded's GUI and is popular in industrial and enterprise applications. | |
| − | + | Besides the regular Ubuntu core's features our FriendlyCore has the following additional features: | |
| − | * | + | * it supports our LCDs with both capacitive touch and resistive touch(S700, X710, HD702, S430, HD101 and S70) |
| − | * | + | * it supports WiFi |
| − | * | + | * it supports Ethernet |
| − | * | + | * it supports Bluetooth and has been installed with bluez utilities |
| − | * | + | * it supports audio playing |
| − | * | + | * it supports Qt5.9 EGLES and OpenGL ES1.1/2.0 (Only for S5P4418/S5P6818) |
| − | === | + | ===FriendlyCore's User Accounts=== |
| − | * | + | * If your board is connected to an HDMI monitor you need to use a USB mouse and keyboard. |
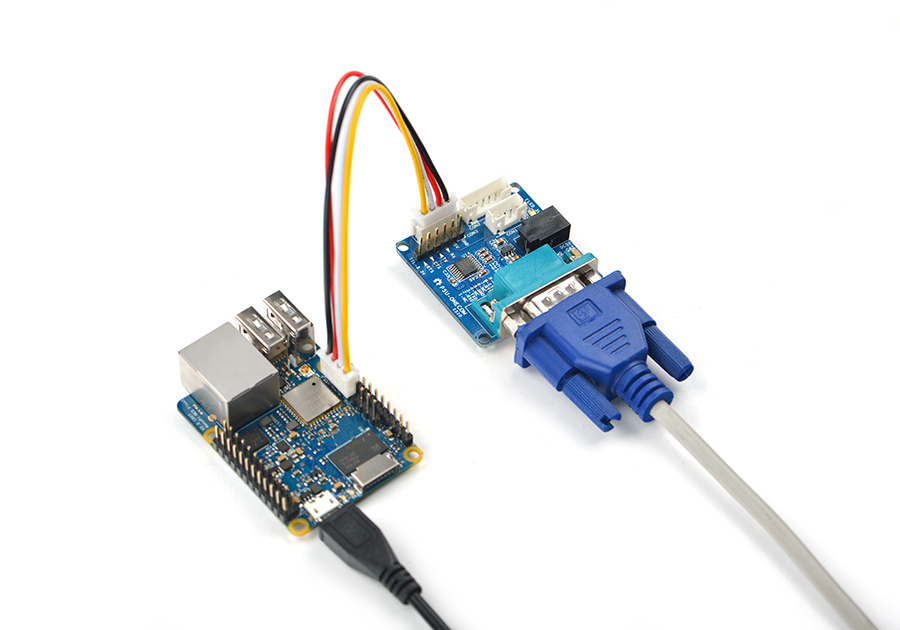
| − | * | + | * If you want to do kernel development you need to use a serial communication board, ie a PSU-ONECOM board, which will allow you to operate the board via a serial terminal.Here is a setup where we connect a board to a PC via the PSU-ONECOM and you can power on your board from either the PSU-ONECOM or its MicroUSB: |
| − | + | ||
| − | + | ||
[[File:PSU-ONECOM-NEO-Plus2.jpg|frameless|400px|PSU-ONECOM-NEO_Plus2]]<br> | [[File:PSU-ONECOM-NEO-Plus2.jpg|frameless|400px|PSU-ONECOM-NEO_Plus2]]<br> | ||
| − | + | You can use a USB to Serial conversion board too. <br> | |
| + | Make sure you use a 5V/2A power to power your board from its MicroUSB port:<br> | ||
[[File:USB2UART-NEO-Plus2.jpg|frameless|400px|USB2UART-NEO-Plus2]] | [[File:USB2UART-NEO-Plus2.jpg|frameless|400px|USB2UART-NEO-Plus2]] | ||
| − | * | + | * FriendlyCore User Accounts: |
| − | + | Non-root User: | |
| − | + | User Name: pi | |
| − | + | Password: pi | |
| + | Root: | ||
| + | User Name: root | ||
| + | Password: fa | ||
| − | + | The system is automatically logged in as "pi". You can do "sudo npi-config" to disable auto login. | |
| − | + | ||
| − | + | ||
| − | + | * Update packages | |
| − | + | ||
| − | * | + | |
<syntaxhighlight lang="bash"> | <syntaxhighlight lang="bash"> | ||
$ sudo apt-get update | $ sudo apt-get update | ||
</syntaxhighlight> | </syntaxhighlight> | ||
| − | === | + | ===Configure System with npi-config=== |
| − | npi- | + | The npi-config is a commandline utility which can be used to initialize system configurations such as user password, system language, time zone, Hostname, SSH switch , Auto login and etc. Type the following command to run this utility. |
<syntaxhighlight lang="bash"> | <syntaxhighlight lang="bash"> | ||
$ sudo npi-config | $ sudo npi-config | ||
</syntaxhighlight> | </syntaxhighlight> | ||
| − | npi- | + | Here is how npi-config's GUI looks like:<br /> |
[[File:npi-config.jpg|frameless|500px|npi-config]]<br /> | [[File:npi-config.jpg|frameless|500px|npi-config]]<br /> | ||
Revision as of 03:24, 25 December 2017
Contents
1 Work with FriendlyCore
1.1 Introduction
FriendlyCore is a light Linux system without X-windows, based on ubuntu core, It uses the Qt-Embedded's GUI and is popular in industrial and enterprise applications.
Besides the regular Ubuntu core's features our FriendlyCore has the following additional features:
- it supports our LCDs with both capacitive touch and resistive touch(S700, X710, HD702, S430, HD101 and S70)
- it supports WiFi
- it supports Ethernet
- it supports Bluetooth and has been installed with bluez utilities
- it supports audio playing
- it supports Qt5.9 EGLES and OpenGL ES1.1/2.0 (Only for S5P4418/S5P6818)
1.2 FriendlyCore's User Accounts
- If your board is connected to an HDMI monitor you need to use a USB mouse and keyboard.
- If you want to do kernel development you need to use a serial communication board, ie a PSU-ONECOM board, which will allow you to operate the board via a serial terminal.Here is a setup where we connect a board to a PC via the PSU-ONECOM and you can power on your board from either the PSU-ONECOM or its MicroUSB:

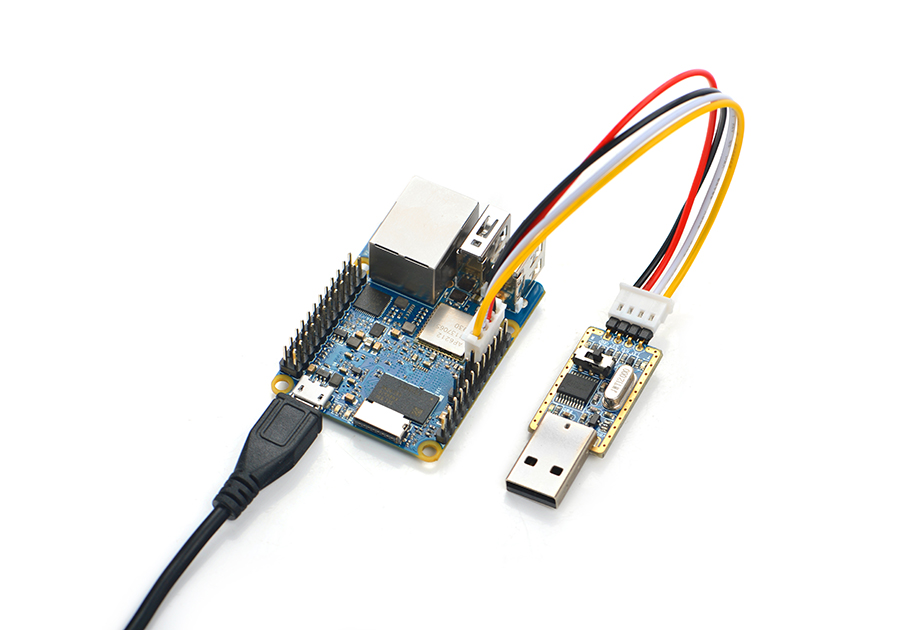
You can use a USB to Serial conversion board too.
Make sure you use a 5V/2A power to power your board from its MicroUSB port:

- FriendlyCore User Accounts:
Non-root User:
   User Name: pi
   Password: pi
Root:
   User Name: root
   Password: fa
The system is automatically logged in as "pi". You can do "sudo npi-config" to disable auto login.
- Update packages
$ sudo apt-get update
1.3 Configure System with npi-config
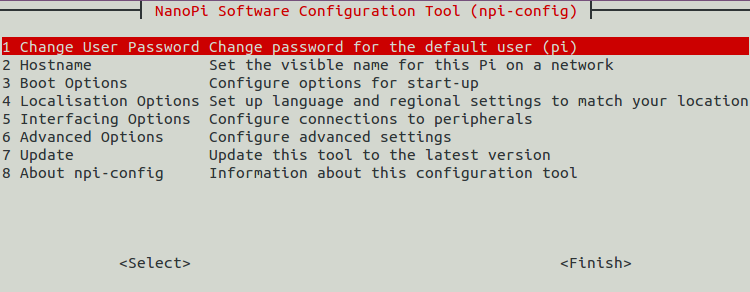
The npi-config is a commandline utility which can be used to initialize system configurations such as user password, system language, time zone, Hostname, SSH switch , Auto login and etc. Type the following command to run this utility.
$ sudo npi-config
Here is how npi-config's GUI looks like:

1.4 扩展TF卡文件系统
第一次启动FriendlyCore系统时,系统会自动扩展文件系统分区,请耐心等待,TF卡/eMMC的容量越大,需要等待的时间越长,进入系统后执行下列命令查看文件系统分区大小:
df -h
1.5 连接WiFi
FriendlyCore 使用 NetworkManager 工具来管理网络,其在命令行下对应的命令是 nmcli,要连接WiFi,相关的命令如下:
- 查看网络设备列表
$ sudo nmcli dev
注意,如果列出的设备状态是 unmanaged 的,说明网络设备不受NetworkManager管理,你需要清空 /etc/network/interfaces下的网络设置,然后重启.
- 开启WiFi
$ sudo nmcli r wifi on
- 扫描附近的 WiFi 热点
$ sudo nmcli dev wifi
- 连接到指定的 WiFi 热点
$ sudo nmcli dev wifi connect "SSID" password "PASSWORD"
请将 SSID和 PASSWORD 替换成实际的 WiFi名称和密码。
连接成功后,下次开机,WiFi 也会自动连接。
更详细的NetworkManager使用指南可参考这篇文章: Use NetworkManager to configure network settings
- 使用USB WiFi
系统已经支持市面上众多常见的USB WiFi,已测试过的USB WiFi型号如下:
序号 型号 1 RTL8188CUS/8188EU 802.11n WLAN Adapter 2 RT2070 Wireless Adapter 3 RT2870/RT3070 Wireless Adapter 4 RTL8192CU Wireless Adapter 5 小米WiFi mt7601
1.6 连接以太网
默认插上网线开机,会自动连接并通过DHCP获取IP地址,如需要配置静态IP地址,请参考 NetworkManager 的相关文档: Use NetworkManager to configure network settings。
1.7 使用蓝牙
如果你的开发板板载有蓝牙模块,可输入以下命令搜索周边的蓝牙设备:
hcitool scan
使用hciconfig命令来了解接口的状态。
1.8 播放音频
在串口终端执行以下aplay命令播放一段音频:
aplay -t raw -c 2 -f S16_LE -r 44100 /root/test.pcm
1.9 HDMI输出声音
系统默认从3.5mm耳机座输出声音,想从HDMI输出需要修改文件系统上的配置文件/etc/asound.conf如下:
pcm.!default {
    type hw
    card 1
    device 0
}

ctl.!default {
    type hw
    card 1
}
card 0代表3.5mm耳机孔,card 1代表HDMI音频。设置完成后需要重启系统才能生效。
1.10 连接USB摄像头模块(FA-CAM202)
FA-CAM202是一款200万像素的USB摄像头模块。
连接测试USB摄像头的方法请参考:连接DVP摄像头模块(CAM500B)
1.11 开发自已的Qt应用
请参考 How to build Qt application
1.12 开机自动运行Qt示例程序
使用npi-config工具进行开启:
sudo npi-config进入Boot Options -> Autologin -> Qt/Embedded,选择Enable然后重启即可。