Difference between revisions of "Debian Jessie"
(→Connect to DVP Camera CAM500B) |
|||
| Line 195: | Line 195: | ||
<br /> | <br /> | ||
For more details about NetworkManager refer to this link:[[Use NetworkManager to configure network settings]]<br /> | For more details about NetworkManager refer to this link:[[Use NetworkManager to configure network settings]]<br /> | ||
| − | |||
| − | |||
| − | |||
| − | |||
| − | |||
| − | |||
| − | |||
| − | |||
| − | |||
| − | |||
| − | |||
| − | |||
| − | |||
| − | |||
| − | |||
| − | |||
| − | |||
| − | |||
| − | |||
| − | |||
| − | |||
| − | |||
| − | |||
| − | |||
| − | |||
| − | |||
| − | |||
| − | |||
| − | |||
| − | |||
| − | |||
| − | |||
===Connect to USB Camera(FA-CAM202)=== | ===Connect to USB Camera(FA-CAM202)=== | ||
Revision as of 07:18, 21 December 2017
1 Download debian image file
1.1 S5P4418 Boards
Get the following files from:download link,Image filename:
| s5p4418-debian-sd8g-20171017.img.zip | Debian8-Desktop |
1.2 S5P6818 Boards
Get the following files from:download link,Image filename:
| s5p6818-debian-sd8g-20171102.img.zip | Debian8-Desktop |
2 Working with Debian
2.1 Ethernet Connection
- If the board is connected to a network via Ethernet before it is powered on, it will automatically obtain an IP after it is powered up.
2.2 Wireless Connection
Under Debian you can manage your network with NetworkManager.
After Debian boots click on the network icon on the bottom right of the task bar a NetworkManger menu will pop up and all the available networks will be listed. If there is an active wireless network you will see something similar to the following screenshot:
![]()
You can click on a WiFI AP and connect your board to it.
For more details refer to:NetworkManager.
2.3 Setup Wi-Fi AP
Follow the steps below. Since our OS image by default already has the NetworkManager utility you will be prompted to uninstall it first:
sudo turn-wifi-into-apmode yes
After you uninstall the NetworkManager reboot your board.
After your board is rebooted run the above commands again and you will be prompted to type in a WIFI's name and password. Type in your wanted name and password
If this is successful you will be able to find and connect your board to a WIFI. Login to your board at 192.168.8.1:
ssh root@192.168.8.1
Type in a password. In our system the password is "fa".
To login smoothly via SSH we recommend you turning off WIFI's power save mode by running the following commands:
sudo iwconfig wlan0 power offYou can check your WiFi's mode by running the following command:
sudo cat /sys/module/bcmdhd/parameters/op_mode
Number 2 means your WiFi is in AP mode. You can switch to the Station mode by running the following command:
sudo turn-wifi-into-apmode no2.4 Bluetooth
Here are the steps to transfer a file from T2 to a mobile phone. Run the following command to search a surrounding Bluetooth device:
hcitool scan
In our example a mobile phone was detected and the following messages were listed:
Scanning ...
38:BC:1A:B1:7E:DD MEIZU MX4
These messages indicated that a MEIZU MX4 mobile phone was detected. We then checked the Bluetooth services this phone supported with its MAC address presented in front of its device name
sdptool browse 38:BC:1A:B1:7E:DDNote: you need to use your device's name and its MAC address when you run these commands.
The command listed all the services the phone supported. We needed the "OBEX Object Push" service which is for file transfers.
Service Name: OBEX Object Push
Service RecHandle: 0x1000b
Service Class ID List:
"OBEX Object Push" (0x1105)
Protocol Descriptor List:
"L2CAP" (0x0100)
"RFCOMM" (0x0003)
Channel: 25
"OBEX" (0x0008)
Profile Descriptor List:
"OBEX Object Push" (0x1105)
Version: 0x0100
From the above messages we could get the channel number 25 for the "OBEX Object Push" service. We input this number to the "ussp-push" by running the following command:
ussp-push 38:BC:1A:B1:7E:DD@25 example.jpg example.jpg
Note: you need to use your device's name, its MAC address and channel number when you run these commands.
Usually after the above commands are run a popup window will show on the phone that communicates with T2 and you can start file transfers.
Common Issues:
1) If T2 cannot find a Bluetooth device you can try this command to restart its Bluetooth:
rfkill unblock 02) If any of these commands is not installed you can try this command to install it:
apt-get install bluetooth bluez obexftp openobex-apps python-gobject ussp-push2.5 Install Debian Packages
We provide a Debian Jessie image. You can install Jessie's packages by commanding "apt-get". If this is your first installation you need to update the package list by running the following command
apt-get updateYou can install your preferred packages. For example if you want to install an FTP server you can do this:
apt-get install vsftpdNote: you can change your download server by editting "/etc/apt/sources.list". You can get a complete server list from [1]. You need to select the one with "armhf".
2.6 Audio Output from HDMI or 3.5mm Jack under Debian
Our default Debian image doesn't support audio output. If you want to enable this function you need to install the alsa package.
- Make sure your Debian OS is our latest version and your board has access to the internet;
- Power up your board and run the following commands on your board's commandline utility to install the alsa package:
apt-get update
apt-get install libasound2
apt-get install alsa-base
apt-get install alsa-utils
- After the installation is done copy a ".wav" audio file to your board, connect your board to a earphone or speaker and try playing this audio file(By default Debian's audio output is from the 3.5mm audio jack):
aplay music.wav- By default Debian's audio output is from the 3.5mm audio jack. If you want audio output from the HDMI you need to change the setting by editing the "/etc/asound.conf" file:
pcm.!default {
    type hw
    card 1
    device 0}

ctl.!default {
    type hw
    card 1}
card 0 stands for the 3.5mm audio jack and card 1 stands for the HDMI audio. After you make your change reboot your board to make it effective.
2.7 Login via VNC and SSH
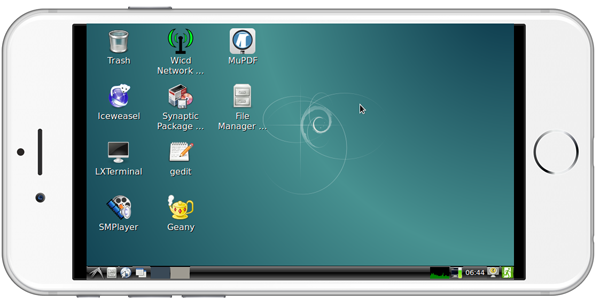
If your board is not connected to a display device you can login to your board from a mobile phone. You need to download and install a "VNC Viewer" from here on a mobile phone and login to the board via VNC at port 1. Its default password is "fa123456".
Here is a screenshot which shows how it looks like when users login to the board from an iPhone via VNC:

In our case our board's IP address is 192.168.1.230. You can login via SSH by running the following commands:
$ ssh root@192.168.1.230
The password is fa.
2.8 Test USB WiFi
Our OS system has support for popular USB WiFi drivers. Many USB WiFi modules are plug and play with our system. Here is a list of models we tested;
Number Model 1 RTL8188CUS 802.11n WLAN Adapter 2 RT2070 Wireless Adapter 3 RT2870/RT3070 Wireless Adapter 4 RTL8192CU Wireless Adapter 5 mi WiFi mt7601
- Check device list
$ nmcli dev
DEVICE  TYPE      STATE         CONNECTION
eth0    ethernet  connected     Wired connection 1
wlan0   wifi      disconnected  --
lo      loopback  unmanaged     --
Note: if the status of a device is "unmanaged" it means that device cannot be accessed by NetworkManager. To make is accessed you need to clear the settings under "/etc/network/interfaces" and reboot your system.
- Start WiFi
$ nmcli r wifi on- Scan Surrounding WiFi Sources
$ nmcli dev wifi- Connect to a WiFi Source
$ nmcli dev wifi connect "SSID" password "PASSWORD"
The "SSID" and "PASSWORD" need to be replaced with your actual SSID and password.
If a connection succeeds it will be automatically setup on next system reboot.
For more details about NetworkManager refer to this link:Use NetworkManager to configure network settings
2.9 Connect to USB Camera(FA-CAM202)
The FA-CAM202 is a 200M USB camera.
Refer to this link for more details on how to connect to a FA-CAM202:
Connect NanoPi M1 to DVP Camera CAM500B
2.10 Use OpenCV to Access Camera
- The full name of "OpenCV" is Open Source Computer Vision Library and it is a cross platform vision library.
- Make sure your board is connected to the internet and an HDMI monitor, Boot Debian and login.
- Install OpenCV libraries:
$ apt-get update
$ apt-get install libcv-dev libopencv-dev
- Refer to the instructions in the previous sections to make sure the camera works
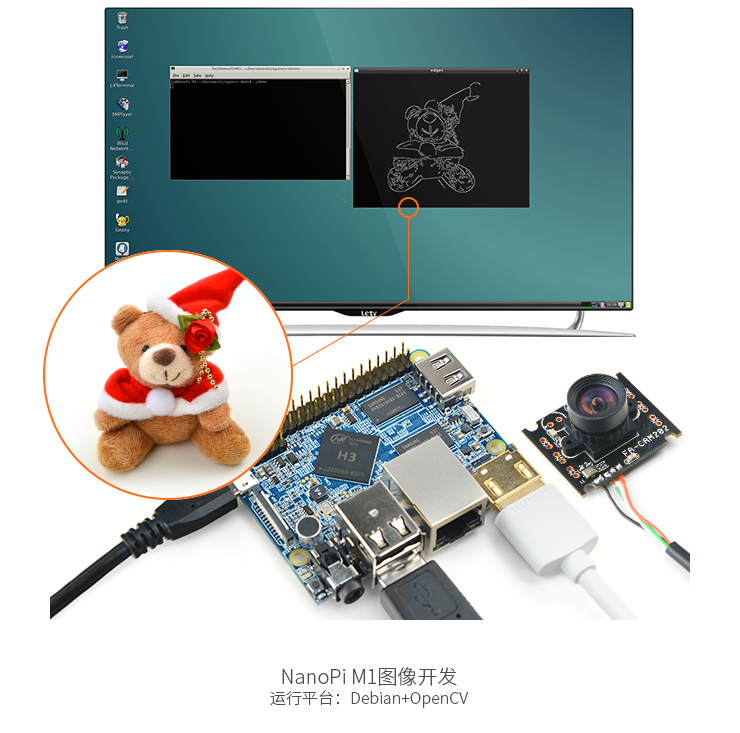
- Compile and run a code sample(Official Code Sample in C++ provided by the OpenCV organization):
$ cd /home/fa/Documents/opencv-demo
$ make
$ ./demo
Here is what you expect to observe:

3 Only Support H3 Platform
3.1 Check CPU's Working Temperature
You can use the following command to read H3's temperature and frequency
cpu_freq
3.2 Check System Information with Rpi-Monitor
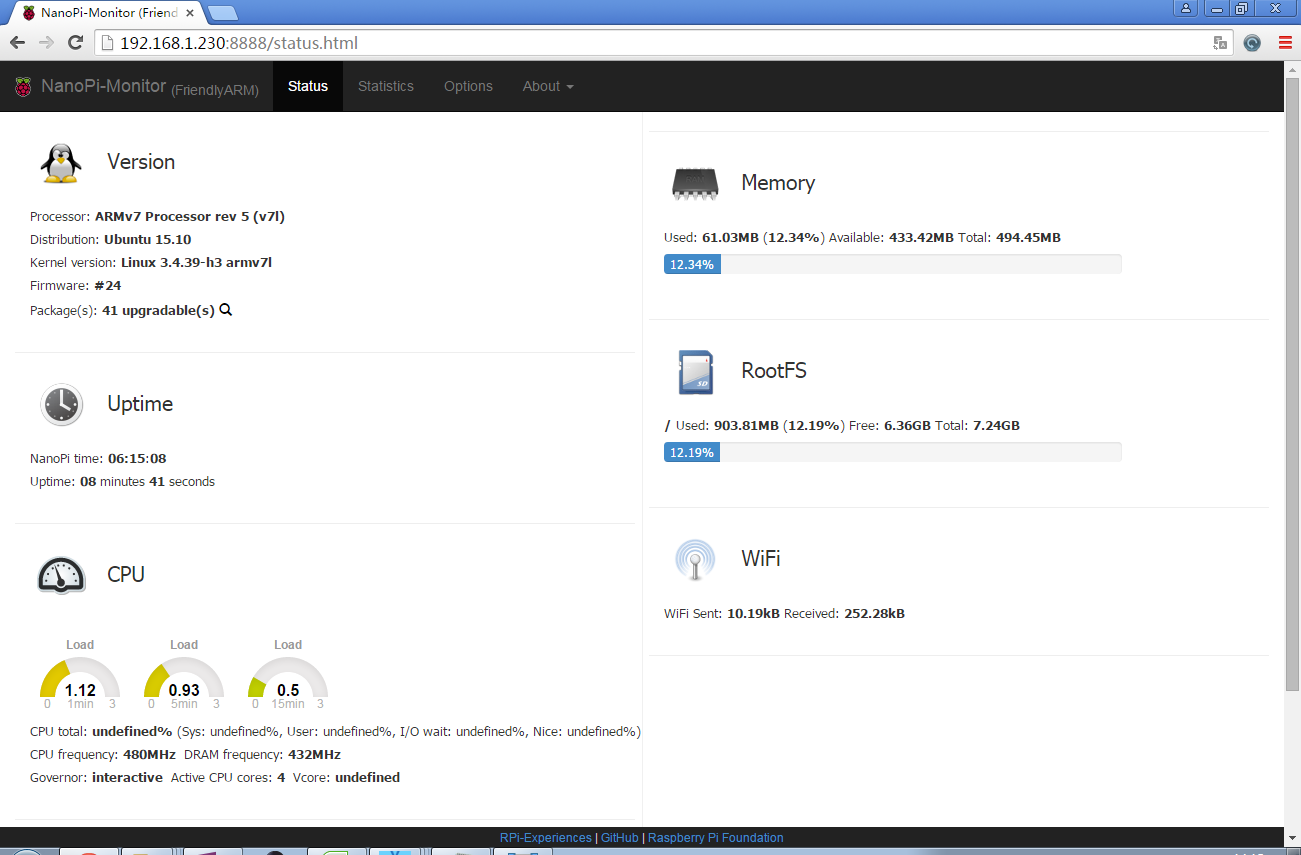
Our OS contains the Rpi-Monitor utility with which users can check system information and status.
In our case our board's IP was 192.168.1.230 and we typed the following IP in a browser:
192.168.1.230:8888We were directed to the following page:

Users can easily check these system information and status.
3.3 Test GPU
Note: this function is only supported in Allwinner Linux-3.4.y.
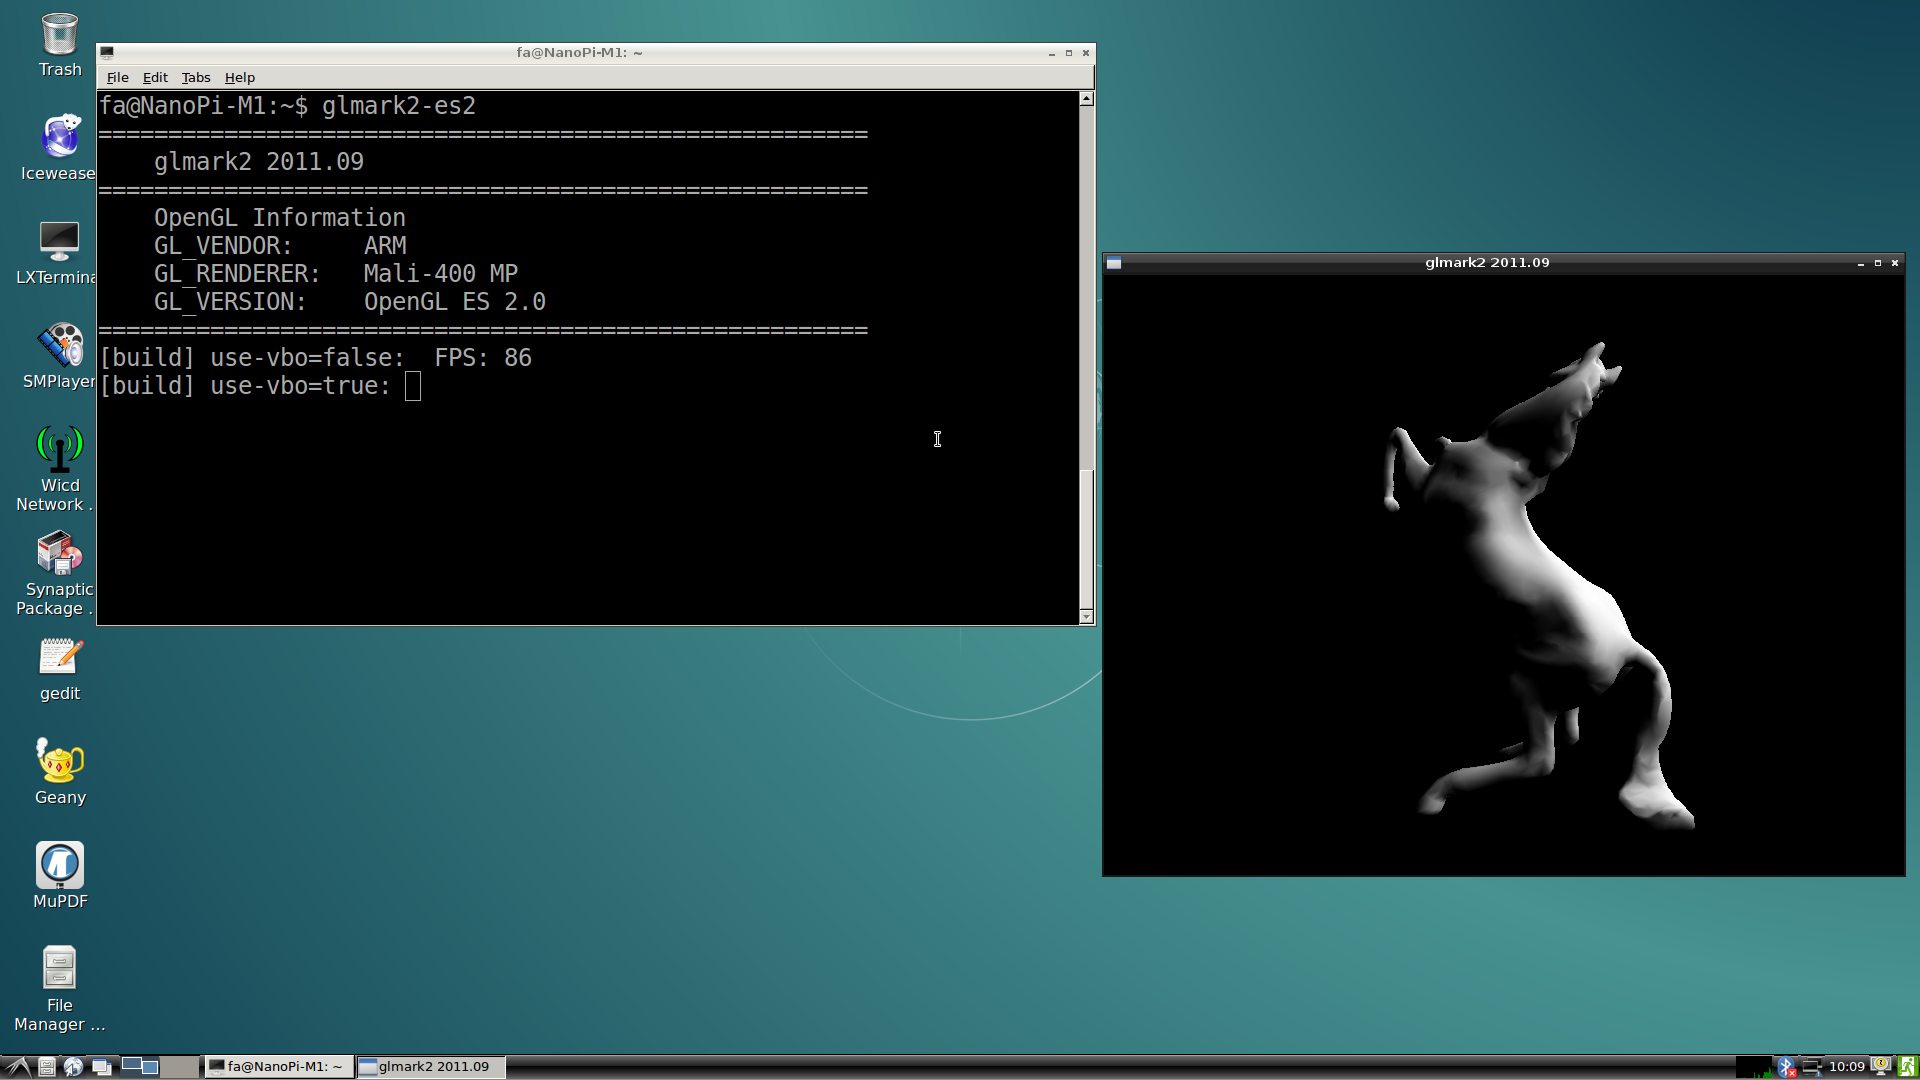
After OS loads please login from a terminal and run the following command:
glmark2-es2
3.4 Test VPU
Note: this function is only supported in Allwinner Linux-3.4.y
Visit this link download link to download files
After OS is loaded login from a terminal and run the following commands:
$ sudo apt-get install mpv
$ video_play mpv ./big_buck_bunny_1080p_H264_AAC_25fps_7200K.MP4
In our test it could do hard coding and play 1080P video fluently.
