Difference between revisions of "Matrix - Sound Sensor/zh"
(→使用方法) |
|||
| Line 3: | Line 3: | ||
==介绍== | ==介绍== | ||
[[File:SoundSensor01.png|thumb|Sound Sensor]] | [[File:SoundSensor01.png|thumb|Sound Sensor]] | ||
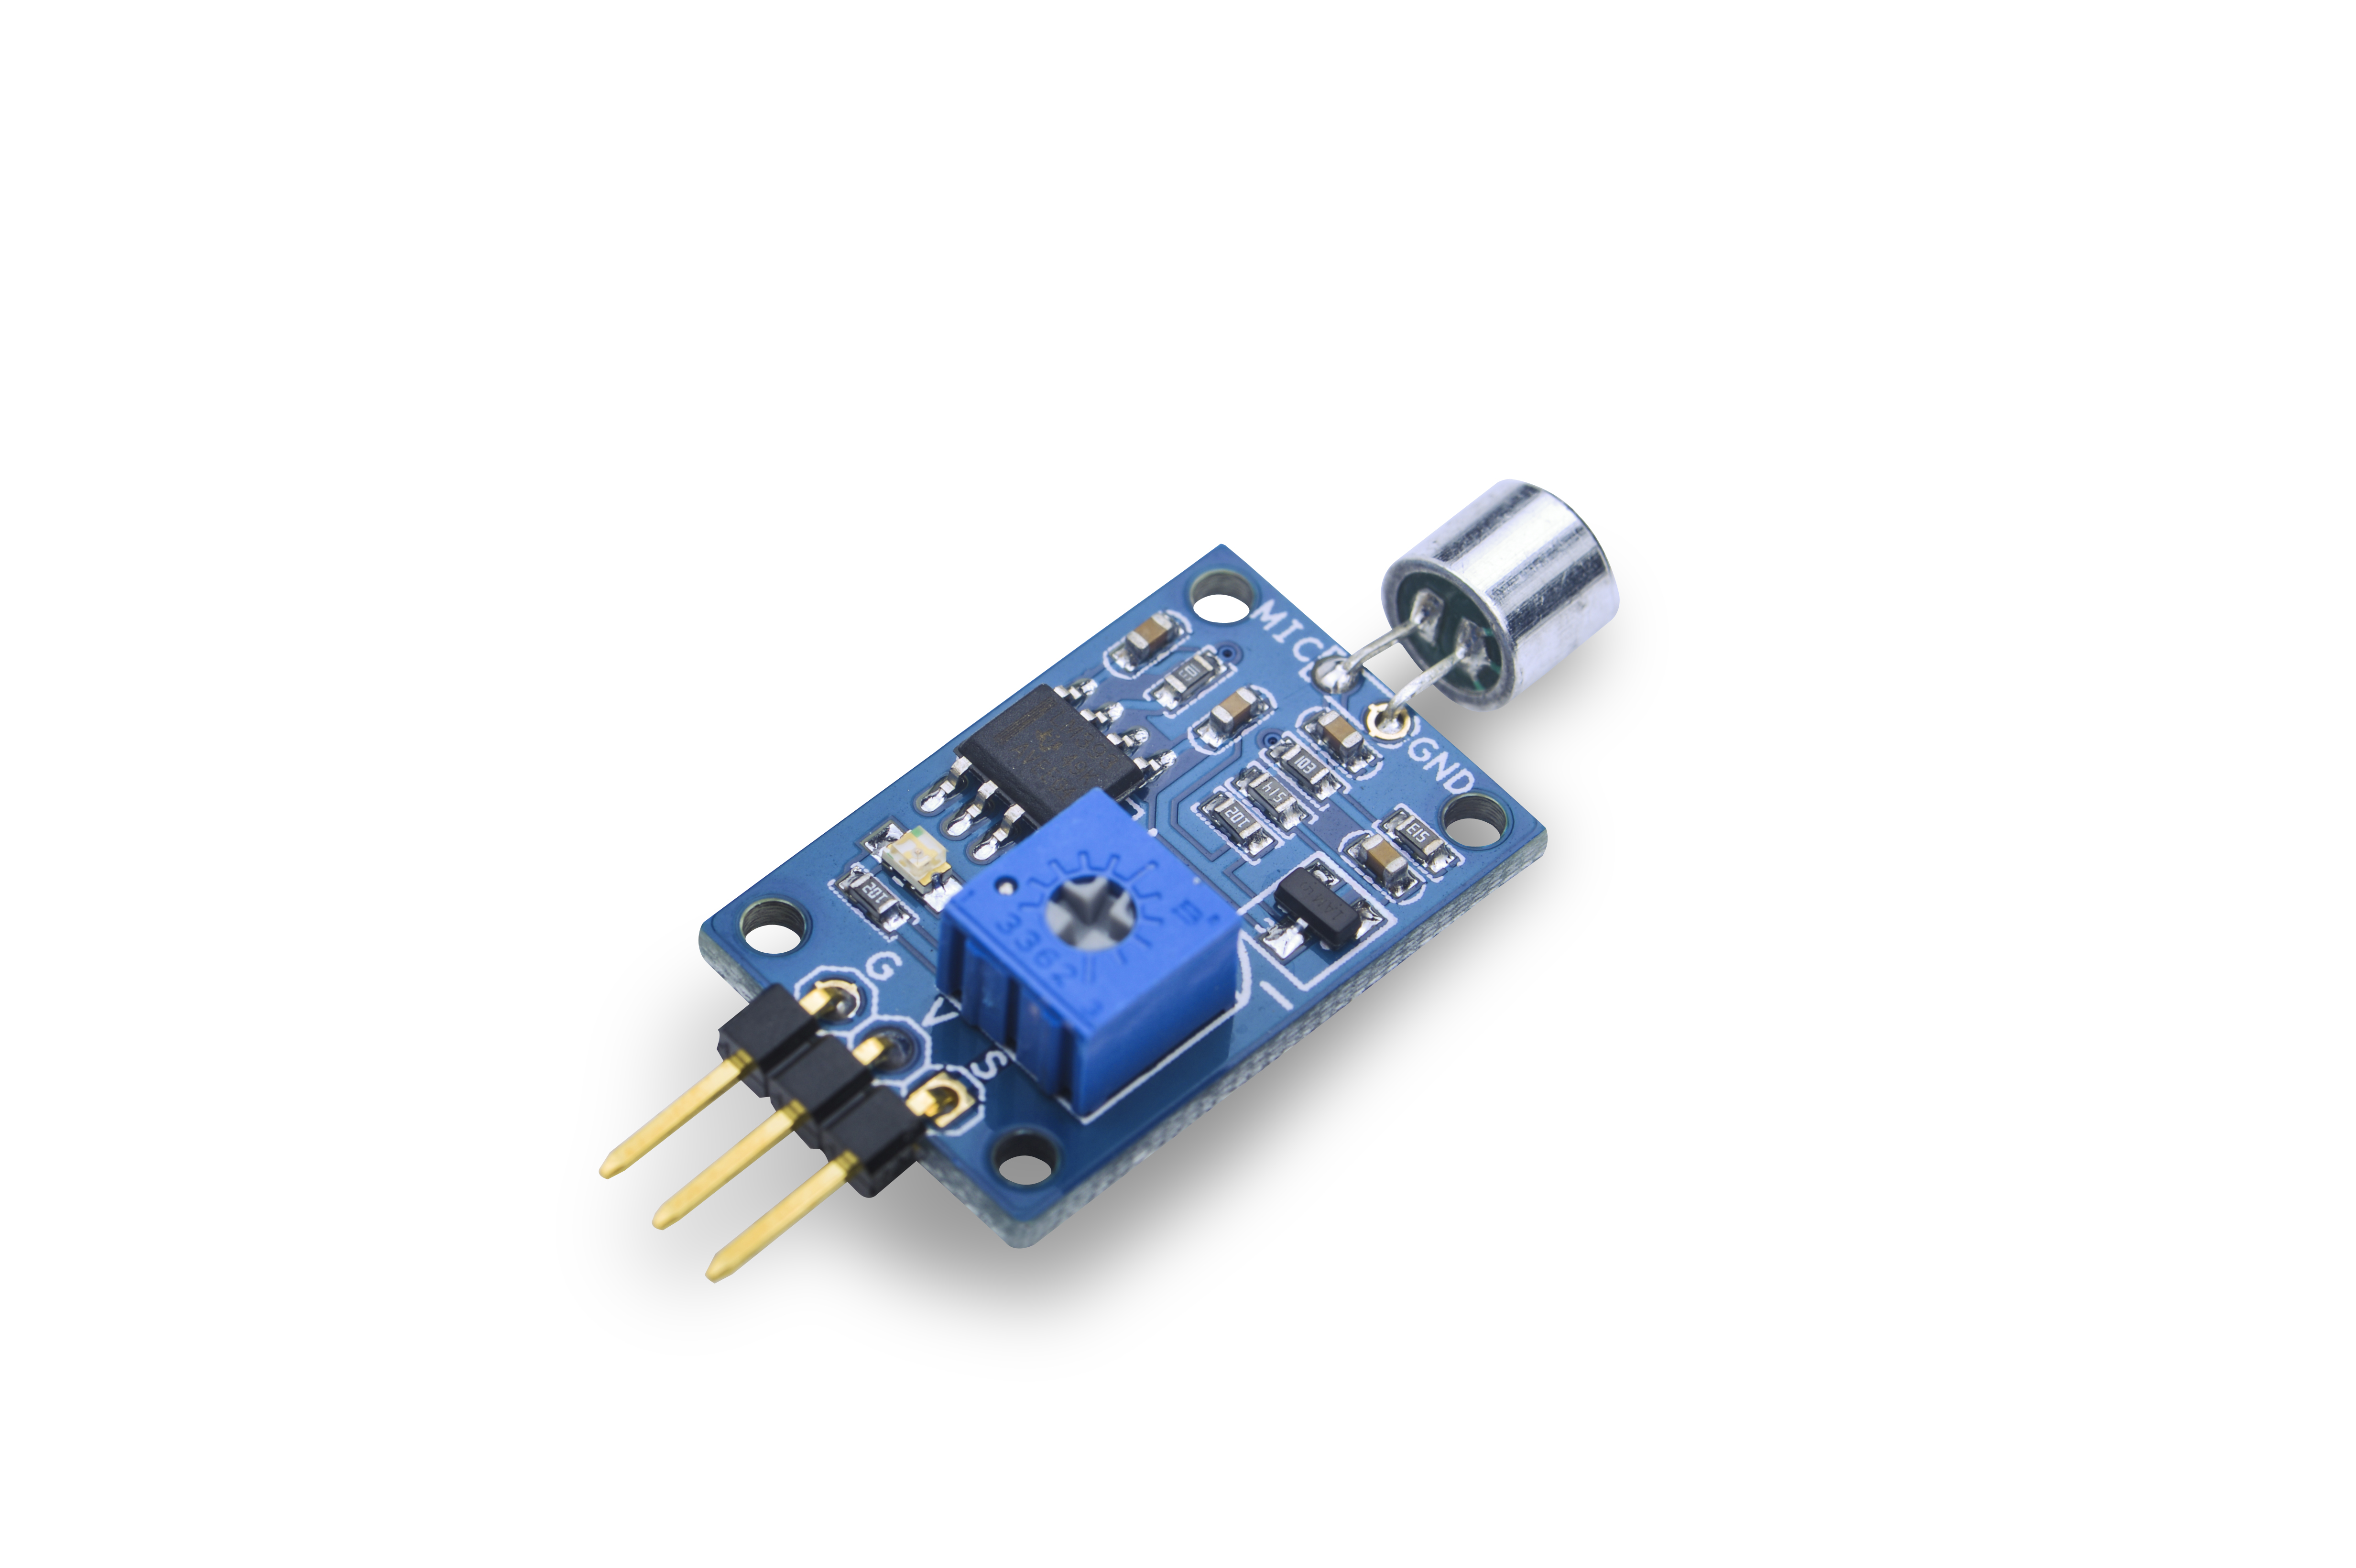
| − | + | 模块Matrix-Sound_sensor在默认状态下输出高电平,当检测到有声音的时候输出低电平,声音消失后恢复高电平,没有延时。配件上面的可调电阻可以调整响应的阀值,也即音量。顺时针旋转可调电阻增大阀值,即音量较大时才被检测到。 | |
==特性== | ==特性== | ||
| Line 10: | Line 10: | ||
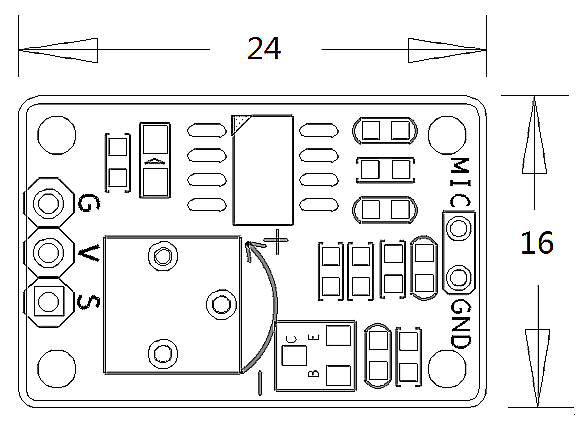
* PCB尺寸(mm):16x24 | * PCB尺寸(mm):16x24 | ||
[[File:micpcb.png|frameless|400px|声音传感器PCB]] | [[File:micpcb.png|frameless|400px|声音传感器PCB]] | ||
| + | 引脚说明: <br> | ||
| + | * V:接电源5V | ||
| + | * G:接地 | ||
| + | * S:接GPIO | ||
==工作原理== | ==工作原理== | ||
该传感器内置一个对声音敏感的电容式驻极体话筒。声波使话筒内的驻极体薄膜振动,导致电容的变化,而产生与之对应变化的微小电压。声音传感器的作用相当于一个话筒(麦克风)。它用来接收声波,显示声音的振动图象。当接收当声音时会输出1,但不能对噪声的强度进行测量。 | 该传感器内置一个对声音敏感的电容式驻极体话筒。声波使话筒内的驻极体薄膜振动,导致电容的变化,而产生与之对应变化的微小电压。声音传感器的作用相当于一个话筒(麦克风)。它用来接收声波,显示声音的振动图象。当接收当声音时会输出1,但不能对噪声的强度进行测量。 | ||
| − | == | + | ==下载Matrix源码== |
| − | + | Matrix配件相关的代码是完全开源的,统一由一个仓库进行管理:git://github.com/friendlyarm/matrix.git <br> | |
| − | : | + | 该仓库里不同的分支代表着Matrix配件所支持的不同开发板。<br> |
| − | + | *matrix-nanopi分支包含了Matrix对NanoPi的支持; | |
| − | + | *matrix-tiny4412分支包含了Matrix对Tiny4412的支持; | |
| − | * | + | *matrix-raspberrypi分支包含了Matrix对RaspberryPi的支持; |
| − | + | 在主机PC上安装git,以Ubuntu14.04为例 | |
| − | + | <syntaxhighlight lang="bash"> | |
| − | + | $ sudo apt-get install git | |
| + | </syntaxhighlight> | ||
| + | 克隆Matrix配件代码仓库 | ||
| + | <syntaxhighlight lang="bash"> | ||
| + | $ git clone git://github.com/friendlyarm/matrix.git | ||
| + | </syntaxhighlight> | ||
| + | 克隆完成后会得到一个matrix目录,里面存放着所有Matrix配件的代码。 | ||
| − | === | + | ==与NanoPi连接使用== |
| − | + | ===准备工作=== | |
| − | + | 在NanoPi上运行Debian系统,安装并使用相应的编译器。参考wiki:[[http://wiki.friendlyarm.com/wiki/index.php/NanoPi]] | |
| − | + | ||
| + | ===硬件连接=== | ||
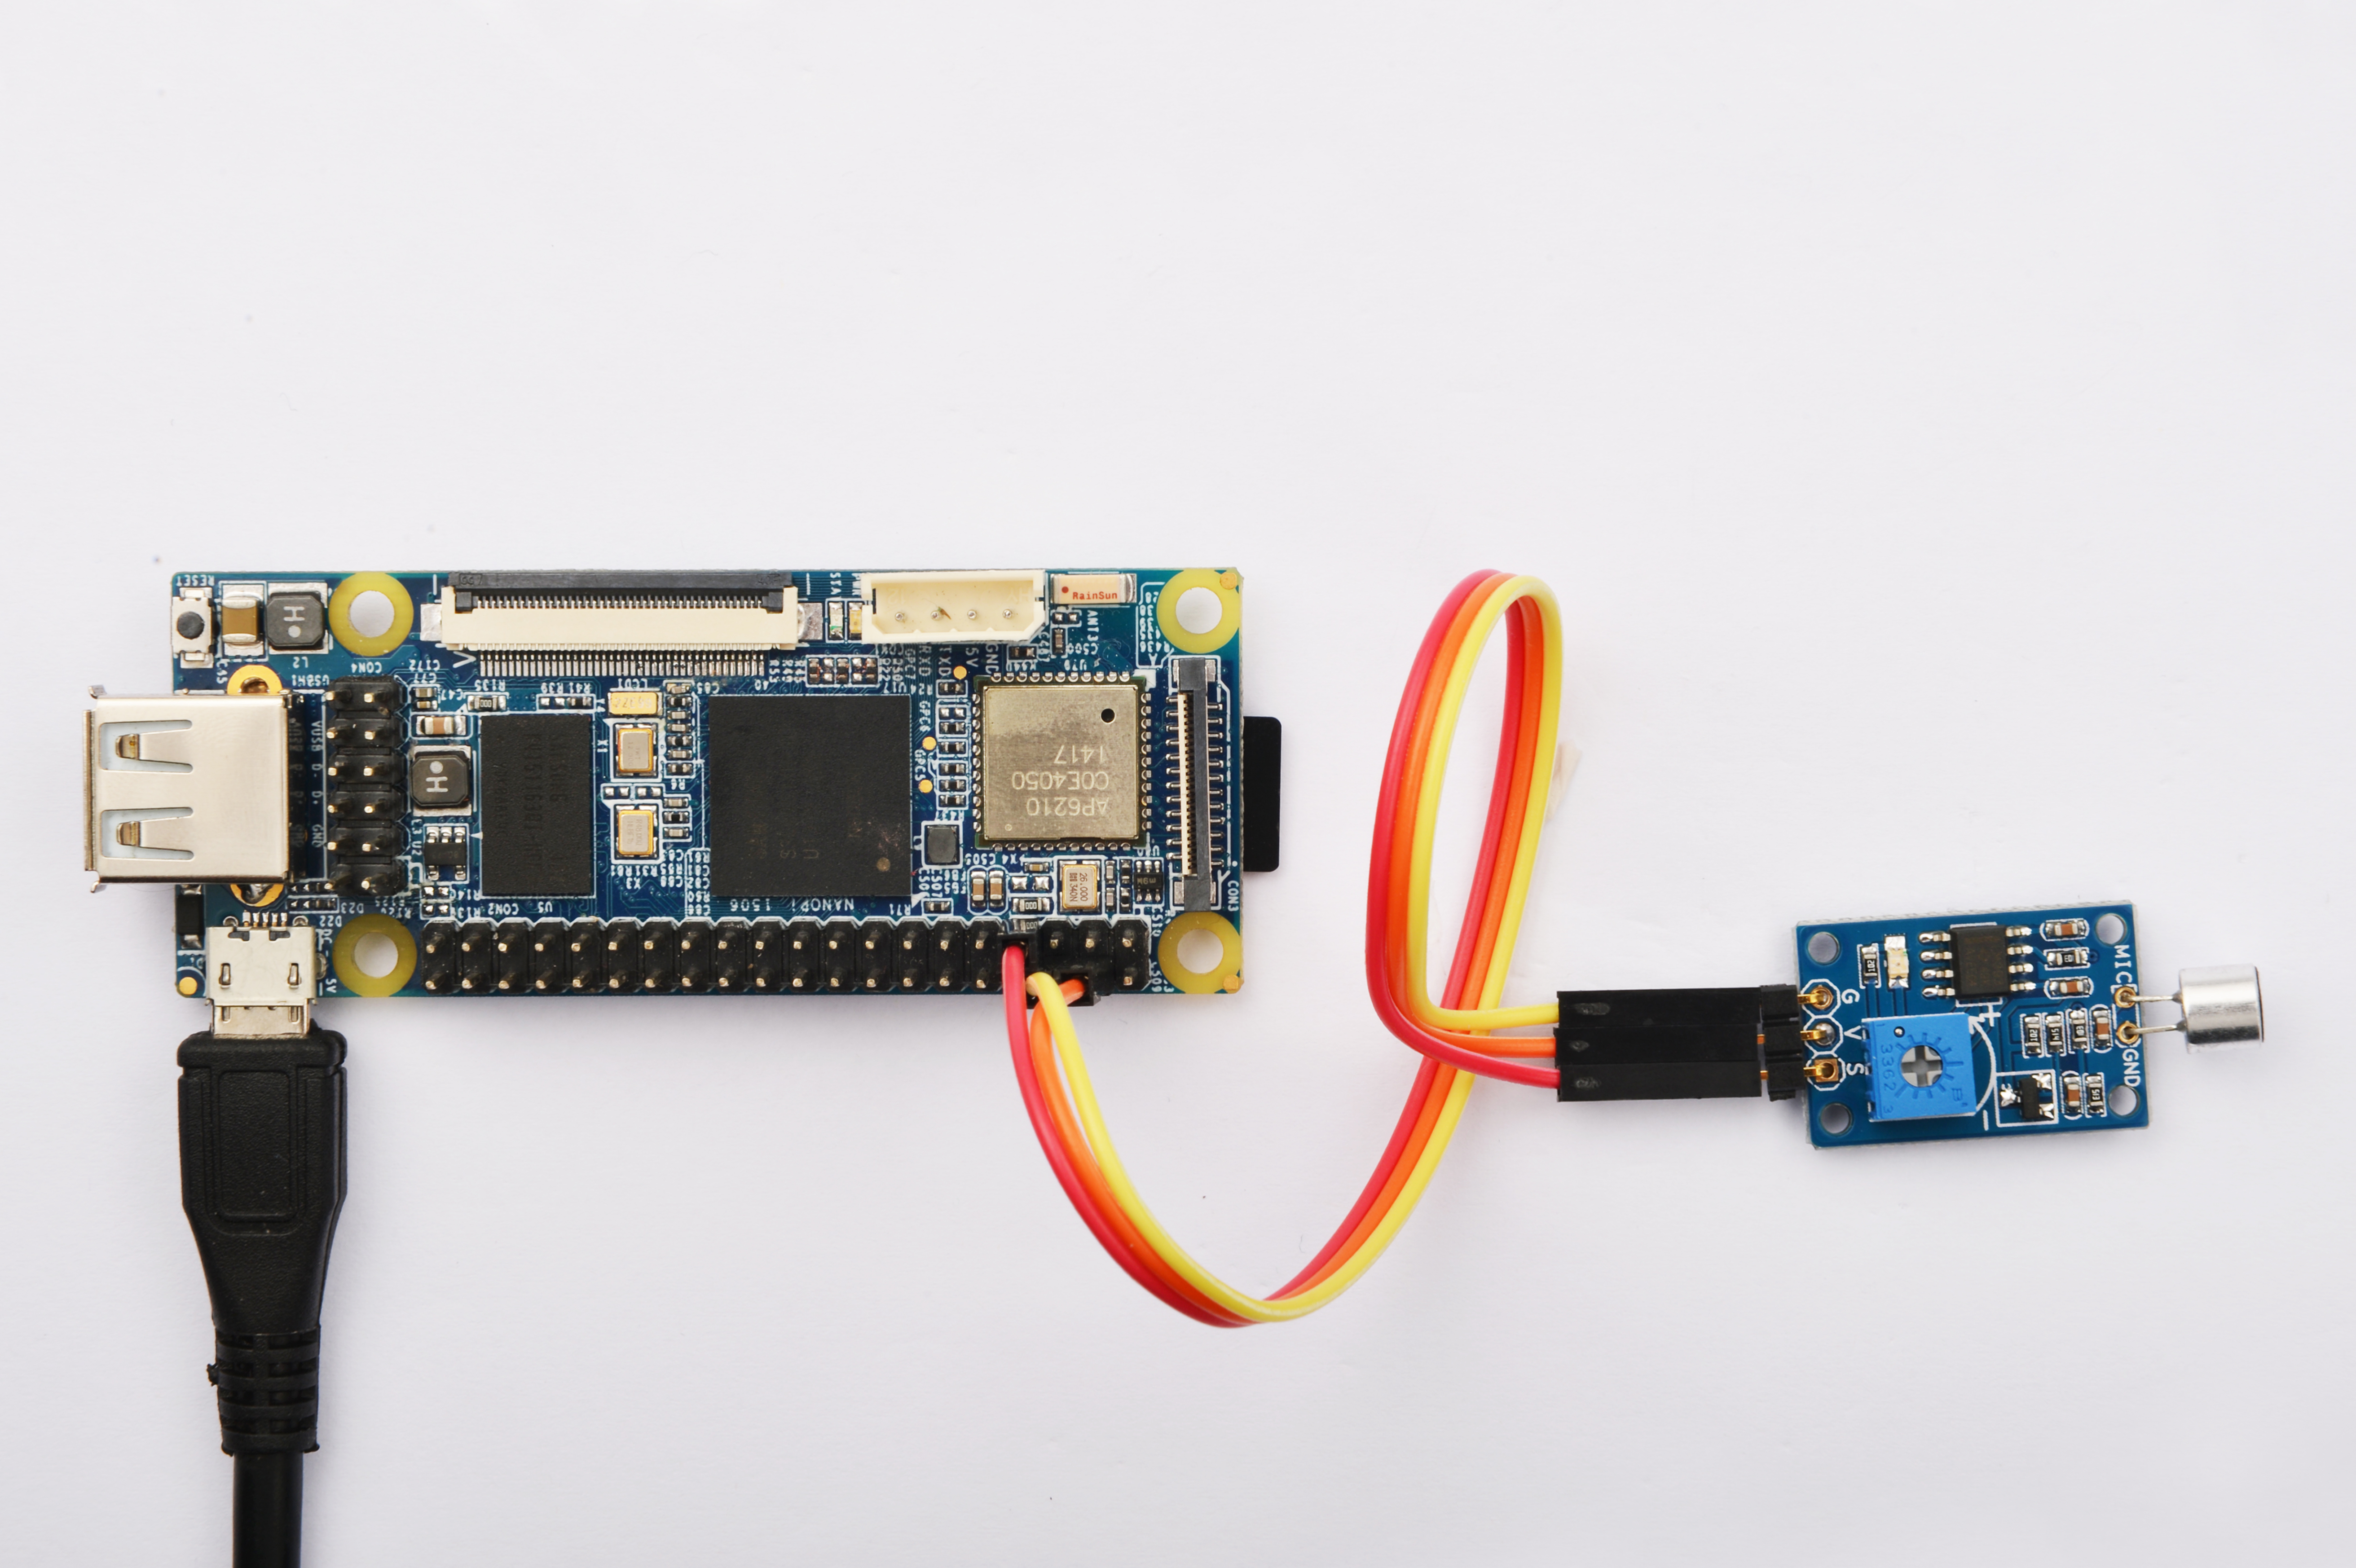
| + | 参考下图连接模块Matrix-Sound_sensor和NanoPi <br> | ||
| + | [[File:matrix-sound_sensor_nanopi.jpg|frameless|600px|matrix-sound_sensor_nanopi]] | ||
| + | |||
| + | ===编译测试程序=== | ||
| + | 进入Matrix代码仓库,切换到matrix-nanopi分支 | ||
| + | <syntaxhighlight lang="bash"> | ||
| + | $ cd matrix | ||
| + | $ git checkout matrix-nanopi | ||
| + | </syntaxhighlight> | ||
| + | |||
| + | 编译Matrix配件代码 | ||
| + | <syntaxhighlight lang="bash"> | ||
| + | $ make CROSS_COMPILE=arm-linux- clean | ||
| + | $ make CROSS_COMPILE=arm-linux- | ||
| + | $ make CROSS_COMPILE=arm-linux- install | ||
| + | </syntaxhighlight> | ||
| + | 注意:请确保你的主机PC当前使用的交叉编译器为NanoPi-Debian配套的arm-linux-gcc.4.4.3。<br> | ||
| + | 编译出来的库文件位于install/lib目录下,而测试程序则位于install/bin目录下,模块Matrix-Sound_sensor对应的测试程序为matrix-sound_sensor。<br> | ||
| + | |||
| + | ===运行测试程序=== | ||
| + | 拷贝库文件和测试程序到NanoPi的文件系统上 | ||
| + | <syntaxhighlight lang="bash"> | ||
| + | $ cp install/bin/* nanopi_rootfs/bin/ | ||
| + | $ cp install/lib/* nanopi_rootfs/lib/ -d | ||
| + | </syntaxhighlight> | ||
| + | |||
| + | 然后启动NanoPi,在Debian的shell终端中执行如下命令运行模块Matrix-Sound_sensor的测试程序 <br> | ||
| + | <syntaxhighlight lang="bash"> | ||
| + | $ matrix-sound_sensor | ||
| + | </syntaxhighlight> | ||
| + | |||
| + | ===代码展示=== | ||
| + | <syntaxhighlight lang="c"> | ||
static struct sensor sound[] = { | static struct sensor sound[] = { | ||
{ | { | ||
| − | + | GPIO_PIN1, | |
IRQ_TYPE_EDGE_BOTH, | IRQ_TYPE_EDGE_BOTH, | ||
} | } | ||
| Line 65: | Line 108: | ||
</syntaxhighlight> | </syntaxhighlight> | ||
| − | === | + | ==与Tiny4412连接使用== |
| + | ===准备工作=== | ||
| + | 参考Tiny4412光盘里的《友善之臂Ubuntu使用手册》,在Tiny4412上运行UbuntuCore系统,安装并使用相应的编译器。<br> | ||
| + | 注意:只能使用Tiny4412SDK-1506的底板。 | ||
| + | |||
| + | ===硬件连接=== | ||
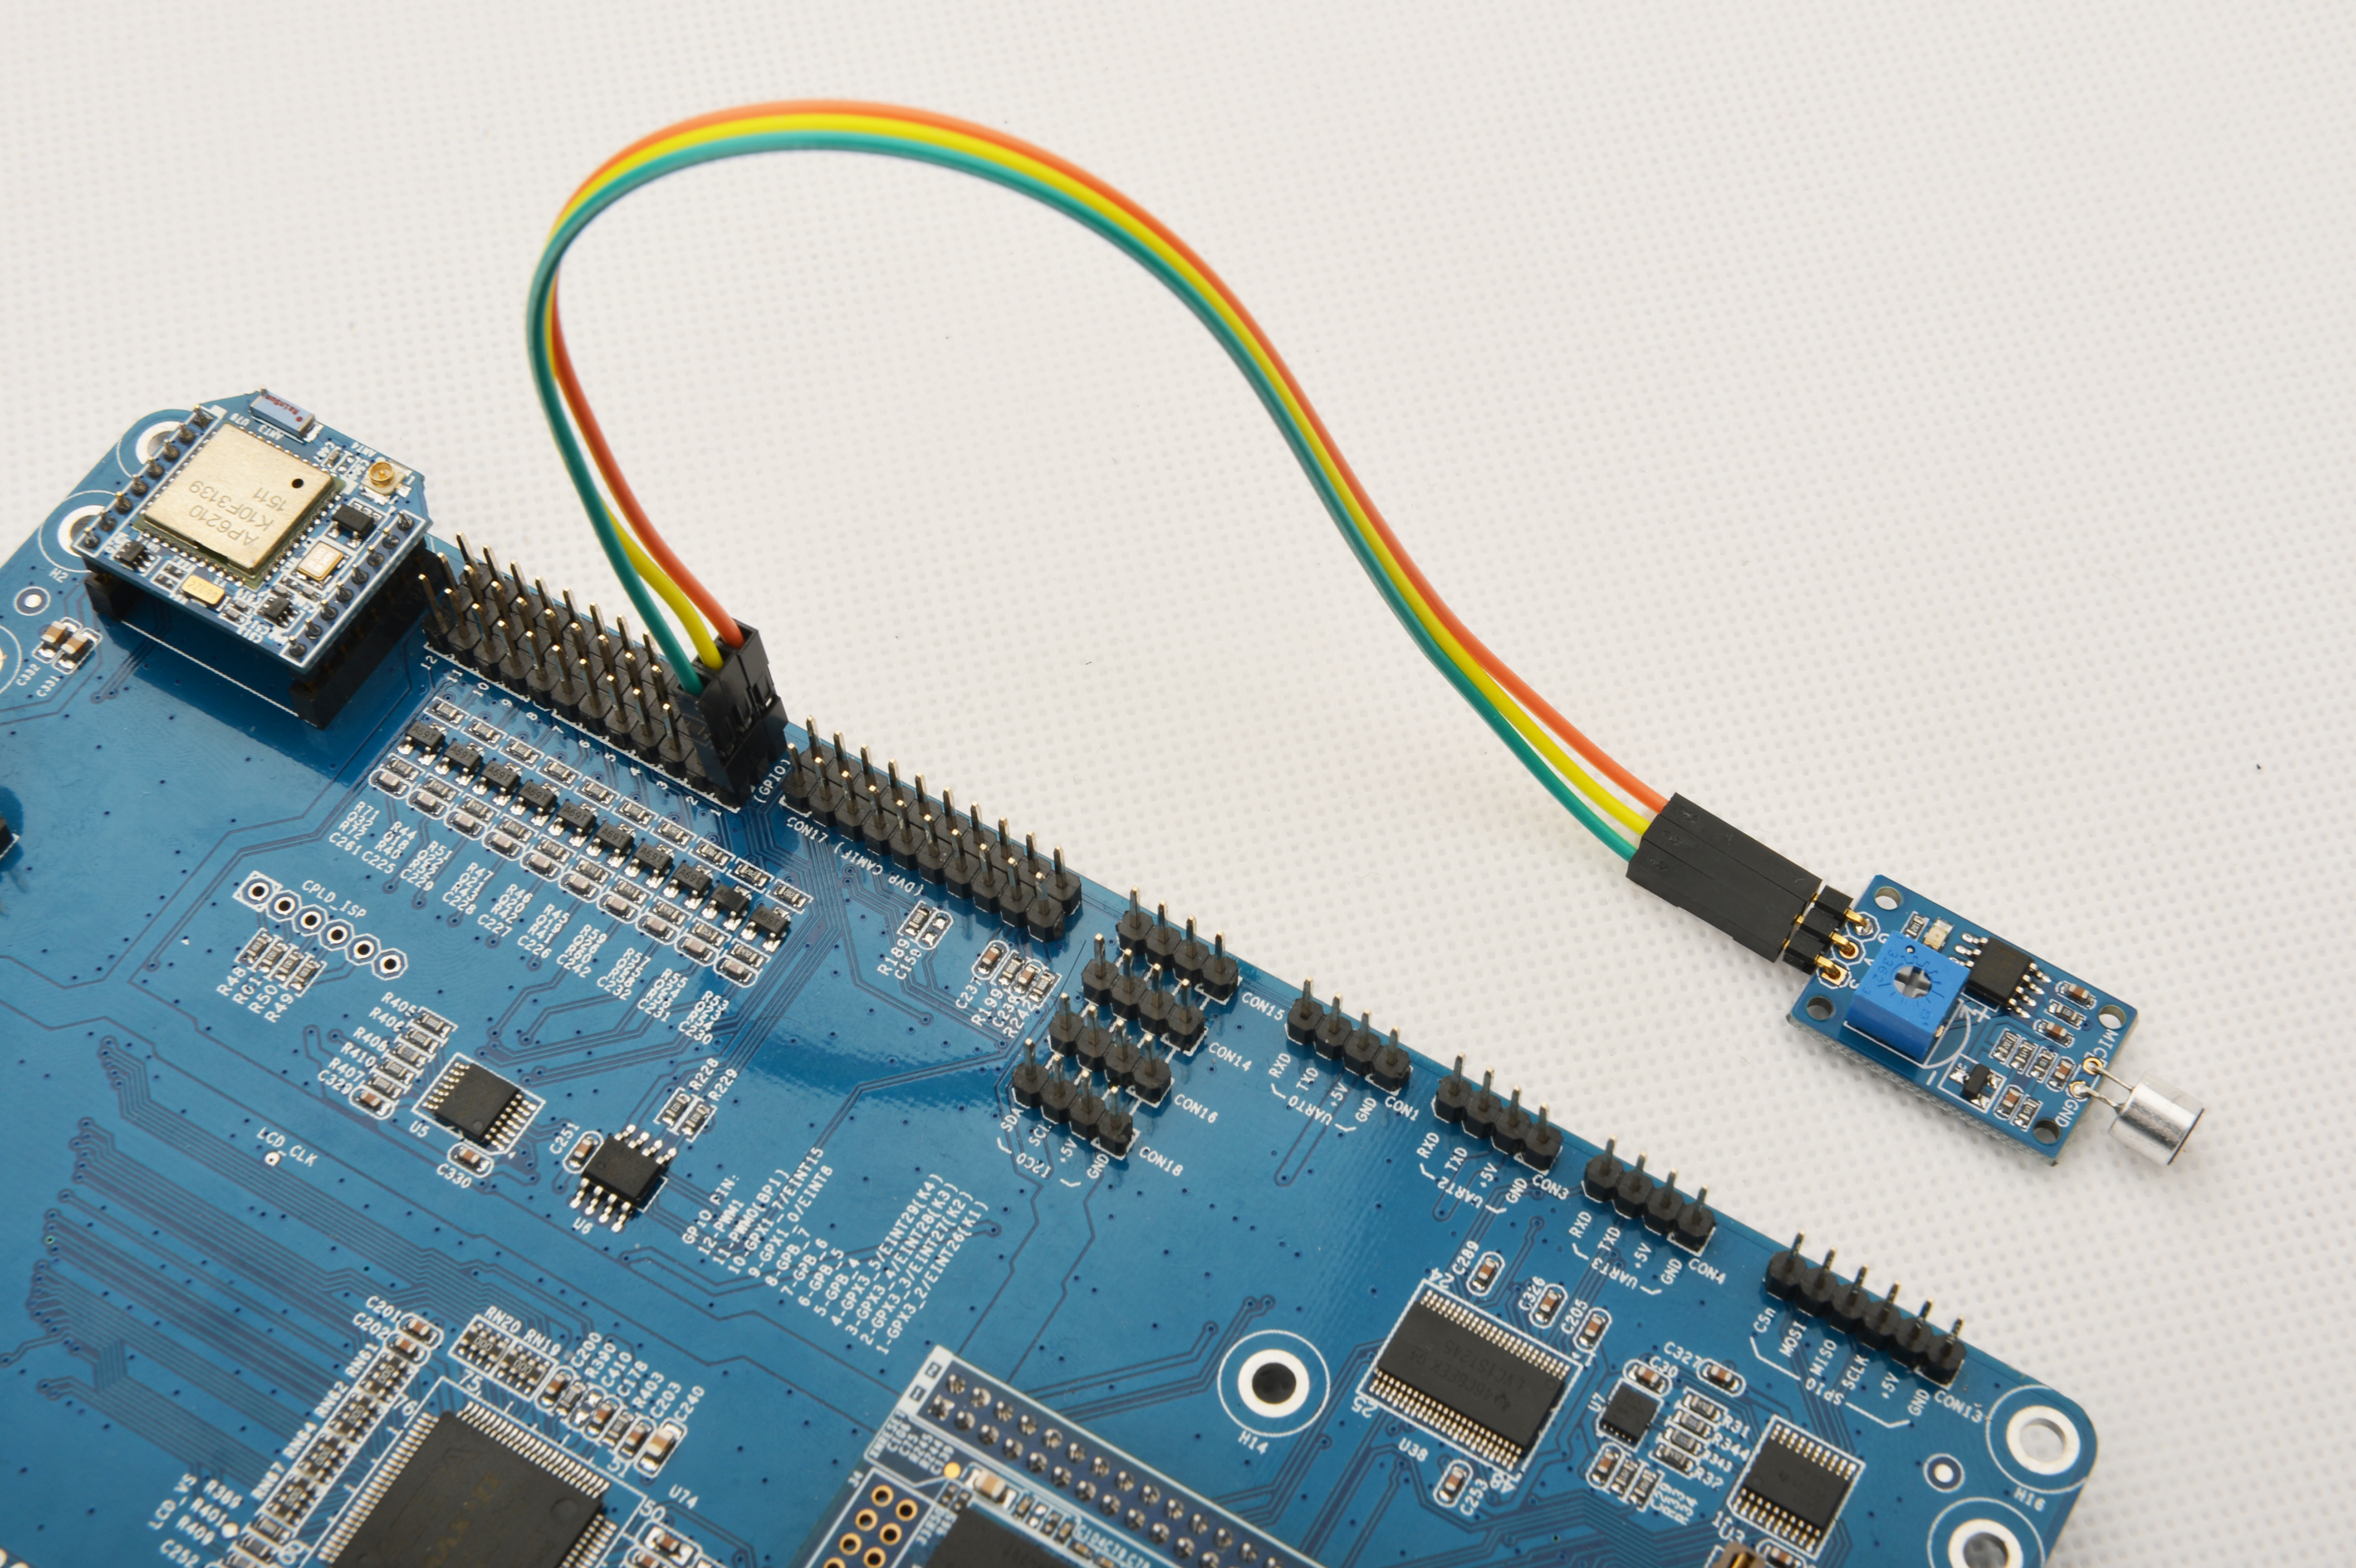
| + | 参考下图连接模块Matrix-Sound_sensor和Tiny4412 <br> | ||
| + | [[File:matrix-sound_sensor_tiny4412.jpg|frameless|600px|matrix-sound_sensor_tiny4412]] | ||
| + | |||
| + | ===编译测试程序=== | ||
| + | 进入Matrix代码仓库,切换到matrix-tiny4412分支 | ||
<syntaxhighlight lang="bash"> | <syntaxhighlight lang="bash"> | ||
| − | + | $ cd matrix | |
| − | cd | + | $ git checkout matrix-tiny4412 |
| − | + | ||
| − | + | ||
| − | + | ||
</syntaxhighlight> | </syntaxhighlight> | ||
| − | + | ||
| + | 编译Matrix配件代码 | ||
| + | <syntaxhighlight lang="bash"> | ||
| + | $ make CROSS_COMPILE=arm-linux-gnueabihf- clean | ||
| + | $ make CROSS_COMPILE=arm-linux-gnueabihf- | ||
| + | $ make CROSS_COMPILE=arm-linux-gnueabihf- install | ||
| + | </syntaxhighlight> | ||
| + | 注意:请确保你的主机PC当前使用的交叉编译器为tiny4412-UbuntuCore配套的arm-linux-gnueabihf-gcc-4.7.3。<br> | ||
| + | 编译出来的库文件位于install/lib目录下,而测试程序则位于install/bin目录下,模块Matrix-Sound_sensor对应的测试程序为matrix-sound_sensor。 | ||
| + | |||
| + | ===运行测试程序=== | ||
| + | 拷贝库文件和测试程序到Tiny4412的UbuntuCore的文件系统上 | ||
| + | <syntaxhighlight lang="bash"> | ||
| + | $ cp install/bin/* tiny4412_rootfs/bin/ | ||
| + | $ cp install/lib/* tiny4412_rootfs/lib/ -d | ||
| + | </syntaxhighlight> | ||
| + | |||
| + | 然后启动Tiny4412,在UbuntuCore的shell终端中执行如下命令运行模块Matrix-Sound_sensor的测试程序 | ||
| + | <syntaxhighlight lang="bash"> | ||
| + | $ matrix-sound_sensor | ||
| + | </syntaxhighlight> | ||
| + | |||
| + | ===代码展示=== | ||
| + | <syntaxhighlight lang="c"> | ||
| + | static struct sensor sound[] = { | ||
| + | { | ||
| + | GPIO_PIN1, | ||
| + | IRQ_TYPE_EDGE_BOTH, | ||
| + | } | ||
| + | }; | ||
| + | |||
| + | int main(void) | ||
| + | { | ||
| + | int i; | ||
| + | int retSize = -1; | ||
| + | char value[ARRAY_SIZE(sound)]; | ||
| + | int devFD = -1; | ||
| + | if ((devFD =sensorInit(sound, ARRAY_SIZE(sound))) == -1) { | ||
| + | printf("Fail to init sensor\n"); | ||
| + | return -1; | ||
| + | } | ||
| + | |||
| + | if (( retSize = sensorRead(devFD, value, ARRAY_SIZE(sound)) ) == -1) { | ||
| + | printf("Fail to read sensors\n"); | ||
| + | } | ||
| + | if (retSize > 0) { | ||
| + | i = 0; | ||
| + | for(i=0; i<retSize; i++) | ||
| + | { | ||
| + | printf("sound[%d]:%d\n", i, value[i]); | ||
| + | } | ||
| + | printf("\n"); | ||
| + | } | ||
| + | sensorDeinit(devFD); | ||
| + | return 0; | ||
| + | } | ||
| + | </syntaxhighlight> | ||
| + | |||
| + | ==与RaspberryPi连接使用== | ||
| + | |||
| + | ==与Arduino连接使用== | ||
==相关资料== | ==相关资料== | ||
Revision as of 01:47, 5 September 2015
Contents
[hide]1 介绍
模块Matrix-Sound_sensor在默认状态下输出高电平,当检测到有声音的时候输出低电平,声音消失后恢复高电平,没有延时。配件上面的可调电阻可以调整响应的阀值,也即音量。顺时针旋转可调电阻增大阀值,即音量较大时才被检测到。
2 特性
- 阀值可调,即时响应
- 2.54mm排针接口,接线方便,通用性强
- PCB尺寸(mm):16x24
- V:接电源5V
- G:接地
- S:接GPIO
3 工作原理
该传感器内置一个对声音敏感的电容式驻极体话筒。声波使话筒内的驻极体薄膜振动,导致电容的变化,而产生与之对应变化的微小电压。声音传感器的作用相当于一个话筒(麦克风)。它用来接收声波,显示声音的振动图象。当接收当声音时会输出1,但不能对噪声的强度进行测量。
4 下载Matrix源码
Matrix配件相关的代码是完全开源的,统一由一个仓库进行管理:git://github.com/friendlyarm/matrix.git
该仓库里不同的分支代表着Matrix配件所支持的不同开发板。
- matrix-nanopi分支包含了Matrix对NanoPi的支持;
- matrix-tiny4412分支包含了Matrix对Tiny4412的支持;
- matrix-raspberrypi分支包含了Matrix对RaspberryPi的支持;
在主机PC上安装git,以Ubuntu14.04为例
$ sudo apt-get install git
克隆Matrix配件代码仓库
$ git clone git://github.com/friendlyarm/matrix.git
克隆完成后会得到一个matrix目录,里面存放着所有Matrix配件的代码。
5 与NanoPi连接使用
5.1 准备工作
在NanoPi上运行Debian系统,安装并使用相应的编译器。参考wiki:[[1]]
5.2 硬件连接
参考下图连接模块Matrix-Sound_sensor和NanoPi

5.3 编译测试程序
进入Matrix代码仓库,切换到matrix-nanopi分支
$ cd matrix
$ git checkout matrix-nanopi
编译Matrix配件代码
$ make CROSS_COMPILE=arm-linux- clean
$ make CROSS_COMPILE=arm-linux-
$ make CROSS_COMPILE=arm-linux- install
注意:请确保你的主机PC当前使用的交叉编译器为NanoPi-Debian配套的arm-linux-gcc.4.4.3。
编译出来的库文件位于install/lib目录下,而测试程序则位于install/bin目录下,模块Matrix-Sound_sensor对应的测试程序为matrix-sound_sensor。
5.4 运行测试程序
拷贝库文件和测试程序到NanoPi的文件系统上
$ cp install/bin/* nanopi_rootfs/bin/
$ cp install/lib/* nanopi_rootfs/lib/ -d
然后启动NanoPi,在Debian的shell终端中执行如下命令运行模块Matrix-Sound_sensor的测试程序
$ matrix-sound_sensor5.5 代码展示
static struct sensor sound[] = {
        {
                GPIO_PIN1,
                IRQ_TYPE_EDGE_BOTH,
        }
};

int main(void)
{
    int i;
    int retSize = -1;
    char value[ARRAY_SIZE(sound)];
    int devFD = -1;
    if ((devFD =sensorInit(sound, ARRAY_SIZE(sound))) == -1) {
        printf("Fail to init sensor\n");
        return -1;
    }

    if (( retSize = sensorRead(devFD, value, ARRAY_SIZE(sound)) ) == -1) {
        printf("Fail to read sensors\n");
    }
    if (retSize > 0) {
        i = 0;
        for(i=0; i<retSize; i++)
        {
            printf("sound[%d]:%d\n", i, value[i]);
        }
        printf("\n");
    }
    sensorDeinit(devFD);
    return 0;
}
6 与Tiny4412连接使用
6.1 准备工作
参考Tiny4412光盘里的《友善之臂Ubuntu使用手册》,在Tiny4412上运行UbuntuCore系统,安装并使用相应的编译器。
注意:只能使用Tiny4412SDK-1506的底板。
6.2 硬件连接
参考下图连接模块Matrix-Sound_sensor和Tiny4412

6.3 编译测试程序
进入Matrix代码仓库,切换到matrix-tiny4412分支
$ cd matrix
$ git checkout matrix-tiny4412
编译Matrix配件代码
$ make CROSS_COMPILE=arm-linux-gnueabihf- clean
$ make CROSS_COMPILE=arm-linux-gnueabihf-
$ make CROSS_COMPILE=arm-linux-gnueabihf- install
注意:请确保你的主机PC当前使用的交叉编译器为tiny4412-UbuntuCore配套的arm-linux-gnueabihf-gcc-4.7.3。
编译出来的库文件位于install/lib目录下,而测试程序则位于install/bin目录下,模块Matrix-Sound_sensor对应的测试程序为matrix-sound_sensor。
6.4 运行测试程序
拷贝库文件和测试程序到Tiny4412的UbuntuCore的文件系统上
$ cp install/bin/* tiny4412_rootfs/bin/
$ cp install/lib/* tiny4412_rootfs/lib/ -d
然后启动Tiny4412,在UbuntuCore的shell终端中执行如下命令运行模块Matrix-Sound_sensor的测试程序
$ matrix-sound_sensor6.5 代码展示
static struct sensor sound[] = {
        {
                GPIO_PIN1,
                IRQ_TYPE_EDGE_BOTH,
        }
};

int main(void)
{
    int i;
    int retSize = -1;
    char value[ARRAY_SIZE(sound)];
    int devFD = -1;
    if ((devFD =sensorInit(sound, ARRAY_SIZE(sound))) == -1) {
        printf("Fail to init sensor\n");
        return -1;
    }

    if (( retSize = sensorRead(devFD, value, ARRAY_SIZE(sound)) ) == -1) {
        printf("Fail to read sensors\n");
    }
    if (retSize > 0) {
        i = 0;
        for(i=0; i<retSize; i++)
        {
            printf("sound[%d]:%d\n", i, value[i]);
        }
        printf("\n");
    }
    sensorDeinit(devFD);
    return 0;
}

