Difference between revisions of "Matrix - Ultrasonic Ranger"
(→编译测试程序) |
(→Update Log) |
||
| (6 intermediate revisions by the same user not shown) | |||
| Line 29: | Line 29: | ||
[[File:Ultrasonic Ranger.png|thumb|matrix Ultrasonic Ranger]] | [[File:Ultrasonic Ranger.png|thumb|matrix Ultrasonic Ranger]] | ||
| + | ==Applications== | ||
| + | ===Connect to NanoPi M1=== | ||
| + | Refer to the following connection diagram to connect the module to the NanoPi M1:<br> | ||
| + | [[File:Matrix-Ultrasonic_Ranger_nanopi_m1.jpg|frameless|600px|Matrix-Ultrasonic_Ranger_nanopi_m1]] | ||
| + | |||
| + | Connection Details: | ||
| + | {| class="wikitable" | ||
| + | |- | ||
| + | |Matrix-Ultrasonic_Ranger || NanoPi M1 | ||
| + | |- | ||
| + | |S || Pin7 | ||
| + | |- | ||
| + | |V || Pin4 | ||
| + | |- | ||
| + | |G || Pin6 | ||
| + | |} | ||
| + | |||
| + | ===Connect to NanoPi 2=== | ||
| + | Refer to the following connection diagram to connect the module to the NanoPi 2:<br> | ||
| + | [[File:Matrix-Ultrasonic_Ranger_nanopi_2.jpg|frameless|600px|Matrix-Ultrasonic_Ranger_nanopi_2]] | ||
| + | |||
| + | Connection Details: | ||
| + | {| class="wikitable" | ||
| + | |- | ||
| + | |Matrix-Ultrasonic_Ranger || NanoPi 2 | ||
| + | |- | ||
| + | |S || Pin7 | ||
| + | |- | ||
| + | |V || Pin4 | ||
| + | |- | ||
| + | |G || Pin6 | ||
| + | |} | ||
| + | |||
| + | ===Connect to NanoPi M2 / NanoPi 2 Fire=== | ||
| + | Refer to the following connection diagram to connect the module to the NanoPi M2/ NanoPi 2 Fire:<br> | ||
| + | [[File:Matrix-Ultrasonic_Ranger_nanopi_m2.jpg|frameless|600px|Matrix-Ultrasonic_Ranger_nanopi_m2]] | ||
| + | |||
| + | Connection Details: | ||
| + | {| class="wikitable" | ||
| + | |- | ||
| + | |Matrix-Ultrasonic_Ranger || NanoPi M2 | ||
| + | |- | ||
| + | |S || Pin7 | ||
| + | |- | ||
| + | |V || Pin4 | ||
| + | |- | ||
| + | |G || Pin6 | ||
| + | |} | ||
| + | |||
| + | ===Connect to NanoPC-T2=== | ||
| + | Refer to the following connection diagram to connect the module to the NanoPC-T2:<br> | ||
| + | [[File:Matrix-Ultrasonic_Ranger_NanoPC-T2.jpg|frameless|600px|Matrix-Ultrasonic_Ranger_NanoPC-T2]] | ||
| + | |||
| + | Connection Details: | ||
| + | {| class="wikitable" | ||
| + | |- | ||
| + | |Matrix-Ultrasonic_Ranger || NanoPC-T2 | ||
| + | |- | ||
| + | |S || Pin15 | ||
| + | |- | ||
| + | |V || Pin29 | ||
| + | |- | ||
| + | |G || Pin30 | ||
| + | |} | ||
| + | |||
| + | ==Compile & Run Test Program== | ||
| + | Boot your ARM board with Debian and copy the matrix code: | ||
| + | <syntaxhighlight lang="bash"> | ||
| + | $ apt-get update && apt-get install git | ||
| + | $ git clone https://github.com/friendlyarm/matrix.git | ||
| + | </syntaxhighlight> | ||
| + | If your cloning is done successfully a "matrix" directory will be generated. | ||
| + | |||
| + | Compile and install Matrix: | ||
| + | <syntaxhighlight lang="bash"> | ||
| + | $ cd matrix | ||
| + | $ make && make install | ||
| + | </syntaxhighlight> | ||
| + | |||
| + | Run test program: | ||
| + | <syntaxhighlight lang="bash"> | ||
| + | $ matrix-ultrasonic_ranger | ||
| + | </syntaxhighlight> | ||
| + | Note: this module is not plug and play therefore before running the module please make sure it is connected to an ARM board.<br> | ||
| + | Here is what you should observe:<br> | ||
| + | <syntaxhighlight lang="bash"> | ||
| + | The distance is 24 cm | ||
| + | </syntaxhighlight> | ||
| + | When you place an object in front of the module the distance between the object and the module will be measured and printed. | ||
| + | |||
| + | ==Code Sample== | ||
| + | This Matrix code sample can work with all the ARM boards mentioned in this module's wiki. The name of this code sample is "matrix-ultrasonic_ranger". Here is its source code: | ||
| + | <syntaxhighlight lang="c"> | ||
| + | int main(int argc, char ** argv) | ||
| + | { | ||
| + | int distance = -1; | ||
| + | int pin = GPIO_PIN(7); | ||
| + | int board; | ||
| + | |||
| + | if ((board = boardInit()) < 0) { | ||
| + | printf("Fail to init board\n"); | ||
| + | return -1; | ||
| + | } | ||
| + | if (board == BOARD_NANOPI_T2) | ||
| + | pin = GPIO_PIN(15); | ||
| + | |||
| + | system("modprobe "DRIVER_MODULE); | ||
| + | if (Hcsr04Init(pin) == -1) { | ||
| + | printf("Fail to init hcsr04\n"); | ||
| + | goto err; | ||
| + | } | ||
| + | if (Hcsr04Read(&distance) != -1) { | ||
| + | printf("The distance is %3d cm\n", distance); | ||
| + | } else { | ||
| + | printf("Faid to get distance\n"); | ||
| + | } | ||
| + | Hcsr04DeInit(); | ||
| + | err: | ||
| + | system("rmmod "DRIVER_MODULE); | ||
| + | |||
| + | return 0; | ||
| + | } | ||
| + | </syntaxhighlight> | ||
| + | For more details about this APIs called in this code sample refer to [[Matrix API reference manual]] <br> | ||
| + | |||
| + | <!--- | ||
==Download Matrix Source Code== | ==Download Matrix Source Code== | ||
All the matrix modules' code samples are open source. They are maintained on GitHub - https://github.com/friendlyarm/matrix.git <br> | All the matrix modules' code samples are open source. They are maintained on GitHub - https://github.com/friendlyarm/matrix.git <br> | ||
| Line 83: | Line 209: | ||
The modules are under the "modules" directory. The driver's source code is in github: https://github.com/friendlyarm/linux-3.4.y.git <br> | The modules are under the "modules" directory. The driver's source code is in github: https://github.com/friendlyarm/linux-3.4.y.git <br> | ||
| − | === | + | ===Run Test Program=== |
| − | + | Please insert a TF card which is flashed with Debian to a Linux host and mount its boot and rootfs sections.<br> | |
| − | + | We assume the rootfs is mounted to /media/rootfs then please run the following commands to copy the module, library and test program to the card.<br> | |
<syntaxhighlight lang="bash"> | <syntaxhighlight lang="bash"> | ||
$ cp modules /media/rootfs/ -r | $ cp modules /media/rootfs/ -r | ||
| Line 92: | Line 218: | ||
</syntaxhighlight> | </syntaxhighlight> | ||
| − | + | Insert this TF card to your NanoPi 2, power on and run the following commands to load the driver.<br> | |
<syntaxhighlight lang="bash"> | <syntaxhighlight lang="bash"> | ||
$ cd /modules | $ cd /modules | ||
| Line 98: | Line 224: | ||
</syntaxhighlight> | </syntaxhighlight> | ||
| − | + | Start the matrix-ultrasonic_ranger program.<br> | |
<syntaxhighlight lang="bash"> | <syntaxhighlight lang="bash"> | ||
$ matrix-ultrasonic_ranger | $ matrix-ultrasonic_ranger | ||
</syntaxhighlight> | </syntaxhighlight> | ||
| − | + | Here is what you expect to observe:<br> | |
[[File:matrix-ultrasonic_ranger_result.png|frameless|600px|matrix-ultrasonic_ranger_result]] | [[File:matrix-ultrasonic_ranger_result.png|frameless|600px|matrix-ultrasonic_ranger_result]] | ||
| Line 280: | Line 406: | ||
==Connect to Arduino== | ==Connect to Arduino== | ||
| − | + | ---> | |
==Resources== | ==Resources== | ||
| Line 287: | Line 413: | ||
* Added the description for "NanoPi 2 branch" in Section 4 | * Added the description for "NanoPi 2 branch" in Section 4 | ||
* Added Section 5: Connect to NanoPi 2 | * Added Section 5: Connect to NanoPi 2 | ||
| − | + | ===June-28-2016=== | |
| + | * Reorganized and simplified wiki | ||
<!-- | <!-- | ||
Latest revision as of 13:56, 28 June 2016
Contents
1 Introduction
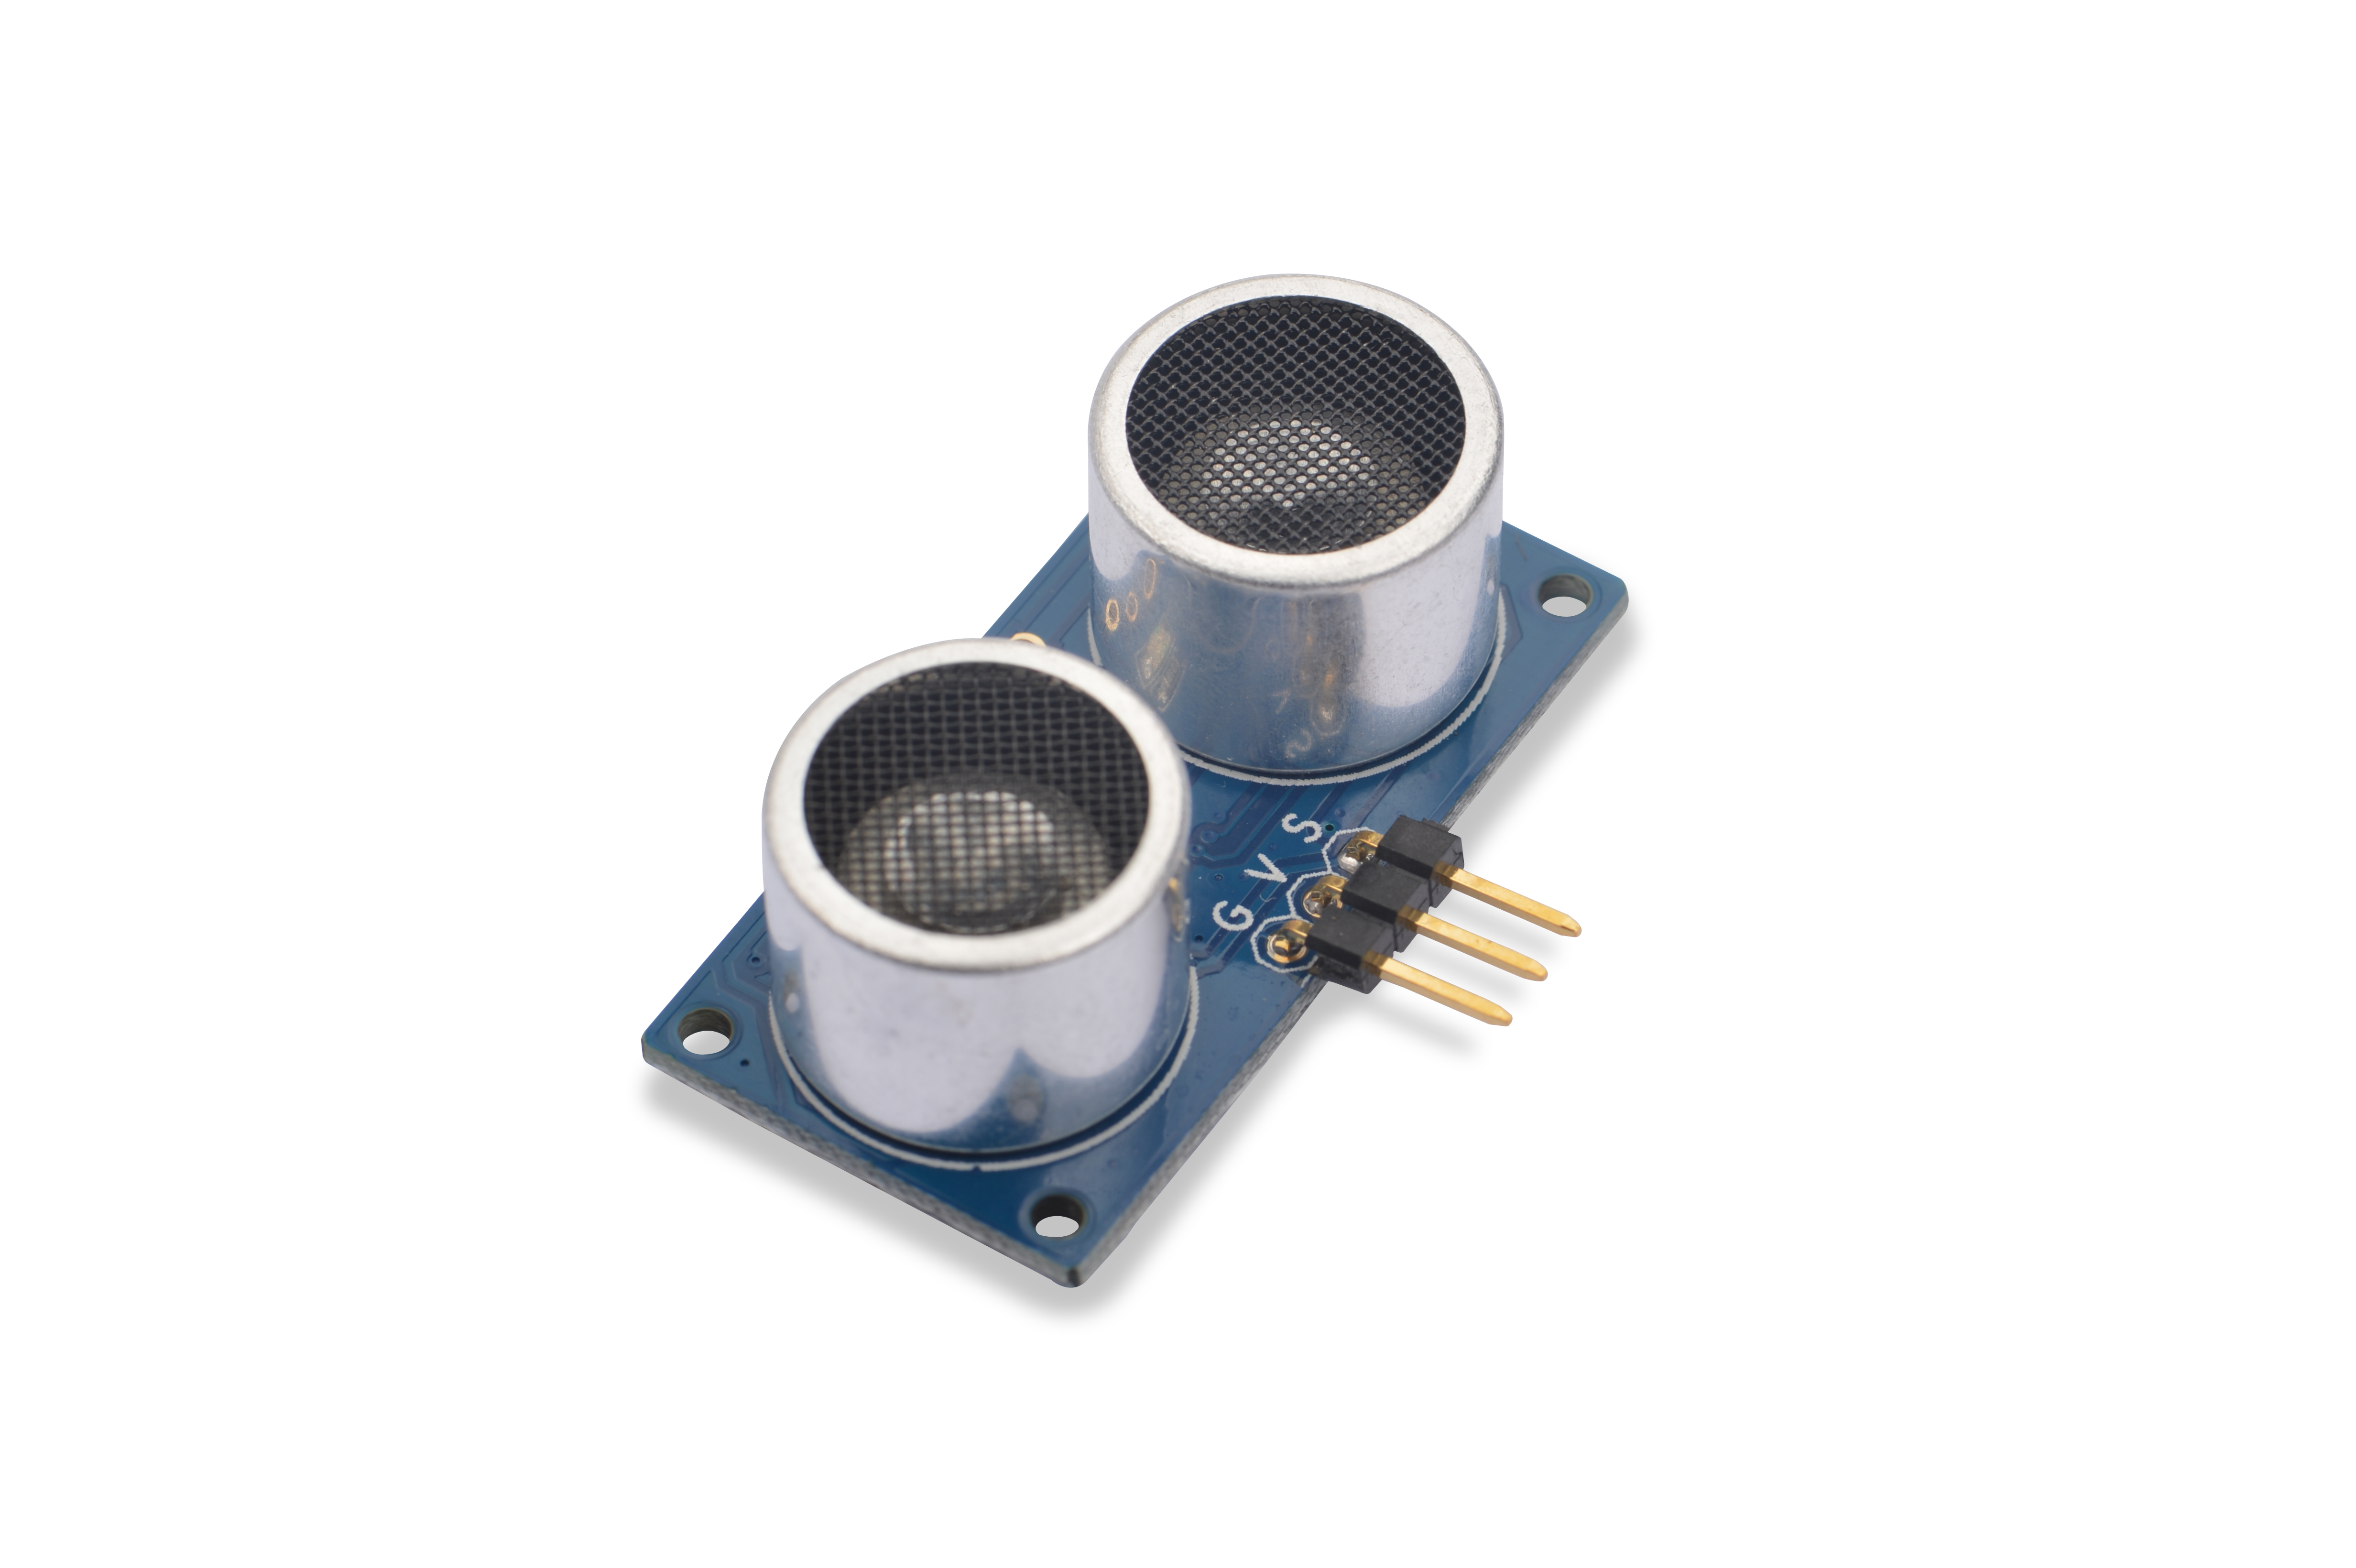
- The Matrix-Ultrasonic_Ranger is used to measure the distance.
- The module's sensor emits a sound wave, which bounces off a reflective surface and returns to the sensor. Then, using the amount of time it takes for the wave to return to the sensor, the distance to the object can be computed.
2 Features
- 5V Power
- Range: 5 cm - 300 cm,Accuracy: 1 cm
- One wire gpio
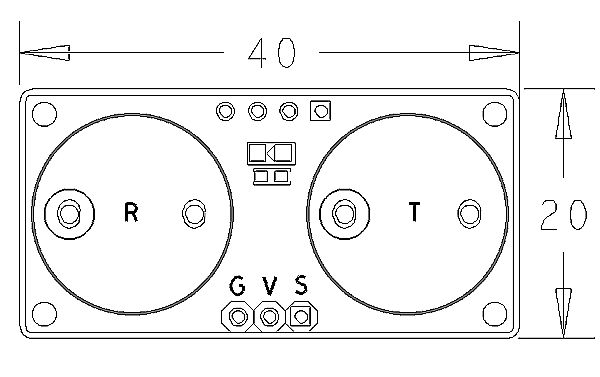
- PCB Dimension (mm): 20 x 40
- Pin Description:
| Pin | Description |
| S | GPIO |
| V | Supply Voltage 5V |
| G | Ground |
3 Basic Device Operation
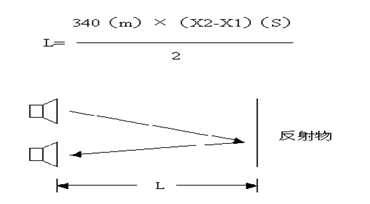
- The sensor emits a 40kHz, 6 mm sound wave, which bounces off a reflective surface and returns to the sensor. The receiver converts ultrasound waves to electrical signals in mV.
- The master sends a signal to the module starting to emit a sound wave. After the module receives the returned signal it will will generate a high level indicating the elapsed time and the distance will be calculated by distance = (elapsed time * speed of sound)/2.
4 Applications
4.1 Connect to NanoPi M1
Refer to the following connection diagram to connect the module to the NanoPi M1:
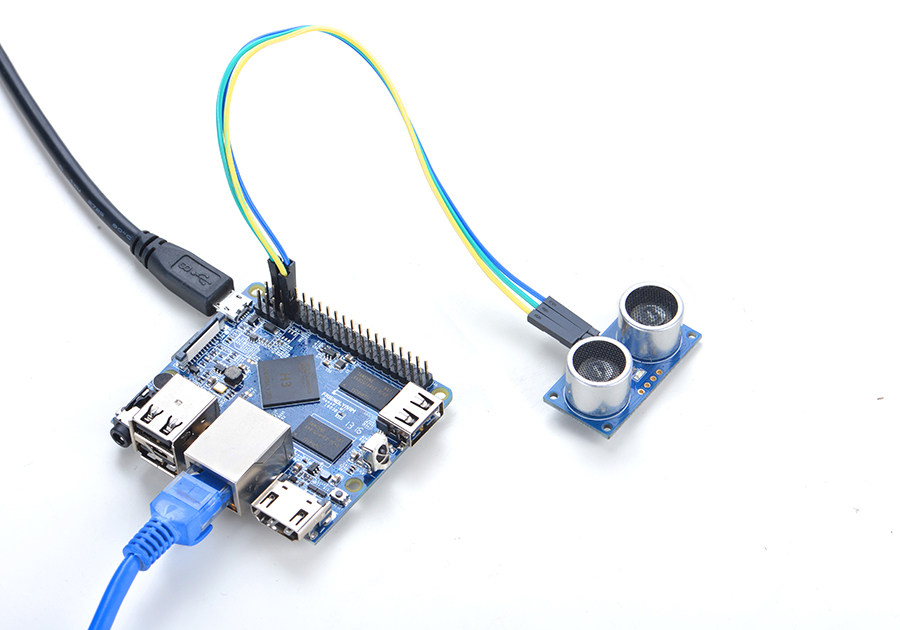
Connection Details:
| Matrix-Ultrasonic_Ranger | NanoPi M1 |
| S | Pin7 |
| V | Pin4 |
| G | Pin6 |
4.2 Connect to NanoPi 2
Refer to the following connection diagram to connect the module to the NanoPi 2:
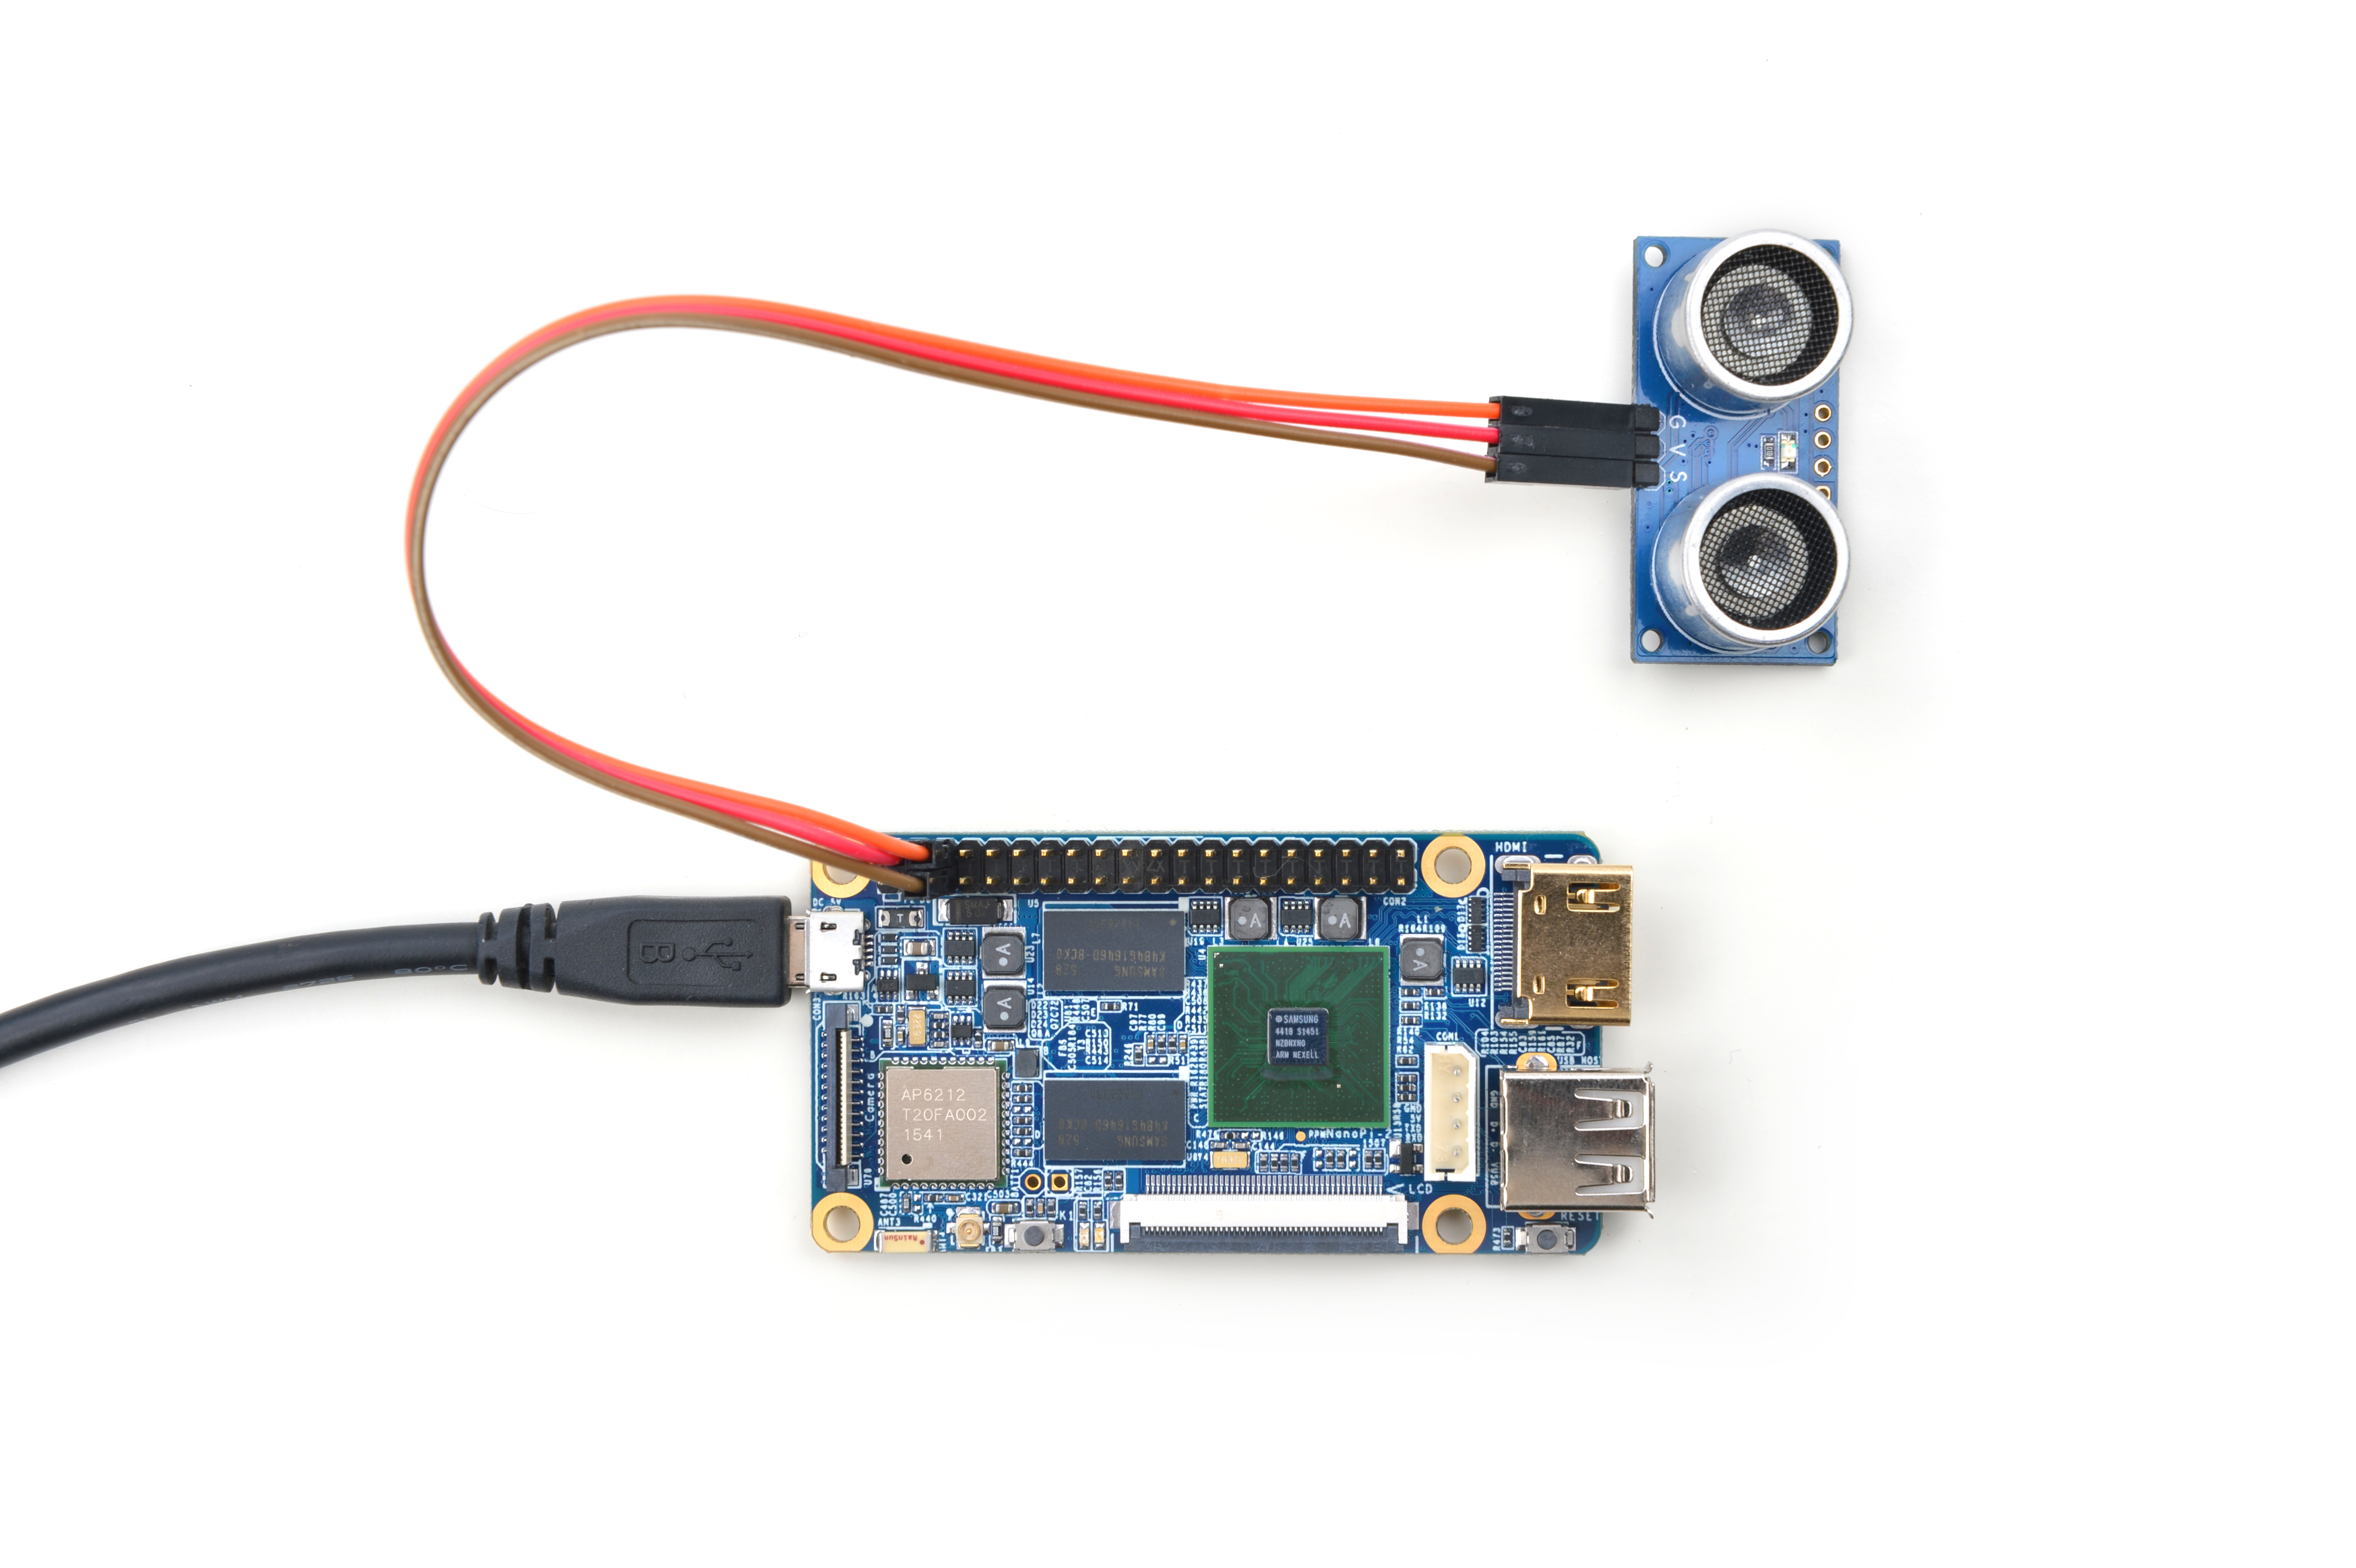
Connection Details:
| Matrix-Ultrasonic_Ranger | NanoPi 2 |
| S | Pin7 |
| V | Pin4 |
| G | Pin6 |
4.3 Connect to NanoPi M2 / NanoPi 2 Fire
Refer to the following connection diagram to connect the module to the NanoPi M2/ NanoPi 2 Fire:
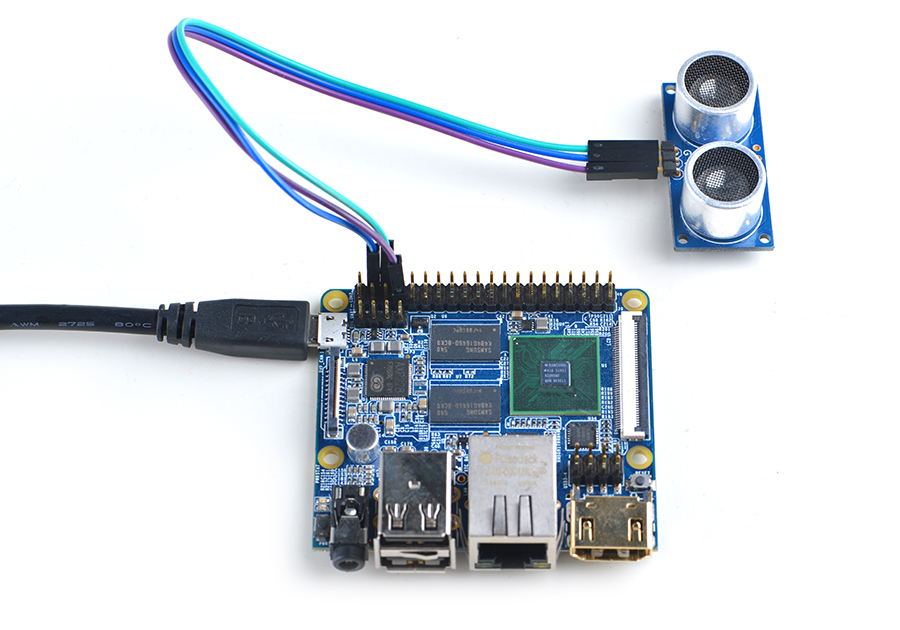
Connection Details:
| Matrix-Ultrasonic_Ranger | NanoPi M2 |
| S | Pin7 |
| V | Pin4 |
| G | Pin6 |
4.4 Connect to NanoPC-T2
Refer to the following connection diagram to connect the module to the NanoPC-T2:
Matrix-Ultrasonic_Ranger_NanoPC-T2
Connection Details:
| Matrix-Ultrasonic_Ranger | NanoPC-T2 |
| S | Pin15 |
| V | Pin29 |
| G | Pin30 |
5 Compile & Run Test Program
Boot your ARM board with Debian and copy the matrix code:
$ apt-get update && apt-get install git
$ git clone https://github.com/friendlyarm/matrix.git
If your cloning is done successfully a "matrix" directory will be generated.
Compile and install Matrix:
$ cd matrix
$ make && make install
Run test program:
$ matrix-ultrasonic_rangerNote: this module is not plug and play therefore before running the module please make sure it is connected to an ARM board.
Here is what you should observe:
The distance is 24 cmWhen you place an object in front of the module the distance between the object and the module will be measured and printed.
6 Code Sample
This Matrix code sample can work with all the ARM boards mentioned in this module's wiki. The name of this code sample is "matrix-ultrasonic_ranger". Here is its source code:
int main(int argc, char ** argv)
{
    int distance = -1;
    int pin = GPIO_PIN(7);
    int board;

    if ((board = boardInit()) < 0) {
        printf("Fail to init board\n");
        return -1;
    }
    if (board == BOARD_NANOPI_T2)
        pin = GPIO_PIN(15);

    system("modprobe "DRIVER_MODULE);
    if (Hcsr04Init(pin) == -1) {
        printf("Fail to init hcsr04\n");
        goto err;
    }
    if (Hcsr04Read(&distance) != -1) {
        printf("The distance is %3d cm\n", distance);
    } else {
        printf("Faid to get distance\n");
    }
    Hcsr04DeInit();
err:
    system("rmmod "DRIVER_MODULE);

    return 0;
}
For more details about this APIs called in this code sample refer to Matrix API reference manual
7 Resources
8 Update Log
8.1 Feb-23-2016
- Added the description for "NanoPi 2 branch" in Section 4
- Added Section 5: Connect to NanoPi 2
8.2 June-28-2016
- Reorganized and simplified wiki
