Difference between revisions of "Matrix - Ball Rolling Switch"
(→Applications) |
|||
| (13 intermediate revisions by 2 users not shown) | |||
| Line 1: | Line 1: | ||
[[Matrix - BAll Rolling Switch/zh|查看中文]] | [[Matrix - BAll Rolling Switch/zh|查看中文]] | ||
| − | == | + | ==Introduction== |
[[File:BAll Rolling Switch01.png|thumb|BAll Rolling Switch]] | [[File:BAll Rolling Switch01.png|thumb|BAll Rolling Switch]] | ||
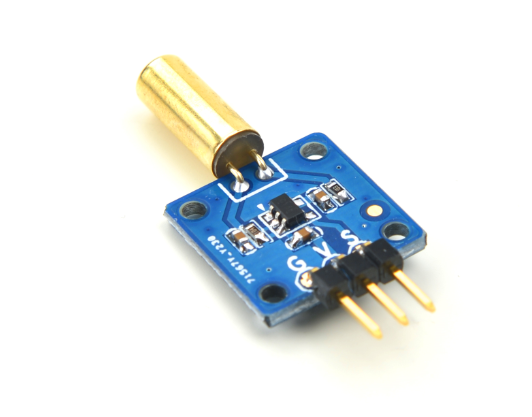
| − | *Matrix- | + | *The Matrix-Ball_Rolling_Switch module is a ball switch. Its electrical characteristics are very similar to a mercury switch's however a mercury switch is easily broken, oxidized, leaking and not environment-friendly. This ball switch prevents all these issues. |
| − | * | + | *The switch is free to move any angle and if that angle is between 15 degrees and 45 degrees a signal will be generated and used as an input to a Schmitt trigger. |
| − | == | + | ==Features== |
* GPIO | * GPIO | ||
| − | * | + | * Small |
| − | * 2. | + | * 2.54 mm spacing pin header |
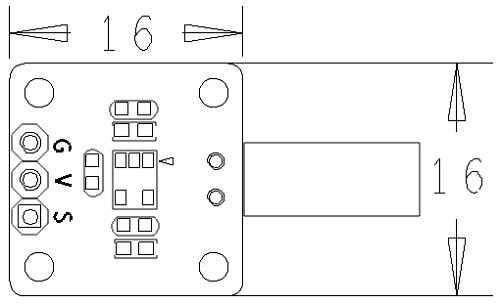
| − | * | + | * PCB Dimension(mm):16 x 16 |
[[File:BAll Rolling Switchpcb.png | frameless|400px|BAll Rolling Switch-01.PCB]] | [[File:BAll Rolling Switchpcb.png | frameless|400px|BAll Rolling Switch-01.PCB]] | ||
| − | * | + | * Pin Description: |
{| class="wikitable" | {| class="wikitable" | ||
|- | |- | ||
| − | | | + | |Pin || Description |
|- | |- | ||
| − | |S || | + | |S || Digital GPIO |
|- | |- | ||
| − | |V || | + | |V || Supply Voltage 5V |
|- | |- | ||
| − | |G || | + | |G || Ground |
|} | |} | ||
| − | == | + | ==Basic Device Operation== |
| − | + | Please connect Pin V to a power supply, Pin G grounded and Pin S to a digital output. When you move the switch pushing the internal metal ball to connect the trigger point a high level signal will be generated and output to a Schmitt trigger which reverses this signal to output a low level signal. When you move the switch pushing the internal metal ball away from the trigger point a low level signal will be generated and output to a Schmitt trigger which reverses this signal to output a high level signal. | |
| − | == | + | ==Applications== |
| − | + | ===Connect to NanoPi M1=== | |
| − | + | Refer to the following connection diagram to connect the module to the NanoPi M1:<br> | |
| − | + | [[File:Matrix-Ball_Rolling_Switch_nanopi_m1.jpg|frameless|600px|matrix-BAll_Rolling_Switch_nanopi_m1]] | |
| − | + | ||
| − | + | ||
| − | + | ||
| − | + | Connection Details: | |
| + | {| class="wikitable" | ||
| + | |- | ||
| + | |Matrix-Ball_Rolling_Switch || NanoPi M1 | ||
| + | |- | ||
| + | |S || Pin7 | ||
| + | |- | ||
| + | |V || Pin4 | ||
| + | |- | ||
| + | |G || Pin6 | ||
| + | |} | ||
| + | |||
| + | ===Connect to NanoPi 2=== | ||
| + | Refer to the following connection diagram to connect the module to the NanoPi 2:<br> | ||
| + | [[File:matrix-BAll Rolling Switch_nanopi.jpg|frameless|600px|matrix-BAll Rolling Switch_nanopi2]] | ||
| + | |||
| + | Connection Details: | ||
| + | {| class="wikitable" | ||
| + | |- | ||
| + | |Matrix-Ball_Rolling_Switch || NanoPi 2 | ||
| + | |- | ||
| + | |S || Pin7 | ||
| + | |- | ||
| + | |V || Pin4 | ||
| + | |- | ||
| + | |G || Pin6 | ||
| + | |} | ||
| + | |||
| + | ===Connect to NanoPi M2 / NanoPi 2 Fire=== | ||
| + | Refer to the following connection diagram to connect the module to the NanoPi M2/ NanoPi 2 Fire.<br> | ||
| + | [[File:Matrix-Ball_Rolling_Switch_nanopi_m2.jpg|frameless|600px|Matrix-Ball_Rolling_Switch_nanopi_m2]] | ||
| + | |||
| + | Connection Details: | ||
| + | {| class="wikitable" | ||
| + | |- | ||
| + | |Matrix-Ball_Rolling_Switch || NanoPi M2 | ||
| + | |- | ||
| + | |S || Pin7 | ||
| + | |- | ||
| + | |V || Pin4 | ||
| + | |- | ||
| + | |G || Pin6 | ||
| + | |} | ||
| + | |||
| + | ===Connect to NanoPC-T2=== | ||
| + | Refer to the following connection diagram to connect the module to the NanoPC-T2:<br> | ||
| + | [[File:Matrix-Ball_Rolling_Switch_NanoPC-T2.jpg|frameless|600px|Matrix-Ball_Rolling_Switch_NanoPC-T2]] | ||
| + | |||
| + | Connection Details: | ||
| + | {| class="wikitable" | ||
| + | |- | ||
| + | |Matrix-Ball_Rolling_Switch || NanoPC-T2 | ||
| + | |- | ||
| + | |S || Pin15 | ||
| + | |- | ||
| + | |V || Pin29 | ||
| + | |- | ||
| + | |G || Pin30 | ||
| + | |} | ||
| + | |||
| + | ==Compile & Run Test Program== | ||
| + | Boot your ARM board with Debian and copy the matrix code: | ||
| + | <syntaxhighlight lang="bash"> | ||
| + | $ apt-get update && apt-get install git | ||
| + | $ git clone https://github.com/friendlyarm/matrix.git | ||
| + | </syntaxhighlight> | ||
| + | If your cloning is done successfully a "matrix" directory will be generated. | ||
| + | |||
| + | Compile and install Matrix: | ||
| + | <syntaxhighlight lang="bash"> | ||
| + | $ cd matrix | ||
| + | $ make && make install | ||
| + | </syntaxhighlight> | ||
| + | |||
| + | Run test program: | ||
| + | <syntaxhighlight lang="bash"> | ||
| + | $ matrix-gpio_int | ||
| + | </syntaxhighlight> | ||
| + | Note: this module is not plug and play therefore before running the module please make sure it is connected to an ARM board.<br> | ||
| + | Here is what you should observe:<br> | ||
| + | <syntaxhighlight lang="bash"> | ||
| + | Waiting event... | ||
| + | Device[0] value is 1 | ||
| + | </syntaxhighlight> | ||
| + | When you tilt the module, roll the ball and make it touch the trigger point you will see an event is detected. | ||
| + | |||
| + | ==Code Sample== | ||
| + | This Matrix code sample can work with all the ARM boards mentioned in this module's wiki. The name of this code sample is "matrix-gpio_int". Here is its source code: | ||
| + | <syntaxhighlight lang="c"> | ||
| + | int main(int argc, char ** argv) | ||
| + | { | ||
| + | int i, board; | ||
| + | int retSize = -1; | ||
| + | char value[ARRAY_SIZE(dev)]; | ||
| + | |||
| + | if ((board = boardInit()) < 0) | ||
| + | printf("Fail to init board\n"); | ||
| + | |||
| + | if (argc == 2) { | ||
| + | dev[0].pin = atoi(argv[1]); | ||
| + | } | ||
| + | printf("Using GPIO_PIN(%d)\n", dev[0].pin); | ||
| + | system("modprobe "DRIVER_MODULE); | ||
| + | signal(SIGINT, intHandler); | ||
| + | if (board == BOARD_NANOPI_T2) | ||
| + | dev[0].pin = GPIO_PIN(15); | ||
| + | if ((devFD =sensorInit(dev, ARRAY_SIZE(dev))) == -1) { | ||
| + | printf("Fail to init sensor\n"); | ||
| + | return -1; | ||
| + | } | ||
| + | printf("Waiting event...\n"); | ||
| + | if ((retSize = sensorRead(devFD, value, ARRAY_SIZE(dev))) == -1) { | ||
| + | printf("Fail to read sensors\n"); | ||
| + | } | ||
| + | if (retSize > 0) { | ||
| + | i = 0; | ||
| + | for (i=0; i<retSize; i++) { | ||
| + | printf("dev[%d] value: %d\n", i, value[i]); | ||
| + | } | ||
| + | } | ||
| + | sensorDeinit(devFD); | ||
| + | system("rmmod "DRIVER_MODULE); | ||
| + | return 0; | ||
| + | } | ||
| + | </syntaxhighlight> | ||
| + | For more details about this APIs called in this code sample refer to [[Matrix API reference manual]] <br> | ||
| + | |||
| + | ==Resources== | ||
| + | *[Schematic]([http://wiki.friendlyarm.com/wiki/images/0/00/TIL-01-1511-Schematic.pdf Matrix - Ball Rolling Switch-Schematic.pdf]) | ||
| + | |||
| + | <!--- | ||
| + | ==Download Matrix Source Code== | ||
| + | All the matrix modules' code samples are open source. They are maintained on GitHub: https://github.com/friendlyarm/matrix.git <br> | ||
| + | Each branch in this hub contains the matrix modules' code samples for a board that the matrix modules can work with<br> | ||
| + | * The matrix-nanopi branch contains the matrix modules' code samples for the NanoPi | ||
| + | * The matrix-nanopi2 branch contains the matrix modules' code samples for the NanoPi 2 | ||
| + | * The matrix-tiny4412 branch contains the matrix modules' code samples for the Tiny4412; | ||
| + | * The matrix-raspberrypi branch contains the matrix modules' code samples for the RaspberryPi; | ||
| + | |||
| + | Please follow the steps below to get the source code:<br> | ||
| + | Install the git utility on a PC running Ubuntu14.04 | ||
<syntaxhighlight lang="bash"> | <syntaxhighlight lang="bash"> | ||
$ sudo apt-get install git | $ sudo apt-get install git | ||
</syntaxhighlight> | </syntaxhighlight> | ||
| − | + | Clone the matrix code from GitHub | |
<syntaxhighlight lang="bash"> | <syntaxhighlight lang="bash"> | ||
| − | $ git clone | + | $ git clone https://github.com/friendlyarm/matrix.git |
</syntaxhighlight> | </syntaxhighlight> | ||
| − | + | If this is successful a "matrix" directory will be generated, which will contain all the matrix modules' code samples. | |
| − | == | + | ==Connect to NanoPi 2== |
| − | === | + | ===Hardware Connection=== |
| − | + | Please refer to the following connection diagram to connect the Matrix-Ball_Rolling_Switch to the NanoPi 2:<br> | |
[[File:matrix-BAll Rolling Switch_nanopi.jpg|frameless|600px|matrix-BAll Rolling Switch_nanopi2]] | [[File:matrix-BAll Rolling Switch_nanopi.jpg|frameless|600px|matrix-BAll Rolling Switch_nanopi2]] | ||
| − | + | Connection Details: | |
{| class="wikitable" | {| class="wikitable" | ||
|- | |- | ||
| Line 64: | Line 201: | ||
|} | |} | ||
| − | === | + | ===Compile Test Program=== |
| − | + | Please login the matrix hub and enter the nanopi2 branch | |
<syntaxhighlight lang="bash"> | <syntaxhighlight lang="bash"> | ||
$ cd matrix | $ cd matrix | ||
| Line 71: | Line 208: | ||
</syntaxhighlight> | </syntaxhighlight> | ||
| − | + | Compile the Matrix code | |
<syntaxhighlight lang="bash"> | <syntaxhighlight lang="bash"> | ||
$ make CROSS_COMPILE=arm-linux- clean | $ make CROSS_COMPILE=arm-linux- clean | ||
| Line 77: | Line 214: | ||
$ make CROSS_COMPILE=arm-linux- install | $ make CROSS_COMPILE=arm-linux- install | ||
</syntaxhighlight> | </syntaxhighlight> | ||
| − | + | Note: please make sure to install the cross compiler "arm-linux-gcc-4.9.3" on your PC, which is used to compile files for the NanoPi 2.<br> | |
| − | + | Generated library files are under the "install/lib" directory. The test program is under the "install/usr/bin" directory.<br> | |
| + | The modules are under the "modules" directory. The driver's source code is in github: https://github.com/friendlyarm/linux-3.4.y.git <br> | ||
| − | === | + | ===Run Test Program=== |
| − | + | Please insert a TF card which is flashed with Debian to a Linux host and mount its boot and rootfs sections.<br> | |
| − | + | We assume the rootfs is mounted to /media/rootfs then please run the following commands to copy the module, library and test program to the card.<br> | |
<syntaxhighlight lang="bash"> | <syntaxhighlight lang="bash"> | ||
$ cp modules /media/rootfs/ -r | $ cp modules /media/rootfs/ -r | ||
| Line 89: | Line 227: | ||
</syntaxhighlight> | </syntaxhighlight> | ||
| − | + | Insert this TF card to your NanoPi 2, power on and run the following commands to start the matrix-ball_switch program.<br> | |
<syntaxhighlight lang="bash"> | <syntaxhighlight lang="bash"> | ||
$ matrix-ball_switch | $ matrix-ball_switch | ||
</syntaxhighlight> | </syntaxhighlight> | ||
| − | + | Here is what you should expect:<br> | |
[[File:matrix-ball_switch_result.png|frameless|600px|matrix-ball_switch_result]] <br> | [[File:matrix-ball_switch_result.png|frameless|600px|matrix-ball_switch_result]] <br> | ||
| − | + | After you get the prompt "Lean the switch" please tilt the module to roll the ball making it touch the trigger point you will see "Switch[0]:1". | |
| − | === | + | ===Code Sample=== |
<syntaxhighlight lang="c"> | <syntaxhighlight lang="c"> | ||
static struct sensor brSwitch[] = { | static struct sensor brSwitch[] = { | ||
| Line 136: | Line 274: | ||
} | } | ||
</syntaxhighlight> | </syntaxhighlight> | ||
| + | ---> | ||
| + | |||
| + | ==Update Log== | ||
| + | ===Feb-24-2016=== | ||
| + | * Added the driver's source code location in Section 5.2 | ||
| + | ===June-17-2016=== | ||
| + | * Re-organized and simplified wiki | ||
Latest revision as of 10:30, 19 June 2016
Contents
1 Introduction
- The Matrix-Ball_Rolling_Switch module is a ball switch. Its electrical characteristics are very similar to a mercury switch's however a mercury switch is easily broken, oxidized, leaking and not environment-friendly. This ball switch prevents all these issues.
- The switch is free to move any angle and if that angle is between 15 degrees and 45 degrees a signal will be generated and used as an input to a Schmitt trigger.
2 Features
- GPIO
- Small
- 2.54 mm spacing pin header
- PCB Dimension(mm):16 x 16
- Pin Description:
| Pin | Description |
| S | Digital GPIO |
| V | Supply Voltage 5V |
| G | Ground |
3 Basic Device Operation
Please connect Pin V to a power supply, Pin G grounded and Pin S to a digital output. When you move the switch pushing the internal metal ball to connect the trigger point a high level signal will be generated and output to a Schmitt trigger which reverses this signal to output a low level signal. When you move the switch pushing the internal metal ball away from the trigger point a low level signal will be generated and output to a Schmitt trigger which reverses this signal to output a high level signal.
4 Applications
4.1 Connect to NanoPi M1
Refer to the following connection diagram to connect the module to the NanoPi M1:
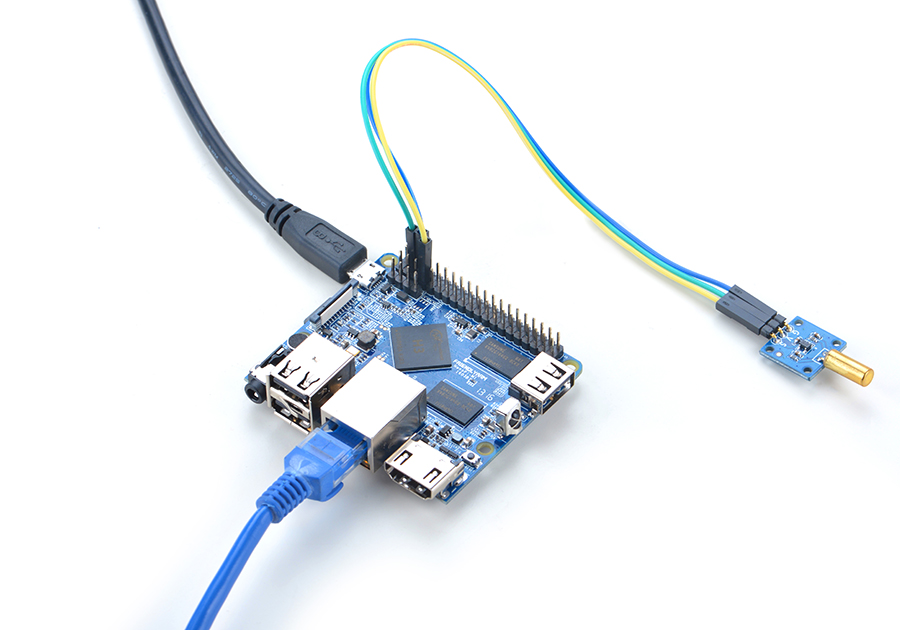
Connection Details:
| Matrix-Ball_Rolling_Switch | NanoPi M1 |
| S | Pin7 |
| V | Pin4 |
| G | Pin6 |
4.2 Connect to NanoPi 2
Refer to the following connection diagram to connect the module to the NanoPi 2:
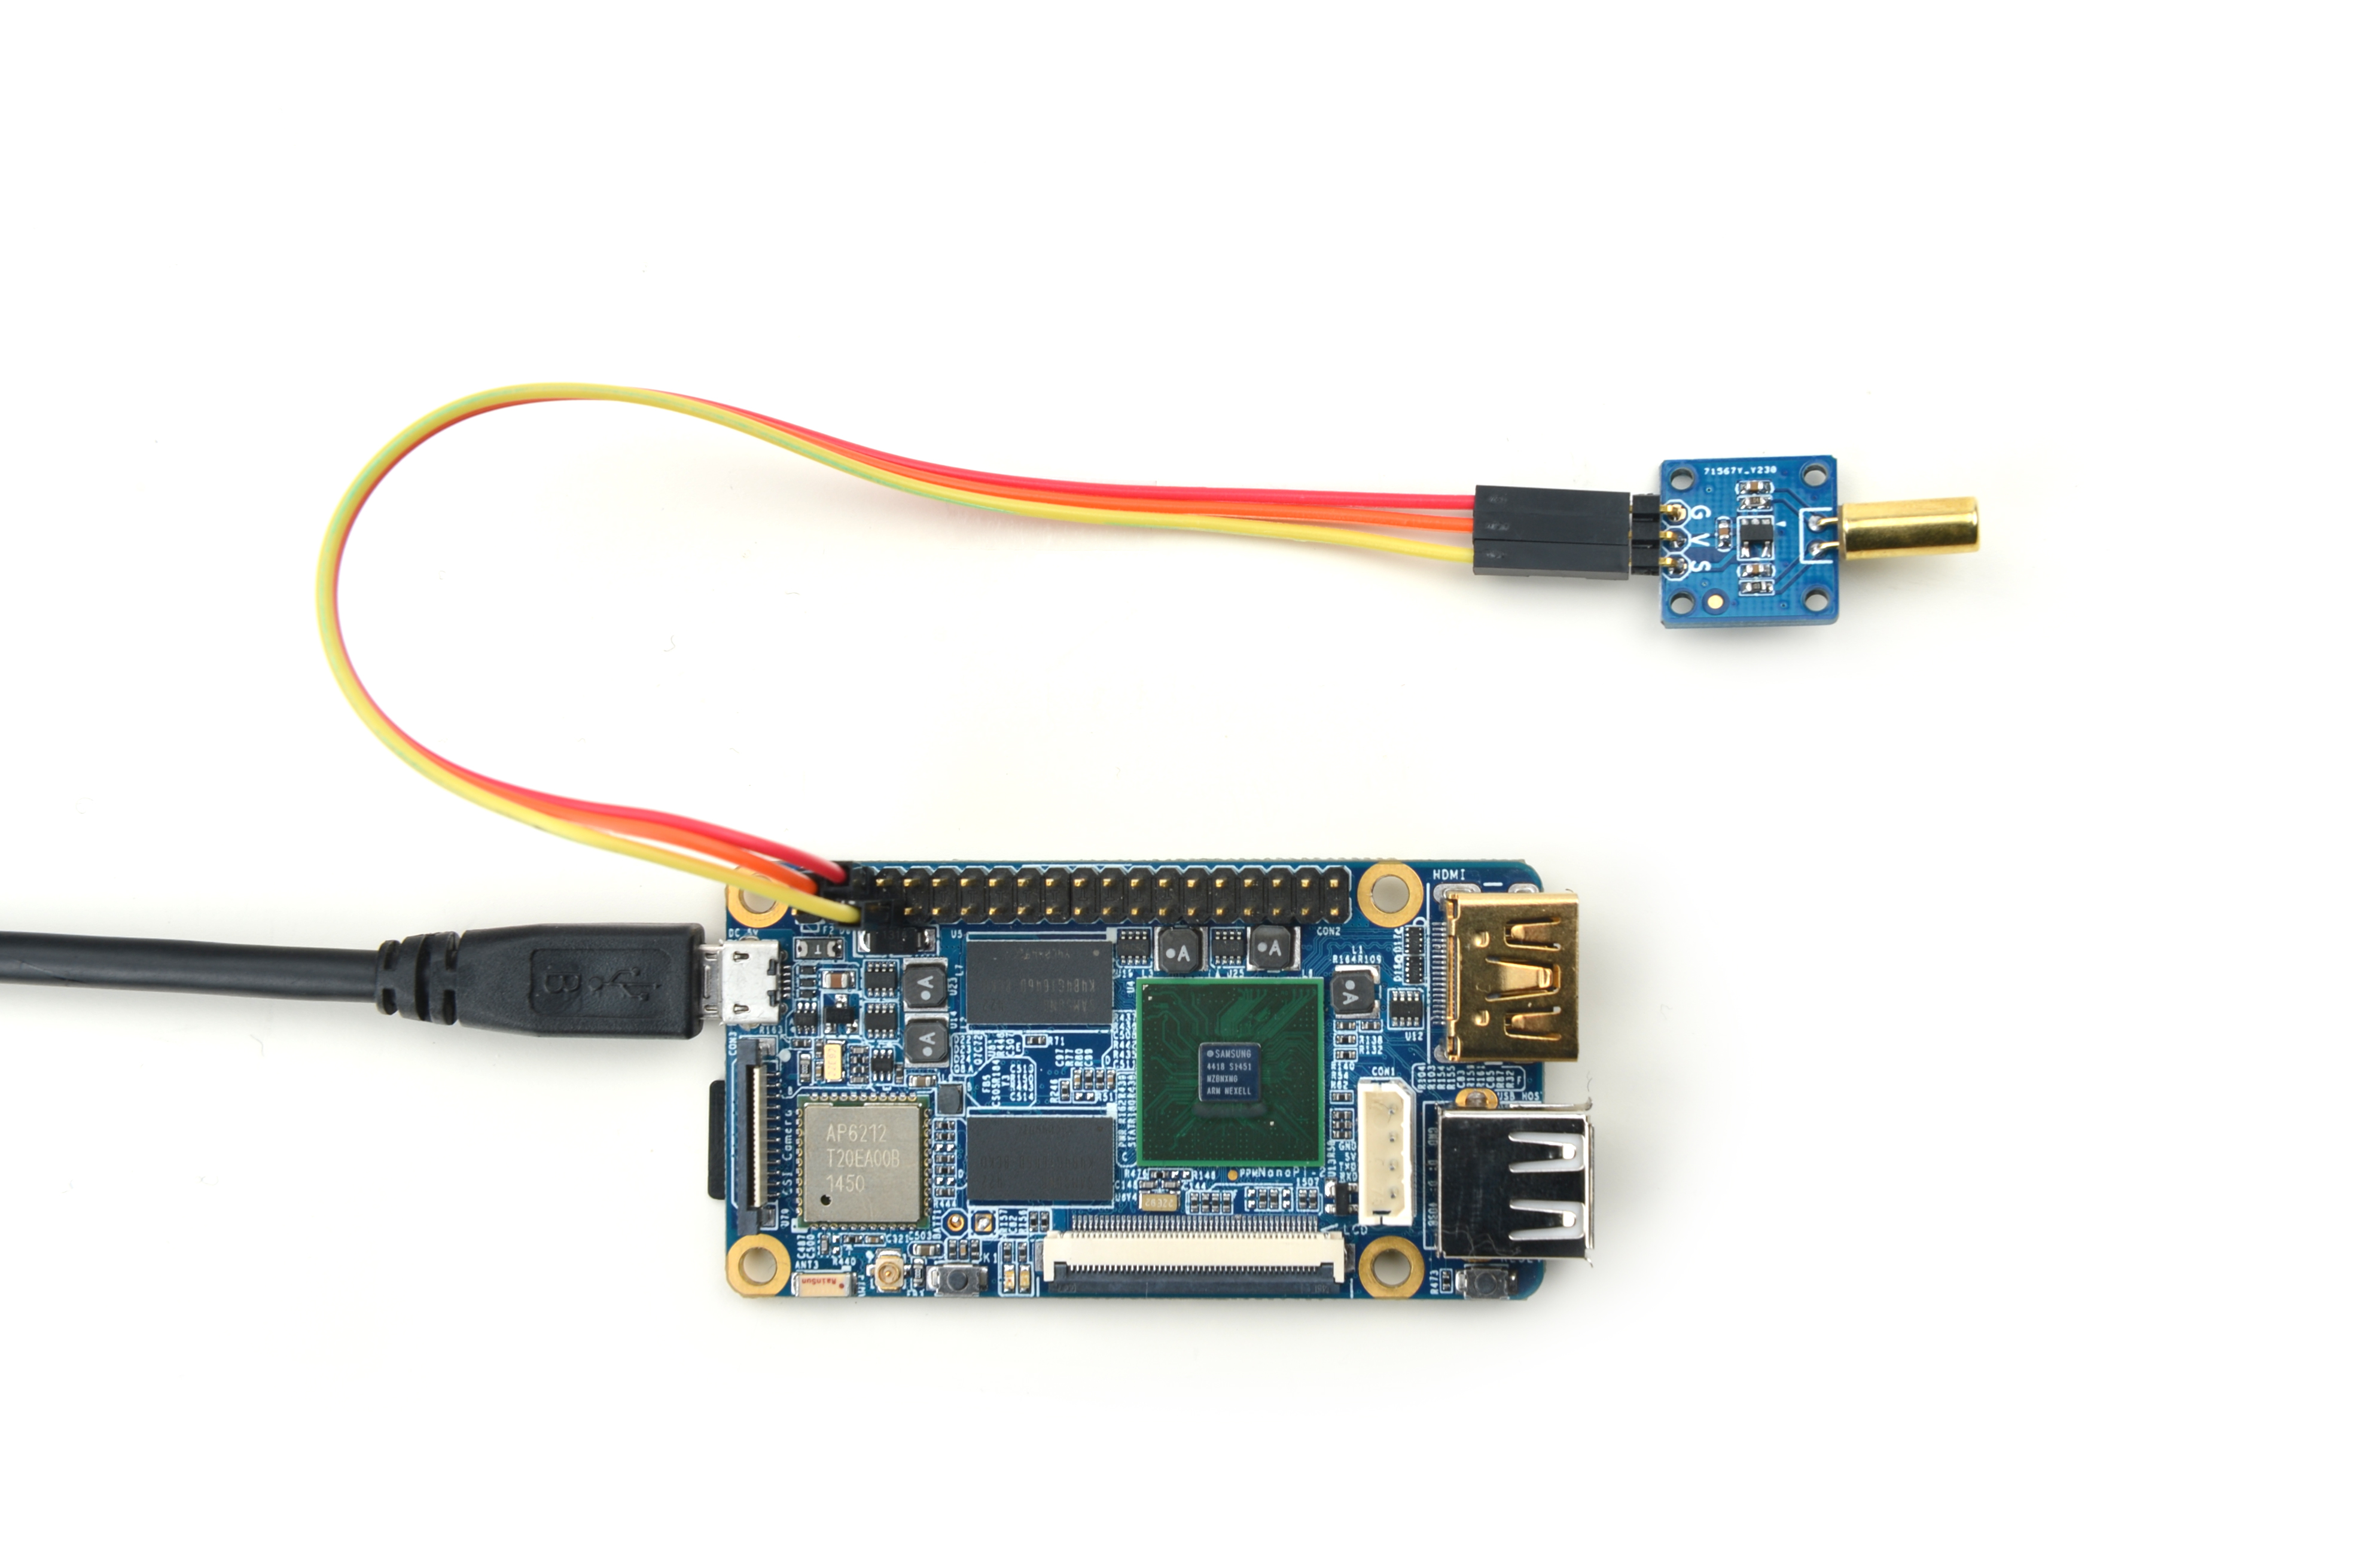
Connection Details:
| Matrix-Ball_Rolling_Switch | NanoPi 2 |
| S | Pin7 |
| V | Pin4 |
| G | Pin6 |
4.3 Connect to NanoPi M2 / NanoPi 2 Fire
Refer to the following connection diagram to connect the module to the NanoPi M2/ NanoPi 2 Fire.
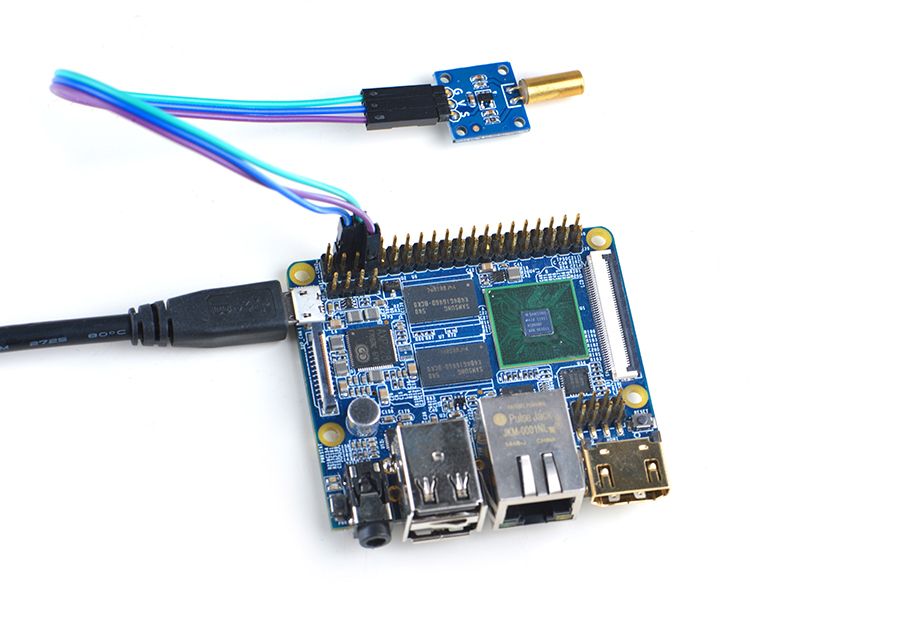
Connection Details:
| Matrix-Ball_Rolling_Switch | NanoPi M2 |
| S | Pin7 |
| V | Pin4 |
| G | Pin6 |
4.4 Connect to NanoPC-T2
Refer to the following connection diagram to connect the module to the NanoPC-T2:
Matrix-Ball_Rolling_Switch_NanoPC-T2
Connection Details:
| Matrix-Ball_Rolling_Switch | NanoPC-T2 |
| S | Pin15 |
| V | Pin29 |
| G | Pin30 |
5 Compile & Run Test Program
Boot your ARM board with Debian and copy the matrix code:
$ apt-get update && apt-get install git
$ git clone https://github.com/friendlyarm/matrix.git
If your cloning is done successfully a "matrix" directory will be generated.
Compile and install Matrix:
$ cd matrix
$ make && make install
Run test program:
$ matrix-gpio_intNote: this module is not plug and play therefore before running the module please make sure it is connected to an ARM board.
Here is what you should observe:
Waiting event...
Device[0] value is 1
When you tilt the module, roll the ball and make it touch the trigger point you will see an event is detected.
6 Code Sample
This Matrix code sample can work with all the ARM boards mentioned in this module's wiki. The name of this code sample is "matrix-gpio_int". Here is its source code:
int main(int argc, char ** argv)
{
    int i, board;
    int retSize = -1;
    char value[ARRAY_SIZE(dev)];

    if ((board = boardInit()) < 0)
        printf("Fail to init board\n");

    if (argc == 2) {
        dev[0].pin = atoi(argv[1]);
    }
    printf("Using GPIO_PIN(%d)\n", dev[0].pin);
    system("modprobe "DRIVER_MODULE);
    signal(SIGINT, intHandler);
    if (board == BOARD_NANOPI_T2)
        dev[0].pin = GPIO_PIN(15);
    if ((devFD =sensorInit(dev, ARRAY_SIZE(dev))) == -1) {
        printf("Fail to init sensor\n");
        return -1;
    }
    printf("Waiting event...\n");
    if ((retSize = sensorRead(devFD, value, ARRAY_SIZE(dev))) == -1) {
        printf("Fail to read sensors\n");
    }
    if (retSize > 0) {
        i = 0;
        for (i=0; i<retSize; i++) {
            printf("dev[%d] value: %d\n", i, value[i]);
        }
    }
    sensorDeinit(devFD);
    system("rmmod "DRIVER_MODULE);
    return 0;
}
For more details about this APIs called in this code sample refer to Matrix API reference manual
7 Resources
- [Schematic](Matrix - Ball Rolling Switch-Schematic.pdf)
8 Update Log
8.1 Feb-24-2016
- Added the driver's source code location in Section 5.2
8.2 June-17-2016
- Re-organized and simplified wiki
