Difference between revisions of "Template:UbuntuJammyDesktop-WithHDMI"
(updated by API) |
(updated by API) |
||
| (One intermediate revision by the same user not shown) | |||
| Line 1: | Line 1: | ||
| + | ===Disable Automatic Login=== | ||
| + | Edit the /etc/gdm3/custom.conf file, set AutomaticLoginEnable to false: | ||
| + | <syntaxhighlight lang="bash"> | ||
| + | [daemon] | ||
| + | AutomaticLoginEnable = false | ||
| + | </syntaxhighlight> | ||
===WiFi Connection=== | ===WiFi Connection=== | ||
====Gui==== | ====Gui==== | ||
| Line 17: | Line 23: | ||
</syntaxhighlight> | </syntaxhighlight> | ||
| − | ===Chromium web browser === | + | ===Chromium web browser=== |
====GPU==== | ====GPU==== | ||
Chromium web browser has enabled hardware acceleration by default, supports WebGL, and can view hardware acceleration details by entering the URL chrome://gpu, as shown below:<br /> | Chromium web browser has enabled hardware acceleration by default, supports WebGL, and can view hardware acceleration details by entering the URL chrome://gpu, as shown below:<br /> | ||
| Line 28: | Line 34: | ||
</syntaxhighlight> | </syntaxhighlight> | ||
If there is no content output from the fuser command, it means software decoding. | If there is no content output from the fuser command, it means software decoding. | ||
| + | |||
| + | ====Check Supported Hardware Decoding Formats==== | ||
| + | Enter about://gpu in your browser's address bar and scroll to the bottom of the page to view the "Video Acceleration Information" table. <br /> | ||
| + | After playing a video, enter about://media-internals in your browser's address bar to check if hardware decoding was enabled for the most recent playback. <br /> | ||
Latest revision as of 02:58, 22 September 2023
Contents
1 Disable Automatic Login
Edit the /etc/gdm3/custom.conf file, set AutomaticLoginEnable to false:
[daemon]
AutomaticLoginEnable = false
2 WiFi Connection
2.1 Gui
Click on the icon on the top right in the FriendlyDesktop's main window, select your wanted WiFi hotspot and proceed with prompts
2.2 Console
Please visit: Use NetworkManager to configure network settings
3 Test OpenGL ES
First, change the CPU governor to performance:
sudo sh -c 'echo performance > /sys/devices/system/cpu/cpufreq/policy0/scaling_governor'
sudo sh -c 'echo performance > /sys/devices/system/cpu/cpufreq/policy4/scaling_governor'
sudo sh -c 'echo performance > /sys/devices/system/cpu/cpufreq/policy6/scaling_governor'
Start glmark2-es2-wayland:
glmark2-es2-wayland
4 Chromium web browser
4.1 GPU
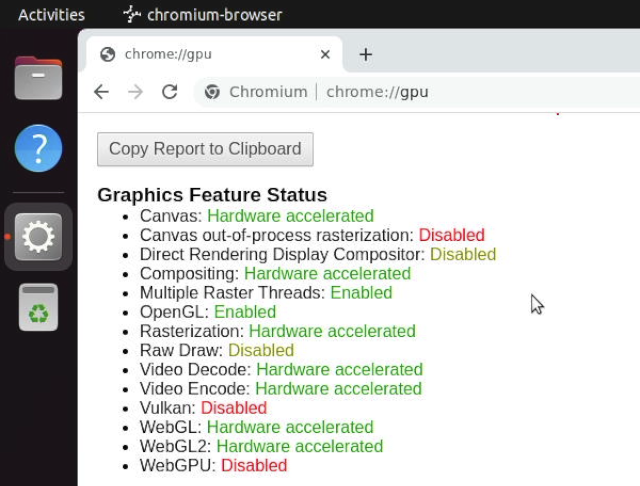
Chromium web browser has enabled hardware acceleration by default, supports WebGL, and can view hardware acceleration details by entering the URL chrome://gpu, as shown below:

4.2 VPU
Play a video in the browser, then use fuser on the command line to view the mpp device node to confirm that the vpu interface is being called:
pi@FriendlyElec:~$ fuser /dev/mpp_service
/dev/mpp_service:     3258
If there is no content output from the fuser command, it means software decoding.
4.3 Check Supported Hardware Decoding Formats
Enter about://gpu in your browser's address bar and scroll to the bottom of the page to view the "Video Acceleration Information" table.
After playing a video, enter about://media-internals in your browser's address bar to check if hardware decoding was enabled for the most recent playback.