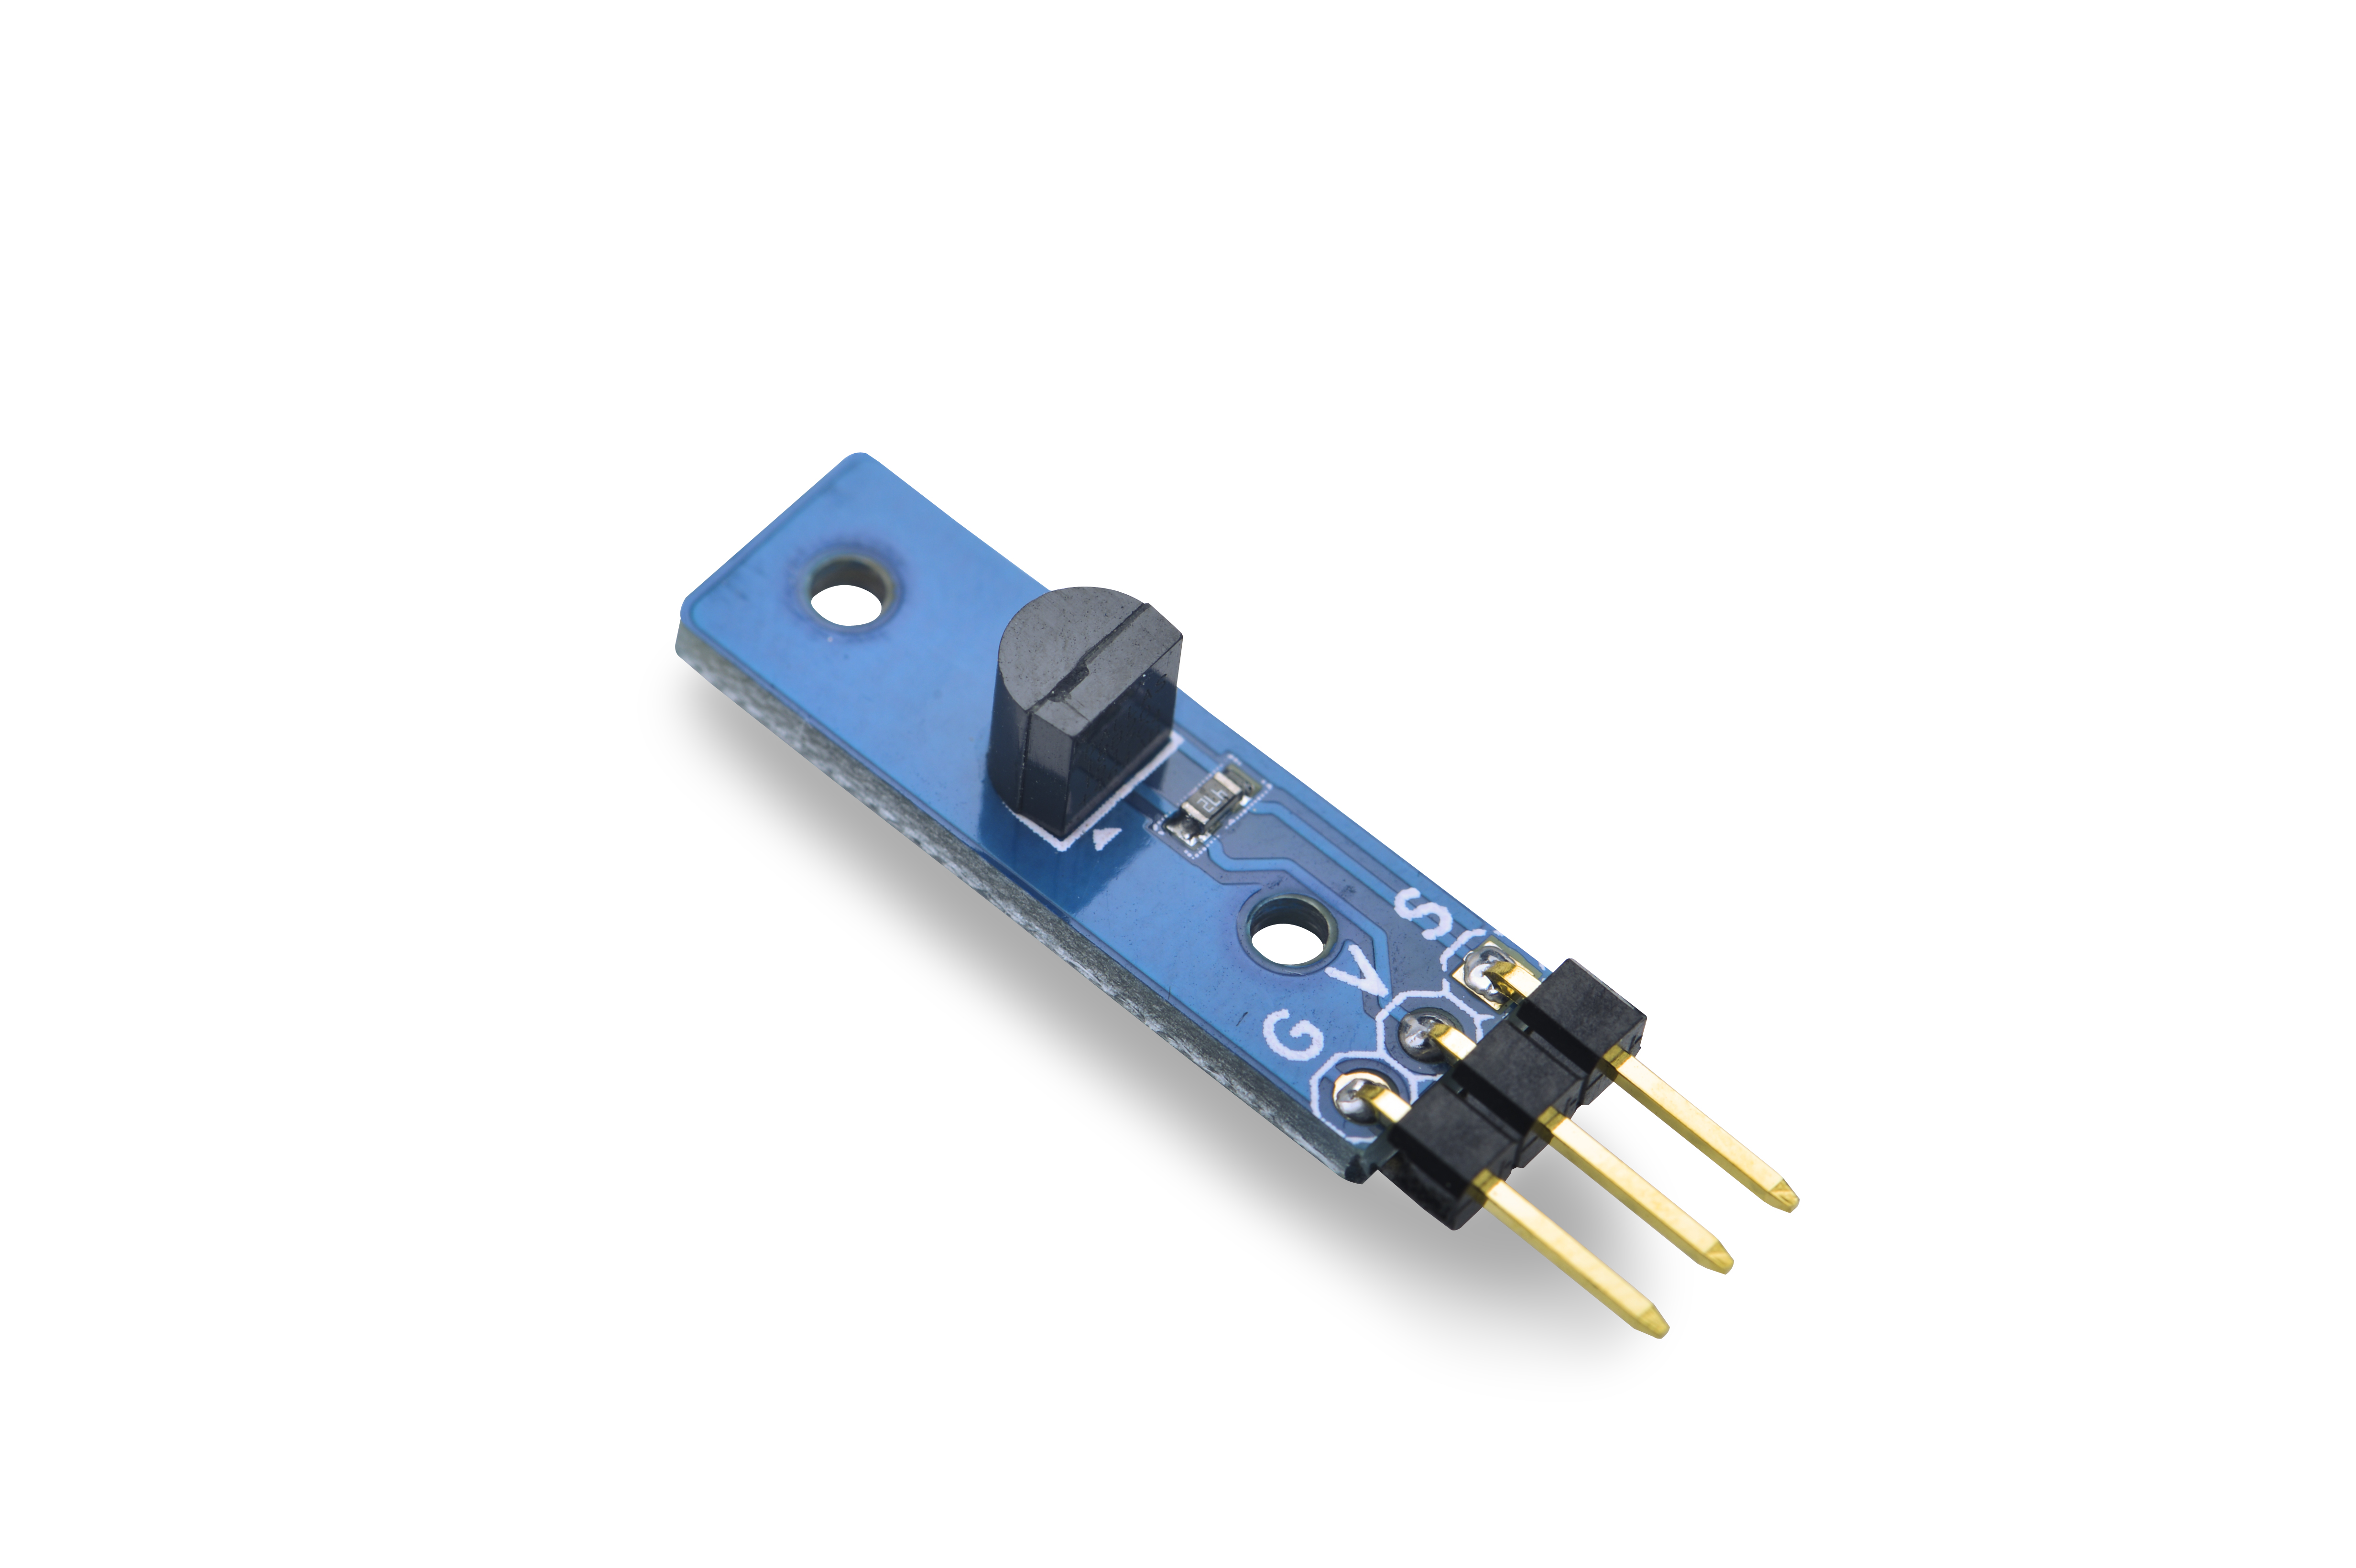
Difference between revisions of "Matrix - Temperature Sensor"
(→与NanoPi 2连接使用) |
(→Feb-23-2016) |
||
| (7 intermediate revisions by the same user not shown) | |||
| Line 13: | Line 13: | ||
* 2.54mm spacing pin | * 2.54mm spacing pin | ||
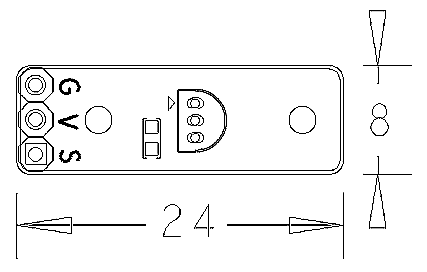
* PCB dimension(mm): 8 X 24 | * PCB dimension(mm): 8 X 24 | ||
| − | [[File:temppcb.png|frameless|400px| | + | [[File:temppcb.png|frameless|400px|Temperature Sensor PCB]] |
| Line 32: | Line 32: | ||
equates to a temperature resolution of 0.5°C, 0.25°C, 0.125°C, or 0.0625°C. Following the issuance of the Convert T [44h] command, a temperature conversion is performed and the thermal data is stored in the scratchpad memory in a 16-bit, sign-extended two’s complement format. The temperature information can be retrieved over the 1-Wire interface by issuing a Read Scratchpad [BEh] command once the conversion has been performed. The data is transferred over the 1-Wire bus, LSB first. The MSB of the temperature register contains the “sign” (S) bit, denoting whether the temperature is positive or negative. | equates to a temperature resolution of 0.5°C, 0.25°C, 0.125°C, or 0.0625°C. Following the issuance of the Convert T [44h] command, a temperature conversion is performed and the thermal data is stored in the scratchpad memory in a 16-bit, sign-extended two’s complement format. The temperature information can be retrieved over the 1-Wire interface by issuing a Read Scratchpad [BEh] command once the conversion has been performed. The data is transferred over the 1-Wire bus, LSB first. The MSB of the temperature register contains the “sign” (S) bit, denoting whether the temperature is positive or negative. | ||
| + | ==Applications== | ||
| + | ===Connect to NanoPi M1=== | ||
| + | Refer to the following connection diagram to connect the module to the NanoPi M1:<br> | ||
| + | [[File:Matrix-Temperature_Sensor_nanopi_m1.jpg|frameless|600px|Matrix-Temperature_Sensor_nanopi_m1]] | ||
| + | |||
| + | Connection Details: | ||
| + | {| class="wikitable" | ||
| + | |- | ||
| + | |Matrix-Temperature_Sensor || NanoPi M1 | ||
| + | |- | ||
| + | |S || Pin7 | ||
| + | |- | ||
| + | |V || Pin4 | ||
| + | |- | ||
| + | |G || Pin6 | ||
| + | |} | ||
| + | |||
| + | ===Connect to NanoPi 2=== | ||
| + | Refer to the following connection diagram to connect the module to the NanoPi 2:<br> | ||
| + | [[File:Matrix-Temperature_Sensor_nanopi_2.jpg|frameless|600px|Matrix-Temperature_Sensor_nanopi_2]] | ||
| + | |||
| + | Connection Details: | ||
| + | {| class="wikitable" | ||
| + | |- | ||
| + | |Matrix-Temperature_Sensor || NanoPi 2 | ||
| + | |- | ||
| + | |S || Pin7 | ||
| + | |- | ||
| + | |V || Pin4 | ||
| + | |- | ||
| + | |G || Pin6 | ||
| + | |} | ||
| + | |||
| + | ===Connect to NanoPi M2 / NanoPi 2 Fire=== | ||
| + | Refer to the following connection diagram to connect the module to the NanoPi M2/ NanoPi 2 Fire:<br> | ||
| + | [[File:Matrix-Temperature_Sensor_nanopi_m2.jpg|frameless|600px|Matrix-Temperature_Sensor_nanopi_m2]] | ||
| + | |||
| + | Connection Details: | ||
| + | {| class="wikitable" | ||
| + | |- | ||
| + | |Matrix-Temperature_Sensor || NanoPi M2 | ||
| + | |- | ||
| + | |S || Pin7 | ||
| + | |- | ||
| + | |V || Pin4 | ||
| + | |- | ||
| + | |G || Pin6 | ||
| + | |} | ||
| + | |||
| + | ===Connect to NanoPC-T2=== | ||
| + | Refer to the following connection diagram to connect the module to the NanoPC-T2:<br> | ||
| + | [[File:Matrix-Temperature_Sensor_NanoPC-T2.jpg|frameless|600px|Matrix-Temperature_Sensor_NanoPC-T2]] | ||
| + | |||
| + | Connection Details: | ||
| + | {| class="wikitable" | ||
| + | |- | ||
| + | |Matrix-Temperature_Sensor || NanoPC-T2 | ||
| + | |- | ||
| + | |S || Pin15 | ||
| + | |- | ||
| + | |V || Pin29 | ||
| + | |- | ||
| + | |G || Pin30 | ||
| + | |} | ||
| + | |||
| + | ==Compile & Run Test Program== | ||
| + | Boot your ARM board with Debian and copy the matrix code: | ||
| + | <syntaxhighlight lang="bash"> | ||
| + | $ apt-get update && apt-get install git | ||
| + | $ git clone https://github.com/friendlyarm/matrix.git | ||
| + | </syntaxhighlight> | ||
| + | If your cloning is done successfully a "matrix" directory will be generated. | ||
| + | |||
| + | Compile and install Matrix: | ||
| + | <syntaxhighlight lang="bash"> | ||
| + | $ cd matrix | ||
| + | $ make && make install | ||
| + | </syntaxhighlight> | ||
| + | |||
| + | Run test program: | ||
| + | <syntaxhighlight lang="bash"> | ||
| + | $ matrix-temp_sensor | ||
| + | </syntaxhighlight> | ||
| + | Note: this module is not plug and play therefore before running the module please make sure it is connected to an ARM board.<br> | ||
| + | Here is what you should observe:<br> | ||
| + | <syntaxhighlight lang="bash"> | ||
| + | The temperature is 27.312 C | ||
| + | </syntaxhighlight> | ||
| + | The module successfully read the environment's temperature. | ||
| + | |||
| + | ==Code Sample== | ||
| + | This Matrix code sample can work with all the ARM boards mentioned in this module's wiki. The name of this code sample is "matrix-temperature_sensor". Here is its source code: | ||
| + | <syntaxhighlight lang="c"> | ||
| + | int main(int argc, char ** argv) | ||
| + | { | ||
| + | char temperature[BUF_SIZE], modStr[BUF_SIZE]; | ||
| + | int board; | ||
| + | int pin=GPIO_PIN(7); | ||
| + | |||
| + | if ((board = boardInit()) < 0) { | ||
| + | printf("Fail to init board\n"); | ||
| + | return -1; | ||
| + | } | ||
| + | if (board == BOARD_NANOPI_T2) | ||
| + | pin = GPIO_PIN(15); | ||
| + | |||
| + | if (argc == 2) | ||
| + | pin = atoi(argv[1]); | ||
| + | sprintf(modStr, "modprobe %s gpio=%d", TEMP_GPIO_DRIVER_MODULE, pintoGPIO(pin)); | ||
| + | printf("%s\n", modStr); | ||
| + | system(modStr); | ||
| + | system("modprobe "TEMP_DRIVER_MODULE); | ||
| + | sleep(1); | ||
| + | memset(temperature, 0, BUF_SIZE); | ||
| + | if (ds18b20Read(temperature) > 0) { | ||
| + | printf("The temperature is %.3f C\n", atoi(temperature)/1000.0); | ||
| + | } else { | ||
| + | printf("Fail to get temperature\n"); | ||
| + | } | ||
| + | system("rmmod "TEMP_GPIO_DRIVER_MODULE); | ||
| + | system("rmmod "TEMP_DRIVER_MODULE); | ||
| + | return 0; | ||
| + | } | ||
| + | </syntaxhighlight> | ||
| + | For more details about this APIs called in this code sample refer to [[Matrix API reference manual]] <br> | ||
| + | |||
| + | <!--- | ||
==Download Matrix Source Code== | ==Download Matrix Source Code== | ||
All the matrix modules' code samples are open source. They are maintained on GitHub - https://github.com/friendlyarm/matrix.git <br> | All the matrix modules' code samples are open source. They are maintained on GitHub - https://github.com/friendlyarm/matrix.git <br> | ||
| Line 83: | Line 210: | ||
$ make CROSS_COMPILE=arm-linux- install | $ make CROSS_COMPILE=arm-linux- install | ||
</syntaxhighlight> | </syntaxhighlight> | ||
| − | + | Note: please make sure to install the cross compiler "arm-linux-gcc-4.9.3" on your PC, which is used to compile files for the NanoPi 2.<br> | |
| − | + | Generated library files are under the "install/lib" directory. The test program is under the "install/usr/bin" directory.<br> | |
| − | + | The modules are under the "modules" directory. The driver's source code is in github: https://github.com/friendlyarm/linux-3.4.y.git <br> | |
| − | === | + | ===Run Test Program=== |
| − | + | Please insert a TF card which is flashed with Debian to a Linux host and mount its boot and rootfs sections.<br> | |
| − | + | We assume the rootfs is mounted to /media/rootfs then please run the following commands to copy the module, library and test program to the card.<br> | |
<syntaxhighlight lang="bash"> | <syntaxhighlight lang="bash"> | ||
$ cp modules /media/rootfs/ -r | $ cp modules /media/rootfs/ -r | ||
| Line 96: | Line 223: | ||
</syntaxhighlight> | </syntaxhighlight> | ||
| − | + | Insert this TF card to your NanoPi 2, power on and run the following commands to load the driver.<br> | |
<syntaxhighlight lang="bash"> | <syntaxhighlight lang="bash"> | ||
$ cd /modules | $ cd /modules | ||
| Line 102: | Line 229: | ||
</syntaxhighlight> | </syntaxhighlight> | ||
| − | + | Start the matrix-temp_sensor program.<br> | |
<syntaxhighlight lang="bash"> | <syntaxhighlight lang="bash"> | ||
$ matrix-temp_sensor | $ matrix-temp_sensor | ||
</syntaxhighlight> | </syntaxhighlight> | ||
| − | + | Here is what you expect to observe:<br> | |
[[File:matrix-temperature_sensor_result.png|frameless|600px|matrix-temperature_sensor_result]] | [[File:matrix-temperature_sensor_result.png|frameless|600px|matrix-temperature_sensor_result]] | ||
| − | === | + | ===Code Sample=== |
<syntaxhighlight lang="c"> | <syntaxhighlight lang="c"> | ||
int main(int argc, char ** argv) | int main(int argc, char ** argv) | ||
| Line 296: | Line 423: | ||
==Connect to Arduino== | ==Connect to Arduino== | ||
| + | ---> | ||
==Resources== | ==Resources== | ||
| Line 304: | Line 432: | ||
* Added the description for "NanoPi 2 branch" in Section 4 | * Added the description for "NanoPi 2 branch" in Section 4 | ||
* Added Section 5: Connect to NanoPi 2 | * Added Section 5: Connect to NanoPi 2 | ||
| − | + | ===June-24-2016=== | |
| + | * Re-organized and simplified wiki | ||
<!-- | <!-- | ||
Latest revision as of 16:01, 24 June 2016
Contents
1 Introduction
- The matrix-temperature_sensor module is used to measure temperature.
- We utilitze the DS18B20 chip with the To-92 package in this module. Its unique 1-wire interface requires only 1 port pin for reading/writing. Power for reading, writing, and performing temperature conversions can be derived from the data line itself with no need for an external power source. The DS18B20 can be powered from its data line. Each DS18B20 is assigned a unique ID.
- Its temperature range is -55 degree Celsius to +125 degree Celsius. The thermometer resolution is programmable from 9 to 12 bits. When the measured temperature is between -10 degree Celsius to +85 degree Celsius the accuracy can be at 0.5 degree. Among all three DS18B20 pins V is power, G is ground and S is data.
2 Features
- -55 degree Celsius to +125 degree Celsius
- One wire interface for communication
- Tiny, easy to be deployed in various situations
- 2.54mm spacing pin
- PCB dimension(mm): 8 X 24
- Pin Description:
| Pin | Description |
| S | GPIO |
| V | Supply Voltage 5V |
| G | Ground |
3 Basic Device Operation
The core functionality of the DS18B20 is its direct-to-digital temperature sensor. The resolution of the DS18B20 is configurable (9, 10, 11, or 12 bits), with 12-bit readings the factory default state. This equates to a temperature resolution of 0.5°C, 0.25°C, 0.125°C, or 0.0625°C. Following the issuance of the Convert T [44h] command, a temperature conversion is performed and the thermal data is stored in the scratchpad memory in a 16-bit, sign-extended two’s complement format. The temperature information can be retrieved over the 1-Wire interface by issuing a Read Scratchpad [BEh] command once the conversion has been performed. The data is transferred over the 1-Wire bus, LSB first. The MSB of the temperature register contains the “sign” (S) bit, denoting whether the temperature is positive or negative.
4 Applications
4.1 Connect to NanoPi M1
Refer to the following connection diagram to connect the module to the NanoPi M1:
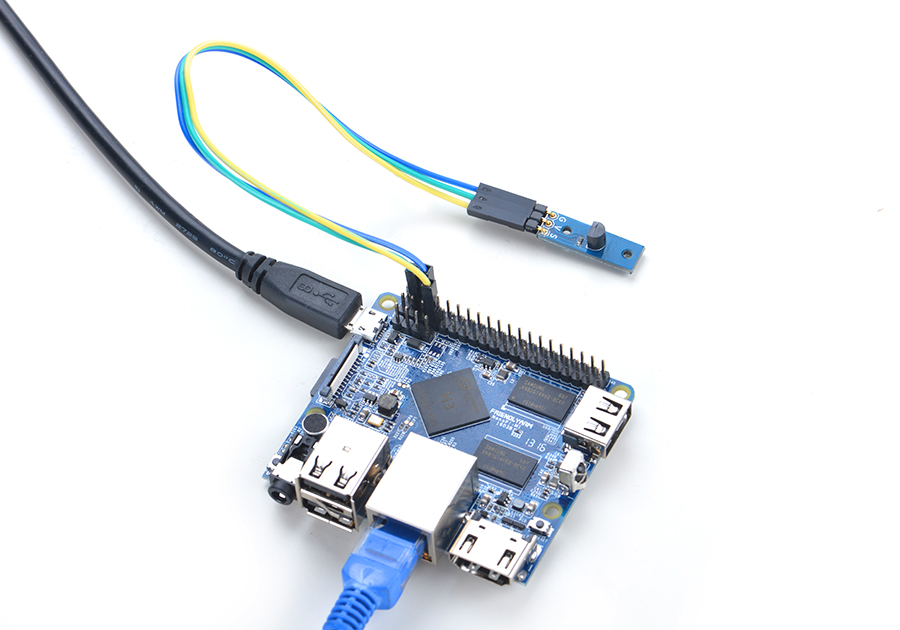
Connection Details:
| Matrix-Temperature_Sensor | NanoPi M1 |
| S | Pin7 |
| V | Pin4 |
| G | Pin6 |
4.2 Connect to NanoPi 2
Refer to the following connection diagram to connect the module to the NanoPi 2:
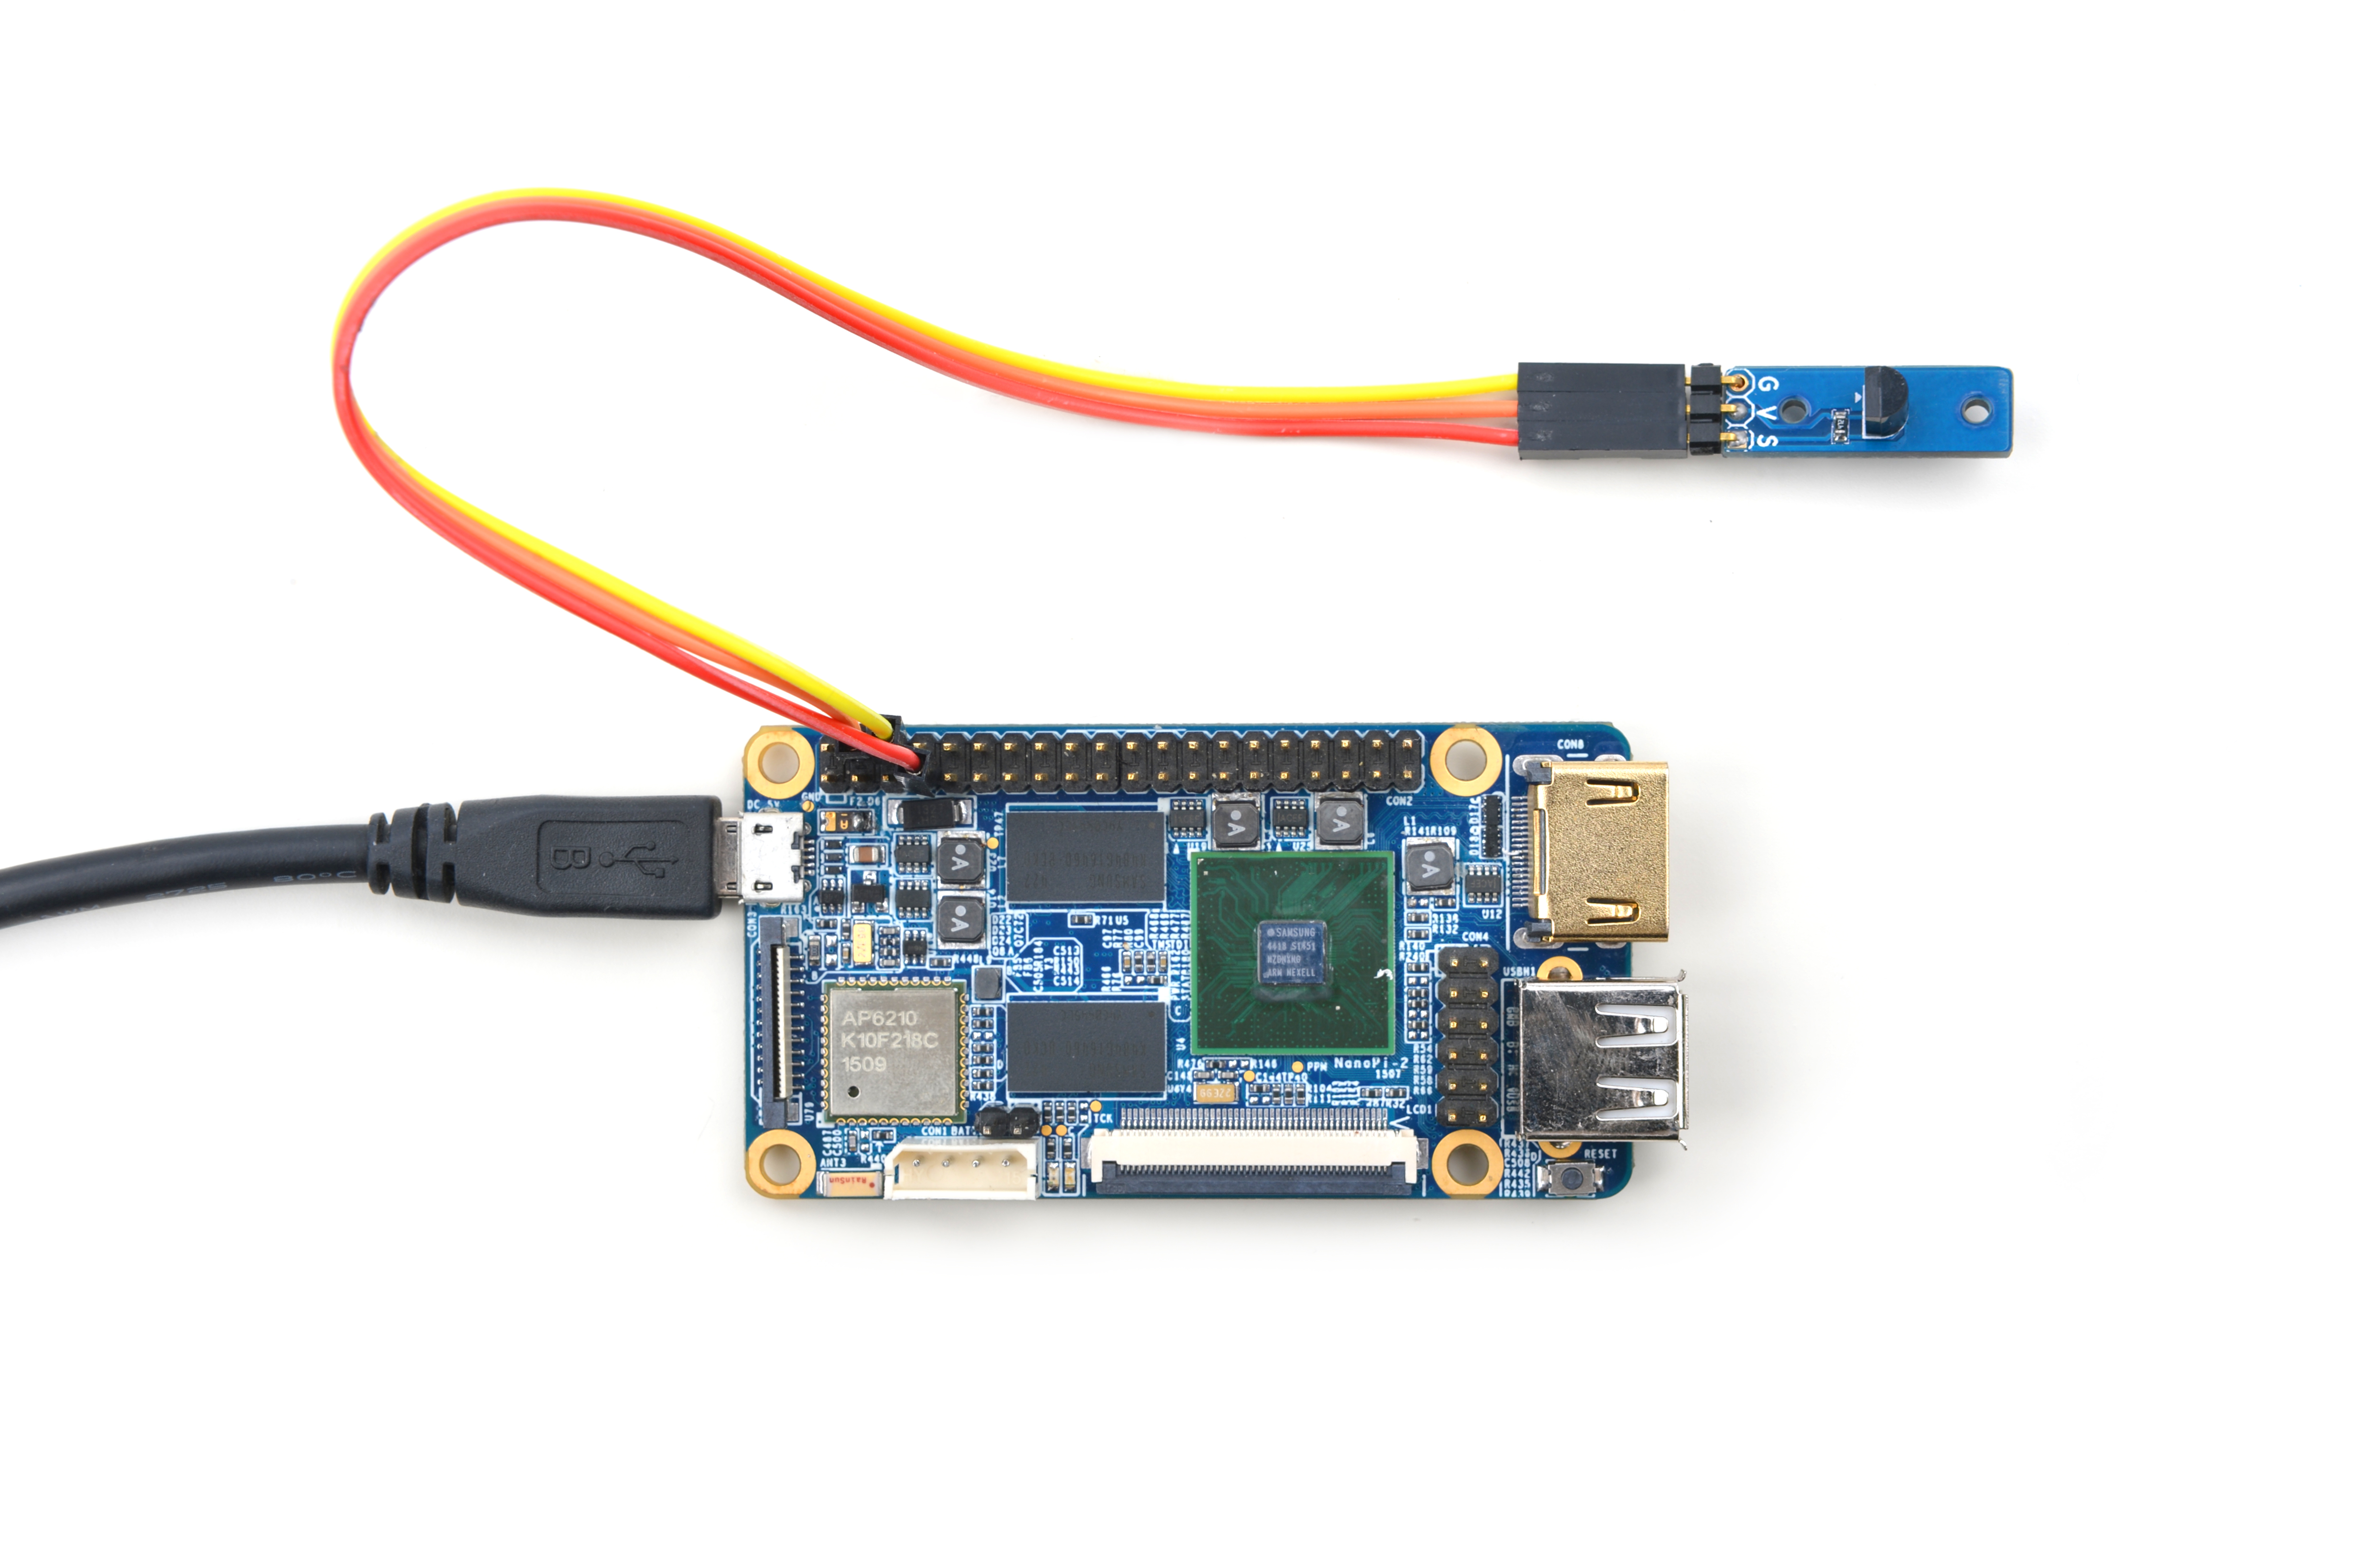
Connection Details:
| Matrix-Temperature_Sensor | NanoPi 2 |
| S | Pin7 |
| V | Pin4 |
| G | Pin6 |
4.3 Connect to NanoPi M2 / NanoPi 2 Fire
Refer to the following connection diagram to connect the module to the NanoPi M2/ NanoPi 2 Fire:
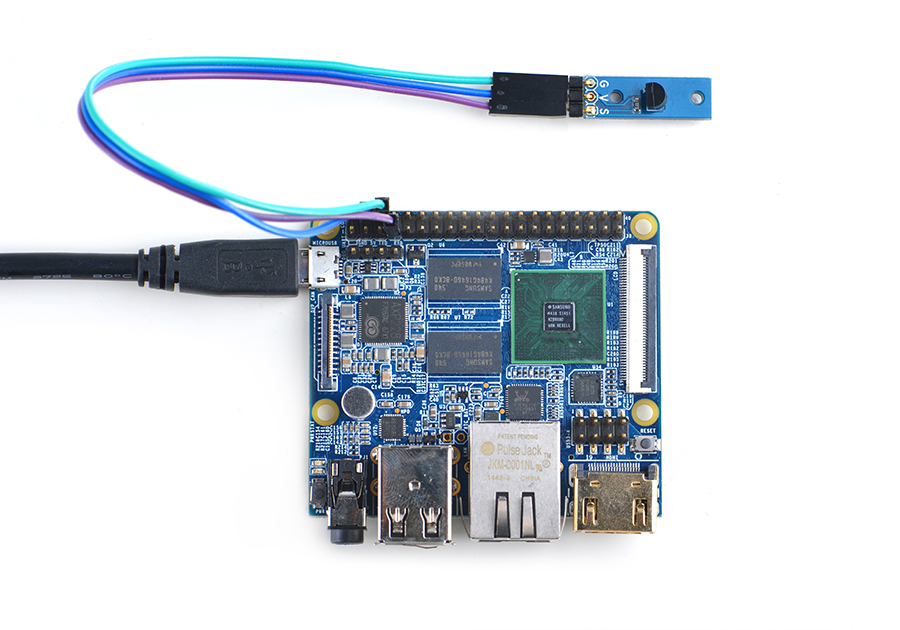
Connection Details:
| Matrix-Temperature_Sensor | NanoPi M2 |
| S | Pin7 |
| V | Pin4 |
| G | Pin6 |
4.4 Connect to NanoPC-T2
Refer to the following connection diagram to connect the module to the NanoPC-T2:
Matrix-Temperature_Sensor_NanoPC-T2
Connection Details:
| Matrix-Temperature_Sensor | NanoPC-T2 |
| S | Pin15 |
| V | Pin29 |
| G | Pin30 |
5 Compile & Run Test Program
Boot your ARM board with Debian and copy the matrix code:
$ apt-get update && apt-get install git
$ git clone https://github.com/friendlyarm/matrix.git
If your cloning is done successfully a "matrix" directory will be generated.
Compile and install Matrix:
$ cd matrix
$ make && make install
Run test program:
$ matrix-temp_sensorNote: this module is not plug and play therefore before running the module please make sure it is connected to an ARM board.
Here is what you should observe:
The temperature is 27.312 CThe module successfully read the environment's temperature.
6 Code Sample
This Matrix code sample can work with all the ARM boards mentioned in this module's wiki. The name of this code sample is "matrix-temperature_sensor". Here is its source code:
int main(int argc, char ** argv)
{
    char temperature[BUF_SIZE], modStr[BUF_SIZE];
    int board;
    int pin=GPIO_PIN(7);

    if ((board = boardInit()) < 0) {
        printf("Fail to init board\n");
        return -1;
    }
    if (board == BOARD_NANOPI_T2)
        pin = GPIO_PIN(15);

    if (argc == 2)
        pin = atoi(argv[1]);
    sprintf(modStr, "modprobe %s gpio=%d", TEMP_GPIO_DRIVER_MODULE, pintoGPIO(pin));
    printf("%s\n", modStr);
    system(modStr);
    system("modprobe "TEMP_DRIVER_MODULE);
    sleep(1);
    memset(temperature, 0, BUF_SIZE);
    if (ds18b20Read(temperature) > 0) {
        printf("The temperature is %.3f C\n", atoi(temperature)/1000.0);
    } else {
        printf("Fail to get temperature\n");
    }
    system("rmmod "TEMP_GPIO_DRIVER_MODULE);
    system("rmmod "TEMP_DRIVER_MODULE);
    return 0;
}
For more details about this APIs called in this code sample refer to Matrix API reference manual
7 Resources
8 Update Log
8.1 Feb-23-2016
- Added the description for "NanoPi 2 branch" in Section 4
- Added Section 5: Connect to NanoPi 2
8.2 June-24-2016
- Re-organized and simplified wiki
