Difference between revisions of "Matrix - 0.96' 128x64 OLED"
(→Features) |
(→Applications) |
||
| (11 intermediate revisions by the same user not shown) | |||
| Line 12: | Line 12: | ||
* PCB Dimension(mm): 27 x 32 | * PCB Dimension(mm): 27 x 32 | ||
[[File:oledpcb.png|frameless|400px|OLEDPCB]] | [[File:oledpcb.png|frameless|400px|OLEDPCB]] | ||
| + | |||
| + | * Pin Description: | ||
| + | {| class="wikitable" | ||
| + | |- | ||
| + | |Pin || Description | ||
| + | |- | ||
| + | |CS || Chip Selection | ||
| + | |- | ||
| + | |DC || Data/Command | ||
| + | |- | ||
| + | |RES || Reset | ||
| + | |- | ||
| + | |MOSI || SPI MOSI | ||
| + | |- | ||
| + | |CLK || SPI Clock | ||
| + | |- | ||
| + | |5V || Power Supply 5V | ||
| + | |- | ||
| + | |GND || Ground | ||
| + | |} | ||
==Basic Device Operation== | ==Basic Device Operation== | ||
| + | |||
| + | <!--- | ||
==Download Matrix Source Code== | ==Download Matrix Source Code== | ||
| Line 35: | Line 57: | ||
If this is successful a "matrix" directory will be generated, which will contain all the matrix modules' code samples. | If this is successful a "matrix" directory will be generated, which will contain all the matrix modules' code samples. | ||
| − | == | + | ---> |
| − | === | + | |
| − | + | ==Applications== | |
| + | ===Connect to NanoPi M1=== | ||
| + | Refer to the following connection diagram to connect the module to the NanoPi M1<br> | ||
| + | [[File:Matrix-0.96'_128x64_OLED_nanopi_m1.jpg|frameless|600px|Matrix-0.96'_128x64_OLED_nanopi_m1]] | ||
| + | |||
| + | Connection Details | ||
| + | {| class="wikitable" | ||
| + | |- | ||
| + | |Matrix-0.96'_128x64_OLED || NanoPi M1 | ||
| + | |- | ||
| + | |CS || Pin24 | ||
| + | |- | ||
| + | |DC || Pin7 | ||
| + | |- | ||
| + | |RES || Pin11 | ||
| + | |- | ||
| + | |MOSI || Pin19 | ||
| + | |- | ||
| + | |CLK || Pin23 | ||
| + | |- | ||
| + | |5V || Pin2 | ||
| + | |- | ||
| + | |GND || Pin6 | ||
| + | |} | ||
| + | |||
| + | ===Connect to NanoPi 2=== | ||
| + | Refer to the following connection diagram to connect the module to the NanoPi 2:<br> | ||
[[File:Matrix-0.96'_128x64_OLED_nanopi_2.jpg|frameless|600px|Matrix-0.96'_128x64_OLED_nanopi_2]] | [[File:Matrix-0.96'_128x64_OLED_nanopi_2.jpg|frameless|600px|Matrix-0.96'_128x64_OLED_nanopi_2]] | ||
| Line 60: | Line 108: | ||
|} | |} | ||
| − | + | ==Compile & Run Test Program== | |
| − | + | Boot your ARM board with Debian and copy the matrix code | |
<syntaxhighlight lang="bash"> | <syntaxhighlight lang="bash"> | ||
| − | $ | + | $ apt-get update && apt-get install git |
| − | $ git | + | $ git clone https://github.com/friendlyarm/matrix.git |
</syntaxhighlight> | </syntaxhighlight> | ||
| − | + | If your cloning is done successfully a "matrix" directory will be generated. | |
| − | + | ||
| − | + | ||
| − | + | ||
| − | + | ||
| − | + | ||
| − | + | ||
| − | + | ||
| − | + | ||
| − | + | Compile and install Matrix: | |
| − | + | ||
| − | + | ||
<syntaxhighlight lang="bash"> | <syntaxhighlight lang="bash"> | ||
| − | $ | + | $ cd matrix |
| − | $ | + | $ make && make install |
| − | + | ||
</syntaxhighlight> | </syntaxhighlight> | ||
| − | + | Run test program: | |
<syntaxhighlight lang="bash"> | <syntaxhighlight lang="bash"> | ||
$ matrix-oled | $ matrix-oled | ||
| Line 96: | Line 133: | ||
"123456789" | "123456789" | ||
| − | + | ==Code Sample== | |
| + | This Matrix code sample can work with all the ARM boards mentioned in this module's wiki. The name of this code sample is "matrix-0.96_128x64_oled". Here is its source code: | ||
<syntaxhighlight lang="c"> | <syntaxhighlight lang="c"> | ||
int main(int argc, char *argv[]) | int main(int argc, char *argv[]) | ||
{ | { | ||
int devFD; | int devFD; | ||
| + | |||
| + | if (boardInit() < 0) { | ||
| + | printf("Fail to init board\n"); | ||
| + | return -1; | ||
| + | } | ||
| + | |||
if ((devFD = OLEDInit(GPIO_PIN(7), GPIO_PIN(11))) == -1) { | if ((devFD = OLEDInit(GPIO_PIN(7), GPIO_PIN(11))) == -1) { | ||
printf("Fail to init OLED\n"); | printf("Fail to init OLED\n"); | ||
| Line 110: | Line 154: | ||
OLEDDisp8x16Str(devFD, 0, 16, "123456789"); | OLEDDisp8x16Str(devFD, 0, 16, "123456789"); | ||
OLEDDeInit(devFD); | OLEDDeInit(devFD); | ||
| + | |||
return 0; | return 0; | ||
} | } | ||
</syntaxhighlight> | </syntaxhighlight> | ||
| − | + | For more details about this APIs called in this code sample refer to :[[Matrix API reference manual]] <br> | |
| − | + | ||
| − | + | ||
| − | + | ||
| − | + | ||
| − | + | ||
| − | + | ||
| − | + | ||
==Resources== | ==Resources== | ||
| Line 127: | Line 165: | ||
===Feb-19-2016=== | ===Feb-19-2016=== | ||
* Added Sections 3, 4, 5, 6 and 7 | * Added Sections 3, 4, 5, 6 and 7 | ||
| + | |||
| + | ===June-16-2016=== | ||
| + | * Re-organized & simplified the wiki | ||
Latest revision as of 10:21, 19 June 2016
Contents
1 Introduction
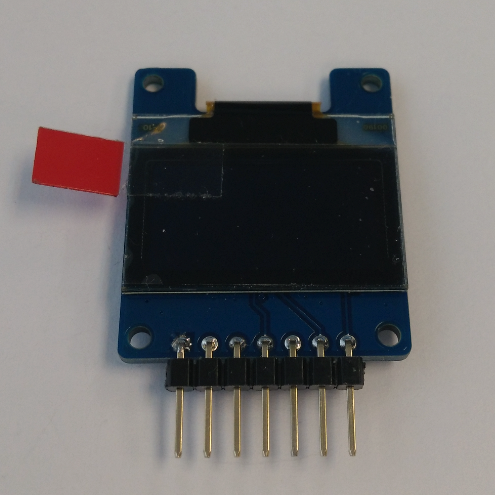
This is a tiny single color OLED. Its dimension is 0.96". Its resolution is 128 x 64. It can display text and graphics.It is high contrast and low power consumption. This module is powered by 5V which is then converted to 3.3V to OLED. It communicates via SPI or I2C. Its signal level is 3.3V. By default it communicates via SPI. If you want to set it to I2C you can change the module's resistor configuration.
2 Features
- Tiny
- High contrast, low power consumption
- SPI/I2C
- 2.54mm spacing pin header
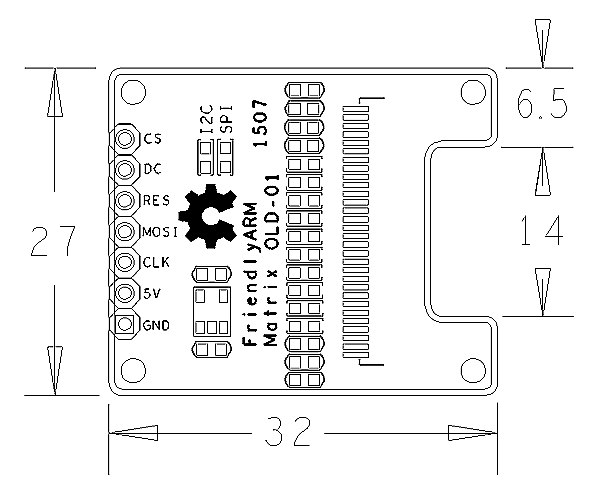
- PCB Dimension(mm): 27 x 32
- Pin Description:
| Pin | Description |
| CS | Chip Selection |
| DC | Data/Command |
| RES | Reset |
| MOSI | SPI MOSI |
| CLK | SPI Clock |
| 5V | Power Supply 5V |
| GND | Ground |
3 Basic Device Operation
4 Applications
4.1 Connect to NanoPi M1
Refer to the following connection diagram to connect the module to the NanoPi M1
Matrix-0.96'_128x64_OLED_nanopi_m1
Connection Details
| Matrix-0.96'_128x64_OLED | NanoPi M1 |
| CS | Pin24 |
| DC | Pin7 |
| RES | Pin11 |
| MOSI | Pin19 |
| CLK | Pin23 |
| 5V | Pin2 |
| GND | Pin6 |
4.2 Connect to NanoPi 2
Refer to the following connection diagram to connect the module to the NanoPi 2:
Matrix-0.96'_128x64_OLED_nanopi_2
Connection Details:
| Matrix-0.96'_128x64_OLED | NanoPi |
| CS | Pin24 |
| DC | Pin7 |
| RES | Pin11 |
| MOSI | SPI MOSI |
| CLK | SPI Clock |
| 5V | Supply Voltage 5V |
| GND | Ground |
5 Compile & Run Test Program
Boot your ARM board with Debian and copy the matrix code
$ apt-get update && apt-get install git
$ git clone https://github.com/friendlyarm/matrix.git
If your cloning is done successfully a "matrix" directory will be generated.
Compile and install Matrix:
$ cd matrix
$ make && make install
Run test program:
$ matrix-oledHere is what you should expect:
matrix-oled_result
The OLED displays the following two lines:
"ABCDEFGHIJKLMN"
"123456789"
6 Code Sample
This Matrix code sample can work with all the ARM boards mentioned in this module's wiki. The name of this code sample is "matrix-0.96_128x64_oled". Here is its source code:
int main(int argc, char *argv[])
{
    int devFD;

    if (boardInit() < 0) {
        printf("Fail to init board\n");
        return -1;
    }

    if ((devFD = OLEDInit(GPIO_PIN(7), GPIO_PIN(11))) == -1) {
        printf("Fail to init OLED\n");
        return -1;
    }
    OLEDCleanScreen(devFD);
    // Char bitmap: 8x16
    OLEDDisp8x16Str(devFD, 0, 0, "ABCDEFGHIJKLMN");
    OLEDDisp8x16Str(devFD, 0, 16, "123456789");
    OLEDDeInit(devFD);

    return 0;
}
For more details about this APIs called in this code sample refer to :Matrix API reference manual
7 Resources
8 Update Log
8.1 Feb-19-2016
- Added Sections 3, 4, 5, 6 and 7
8.2 June-16-2016
- Re-organized & simplified the wiki

