Difference between revisions of "Matrix - Button/zh"
| Line 1: | Line 1: | ||
| − | [[Matrix - | + | [[Matrix - Button|English]] |
| − | + | ||
==介绍== | ==介绍== | ||
| − | [[File: | + | [[File:Btn01.jpg|thumb|按键]] |
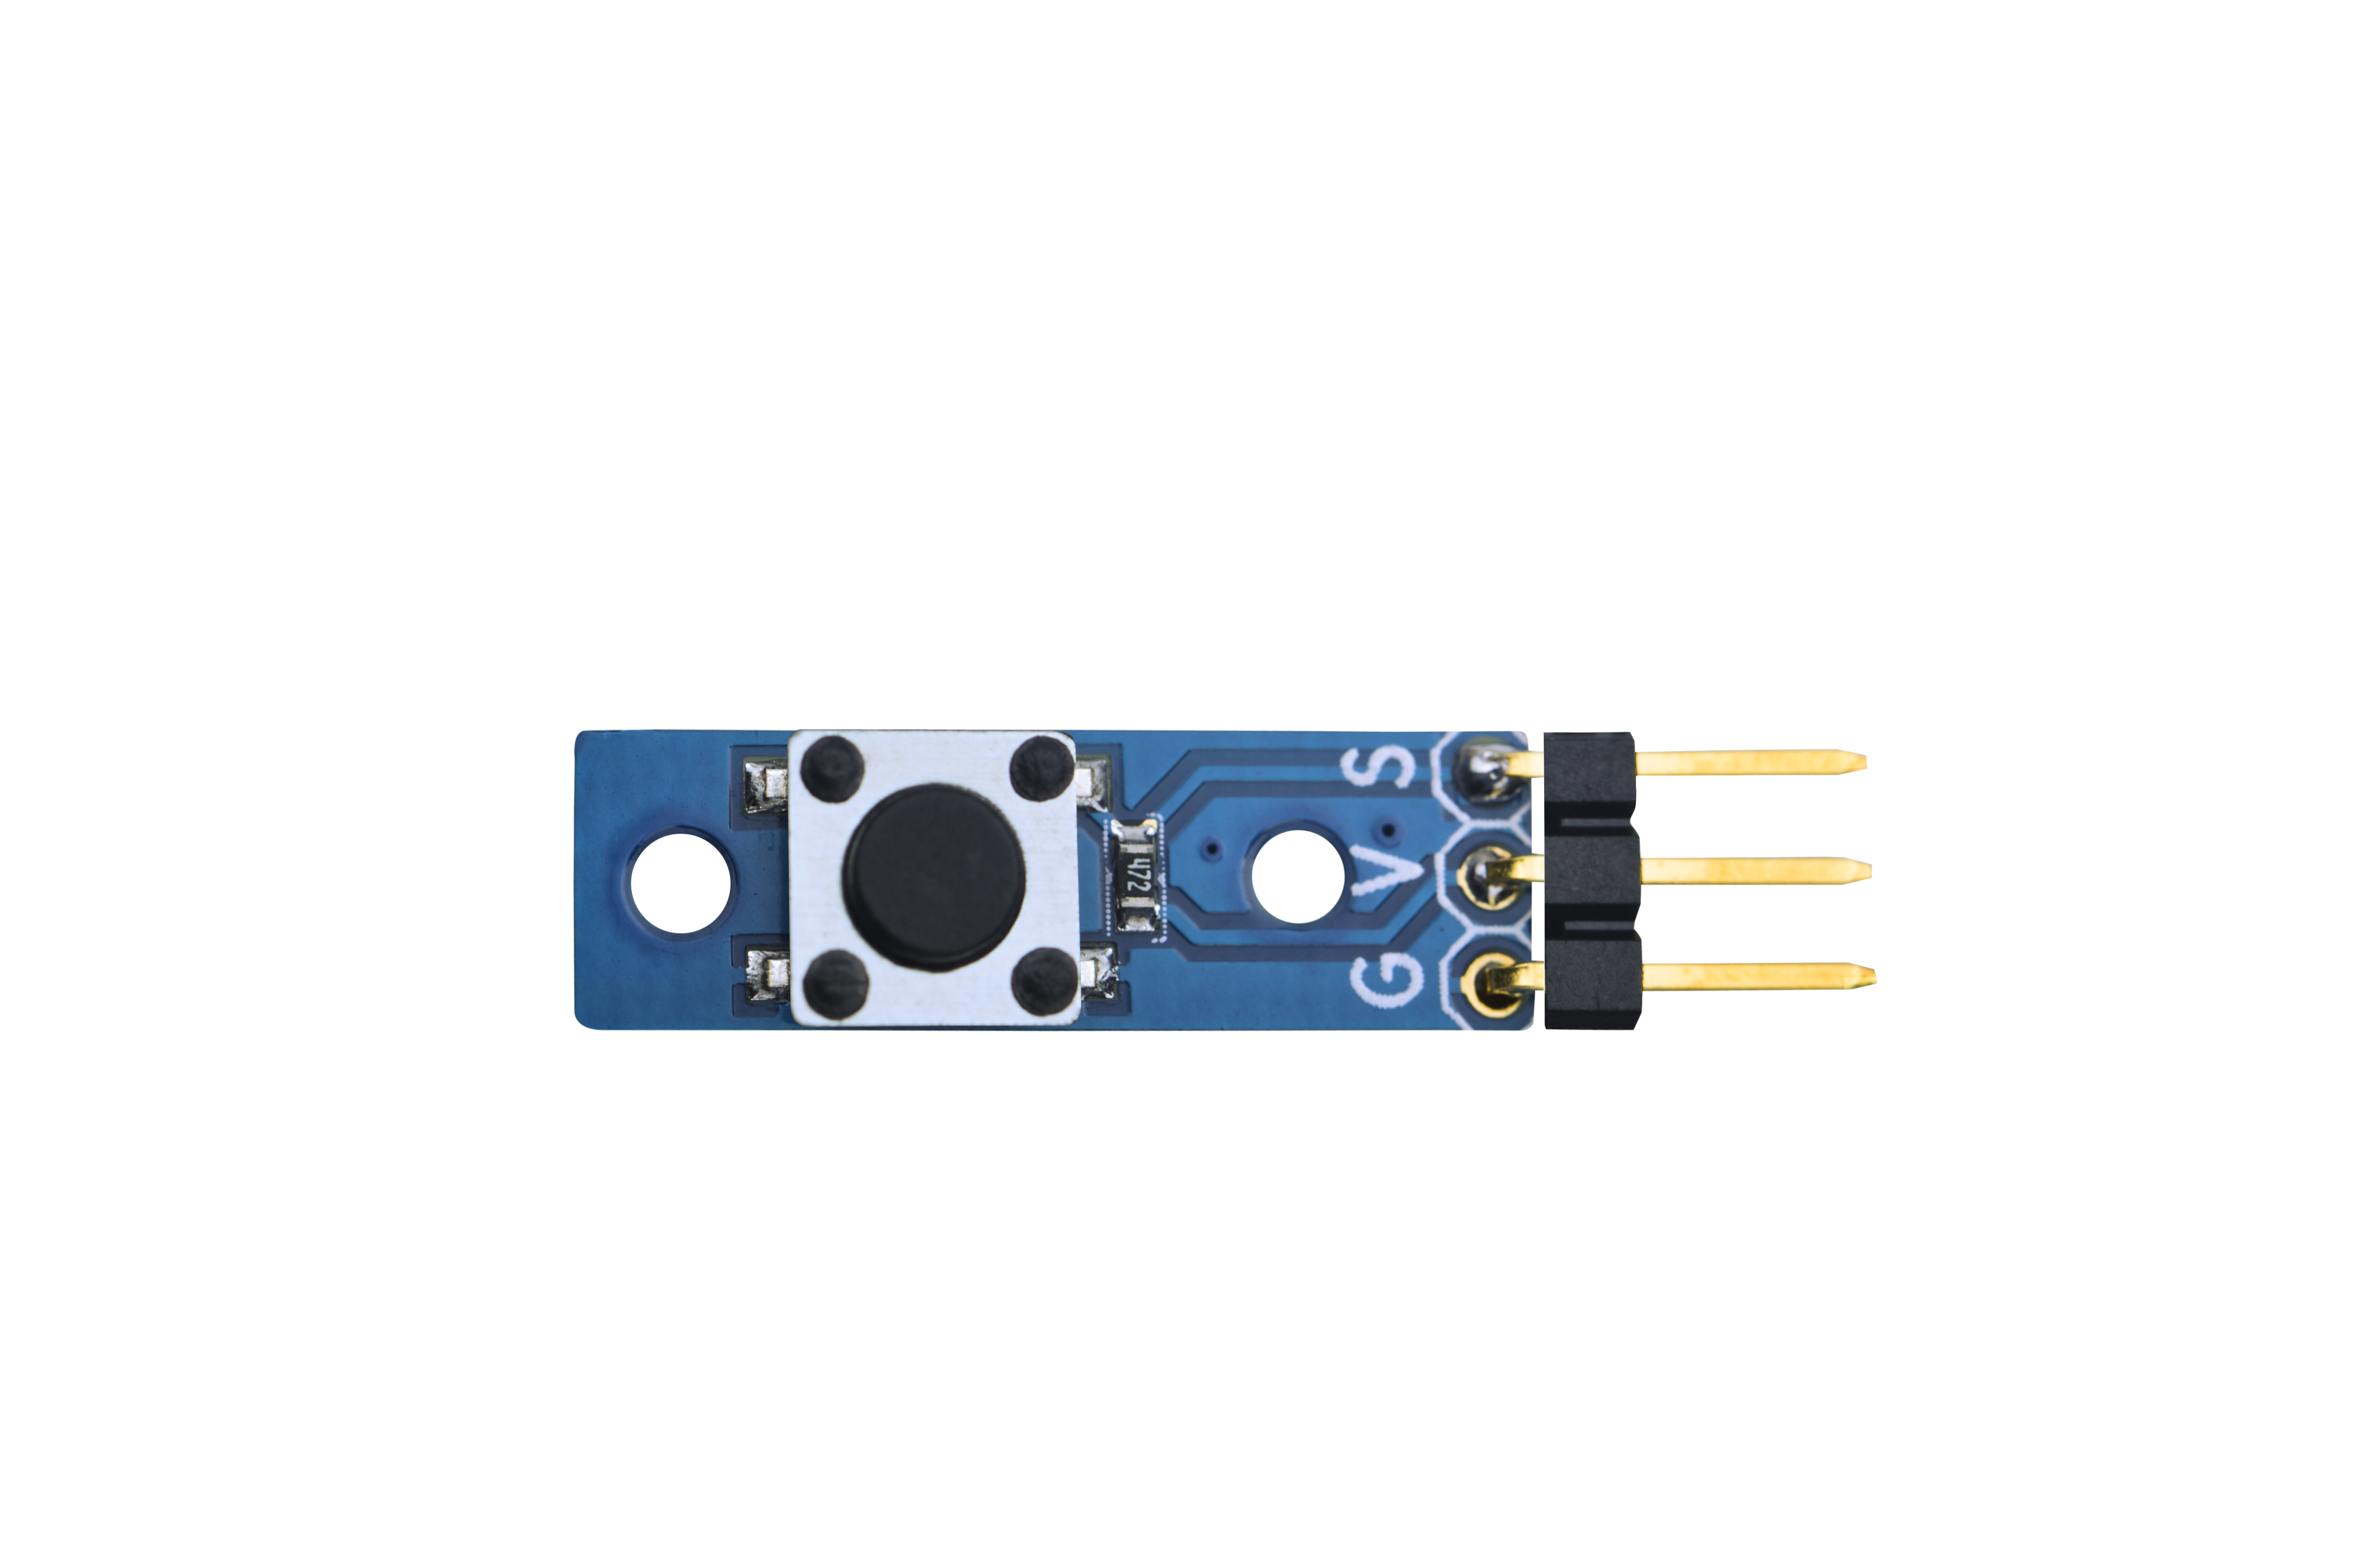
| − | * 模块Matrix- | + | * 模块Matrix-Button用于检测按键事件。 |
| + | * 未按时输出高电平,按下后输出低电平。 | ||
==特性== | ==特性== | ||
* 使用标准的3 PIN接口 | * 使用标准的3 PIN接口 | ||
| − | * 尺寸为 | + | * 尺寸为 8x24mm |
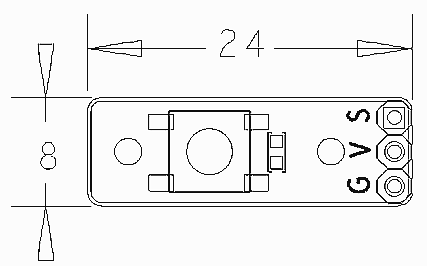
| − | * | + | * PCB尺寸(mm):8x24 |
| − | [[File: | + | [[File:btn002.png | frameless|400px|BTN-01.PCB]] |
* 引脚说明: | * 引脚说明: | ||
| Line 24: | Line 24: | ||
==工作原理== | ==工作原理== | ||
| − | * | + | * Matrix-Button主要器件是一个瞬时(非自锁)按钮开关,通过3-Pin 2.54mm排针中的S信号输出按钮开关的状态。 |
| + | * 平时没有按下按钮时触点断开,S输出高电平;当按下按钮时触点导通,S输出低电平,直到松开才恢复高电平。 | ||
==下载Matrix源码== | ==下载Matrix源码== | ||
| + | Matrix配件相关的代码是完全开源的,统一由一个仓库进行管理:https://github.com/friendlyarm/matrix.git <br> | ||
| + | 该仓库里不同的分支代表着Matrix配件所支持的不同开发板。<br> | ||
| + | * nanopi分支用于支持NanoPi; | ||
| + | * nanopi2分支用于支持NanoPi 2; | ||
| + | * tiny4412分支用于支持Tiny4412; | ||
| + | * raspberrypi分支用于支持RaspberryPi; | ||
| + | |||
| + | 在主机PC上安装git,以Ubuntu14.04为例 | ||
| + | <syntaxhighlight lang="bash"> | ||
| + | $ sudo apt-get install git | ||
| + | </syntaxhighlight> | ||
| + | |||
| + | 克隆Matrix配件代码仓库 | ||
| + | <syntaxhighlight lang="bash"> | ||
| + | $ git clone https://github.com/friendlyarm/matrix.git | ||
| + | </syntaxhighlight> | ||
| + | 克隆完成后会得到一个名为matrix的目录,里面存放着所有Matrix配件的代码。 | ||
| + | |||
| + | ==与NanoPi 2连接使用== | ||
| + | ===硬件连接=== | ||
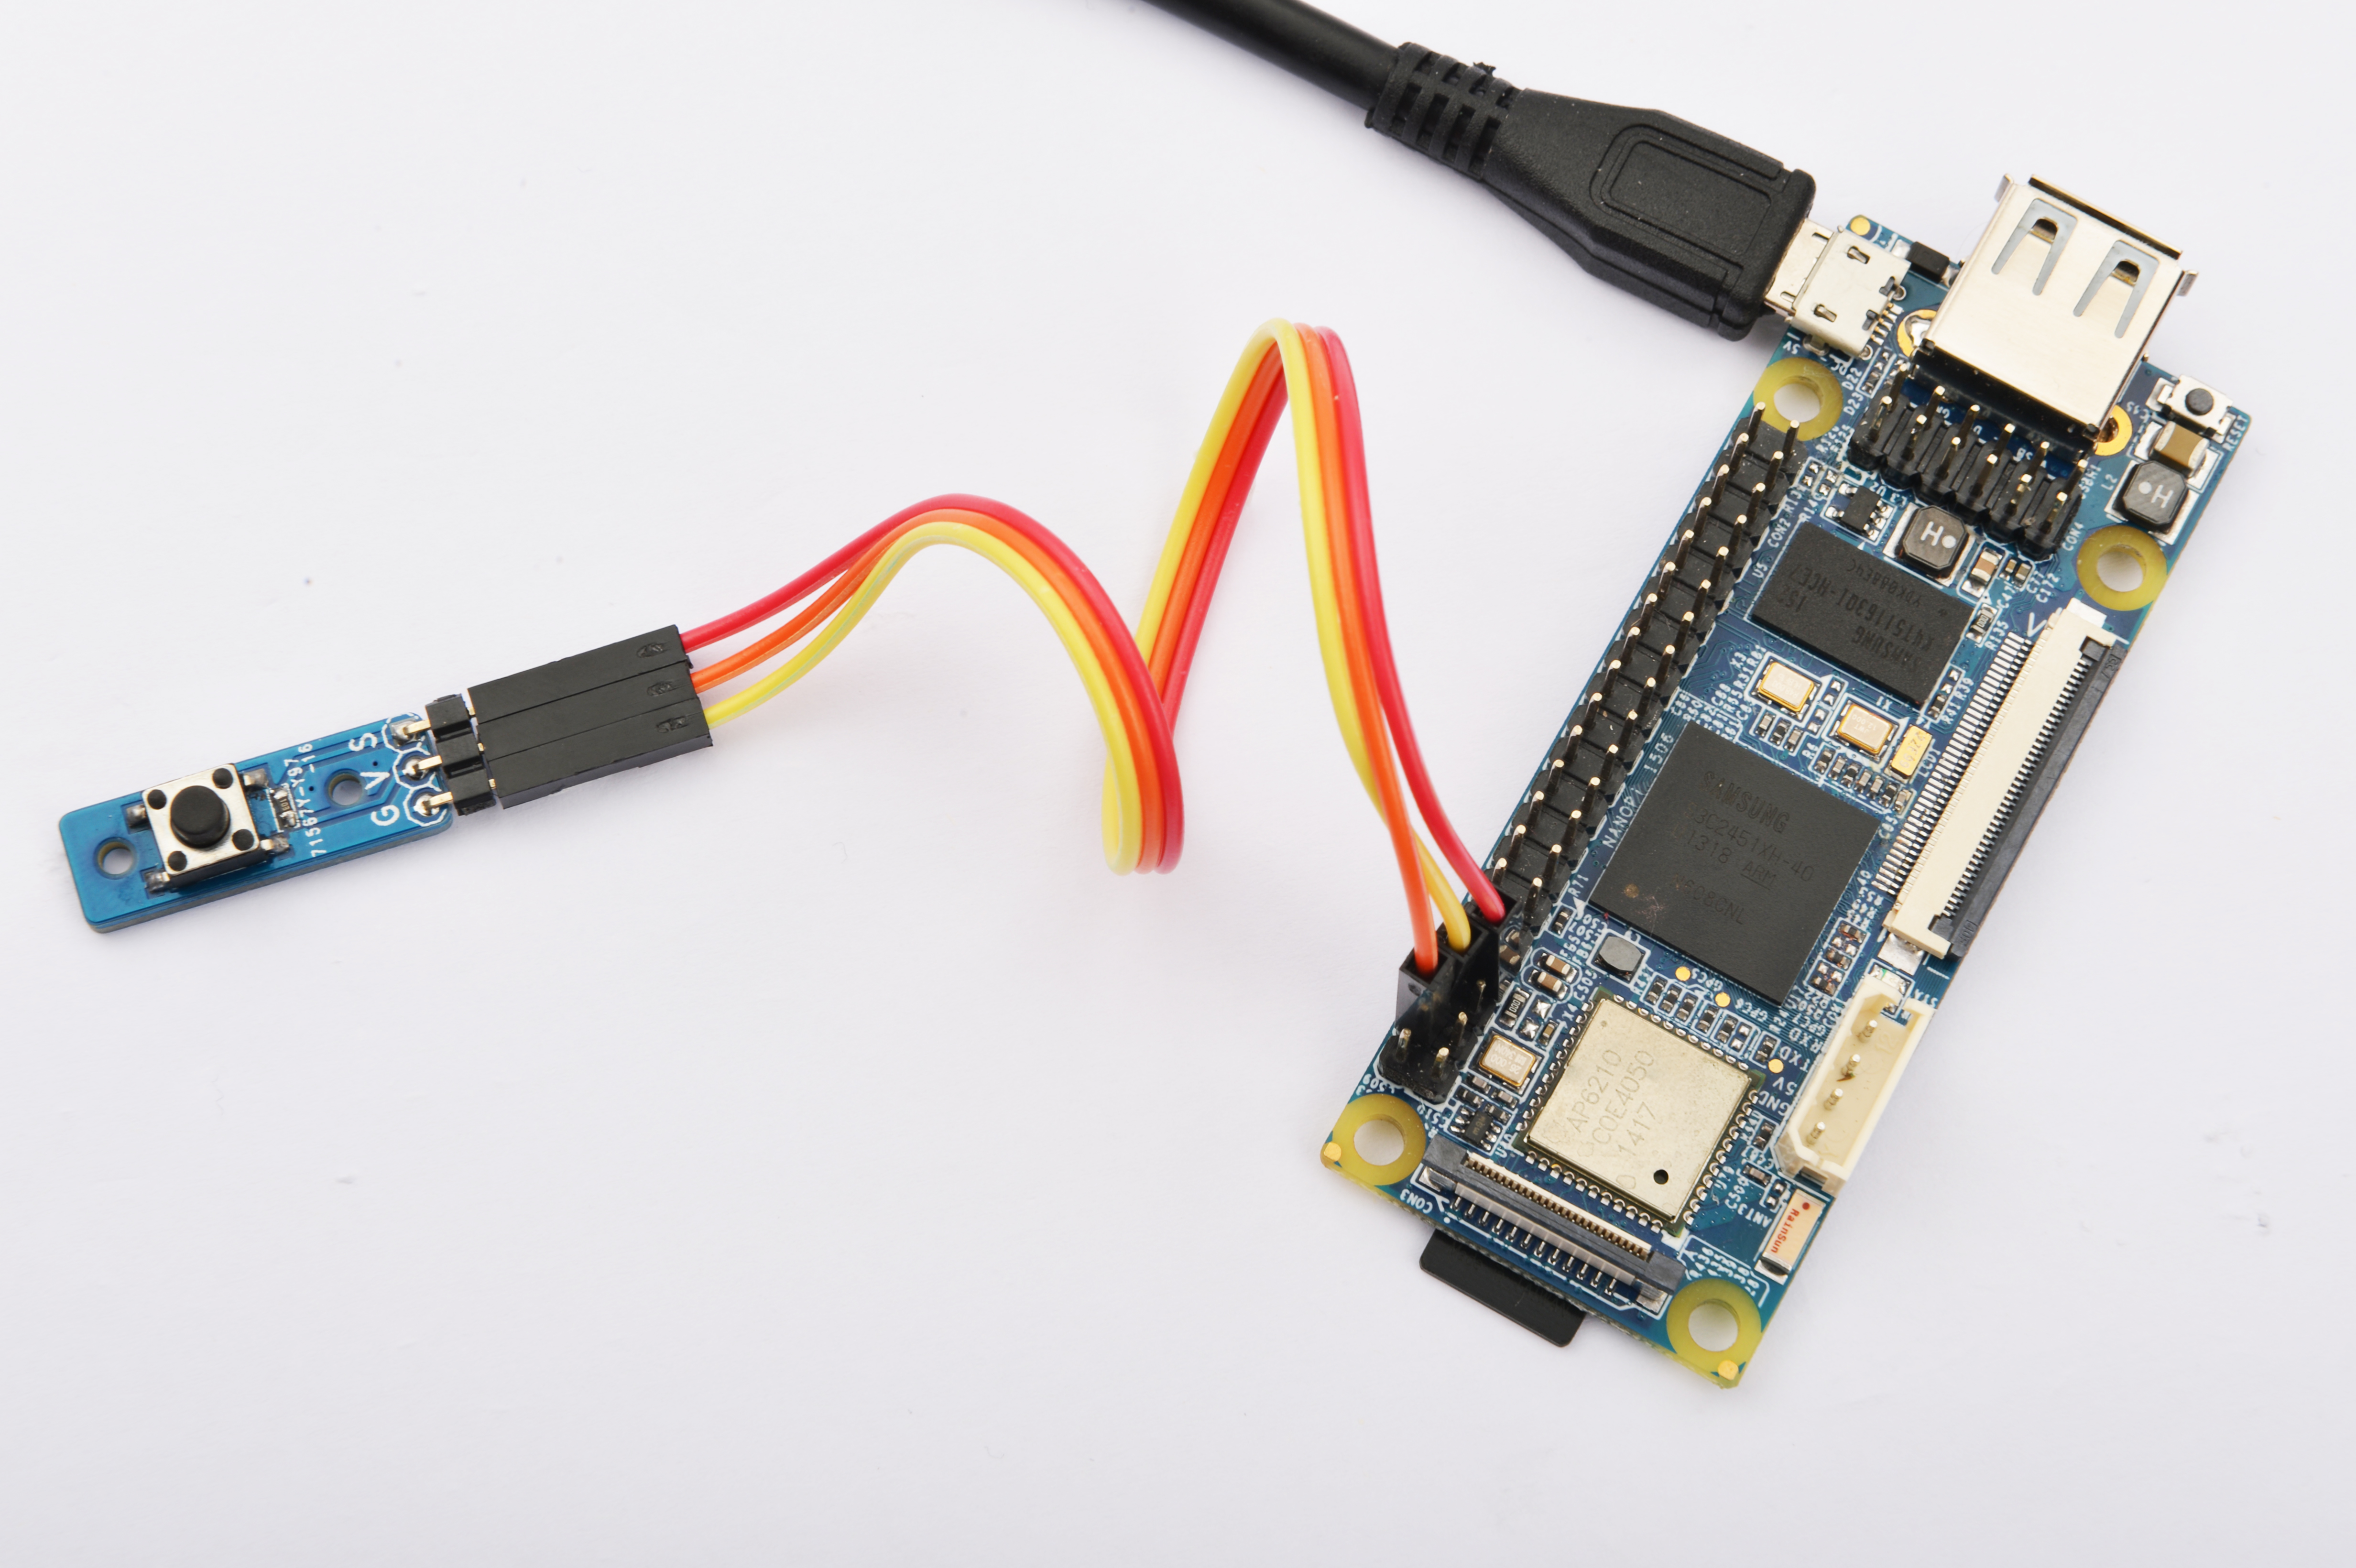
| + | 参考下图连接模块Matrix-Button和NanoPi 2:<br> | ||
| + | [[File:Matrix-Button_nanopi_2.jpg|frameless|600px|Matrix-Button_nanopi_2]] | ||
| + | |||
| + | 连接说明: | ||
| + | {| class="wikitable" | ||
| + | |- | ||
| + | |Matrix-Button || NanoPi 2 | ||
| + | |- | ||
| + | |S || Pin7 | ||
| + | |- | ||
| + | |V || Pin4 | ||
| + | |- | ||
| + | |G || Pin6 | ||
| + | |} | ||
| + | ===编译测试程序=== | ||
| + | 进入Matrix代码仓库,切换到nanopi2分支 | ||
| + | <syntaxhighlight lang="bash"> | ||
| + | $ cd matrix | ||
| + | $ git checkout nanopi2 | ||
| + | </syntaxhighlight> | ||
| + | |||
| + | 编译Matrix配件代码 | ||
| + | <syntaxhighlight lang="bash"> | ||
| + | $ make CROSS_COMPILE=arm-linux- clean | ||
| + | $ make CROSS_COMPILE=arm-linux- | ||
| + | $ make CROSS_COMPILE=arm-linux- install | ||
| + | </syntaxhighlight> | ||
| + | 注意:请确保你的主机PC当前使用的交叉编译器为NanoPi 2配套的arm-linux-gcc-4.9.3。<br> | ||
| + | 编译成功后库文件位于install/lib目录下,而测试程序则位于install/usr/bin目录下,模块Matrix-Button对应的测试程序为matrix-button。<br> | ||
| + | 硬件驱动模块位于modules目录下,对应的驱动源码都包含在在NanoPi 2的Linux内核仓库里:https://github.com/friendlyarm/linux-3.4.y.git <br> | ||
| + | |||
| + | ===运行测试程序=== | ||
| + | 将带有Debian系统的SD卡插入一台运行Linux的电脑,可以挂载SD卡上的boot和rootfs分区。<br> | ||
| + | 假设rootfs分区的挂载路径为/media/rootfs,执行以下命令将Matrix的硬件驱动、库文件和测试程序拷贝到NanoPi 2的文件系统上。<br> | ||
| + | <syntaxhighlight lang="bash"> | ||
| + | $ cp modules /media/rootfs/ -r | ||
| + | $ cp install/lib/* /media/rootfs/lib/ -d | ||
| + | $ cp install/usr/bin/* /media/rootfs/usr/bin/ | ||
| + | </syntaxhighlight> | ||
| + | |||
| + | 将SD卡重新插入NanoPi 2,上电启动,在Debian的shell终端中执行以下命令加载硬件驱动。<br> | ||
| + | <syntaxhighlight lang="bash"> | ||
| + | $ cd /modules | ||
| + | $ insmod matrix_gpio_int.ko | ||
| + | </syntaxhighlight> | ||
| + | |||
| + | 运行模块Matrix-Button的测试程序。<br> | ||
| + | <syntaxhighlight lang="bash"> | ||
| + | $ matrix-button | ||
| + | </syntaxhighlight> | ||
| + | |||
| + | 运行效果如下:<br> | ||
| + | [[File:matrix-button_result.png|frameless|600px|matrix-button_result]] | ||
| + | |||
| + | ===代码展示=== | ||
| + | <syntaxhighlight lang="c"> | ||
| + | static struct sensor button[] = { | ||
| + | { | ||
| + | GPIO_PIN(7), | ||
| + | IRQ_TYPE_EDGE_FALLING, | ||
| + | } | ||
| + | }; | ||
| + | int main(int argc, char ** argv) | ||
| + | { | ||
| + | int i; | ||
| + | int retSize = -1; | ||
| + | char value[ARRAY_SIZE(button)]; | ||
| + | int devFD = -1; | ||
| + | |||
| + | if (argc == 2) { | ||
| + | button[0].pin = atoi(argv[1]); | ||
| + | } | ||
| + | |||
| + | printf("Using GPIO_PIN(%d)\n", button[0].pin); | ||
| + | if ((devFD =sensorInit(button, ARRAY_SIZE(button))) == -1) { | ||
| + | printf("Fail to init sensor\n"); | ||
| + | return -1; | ||
| + | } | ||
| + | printf("Press the button...\n"); | ||
| + | if ((retSize = sensorRead(devFD, value, ARRAY_SIZE(button))) == -1) { | ||
| + | printf("Fail to read sensors\n"); | ||
| + | } | ||
| + | if (retSize > 0) { | ||
| + | i = 0; | ||
| + | for (i=0; i<retSize; i++) { | ||
| + | printf("Button[%d]:%d\n", i, value[i]); | ||
| + | } | ||
| + | } | ||
| + | sensorDeinit(devFD); | ||
| + | return 0; | ||
| + | } | ||
| + | </syntaxhighlight> | ||
| + | |||
| + | ==与NanoPi连接使用== | ||
| + | ===准备工作=== | ||
| + | 在NanoPi上运行Debian系统,然后在主机PC上安装并使用相应的编译器,参考wiki: [[NanoPi/zh|NanoPi]] & [[How_to_build_the_Compiling_Environment/zh|How to Build the Compiling Environment]]。<br> | ||
| + | 注意: 只有使用nanopi-v4.1.y-matrix分支编译出来的内核才能配合Matrix配件正常工作。<br> | ||
| + | 下载NanoPi内核源代码并编译: <br> | ||
| + | <syntaxhighlight lang="bash"> | ||
| + | $ git clone https://github.com/friendlyarm/linux-4.x.y.git | ||
| + | $ cd linux-4.x.y | ||
| + | $ git checkout nanopi-v4.1.y-matrix | ||
| + | $ make nanopi_defconfig | ||
| + | $ touch .scmversion | ||
| + | $ make | ||
| + | </syntaxhighlight> | ||
| + | 编译好后的zImage位于内核源码arch/arm/boot/目录下,把该zImage替换掉NanoPi烧写文件sd-fuse_nanopi/prebuilt下的zImage,重新制作SD卡即可。 | ||
| + | |||
| + | ===硬件连接=== | ||
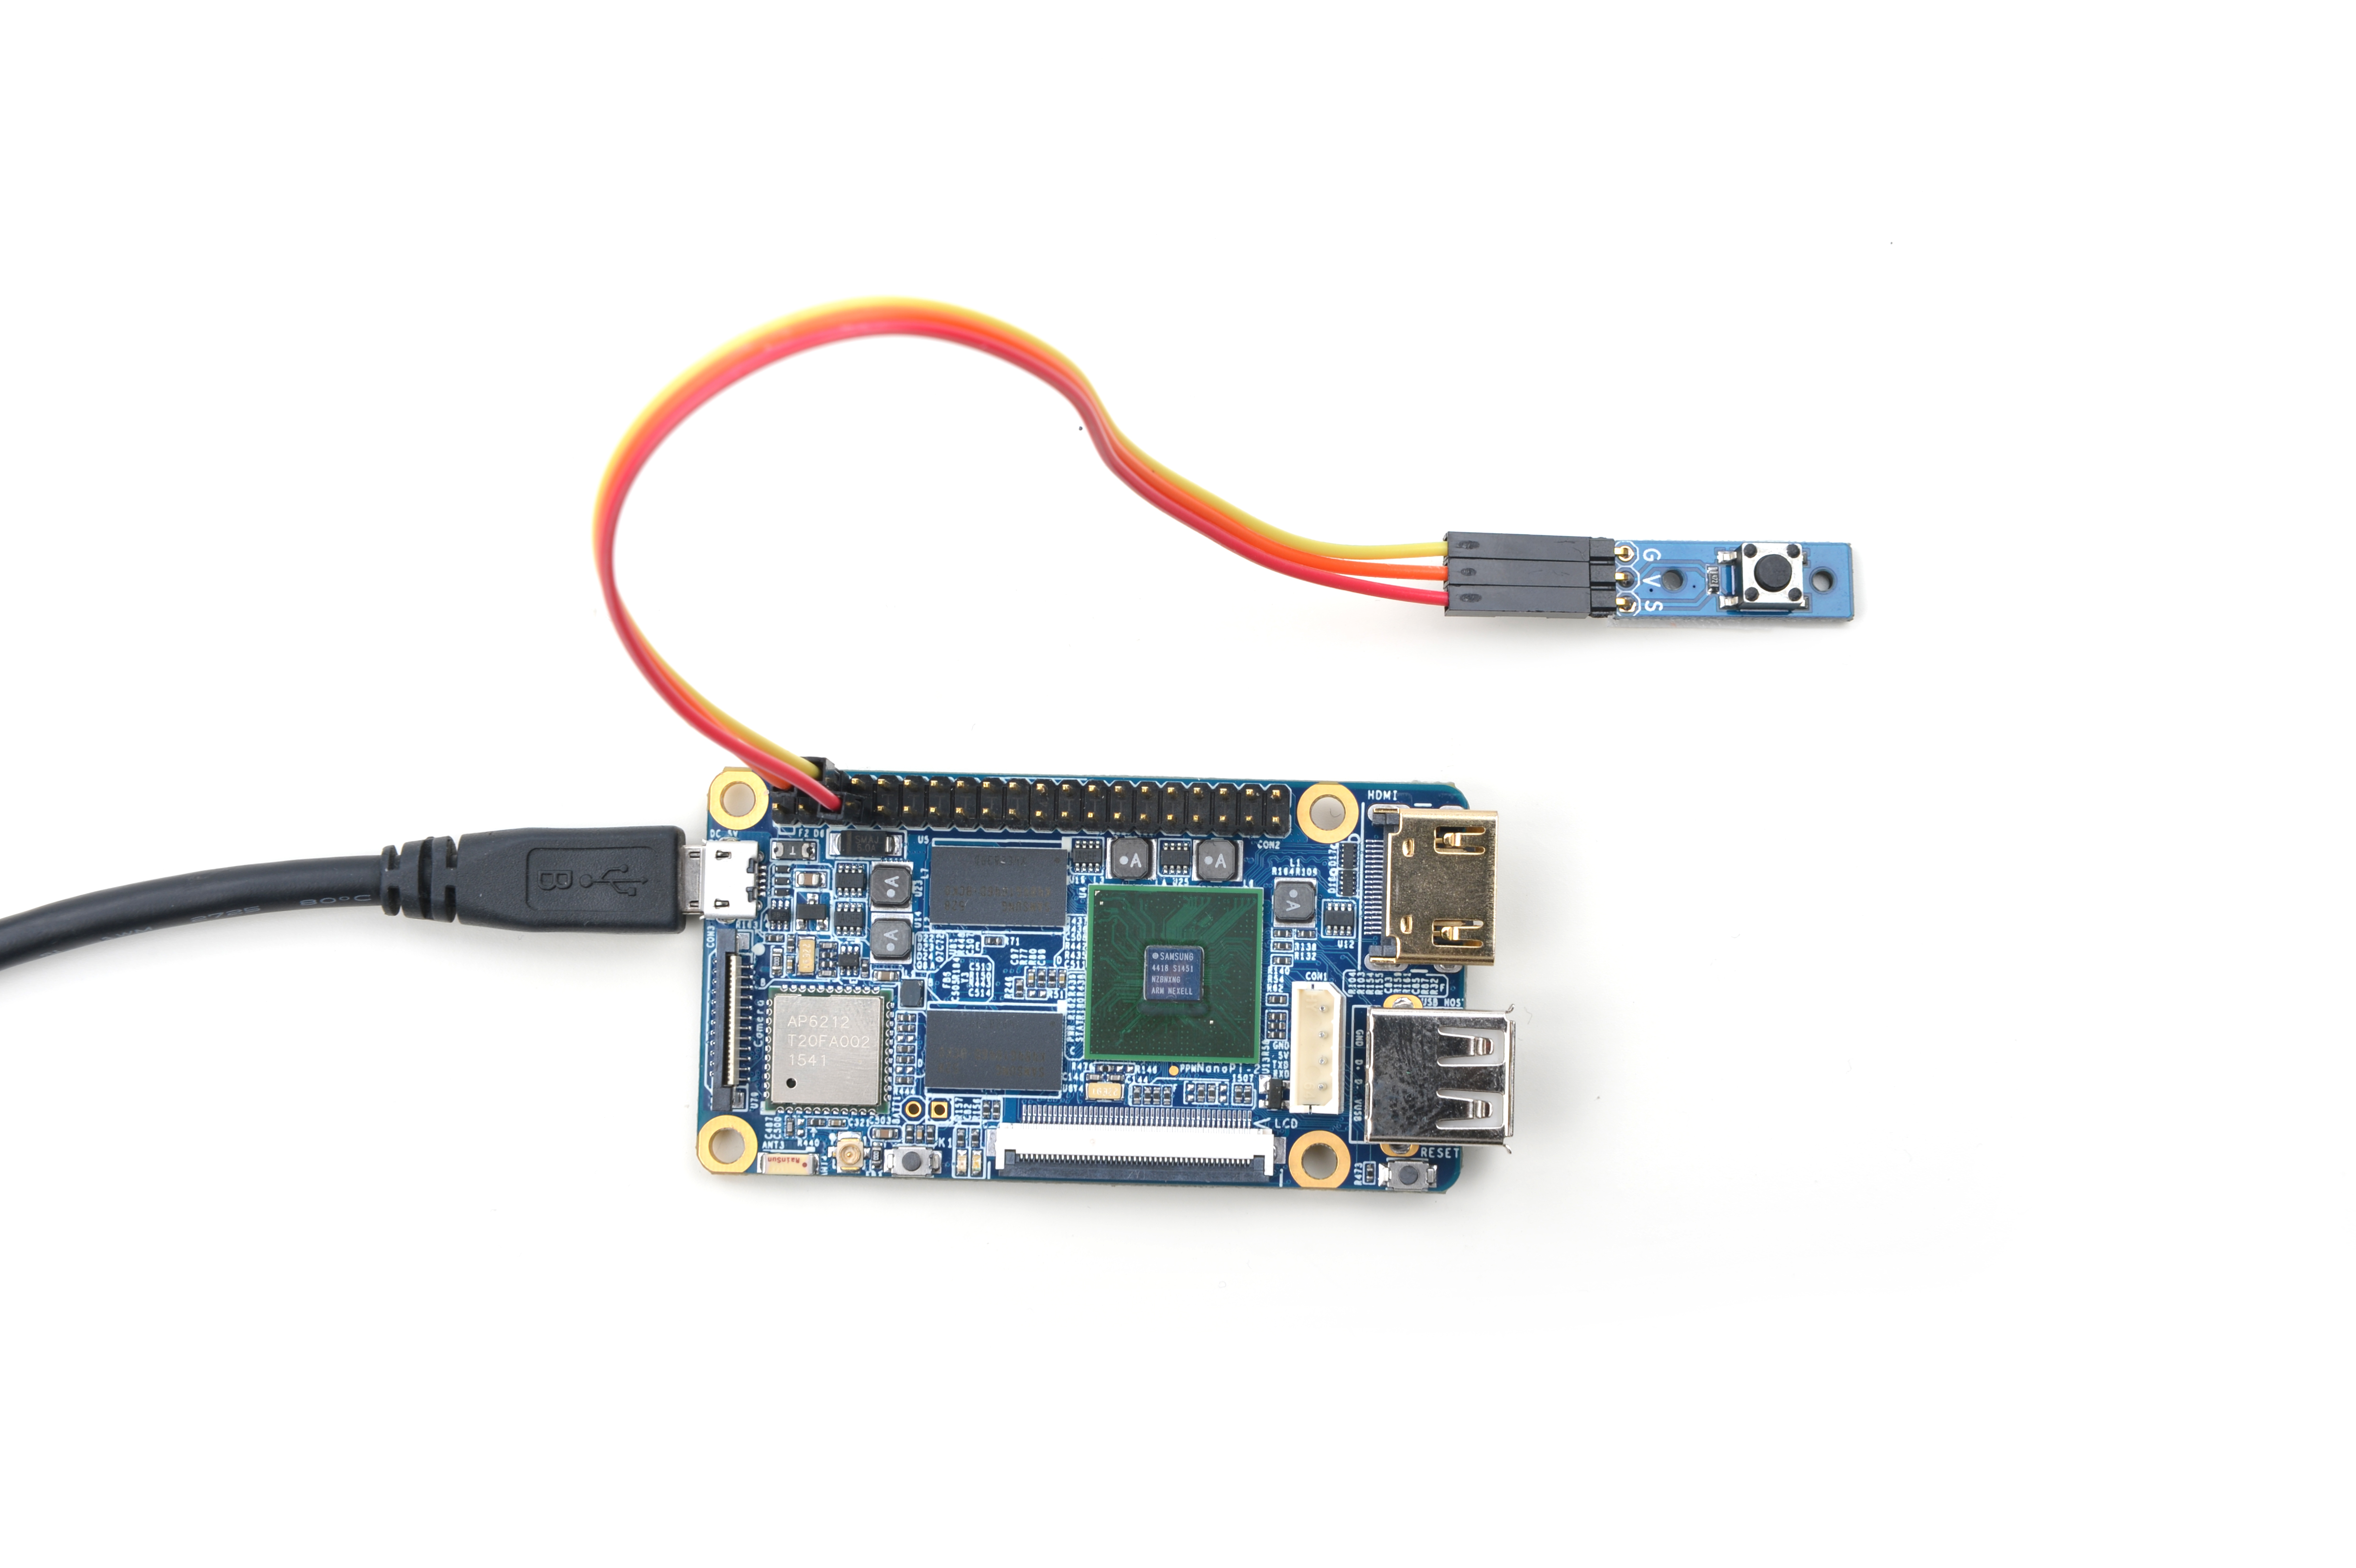
| + | 参考下图连接模块Matrix-Button和NanoPi:<br> | ||
| + | [[File:matrix-button_nanopi.jpg|frameless|600px|matrix-button_nanopi]] | ||
| + | |||
| + | 连接说明: | ||
| + | {| class="wikitable" | ||
| + | |- | ||
| + | |Matrix-Button || NanoPi | ||
| + | |- | ||
| + | |S || Pin7 | ||
| + | |- | ||
| + | |V || Pin4 | ||
| + | |- | ||
| + | |G || Pin6 | ||
| + | |} | ||
| + | |||
| + | ===编译测试程序=== | ||
| + | 进入Matrix代码仓库,切换到nanopi分支 | ||
| + | <syntaxhighlight lang="bash"> | ||
| + | $ cd matrix | ||
| + | $ git checkout nanopi | ||
| + | </syntaxhighlight> | ||
| + | |||
| + | 编译Matrix配件代码 | ||
| + | <syntaxhighlight lang="bash"> | ||
| + | $ make CROSS_COMPILE=arm-linux- clean | ||
| + | $ make CROSS_COMPILE=arm-linux- | ||
| + | $ make CROSS_COMPILE=arm-linux- install | ||
| + | </syntaxhighlight> | ||
| + | 注意:请确保你的主机PC当前使用的交叉编译器为NanoPi-Debian配套的arm-linux-gcc-4.4.3。<br> | ||
| + | 编译出来的库文件位于install/lib目录下,而测试程序则位于install/usr/bin目录下,模块Matrix-Button对应的测试程序为matrix-button。<br> | ||
| + | |||
| + | ===运行测试程序=== | ||
| + | 将带有Debian系统的SD卡插入一台运行Linux的电脑,可以挂载SD卡上的boot和rootfs分区。<br> | ||
| + | 假设rootfs分区的挂载路径为/media/rootfs,执行以下命令可将Matrix的所有库文件和测试程序拷贝到NanoPi的文件系统上。<br> | ||
| + | <syntaxhighlight lang="bash"> | ||
| + | $ cp install/usr/bin/* /media/rootfs/usr/bin/ | ||
| + | $ cp install/lib/* /media/rootfs/lib/ -d | ||
| + | </syntaxhighlight> | ||
| + | |||
| + | 将SD卡重新插入NanoPi,上电启动,在Debian的shell终端中执行以下命令运行模块Matrix-Button的测试程序。<br> | ||
| + | <syntaxhighlight lang="bash"> | ||
| + | $ matrix-button | ||
| + | </syntaxhighlight> | ||
| + | 注意:此模块并不支持热插拔,启动系统前需要确保硬件正常连接。 | ||
| + | |||
| + | ===代码展示=== | ||
| + | <syntaxhighlight lang="c"> | ||
| + | int main(int argc, char ** argv) | ||
| + | { | ||
| + | int i; | ||
| + | int retSize = -1; | ||
| + | char value[ARRAY_SIZE(button)]; | ||
| + | int devFD = -1; | ||
| + | |||
| + | printf("Using pin GPIO_PIN1\n"); | ||
| + | if ((devFD =sensorInit(button, ARRAY_SIZE(button))) == -1) { | ||
| + | printf("Fail to init sensor\n"); | ||
| + | return -1; | ||
| + | } | ||
| + | printf("Press the button...\n"); | ||
| + | if ((retSize = sensorRead(devFD, value, ARRAY_SIZE(button))) == -1) { | ||
| + | printf("Fail to read sensors\n"); | ||
| + | } | ||
| + | if (retSize > 0) { | ||
| + | i = 0; | ||
| + | for (i=0; i<retSize; i++) { | ||
| + | printf("Button[%d]:%d\n", i, value[i]); | ||
| + | } | ||
| + | } | ||
| + | sensorDeinit(devFD); | ||
| + | return 0; | ||
| + | } | ||
| + | </syntaxhighlight> | ||
| + | |||
| + | ==与Tiny4412连接使用== | ||
| + | ===准备工作=== | ||
| + | 参考Tiny4412光盘里的《友善之臂Ubuntu使用手册》,在Tiny4412上运行UbuntuCore系统,然后在主机PC上安装并使用相应的编译器。<br> | ||
| + | 注意:只能使用Tiny4412SDK-1506的底板。 | ||
| + | |||
| + | ===硬件连接=== | ||
| + | 参考下图连接模块Matrix-Button和Tiny4412 <br> | ||
| + | [[File:matrix-button_tiny4412.jpg|frameless|600px|matrix-button_tiny4412]] | ||
| + | |||
| + | 连接说明: | ||
| + | {| class="wikitable" | ||
| + | |- | ||
| + | |Matrix-Button || Tiny4412 | ||
| + | |- | ||
| + | |S || GPIO1 S | ||
| + | |- | ||
| + | |V || GPIO1 5V | ||
| + | |- | ||
| + | |G || GPIO1 GND | ||
| + | |} | ||
| + | |||
| + | ===编译测试程序=== | ||
| + | 进入Matrix代码仓库,切换到tiny4412分支 | ||
| + | <syntaxhighlight lang="bash"> | ||
| + | $ cd matrix | ||
| + | $ git checkout tiny4412 | ||
| + | </syntaxhighlight> | ||
| + | |||
| + | 编译Matrix配件代码 | ||
| + | <syntaxhighlight lang="bash"> | ||
| + | $ make CROSS_COMPILE=arm-linux-gnueabihf- clean | ||
| + | $ make CROSS_COMPILE=arm-linux-gnueabihf- | ||
| + | $ make CROSS_COMPILE=arm-linux-gnueabihf- install | ||
| + | </syntaxhighlight> | ||
| + | 注意:请确保你的主机PC当前使用的交叉编译器为Tiny4412-UbuntuCore配套的arm-linux-gnueabihf-gcc-4.7.3。<br> | ||
| + | 编译出来的库文件位于install/lib目录下,而测试程序则位于install/usr/bin目录下,模块Matrix-Button对应的测试程序为matrix-button。 | ||
| + | |||
| + | ===运行测试程序=== | ||
| + | 将带有UbuntuCore系统的SD卡插入一台运行Linux的电脑,可以挂载SD卡上的boot和rootfs分区。<br> | ||
| + | 假设rootfs分区的挂载路径为/media/rootfs,执行以下命令可将Matrix的所有库文件和测试程序拷贝到Tiny4412的文件系统上。<br> | ||
| + | <syntaxhighlight lang="bash"> | ||
| + | $ cp install/usr/bin/* /media/rootfs/usr/bin/ | ||
| + | $ cp install/lib/* /media/rootfs/lib/ -d | ||
| + | </syntaxhighlight> | ||
| + | |||
| + | 将SD卡重新插入Tiny4412,上电启动,在UbuntuCore的shell终端中执行以下命令运行模块Matrix-Button的测试程序。<br> | ||
| + | <syntaxhighlight lang="bash"> | ||
| + | $ matrix-button | ||
| + | </syntaxhighlight> | ||
| + | 注意:此模块并不支持热插拔,启动系统前需要确保硬件连接正确。 | ||
| + | |||
| + | ===代码展示=== | ||
| + | <syntaxhighlight lang="c"> | ||
| + | int main(int argc, char ** argv) | ||
| + | { | ||
| + | int i; | ||
| + | int retSize = -1; | ||
| + | char value[ARRAY_SIZE(button)]; | ||
| + | int devFD = -1; | ||
| + | |||
| + | printf("Using pin GPIO_PIN1\n"); | ||
| + | if ((devFD =sensorInit(button, ARRAY_SIZE(button))) == -1) { | ||
| + | printf("Fail to init sensor\n"); | ||
| + | return -1; | ||
| + | } | ||
| + | printf("Press the button...\n"); | ||
| + | if ((retSize = sensorRead(devFD, value, ARRAY_SIZE(button))) == -1) { | ||
| + | printf("Fail to read sensors\n"); | ||
| + | } | ||
| + | if (retSize > 0) { | ||
| + | i = 0; | ||
| + | for (i=0; i<retSize; i++) { | ||
| + | printf("Button[%d]:%d\n", i, value[i]); | ||
| + | } | ||
| + | } | ||
| + | sensorDeinit(devFD); | ||
| + | return 0; | ||
| + | } | ||
| + | </syntaxhighlight> | ||
| + | |||
| + | ==与RaspberryPi连接使用== | ||
| + | |||
| + | ==与Arduino连接使用== | ||
| + | |||
| + | ==相关资料== | ||
Revision as of 08:39, 24 February 2016
Contents
[hide]1 介绍
- 模块Matrix-Button用于检测按键事件。
- 未按时输出高电平,按下后输出低电平。
2 特性
- 使用标准的3 PIN接口
- 尺寸为 8x24mm
- PCB尺寸(mm):8x24
- 引脚说明:
| 名称 | 描述 |
| S | GPIO |
| V | 电源5V |
| G | 地 |
3 工作原理
- Matrix-Button主要器件是一个瞬时(非自锁)按钮开关,通过3-Pin 2.54mm排针中的S信号输出按钮开关的状态。
- 平时没有按下按钮时触点断开,S输出高电平;当按下按钮时触点导通,S输出低电平,直到松开才恢复高电平。
4 下载Matrix源码
Matrix配件相关的代码是完全开源的,统一由一个仓库进行管理:https://github.com/friendlyarm/matrix.git
该仓库里不同的分支代表着Matrix配件所支持的不同开发板。
- nanopi分支用于支持NanoPi;
- nanopi2分支用于支持NanoPi 2;
- tiny4412分支用于支持Tiny4412;
- raspberrypi分支用于支持RaspberryPi;
在主机PC上安装git,以Ubuntu14.04为例
$ sudo apt-get install git
克隆Matrix配件代码仓库
$ git clone https://github.com/friendlyarm/matrix.git
克隆完成后会得到一个名为matrix的目录,里面存放着所有Matrix配件的代码。
5 与NanoPi 2连接使用
5.1 硬件连接
参考下图连接模块Matrix-Button和NanoPi 2:
连接说明:
| Matrix-Button | NanoPi 2 |
| S | Pin7 |
| V | Pin4 |
| G | Pin6 |
5.2 编译测试程序
进入Matrix代码仓库,切换到nanopi2分支
$ cd matrix
$ git checkout nanopi2
编译Matrix配件代码
$ make CROSS_COMPILE=arm-linux- clean
$ make CROSS_COMPILE=arm-linux-
$ make CROSS_COMPILE=arm-linux- install
注意:请确保你的主机PC当前使用的交叉编译器为NanoPi 2配套的arm-linux-gcc-4.9.3。
编译成功后库文件位于install/lib目录下,而测试程序则位于install/usr/bin目录下,模块Matrix-Button对应的测试程序为matrix-button。
硬件驱动模块位于modules目录下,对应的驱动源码都包含在在NanoPi 2的Linux内核仓库里:https://github.com/friendlyarm/linux-3.4.y.git
5.3 运行测试程序
将带有Debian系统的SD卡插入一台运行Linux的电脑,可以挂载SD卡上的boot和rootfs分区。
假设rootfs分区的挂载路径为/media/rootfs,执行以下命令将Matrix的硬件驱动、库文件和测试程序拷贝到NanoPi 2的文件系统上。
$ cp modules /media/rootfs/ -r
$ cp install/lib/* /media/rootfs/lib/ -d
$ cp install/usr/bin/* /media/rootfs/usr/bin/
将SD卡重新插入NanoPi 2,上电启动,在Debian的shell终端中执行以下命令加载硬件驱动。
$ cd /modules
$ insmod matrix_gpio_int.ko
运行模块Matrix-Button的测试程序。
$ matrix-button5.4 代码展示
static struct sensor button[] = {
        {
                GPIO_PIN(7),
                IRQ_TYPE_EDGE_FALLING,
        }
};
int main(int argc, char ** argv)
{
    int i;
    int retSize = -1;
    char value[ARRAY_SIZE(button)];
    int devFD = -1;

    if (argc == 2) {
        button[0].pin = atoi(argv[1]);
    }

    printf("Using GPIO_PIN(%d)\n", button[0].pin);
    if ((devFD =sensorInit(button, ARRAY_SIZE(button))) == -1) {
        printf("Fail to init sensor\n");
        return -1;
    }
    printf("Press the button...\n");
    if ((retSize = sensorRead(devFD, value, ARRAY_SIZE(button))) == -1) {
        printf("Fail to read sensors\n");
    }
    if (retSize > 0) {
        i = 0;
        for (i=0; i<retSize; i++) {
            printf("Button[%d]:%d\n", i, value[i]);
        }
    }
    sensorDeinit(devFD);
    return 0;
}
6 与NanoPi连接使用
6.1 准备工作
在NanoPi上运行Debian系统,然后在主机PC上安装并使用相应的编译器,参考wiki: NanoPi & How to Build the Compiling Environment。
注意: 只有使用nanopi-v4.1.y-matrix分支编译出来的内核才能配合Matrix配件正常工作。
下载NanoPi内核源代码并编译:
$ git clone https://github.com/friendlyarm/linux-4.x.y.git
$ cd linux-4.x.y
$ git checkout nanopi-v4.1.y-matrix
$ make nanopi_defconfig
$ touch .scmversion
$ make
编译好后的zImage位于内核源码arch/arm/boot/目录下,把该zImage替换掉NanoPi烧写文件sd-fuse_nanopi/prebuilt下的zImage,重新制作SD卡即可。
6.2 硬件连接
连接说明:
| Matrix-Button | NanoPi |
| S | Pin7 |
| V | Pin4 |
| G | Pin6 |
6.3 编译测试程序
进入Matrix代码仓库,切换到nanopi分支
$ cd matrix
$ git checkout nanopi
编译Matrix配件代码
$ make CROSS_COMPILE=arm-linux- clean
$ make CROSS_COMPILE=arm-linux-
$ make CROSS_COMPILE=arm-linux- install
注意:请确保你的主机PC当前使用的交叉编译器为NanoPi-Debian配套的arm-linux-gcc-4.4.3。
编译出来的库文件位于install/lib目录下,而测试程序则位于install/usr/bin目录下,模块Matrix-Button对应的测试程序为matrix-button。
6.4 运行测试程序
将带有Debian系统的SD卡插入一台运行Linux的电脑,可以挂载SD卡上的boot和rootfs分区。
假设rootfs分区的挂载路径为/media/rootfs,执行以下命令可将Matrix的所有库文件和测试程序拷贝到NanoPi的文件系统上。
$ cp install/usr/bin/* /media/rootfs/usr/bin/
$ cp install/lib/* /media/rootfs/lib/ -d
将SD卡重新插入NanoPi,上电启动,在Debian的shell终端中执行以下命令运行模块Matrix-Button的测试程序。
$ matrix-button注意:此模块并不支持热插拔,启动系统前需要确保硬件正常连接。
6.5 代码展示
int main(int argc, char ** argv)
{
    int i;
    int retSize = -1;
    char value[ARRAY_SIZE(button)];
    int devFD = -1;

    printf("Using pin GPIO_PIN1\n");
    if ((devFD =sensorInit(button, ARRAY_SIZE(button))) == -1) {
        printf("Fail to init sensor\n");
        return -1;
    }
    printf("Press the button...\n");
    if ((retSize = sensorRead(devFD, value, ARRAY_SIZE(button))) == -1) {
        printf("Fail to read sensors\n");
    }
    if (retSize > 0) {
        i = 0;
        for (i=0; i<retSize; i++) {
            printf("Button[%d]:%d\n", i, value[i]);
        }
    }
    sensorDeinit(devFD);
    return 0;
}
7 与Tiny4412连接使用
7.1 准备工作
参考Tiny4412光盘里的《友善之臂Ubuntu使用手册》,在Tiny4412上运行UbuntuCore系统,然后在主机PC上安装并使用相应的编译器。
注意:只能使用Tiny4412SDK-1506的底板。
7.2 硬件连接
参考下图连接模块Matrix-Button和Tiny4412
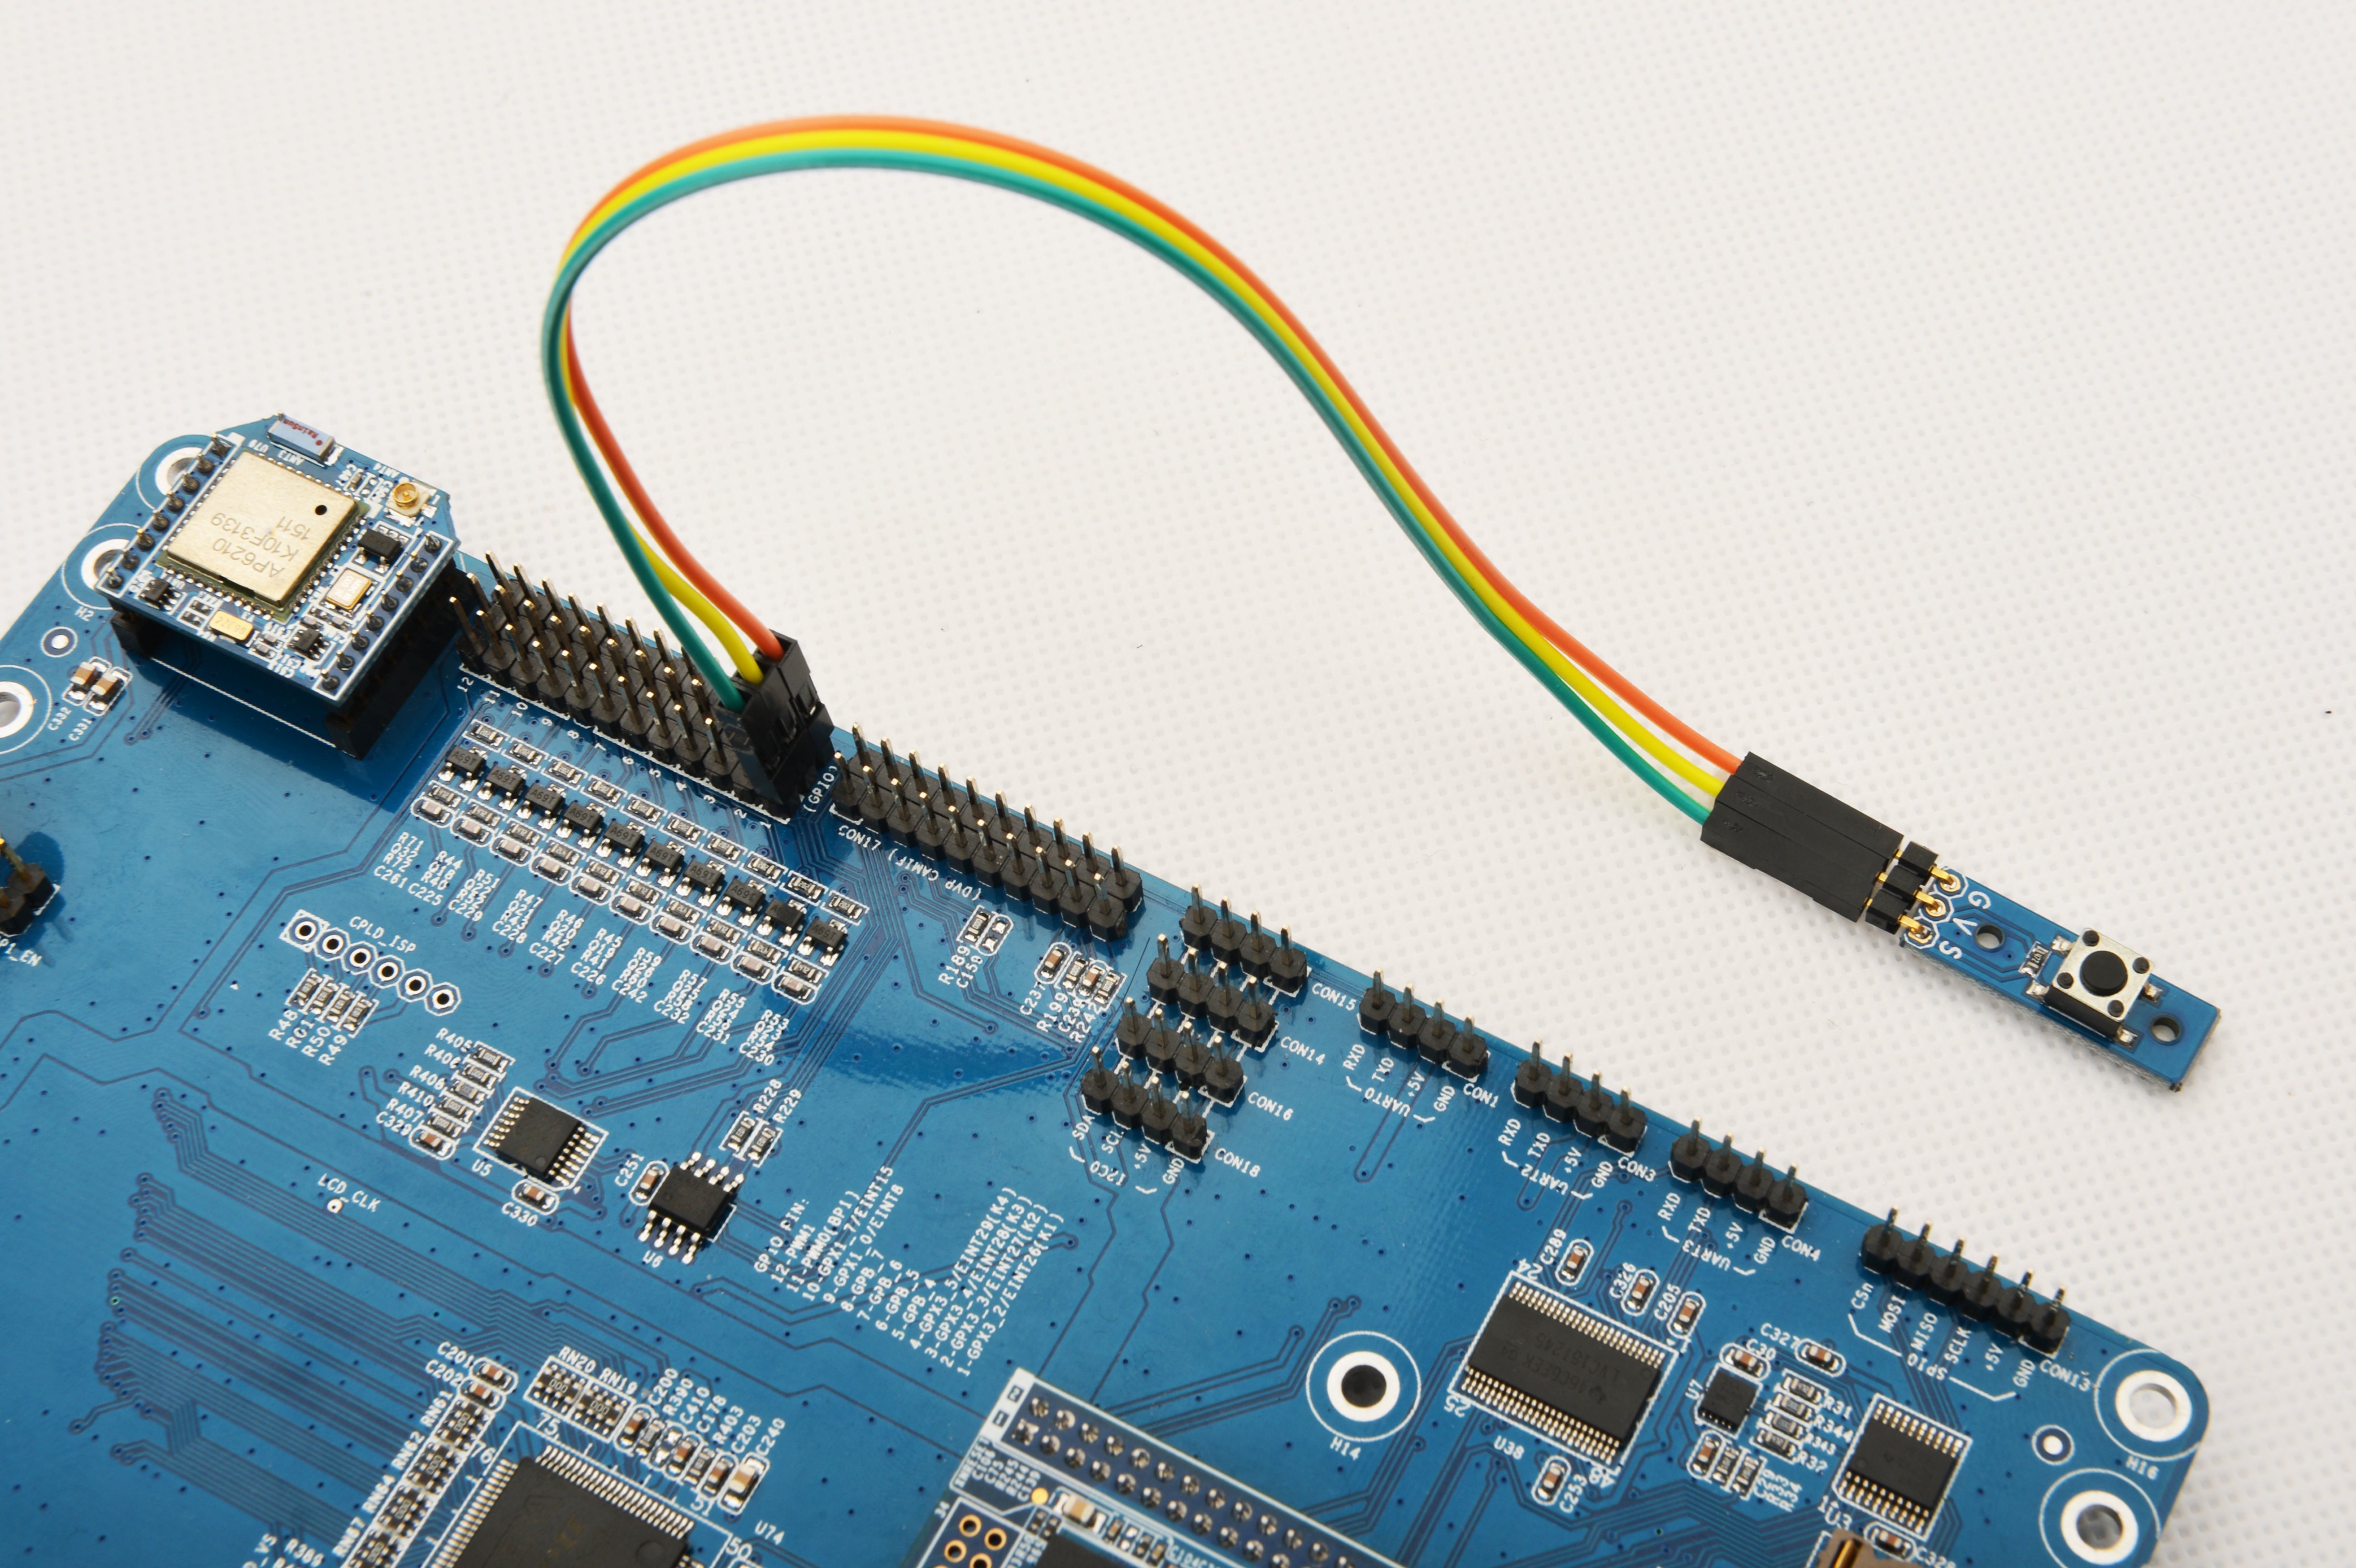
连接说明:
| Matrix-Button | Tiny4412 |
| S | GPIO1 S |
| V | GPIO1 5V |
| G | GPIO1 GND |
7.3 编译测试程序
进入Matrix代码仓库,切换到tiny4412分支
$ cd matrix
$ git checkout tiny4412
编译Matrix配件代码
$ make CROSS_COMPILE=arm-linux-gnueabihf- clean
$ make CROSS_COMPILE=arm-linux-gnueabihf-
$ make CROSS_COMPILE=arm-linux-gnueabihf- install
注意:请确保你的主机PC当前使用的交叉编译器为Tiny4412-UbuntuCore配套的arm-linux-gnueabihf-gcc-4.7.3。
编译出来的库文件位于install/lib目录下,而测试程序则位于install/usr/bin目录下,模块Matrix-Button对应的测试程序为matrix-button。
7.4 运行测试程序
将带有UbuntuCore系统的SD卡插入一台运行Linux的电脑,可以挂载SD卡上的boot和rootfs分区。
假设rootfs分区的挂载路径为/media/rootfs,执行以下命令可将Matrix的所有库文件和测试程序拷贝到Tiny4412的文件系统上。
$ cp install/usr/bin/* /media/rootfs/usr/bin/
$ cp install/lib/* /media/rootfs/lib/ -d
将SD卡重新插入Tiny4412,上电启动,在UbuntuCore的shell终端中执行以下命令运行模块Matrix-Button的测试程序。
$ matrix-button注意:此模块并不支持热插拔,启动系统前需要确保硬件连接正确。
7.5 代码展示
int main(int argc, char ** argv)
{
    int i;
    int retSize = -1;
    char value[ARRAY_SIZE(button)];
    int devFD = -1;

    printf("Using pin GPIO_PIN1\n");
    if ((devFD =sensorInit(button, ARRAY_SIZE(button))) == -1) {
        printf("Fail to init sensor\n");
        return -1;
    }
    printf("Press the button...\n");
    if ((retSize = sensorRead(devFD, value, ARRAY_SIZE(button))) == -1) {
        printf("Fail to read sensors\n");
    }
    if (retSize > 0) {
        i = 0;
        for (i=0; i<retSize; i++) {
            printf("Button[%d]:%d\n", i, value[i]);
        }
    }
    sensorDeinit(devFD);
    return 0;
}
