Difference between revisions of "Template:DebianBullseyeDesktop-Common"
(updated by API) |
(updated by API) |
||
| Line 7: | Line 7: | ||
the root user account is disabled by default, you may configure the root password through the 'sudo passwd root' command. | the root user account is disabled by default, you may configure the root password through the 'sudo passwd root' command. | ||
===View IP address=== | ===View IP address=== | ||
| − | Since the Debian Bullseye hostname is the hardware model by default, you can use the ping command to get the IP address:< | + | Since the Debian Bullseye hostname is the hardware model by default, you can use the ping command to get the IP address:<code>ping {{{1}}}</code><br/> |
| − | ping {{{1}}}< | + | |
| − | <br/> | + | |
| − | + | ||
===Connect to Debian via SSH=== | ===Connect to Debian via SSH=== | ||
| − | < | + | <code>ssh pi@{{{1}}}</code><br/> |
| − | ssh pi@ | + | |
| − | </ | + | |
The default password is: pi | The default password is: pi | ||
Revision as of 07:32, 8 February 2023
Contents
- 1 Account & Password
- 2 View IP address
- 3 Connect to Debian via SSH
- 4 Update Software Packages
- 5 Install x11vnc Server on Debian for Remote Access
- 6 Install the kernel-header package
- 7 Change time zone
- 8 Change startup LOGO and Wallpaper
- 9 Soft Factory Reset
- 10 Start the program automatically at startup(For example Kodi)
- 11 Disable auto-mounting
- 12 Setup Chinese language and Input method
- 13 Install Docker Engine on Debian
1 Account & Password
Regular Account:
User Name: pi
Password: pi
Root:
the root user account is disabled by default, you may configure the root password through the 'sudo passwd root' command.
2 View IP address
Since the Debian Bullseye hostname is the hardware model by default, you can use the ping command to get the IP address:ping {{{1}}}
3 Connect to Debian via SSH
ssh pi@{{{1}}}
The default password is: pi
4 Update Software Packages
$ sudo apt-get update
5 Install x11vnc Server on Debian for Remote Access
5.1 Install x11vnc server
The following command to install x11vnc server:
sudo apt-get install x11vnc
5.2 Set your password
sudo x11vnc -storepasswd /etc/x11vnc.pwd
5.3 Setup x11vnc server with systemd auto start up
Create service configuration file:
sudo vi /lib/systemd/system/x11vnc.service
Let’s copy and paste the following configuration into our newly create service file:
[Unit]
Description=Start x11vnc at startup.
Requires=display-manager.service
After=syslog.target network-online.target
Wants=syslog.target network-online.target

[Service]
Type=simple
ExecStart=/usr/bin/x11vnc -display :0 -forever -loop -noxdamage -repeat -rfbauth /etc/x11vnc.pwd -rfbport 5900 -shared -capslock -nomodtweak
ExecStop=/usr/bin/x11vnc -R stop
Restart=on-failure

[Install]
WantedBy=multi-user.target
The following commands to reload the systmd system and to enable and start the x11vnc service:
sudo systemctl daemon-reload
sudo systemctl enable x11vnc.service
sudo systemctl start x11vnc
5.4 Testing remote access
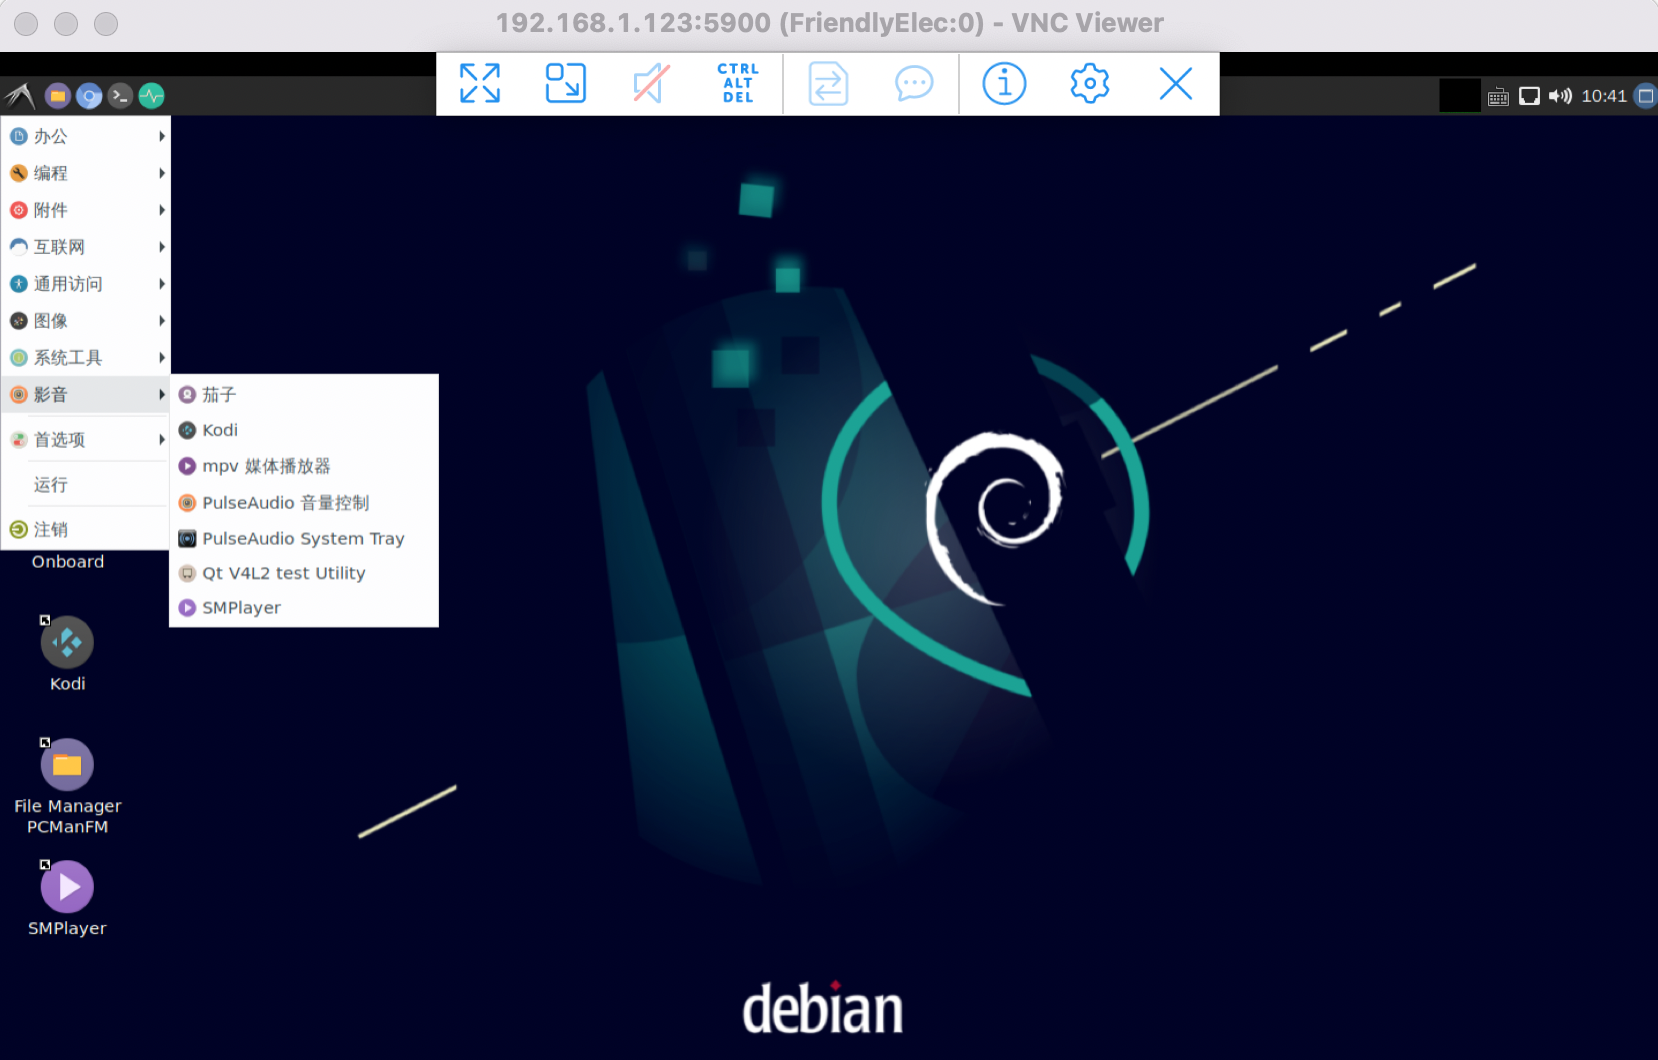
Start the VNC client software, input IP:5900 to connect:

6 Install the kernel-header package
sudo dpkg -i /opt/linux-headers-*.deb
7 Change time zone
7.1 Check the current time zone
timedatectl
7.2 List all available time zones
timedatectl list-timezones
7.3 Set the time zone (e.g. Shanghai)
sudo timedatectl set-timezone Asia/Shanghai
8 Change startup LOGO and Wallpaper
8.1 Change startup LOGO
Replace the following two files in the kernel source code directory and recompile the kernel:
kernel/logo.bmp
kernel/logo_kernel.bmp
Or use the script to operate, as shown below:
- Download scripts:
git clone https://github.com/friendlyarm/sd-fuse_rk3399.git -b kernel-4.19
cd sd-fuse_rk3399
- Compile kernel and repackage firmware
convert files/logo.jpg -type truecolor /tmp/logo.bmp
convert files/logo.jpg -type truecolor /tmp/logo_kernel.bmp
LOGO=/tmp/logo.bmp KERNEL_LOGO=/tmp/logo_kernel.bmp ./build-kernel.sh debian-bullseye-desktop-arm64
./mk-emmc-image.sh debian-bullseye-desktop-arm64
8.2 Change Wallpaper
Modify the following configuration file:
/home/pi/.config/pcmanfm/LXDE/desktop-items-0.conf
9 Soft Factory Reset
Execute the following command in a terminal:
sudo firstboot && sudo reboot
10 Start the program automatically at startup(For example Kodi)
Put the desktop file in the ~/.config/autostart/ directory, for example:
mkdir ~/.config/autostart/
cp /usr/share/applications/kodi.desktop ~/.config/autostart/
11 Disable auto-mounting
sudo systemctl mask udisks2
sudo reboot
12 Setup Chinese language and Input method
12.1 Setup Chinese language
Enter the following command and select 'zh_CN.UTF-8':
sudo dpkg-reconfigure localesAdd environment variables to .bashrc:
echo "export LC_ALL=zh_CN.UTF-8" >> ~/.bashrc
echo "export LANG=zh_CN.UTF-8" >> ~/.bashrc
echo "export LANGUAGE=zh_CN.UTF-8" >> ~/.bashrc
Reboot device:
sudo reboot12.2 Installing Chinese input method
Enter the following command to install fcitx and Pinyin input method:
sudo apt update
sudo apt-get install fcitx fcitx-pinyin
sudo apt-get install im-config
sudo apt-get install fcitx-table*
sudo apt-get install fcitx-ui-classic fcitx-ui-light
sudo apt-get install fcitx-frontend-gtk2 fcitx-frontend-gtk3 fcitx-frontend-qt4
sudo apt-get remove --purge scim* ibus*
sudo reboot
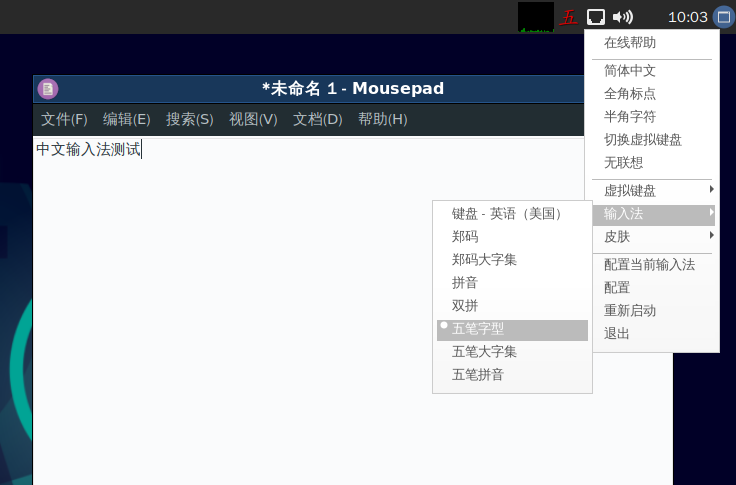
After reboot, press Ctrl+Space to switch between Chinese and English input methods, and the input method icon will appear in the upper right corner, right-click the input method icon in the upper right corner to switch input methods in the pop-up menu, as shown below:

13 Install Docker Engine on Debian
The docker installer uses iptables for nat, unfortunately Debian uses nftables, here we just setup Debian to use the legacy iptables:
sudo update-alternatives --set iptables /usr/sbin/iptables-legacy
sudo update-alternatives --set ip6tables /usr/sbin/ip6tables-legacy
13.1 Install Docker Engine
curl -fsSL https://get.docker.com | bash
Let’s verify:
sudo docker info13.2 Run Docker as a non-root user
sudo groupadd docker
sudo gpasswd -a ${USER} docker
sudo systemctl restart docker
sudo chmod a+rw /var/run/docker.sock
Let’s verify:
docker images
13.3 Testing Docker: Installing Nextcloud with docker
mkdir ~/nextcloud -p
docker run -d -p 8888:80  --name nextcloud  -v ~/nextcloud/:/var/www/html/ --restart=always --privileged=true  arm64v8/nextcloud
After installation, visit: http://Device-IP-Address:8888 on your computer browser to view the nextcloud web page.