Difference between revisions of "Template:BurnLinuxToEMMC-Rockchip"
(updated by API) |
(updated by API) |
||
| Line 23: | Line 23: | ||
|- | |- | ||
| rk3328-eflasher-friendlywrt-22.03-YYYYMMDD.img.gz | | rk3328-eflasher-friendlywrt-22.03-YYYYMMDD.img.gz | ||
| − | | '''[[How to Build FriendlyWrt|FriendlyWrt]]'''<br/>Based on OpenWrt 22.03 | + | | '''[[How to Build FriendlyWrt|FriendlyWrt]]'''<br/>Based on OpenWrt 22.03<br />Kernel version 5.15.y |
|- | |- | ||
| rk3328-eflasher-friendlywrt-22.03-docker-YYYYMMDD.img.gz | | rk3328-eflasher-friendlywrt-22.03-docker-YYYYMMDD.img.gz | ||
| − | | '''[[How to Build FriendlyWrt|FriendlyWrt]]'''<br/>Pre-installed Docker<br />Based on OpenWrt 22.03 | + | | '''[[How to Build FriendlyWrt|FriendlyWrt]]'''<br/>Pre-installed Docker<br />Based on OpenWrt 22.03<br />Kernel version 5.15.y |
|- | |- | ||
| rk3328-eflasher-friendlycore-lite-focal-5.15-arm64-YYYYMMDD.img.gz | | rk3328-eflasher-friendlycore-lite-focal-5.15-arm64-YYYYMMDD.img.gz | ||
Revision as of 09:24, 25 October 2022
Contents
1 Install OS to eMMC
1.1 Option 1: Install OS on Web Page
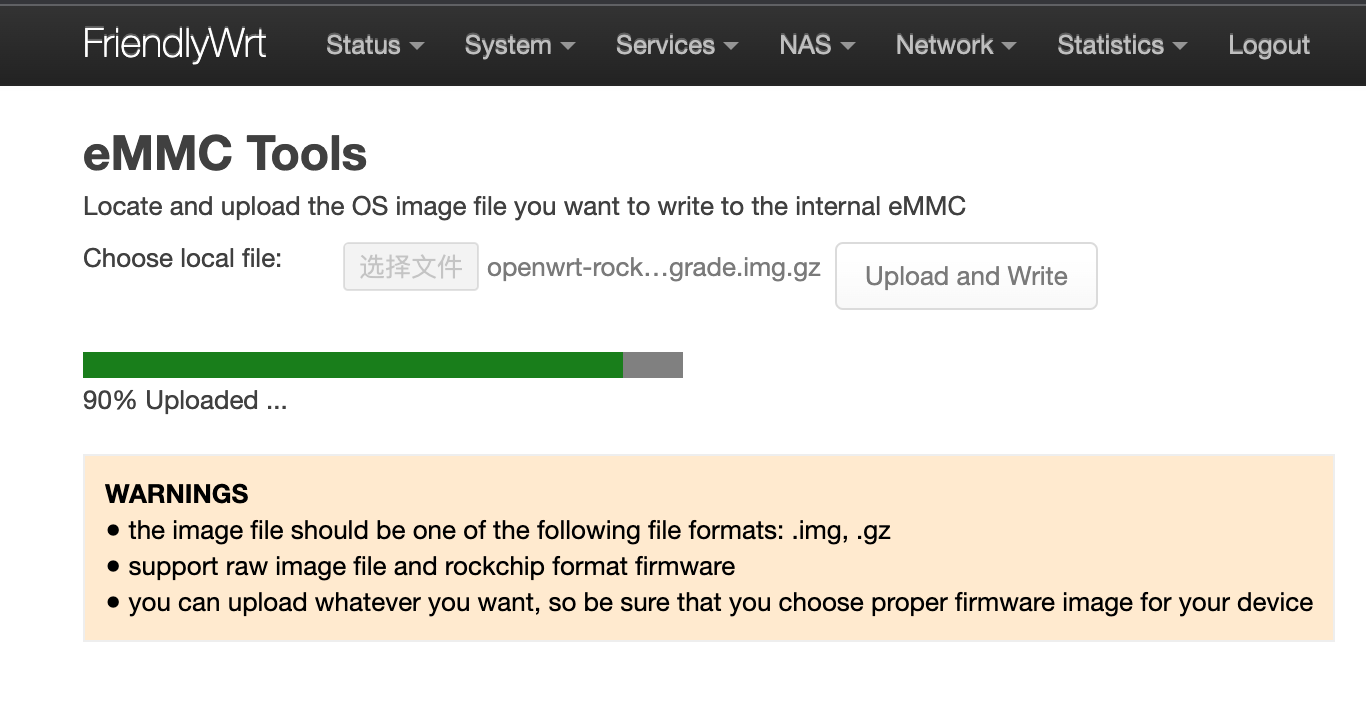
Get a TF card which has been installed with FriendlyWrt, log in FriendlyWrt on the web page, click on “System” ->”eMMC Tools”. Click on “Select file” to select your wanted image file, either an official image (the name might start with “rk3328-sd”) or a third party image. The file should be a “.gz” or “.img” file.
After a file is selected, click on “Upload and Write” to start installing an OS.

After installation is done, eject the SD card, the system will automatically reboot and load the OS from eMMC. After the OS begins to load, if the system LED is flashing and the network LED is on, it means the the OS has loaded successfully. If the OS is FriendlyWrt, you can click on “Go to Homepage” to enter the homepage.
Note that if you are burning the FriendlyElec firmware, you need to use an image file with the "-sd-" file name, similar to the one below:
| rk3328-sd-friendlywrt-22.03-YYYYMMDD.img.gz |
| rk3328-sd-friendlywrt-22.03-docker-YYYYMMDD.img.gz |
If the file is in 7z, zip or rar format, you will need to extract it first. If the file is too large to write, you can compress it into .gz format and try again.
1.2 Option 2: Install OS via TF Card
1.2.1 Install OS to eMMC
- This method firstly boots a mini Linux from a TF card and then automatically runs an EFlasher utility to install the OS to eMMC.
- You can watch its progress by observing its LEDs as well.
Visit download link to download the needed utilities and image file:
| Image File | |
| rk3328-eflasher-friendlywrt-22.03-YYYYMMDD.img.gz | FriendlyWrt Based on OpenWrt 22.03 Kernel version 5.15.y |
| rk3328-eflasher-friendlywrt-22.03-docker-YYYYMMDD.img.gz | FriendlyWrt Pre-installed Docker Based on OpenWrt 22.03 Kernel version 5.15.y |
| rk3328-eflasher-friendlycore-lite-focal-5.15-arm64-YYYYMMDD.img.gz | FriendlyCore Minimal system Based on Ubuntu core 20.04 kernel version 5.15.y |
| Flash Utility: | |
| win32diskimager.rar | Windows utility. Under Linux users can use "dd" |
Here are the steps:
- Get an SDHC card with a minimum capacity of 8G
- Download a rk3328-eflasher-OSNAME-YYYYMMDD.img.gz image file and a win32diskimager;
- Under Windows, run win32diskimager as administrator, select your SD card and extracted EFlasher image file, and click on “Write” to write image file on the SD card; or under Linux, you use the dd command to write the rk3328-eflasher-OSNAME-YYYYMMDD.img file to the SD card.
- Eject your SD card and insert it to {{{1}}}’s microSD card slot.
- Turn on {{{1}}}, it will boot from the SD card and automatically run EFlasher to install the OS to the board’s eMMC. You can observer the board’s LEDs to watch its installation progress
| Progress | SYS LED(Red) | LAN LED(Green) | WAN LED(Green) |
|---|---|---|---|
| Power On | Solid On | Off | Off |
| System Boot | Slow Flashing | Off | Off |
| Installation in Progress | Fast Flashing | Off | Off |
| Installation Done | Slow Flashing | Solid On | Solid On |
- After installation is done, power off the board, eject the SD card from {{{1}}}, power on the board again, {{{1}}} will load the OS from its eMMC
1.2.2 Install Flash Image File to eMMC
- Auto Install (Default Behavior)
1) Download an “eflasher” firmware from network drive, extract it and install it to a TF card ;
2) Eject and insert the TF card to your PC, after a “FriendlyARM” device shows up(Under Linux, it is a “FriendlyARM” directory), copy an .img or .gz file to the TF card.
3) Open the eflasher.conf file on the TF card, set “autoStart=” to the name of your image file, such as:
autoStart=openwrt-rockchip-armv8_nanopi-ext4-sysupgrade.img.gzAnyone of the files that contain “-sd-” will work. Here is a list:
| rk3328-sd-friendlywrt-22.03-YYYYMMDD.img.gz |
| rk3328-sd-friendlywrt-22.03-docker-YYYYMMDD.img.gz |
| rk3328-sd-friendlywrt-21.02-YYYYMMDD.img.gz |
| rk3328-sd-friendlywrt-21.02-docker-YYYYMMDD.img.gz |
4) Eject the TF card, insert the TF card to {{{1}}}, power it on it will automatically install your firmware. You can watch the installation progress by observing the LEDs’ status.