Difference between revisions of "NanoPi 2"
(→如何编译系统) |
(→准备mkimage) |
||
| Line 223: | Line 223: | ||
Warning: you cannot update this MicroSD card by commanding "dd". This command which will cause trouble when booting the NanoPi2. | Warning: you cannot update this MicroSD card by commanding "dd". This command which will cause trouble when booting the NanoPi2. | ||
| − | === | + | ===Prepare mkimage=== |
| − | + | You need the mkimage utility to compile a U-Boot source code package. Please make sure this utility works well on your host before you start compiling a uImage.<br /> | |
| − | + | You can install this utility by either commanding "sudo apt-get install u-boot-tools" or following the commands below: | |
<syntaxhighlight lang="bash"> | <syntaxhighlight lang="bash"> | ||
cd uboot_nanopi2 | cd uboot_nanopi2 | ||
Revision as of 10:51, 29 October 2015
Contents
1 Introduction
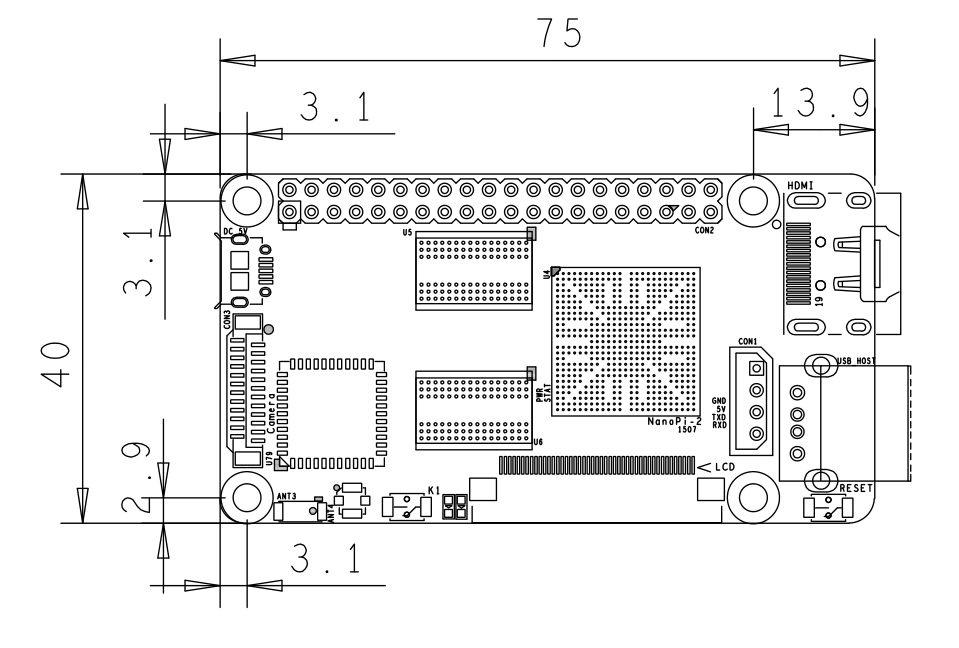
- The NanoPi2 is a high performance ARM Board developed by FriendlyARM for Hobbysts, Makers and Hackers for IOT projects. It features Samsung’s Cortex-A9 Quad Core S5P4418@1.4GHz SoC and 1G 32bit DDR3 RAM. It has built-in WiFi and Bluetooth which supports 802.11 b/g/n and Bluetooth 4.0. It boots Android and Debian from a TF card. It integrates an HDMI and LCD interface. Its adoption of the Raspberry Pi’s GPIO pin header makes it compatible with both Raspberry Pi’s external GPIO modules and Arduino’s shield boards. Its PCB dimension is 75 x 40 mm.
2 Features
- CPU: S5P4418, 1.4GHz
- RAM: 1GB DDR3
- Built in SDIO WiFi and Bluetooth module
- USB 2.0 Type A x 1
- Debug Serial Port/UART0 x 1
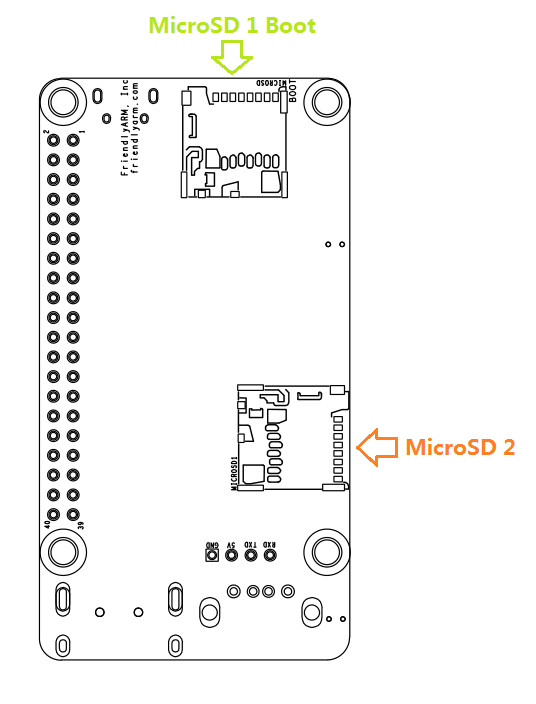
- microSD Slot x 2
- microUSB x 1: for data transmission and power input
- LCD Interface: 0.5mm spacing FPC socket, full color LCD (RGB:8-8-8)
- HDMI: HDMI 1.4A, Type-A, 1080P60
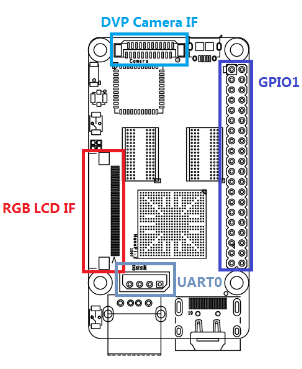
- DVP Camera Interface: 0.5mm spacing FPC socket. It includes ITU-R BT 601/656 8-bit, I2C and IO
- GPIO: 2.54mm spacing 40pin, compatible with Raspberry Pi's GPIO. It includes UART, SPI, I2C, IO etc
- Button: User Button x 1, Reset Button x 1
- LED: LED for Power Indication x 1, User LED x 1
- PCB Dimension: 75 x 40mm
- Power: DC 5V/2A
- OS: Android, Debian
3 Diagram, Layout and Dimension
3.1 Layout
- GPIO Pin Spec
Pin# Name Pin# Name 1 VDD_SYS_3.3V 2 VDD_5V 3 I2C0_SDA 4 VDD_5V 5 I2C0_SCL 6 DGND 7 GPIOB28 8 UART3_TXD 9 DGND 10 UART3_RXD 11 GPIOB29 12 GPIOB26 13 GPIOB30 14 DGND 15 GPIOB31 16 PWM2 17 VDD_SYS_3.3V 18 GPIOB27 19 SPI0_MOSI 20 DGND 21 SPI0_MISO 22 PWM0 23 SPI0_CLK 24 SPI0_CS 25 DGND 26 PWM1 27 I2C1_SDA 28 I2C1_SCL 29 GPIOC8 30 DGND 31 SPI2_CLK 32 GPIOC28 33 SPI2_CS 34 DGND 35 SPI2_MOSI 36 GPIOC7 37 SPI2_MISO 38 ALIVEGPIO2 39 DGND 40 ALIVEGPIO3
- Debug Port CON1(UART0)
Pin# Name 1 DGND 2 VDD_5V 3 TXD0 4 RXD0
- DVP Camera Interface Pin Spec
Pin# Name 1, 2 VDD_SYS_3.3V 7,9,13,15,24 DGND 3 SCL0 4 SDA0 5 GPIOB14 6 GPIOB16 8,10 NC 11 VSYNC 12 HREF 14 PCLK 16-23 Data bit7-0
- RGB LCD Interface Pin Spec
Pin# Name 1, 2 VDD_5V 11,20,29, 37,38,39,40, 45 DGND 3-10 Blue LSB to MSB 12-19 Green LSB to MSB 21-28 Red LSB to MSB 30 GPIOB25 31 GPIOC15 32 XnRSTOUT Form CPU 33 VDEN 34 VSYNC 35 HSYNC 36 LCDCLK 41 SCL2 42 SDA2 43 GPIOC16 44 NC
- Note
- VDD_SYS_3.3V: 3.3V power output
- VDD_5V: 5V power input/output. When the external device’s power is greater than the MicroUSB’s the external device is charging the board otherwise the board powers the external device. The input range is 4.7V ~ 5.6V
- For more details please refer to the document:NanoPi-2-1507-Schematic.pdf
3.2 Board Dimension
- For more details please refer to the document:NanoPi-2-1507-Dimesions(dxf).zip
4 Get Started
4.1 Essentials You Need
要开启你的NanoPi新玩具,请先准备好以下硬件
- NanoPi 2
- microSD Card/TFCard: Class 10 or Above, minimum 8GB SDHC
- microUSB cable
- A Host running Ubuntu 14.04 64 bit system
4.2 Make an Installation MicroSD Card
- 1) Insert your microSD card to your host running Ubuntu and check your SD card's device name
dmesg | tail
Search the messages output by "dmesg" for similar words like "sdc: sdc1 sdc2". If you can find them it means your SD card is recognized as "/dev/sdc". Or you can check that by commanding "cat /proc/partitions".
- 2) Download Firmware Package
git clone https://github.com/friendlyarm/sd-fuse_nanopi2.git
cd sd-fuse_nanopi2
- 3) Flash Android Firmware to MicroSD Card
su
./fusing.sh /dev/sdx
(Note: you need to replace "/dev/sdx" with the device name in your system) When you do “git clone” you have to hit “Y” within 10 seconds after it prompts you to download image files otherwise you will miss the download.
- 4) Flash Debian Firmware to MicroSD Card
./fusing.sh /dev/sdx debian
4.3 Run Android
Insert a MicroSD card with Android image files to your NanoPi2, connect the NanoPi2 to an HDMI monitor and a 5V/2A power source the NanoPi2 will be automatically powered on. If you can see the blue LED flashing it means your board is working and you will see Android loading on the HDMI monitor. If at the same time you connect your NanoPi2 to a PC running Ubuntu and Minicom via a serial cable you will see system messages output to the PC’s minicom terminal.
5 Make Your Own OS Image
5.1 Setup Development Environment
5.2 Install Cross Compiler
FriendlyARM has an open source Android package which contains a working cross compiler. You can set it up in the "PATH" variable:
export PATH=/opt/FriendlyARM/s5p4418/android/prebuilts/gcc/linux-x86/arm/arm-eabi-4.6/bin:$PATH
arm-eabi-gcc -v
The “/opt/FriendlyARM/s5p4418/android” is where Android source code package is located.
When you use this compiler please specify the option "CROSS_COMPILE=arm-eabi-".
5.3 Compile U-Boot
Download the U-Boot source code and compile it. Please note the github's branch is s5p4418-nanopi2:
git clone https://github.com/friendlyarm/uboot_nanopi2.git
cd uboot_nanopi2
git checkout s5p4418-nanopi2
make s5p4418_nanopi2_config
make CROSS_COMPILE=arm-eabi-
After your compilation succeeds a u-boot.bin will be generated. If you want to test it please flash it to your installation MicroSD card via fastboot.
Warning: you cannot update this MicroSD card by commanding "dd". This command which will cause trouble when booting the NanoPi2.
5.4 Prepare mkimage
You need the mkimage utility to compile a U-Boot source code package. Please make sure this utility works well on your host before you start compiling a uImage.
You can install this utility by either commanding "sudo apt-get install u-boot-tools" or following the commands below:
cd uboot_nanopi2
make tools
mkdir -p /usr/local/sbin && cp -v tools/mkimage /usr/local/sbin
5.5 编译Linux kernel
5.5.1 编译内核
- 下载内核源代码
git clone https://github.com/friendlyarm/linux-3.4.y.git
cd linux-3.4.y
git checkout s5p4418-nanopi2
NanoPi2内核所属的分支是s5p4418-nanopi2,在开始编译前先切换分支。
- 编译Android内核
make nanopi2_android_defconfig
touch .scmversion
make CROSS_COMPILE=arm-eabi- uImage
- 编译Debian内核
make nanopi2_linux_defconfig
touch .scmversion
make CROSS_COMPILE=arm-eabi- uImage
编译成功结束后,新生成的内核烧写文件为 arch/arm/boot/uImage 。
5.5.2 编译内核模块
Android包含内核模块,位于system分区的 /lib/modules/ 下,如果您有新的内核模块或者内核配置有变化,则需要重新编译。
首先编译内核源代码中的模块:
cd linux-3.4.y
make CROSS_COMPILE=arm-eabi- modules
另外有2个内核模块的源代码位于Android源代码中,可使用以下命令来编译:
cd /opt/FriendlyARM/s5p4418/android
./vendor/friendly-arm/build/common/build-modules.sh
其中 “/opt/FriendlyARM/s5p4418/android” 是指Android源代码的TOP目录,使用参数“-h”可查看帮助。
编译成功结束后,会显示生成的内核模块。
5.6 编译Android
- 搭建编译环境
搭建编译Android的环境建议使用64位的Ubuntu 14.04,安装需要的包即可。
sudo apt-get install zlib1g-dev:i386
sudo apt-get install bison g++-multilib git gperf libxml2-utils make python-networkx zip
sudo apt-get install flex libncurses5-dev zlib1g-dev gawk minicom
更多说明可查看 https://source.android.com/source/initializing.html 。
- 下载源代码
Android源代码的下载需要使用repo,其安装和使用请查看 https://source.android.com/source/downloading.html 。
mkdir android && cd android
repo init -u git@github.com:friendlyarm/android_manifest.git -b nanopi2-kitkat
repo sync
其中“android”是指工作目录,另外,初始化repo时也可以使用HTTPS clone URL。
- 编译系统
source build/envsetup.sh
lunch aosp_nanopi2-userdebug
make -j8
编译成功完成后,目录 out/target/product/nanopi2/ 下包含可用于烧写的image文件。
6 Resources
- [Schematic]( NanoPi-2-1507-Schematic.pdf)
- [Dimensions]( NanoPi-2-1507-Dimesions(dxf).zip )


