Difference between revisions of "Template:BurnLinuxToEMMC-Allwinner/zh"
From FriendlyELEC WiKi
(updated by API) |
(→eflasher脱机烧写) |
||
| (54 intermediate revisions by 3 users not shown) | |||
| Line 1: | Line 1: | ||
| − | ===== | + | =====烧写到eMMC===== |
| − | * | + | ======eflasher脱机烧写====== |
| − | + | * eflasher的详细说明请参考wiki: [[EFlasher|EFlasher]],请阅读该WiKi以了解eflasher系统的完整功能。 | |
| − | * | + | * 将 eflasher 系统固件和烧写工具 win32diskimager.rar 分别解压,在 Windows 下插入TF卡(限8G及以上的卡),以管理员身份运行烧写工具 win32diskimager,在烧写工具 win32diskimager 的界面上,选择你的TF卡盘符,选择 eflasher 系统固件,点击 Write 按钮烧写即可。 |
| − | + | * 当制作完成TF卡后,拔出TF卡插入 BOOT 卡槽,上电启动(注意,这里需要5V/2A的供电),你可以看到STAT灯闪烁,说明已经成功启动 eflasher 系统。 | |
| − | + | * 对于没有HDMI接口的板子或者不想连接HDMI,可以在命令行终端中通过执行下列命令进行烧写: | |
| − | + | ||
<syntaxhighlight lang="bash"> | <syntaxhighlight lang="bash"> | ||
$ su root | $ su root | ||
$ eflasher | $ eflasher | ||
</syntaxhighlight> | </syntaxhighlight> | ||
| − | + | root 用户的密码是 fa。<br> | |
| − | [[File: | + | |
| − | + | {{#switch: {{{2}}} | |
| + | | h3 = | ||
| + | 这里以{{#replace:{{lc:{{{1}}}}}|category:|}}_eflasher_friendlycore-xenial_4.14_armhf_YYYYMMDD.img为例,执行"eflasher"命令后会出现如下信息:<br> | ||
| + | | h5 = | ||
| + | 这里以{{#replace:{{lc:{{{1}}}}}|category:|}}_eflasher_friendlycore-xenial_4.14_arm64_YYYYMMDD.img为例,执行"eflasher"命令后会出现如下信息:<br> | ||
| + | }} | ||
| + | |||
| + | [[File:eflasher_friendlycore1.jpg|frameless|600px|eflasher_friendlycore1]]<br> | ||
| + | 输入“1”,选择烧写friendlycore系统到eMMC上后,会提示如下信息:<br> | ||
| + | |||
| + | {{#switch: {{{2}}} | ||
| + | | h3 = | ||
| + | [[File:eflasher_friendlycore2_h3.jpg|frameless|600px|eflasher_friendlycore2_h3]]<br> | ||
| + | | h5 = | ||
| + | [[File:eflasher_friendlycore2_h5.jpg|frameless|600px|eflasher_friendlycore2_h5]]<br> | ||
| + | }} | ||
| + | 输入“yes”,确定进行烧写:<br> | ||
| + | |||
| + | [[File:eflasher_friendlycore3.jpg|frameless|600px|eflasher_friendlycore3]]<br> | ||
| + | 等待烧写完毕后,断电并从BOOT卡槽中取出TF卡,此时再上电就会从 eMMC 启动系统了。 | ||
| + | |||
| + | * 如果想烧写其他系统映像到 eMMC ,请下载光盘里images-for-eflasher目录,将目录内的压缩包解压到 SD 卡的 FRIENDLYARM 分区。<br> | ||
| + | {{#switch: {{{2}}} | ||
| + | | h3 = | ||
| + | [[File:eflasher_friendlyarm_h3.jpg|frameless|600px|eflasher_friendlyarm_h3]]<br> | ||
| + | | h5 = | ||
| + | [[File:eflasher_friendlyarm_h5.jpg|frameless|600px|eflasher_friendlyarm_h5]]<br> | ||
| + | }} | ||
| + | |||
| + | {{#switch: {{{1}}} | ||
| + | | NanoPi-K1-Plus = | ||
| + | ======PC上烧写eMMC模块====== | ||
| + | * eMMC 里的系统本质上和 SD 卡上的系统是一样的,所以 eMMC 的系统固件和 SD 卡的系统固件是同一个。将固件和烧写工具分别解压,在 Windows 下插入 eMMC(需使用 MicroSD 转 eMMC 模块适配器),以管理员身份运行 win32diskimager 工具, 在 win32diskimager 工具的界面上, 选择你的MicroSD转eMMC模块适配器盘符,选择你要烧写的系统固件,点击 Write 按钮烧写即可。 | ||
| + | [[File:EMMC_module_1.jpg|400px]][[File:EMMC_module_4.jpg|400px]] | ||
| + | * 当烧写完成后,弹出 MicroSD 转 eMMC 模块适配器,将 eMMC 模块插入 eMMC 插槽,上电启动(注意,这里需要 5V/2A 的供电),你可以看到PWR灯常亮以及STAT灯闪烁,说明已经成功启动系统。<br /> | ||
| + | * 当同时接了 SD 卡和 eMMC 模块时,会优先选择 SD 启动,SD 启动失败后,再选择eMMC启动。 | ||
| + | }} | ||
Latest revision as of 02:43, 9 April 2020
1 烧写到eMMC
1.1 eflasher脱机烧写
- eflasher的详细说明请参考wiki: EFlasher,请阅读该WiKi以了解eflasher系统的完整功能。
- 将 eflasher 系统固件和烧写工具 win32diskimager.rar 分别解压,在 Windows 下插入TF卡(限8G及以上的卡),以管理员身份运行烧写工具 win32diskimager,在烧写工具 win32diskimager 的界面上,选择你的TF卡盘符,选择 eflasher 系统固件,点击 Write 按钮烧写即可。
- 当制作完成TF卡后,拔出TF卡插入 BOOT 卡槽,上电启动(注意,这里需要5V/2A的供电),你可以看到STAT灯闪烁,说明已经成功启动 eflasher 系统。
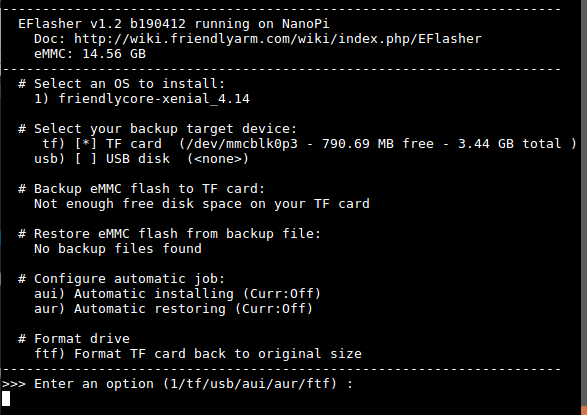
- 对于没有HDMI接口的板子或者不想连接HDMI,可以在命令行终端中通过执行下列命令进行烧写:
$ su root
$ eflasher
root 用户的密码是 fa。

输入“1”,选择烧写friendlycore系统到eMMC上后,会提示如下信息:
输入“yes”,确定进行烧写:

等待烧写完毕后,断电并从BOOT卡槽中取出TF卡,此时再上电就会从 eMMC 启动系统了。
- 如果想烧写其他系统映像到 eMMC ,请下载光盘里images-for-eflasher目录,将目录内的压缩包解压到 SD 卡的 FRIENDLYARM 分区。