Difference between revisions of "Template:OpenWrt1"
(updated by API) |
(updated by API) |
||
| Line 44: | Line 44: | ||
After you connect your board to a serial communication board (e.g. FriendlyElec's serial communication board) you can power the whole system from either the DC port on the serial communication board or the MicroUSB port(if there is one) on your board:<br /> | After you connect your board to a serial communication board (e.g. FriendlyElec's serial communication board) you can power the whole system from either the DC port on the serial communication board or the MicroUSB port(if there is one) on your board:<br /> | ||
[[File:PSU-ONECOM-R1.jpg|frameless|500px]]<br> | [[File:PSU-ONECOM-R1.jpg|frameless|500px]]<br> | ||
| + | | NanoPi-NEO2-Black = | ||
| + | Here is a hardware setup:<br> | ||
| + | After you connect your board to a serial communication board (e.g. FriendlyElec's serial communication board) you can power the whole system from either the DC port on the serial communication board or the MicroUSB port(if there is one) on your board:<br /> | ||
| + | [[File:PSU-ONECOM-NEO2-Black.jpg|frameless|500px]]<br> | ||
| NanoPi-Duo = | | NanoPi-Duo = | ||
| NanoPi-Duo2 = | | NanoPi-Duo2 = | ||
| Line 90: | Line 94: | ||
or you can use a USB to serial board and power on the whole system at the MicroUSB port with a 5V/2A power:<br> | or you can use a USB to serial board and power on the whole system at the MicroUSB port with a 5V/2A power:<br> | ||
[[File:Matrix-USB2UART_nanopi_R1.jpg|frameless|500px]]<br> | [[File:Matrix-USB2UART_nanopi_R1.jpg|frameless|500px]]<br> | ||
| + | | NanoPi-NEO2-Black = | ||
| + | or you can use a USB to serial board and power on the whole system at the MicroUSB port with a 5V/2A power:<br> | ||
| + | [[File:Matrix-USB2UART_nanopi_NEO2-Black.jpg|frameless|500px]]<br> | ||
| #default = | | #default = | ||
or you can use a USB to serial board and power on the whole system at the MicroUSB port with a 5V/2A power. | or you can use a USB to serial board and power on the whole system at the MicroUSB port with a 5V/2A power. | ||
| Line 110: | Line 117: | ||
| NanoPi-NEO-Core2 | | NanoPi-NEO-Core2 | ||
| NanoPi-NEO-Plus2 | | NanoPi-NEO-Plus2 | ||
| − | | NanoPi-NEO2 = | + | | NanoPi-NEO2 |
| + | | NanoPi-NEO2-Black = | ||
In FriendlyElec's OpenWrt system the Ethernet(eth0) is configured as WAN.<br> | In FriendlyElec's OpenWrt system the Ethernet(eth0) is configured as WAN.<br> | ||
Before power on your board make sure your board is connected to a master router's LAN with an Ethernet cable and the eth0 will be assigned an IP address by DHCP.<br> | Before power on your board make sure your board is connected to a master router's LAN with an Ethernet cable and the eth0 will be assigned an IP address by DHCP.<br> | ||
| Line 139: | Line 147: | ||
| NanoPi-NEO-Core2 | | NanoPi-NEO-Core2 | ||
| NanoPi-NEO-Plus2 | | NanoPi-NEO-Plus2 | ||
| − | | NanoPi-NEO2 = | + | | NanoPi-NEO2 |
| + | | NanoPi-NEO2-Black = | ||
After you go through all the steps in <Login via SSH> and get an IP address e.g. 192.168.1.163 for the Ethernet connection, type this IP address in a browser's address bar and you will be able to login OpenWrt-LuCI:<br> | After you go through all the steps in <Login via SSH> and get an IP address e.g. 192.168.1.163 for the Ethernet connection, type this IP address in a browser's address bar and you will be able to login OpenWrt-LuCI:<br> | ||
[[File:R1-OpenWrt-LuCI.jpg|frameless|600px|R1-OpenWrt-LuCI]]<br> | [[File:R1-OpenWrt-LuCI.jpg|frameless|600px|R1-OpenWrt-LuCI]]<br> | ||
| Line 280: | Line 289: | ||
| NanoPi-NEO-Core | | NanoPi-NEO-Core | ||
| NanoPi-NEO-Core2 | | NanoPi-NEO-Core2 | ||
| − | | NanoPi-NEO2 = | + | | NanoPi-NEO2 |
| + | | NanoPi-NEO2-Black = | ||
[[File:op_interface_eth0.png|frameless|600px|op_interface_eth0]] <br> | [[File:op_interface_eth0.png|frameless|600px|op_interface_eth0]] <br> | ||
| NanoPi-NEO-Air = | | NanoPi-NEO-Air = | ||
| Line 324: | Line 334: | ||
** [https://openwrt.org/docs/guide-user/hardware/hardware.button openwrt hardware.button] | ** [https://openwrt.org/docs/guide-user/hardware/hardware.button openwrt hardware.button] | ||
}} | }} | ||
| + | |||
| + | ===使用USB WiFi=== | ||
| + | 目前仅支持 RTL8821CU,即插即用,插入后默认设置为AP模式,热点名称为 "rtl8821cu-mac地址",密码为"password"; | ||
| + | |||
| + | ===使用华为随行WiFi 2 mini(E8372H-155)=== | ||
| + | 即插即用,插入后,热点名称为 "HUAWEI-8DA5",其他设备连接上该热点后就可以使用4G的流量上网了。 | ||
Revision as of 10:20, 17 October 2019
Contents
1 Work with OpenWrt
1.1 Introduction
OpenWrt is a highly extensible GNU/Linux distribution for embedded devices.Unlike many other distributions for routers, OpenWrt is built from the ground up to be a full-featured, easily modifiable operating system for embedded devices. In practice, this means that you can have all the features you need with none of the bloat, powered by a modern Linux kernel. For more details you can refer to:OpenWrt Website.
1.2 System Login
- Login via Serial Port
When you do kernel development you'd better get a serial communication board. After you connect your board to a serial communication board you will be able to do development work from a commandline utility.
Here is a hardware setup:
After you connect your board to a serial communication board (e.g. FriendlyElec's serial communication board) you can power the whole system from either the DC port on the serial communication board or the MicroUSB port(if there is one) on your board:
or you can use a USB to serial board and power on the whole system at the MicroUSB port with a 5V/2A power.
By default you will login as root without a password. You can use "passwd" to set a password for root.
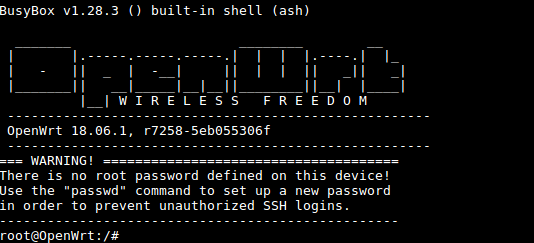
On first boot the system will automatically extend the file system on the TF card to the max capacity:
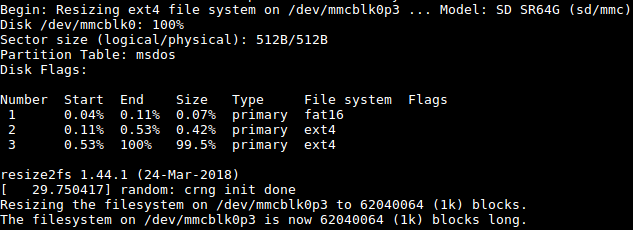
Please wait for this to be done.
- Login via SSH
- Login via Web
You can login OpenWrt via a LuCI Web page.
By default you will login as root without a password, just click on "Login" to login.
1.3 Manage Software Packages
OpenWrt has a package management utility: opkg. You can get its details by running the following command:
$ opkg
Package Manipulation:
        update                  Update list of available packages
        upgrade <pkgs>          Upgrade packages
        install <pkgs>          Install package(s)
        configure <pkgs>        Configure unpacked package(s)
        remove <pkgs|regexp>    Remove package(s)
        flag <flag> <pkgs>      Flag package(s)
         <flag>=hold|noprune|user|ok|installed|unpacked (one per invocation)

Informational Commands:
        list                    List available packages
        list-installed          List installed packages
        list-upgradable         List installed and upgradable packages
        list-changed-conffiles  List user modified configuration files
        files <pkg>             List files belonging to <pkg>
        search <file|regexp>    List package providing <file>
        find <regexp>           List packages whose name or description matches <regexp>
        info [pkg|regexp]       Display all info for <pkg>
        status [pkg|regexp]     Display all status for <pkg>
        download <pkg>          Download <pkg> to current directory
...
These are just part of the manual. Here are some popular opkg commands.
- Update Package List
Before you install a package you'd better update the package list:
$ opkg update
- Check Available Packages
$ opkg list
At the time of writing there are 3241 packages available.
- Check Installed Packages:
$ opkg list-installed
At the time of writing 124 packages have been installed.
- Install/Delete Packages:
$ opkg install <pkgs>
$ opkg remove <pkgs>
- Check Files Contained in Installed Packages:
$ opkg files <pkg>
- Install Chinese Language Package for LuCI
$ opkg install luci-i18n-base-zh-cn
- Check Changed Files:
$ opkg list-changed-conffiles
- Reference Links:
1.4 Check System Status
- Check CPU Temperature & Frequency via Commandline
$ cpu_freq
Aavailable frequency(KHz):
        480000 624000 816000 1008000
Current frequency(KHz):
        CPU0 online=1 temp=26548C governor=ondemand freq=624000KHz
        CPU1 online=1 temp=26548C governor=ondemand freq=624000KHz
        CPU2 online=1 temp=26548C governor=ondemand freq=624000KHz
        CPU3 online=1 temp=26548C governor=ondemand freq=624000KHz
These messages mean that there are four CPU cores working online simultaneously. Each core's temperature is 26.5 degrees in Celsius, the scheduling policy is on-demand and the working frequency is 624MHz. You can set the frequency by running the following command:
$ cpu_freq -s 1008000
Aavailable frequency(KHz):
        480000 624000 816000 1008000
Current frequency(KHz):
        CPU0 online=1 temp=36702C governor=userspace freq=1008000KHz
        CPU1 online=1 temp=36702C governor=userspace freq=1008000KHz
        CPU2 online=1 temp=36702C governor=userspace freq=1008000KHz
        CPU3 online=1 temp=36702C governor=userspace freq=1008000KHz
These messages mean four CPU cores are working online. Each core's temperature is 26.5 degrees. Each core's governor is on demand and the frequency is 480 MHz.
- Check System Status on OpenWrt-LuCI Web Page
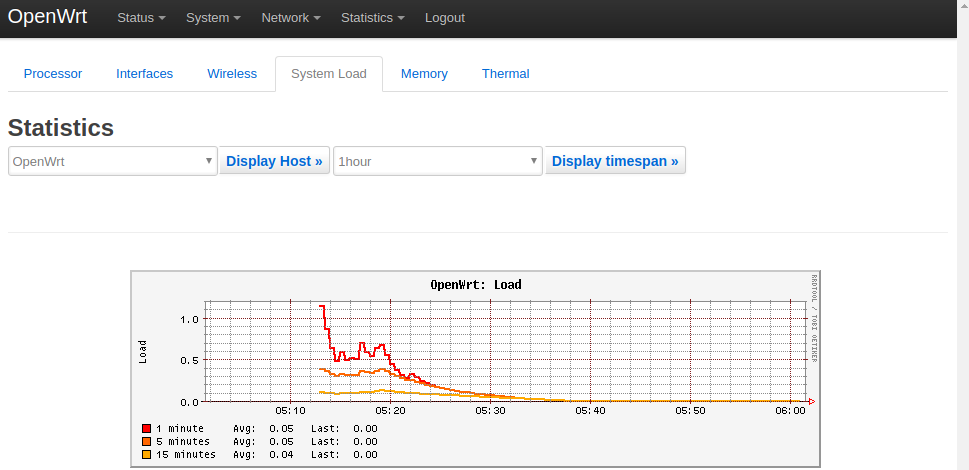
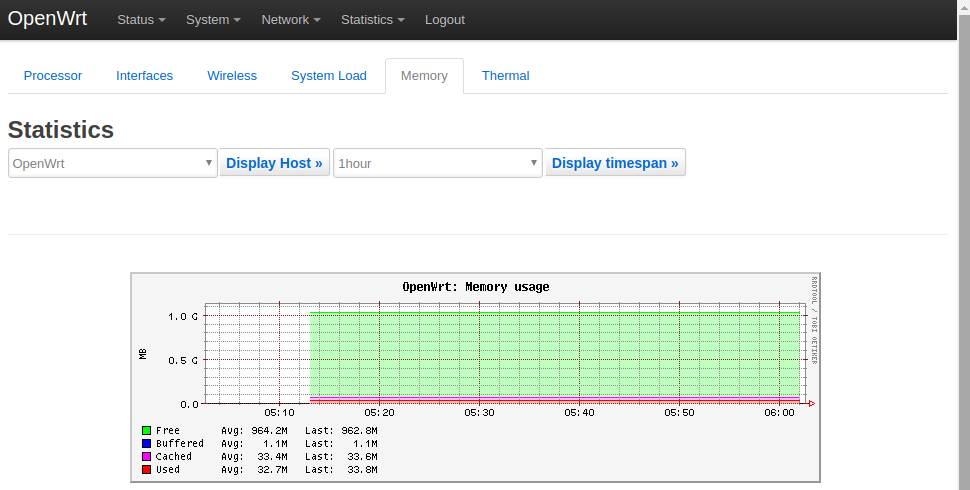
After open the OpenWrt-LuCI page, go to "Statistics ---> Graphs" and you will see various system statistics e.g.:
1) System Load:
2) RAM:
3) CPU Temperature:
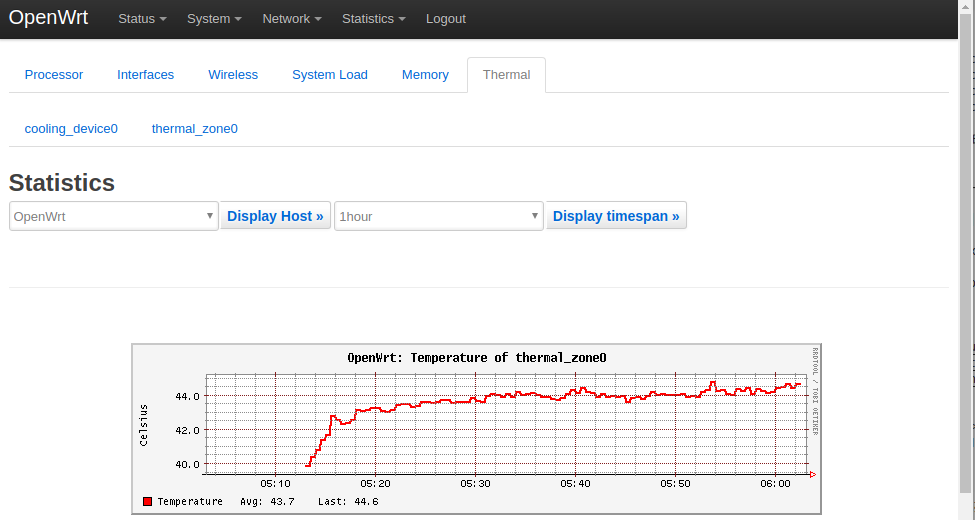
All the statistics listed on the Statistics page are presented by the luci-app-statistics package which uses the Collectd utility to collect data and presents them with the RRDtool utility.
If you want to get more statistics you can install other collectd-mod-* packages.
All collectd-mod-* packages use the same configuration file: /etc/config/luci_statistics.
- Reference Links:
1.5 Check Network->Interfaces Configurations
- After open the OpenWrt-LuCI page, go to "Network" ---> "Interfaces" and you will see the current network's configurations:
- All the configurations listed on the Network->Interfaces page are stored in the "/etc/config/network" file.
1.6 使用USB WiFi
目前仅支持 RTL8821CU,即插即用,插入后默认设置为AP模式,热点名称为 "rtl8821cu-mac地址",密码为"password";
1.7 使用华为随行WiFi 2 mini(E8372H-155)
即插即用,插入后,热点名称为 "HUAWEI-8DA5",其他设备连接上该热点后就可以使用4G的流量上网了。