Difference between revisions of "Template:OpenWrt1"
(→Check Network->Interfaces Configurations) |
(updated by API) |
||
| Line 4: | Line 4: | ||
===System Login=== | ===System Login=== | ||
| − | * <strong> | + | * <strong>串口登录</strong> |
<!-- copy frome FriendlyCoreGeneral-zh.txt --> | <!-- copy frome FriendlyCoreGeneral-zh.txt --> | ||
| − | + | 如果您需要进行内核开发,最好选购一个串口配件,连接了串口,则可以通过串口终端对开发板进行操作。<br /> | |
{{#switch: {{{1}}} | {{#switch: {{{1}}} | ||
| NanoPi-NEO2 = | | NanoPi-NEO2 = | ||
| − | + | 使用串口模块能有效地提升开发效率,以下是串口模块的连接方法:<br> | |
| − | + | 接上串口后,您可以选择从串口模块的DC口或者从MicroUSB口 (如果有) 进行供电:<br /> | |
[[File:PSU-ONECOM-NEO2.jpg|frameless|400px]]<br> | [[File:PSU-ONECOM-NEO2.jpg|frameless|400px]]<br> | ||
| NanoPi-NEO = | | NanoPi-NEO = | ||
| − | + | 使用串口模块能有效地提升开发效率,以下是串口模块的连接方法:<br> | |
| − | + | 接上串口后,您可以选择从串口模块的DC口或者从MicroUSB口 (如果有) 进行供电:<br /> | |
[[File:PSU-ONECOM-NEO.jpg|frameless|400px]]<br> | [[File:PSU-ONECOM-NEO.jpg|frameless|400px]]<br> | ||
| NanoPi-NEO-Plus2 = | | NanoPi-NEO-Plus2 = | ||
| − | + | 使用串口模块能有效地提升开发效率,以下是串口模块的连接方法:<br> | |
| − | + | 接上串口后,您可以选择从串口模块的DC口或者从MicroUSB口 (如果有) 进行供电:<br /> | |
[[File:PSU-ONECOM-NEO-Plus2.jpg|frameless|400px]]<br> | [[File:PSU-ONECOM-NEO-Plus2.jpg|frameless|400px]]<br> | ||
| NanoPi-NEO-Core = | | NanoPi-NEO-Core = | ||
| − | + | 使用串口模块能有效地提升开发效率,以下是串口模块的连接方法:<br> | |
| − | + | 接上串口后,您可以选择从串口模块的DC口或者从MicroUSB口 (如果有) 进行供电:<br /> | |
[[File:PSU-ONECOM-NEO-Core.jpg|frameless|400px]]<br> | [[File:PSU-ONECOM-NEO-Core.jpg|frameless|400px]]<br> | ||
| NanoPi-M1 = | | NanoPi-M1 = | ||
| − | + | 使用串口模块能有效地提升开发效率,以下是串口模块的连接方法:<br> | |
| − | + | 接上串口后,您可以选择从串口模块的DC口或者从MicroUSB口 (如果有) 进行供电:<br /> | |
[[File:PSU-ONECOM-M1.jpg|frameless|400px]]<br> | [[File:PSU-ONECOM-M1.jpg|frameless|400px]]<br> | ||
| NanoPi-M1-Plus = | | NanoPi-M1-Plus = | ||
| − | + | 使用串口模块能有效地提升开发效率,以下是串口模块的连接方法:<br> | |
| − | + | 接上串口后,您可以选择从串口模块的DC口或者从MicroUSB口 (如果有) 进行供电:<br /> | |
[[File:PSU-ONECOM-NanoPi-M1-Plus.jpg|frameless|400px]]<br> | [[File:PSU-ONECOM-NanoPi-M1-Plus.jpg|frameless|400px]]<br> | ||
| NanoPi-A64 = | | NanoPi-A64 = | ||
| − | + | 使用串口模块能有效地提升开发效率,以下是串口模块的连接方法:<br> | |
| − | + | 接上串口后,您可以选择从串口模块的DC口或者从MicroUSB口 (如果有) 进行供电:<br /> | |
[[File:PSU-ONECOM-A64.jpg|frameless|400px]]<br> | [[File:PSU-ONECOM-A64.jpg|frameless|400px]]<br> | ||
| NanoPi-NEO-Air = | | NanoPi-NEO-Air = | ||
| − | + | 使用串口模块能有效地提升开发效率,以下是串口模块的连接方法:<br> | |
| − | + | 接上串口后,您可以选择从串口模块的DC口或者从MicroUSB口 (如果有) 进行供电:<br /> | |
[[File:PSU-ONECOM-AIR.jpg|frameless|400px]]<br> | [[File:PSU-ONECOM-AIR.jpg|frameless|400px]]<br> | ||
| NanoPi-R1 = | | NanoPi-R1 = | ||
| − | + | 使用串口模块能有效地提升开发效率,以下是串口模块的连接方法:<br> | |
| − | + | 接上串口后,请注意串口模块的DC口和NanoPi-R1的MicroUSB口都需要供电:<br /> | |
[[File:PSU-ONECOM-R1.jpg|frameless|500px]]<br> | [[File:PSU-ONECOM-R1.jpg|frameless|500px]]<br> | ||
| NanoPi-Duo = | | NanoPi-Duo = | ||
| Line 48: | Line 48: | ||
<!-- Duox not support ONECOM --> | <!-- Duox not support ONECOM --> | ||
| #default = | | #default = | ||
| − | + | 使用串口模块能有效地提升开发效率,以下是串口模块的连接方法:<br> | |
| − | + | 接上串口后,您可以选择从串口模块的DC口或者从MicroUSB口 (如果有) 进行供电。 | |
| + | }} | ||
{{#switch: {{{1}}} | {{#switch: {{{1}}} | ||
| NanoPC-T4 = | | NanoPC-T4 = | ||
| − | {{{1}}} | + | {{{1}}}需要使用USB转串口模块,连接方法如下图所示:<br>[[File:T4usb2serialport.jpg|frameless|500px]]<br> |
| NanoPi-M4 = | | NanoPi-M4 = | ||
| − | {{{1}}} | + | {{{1}}}需要使用USB转串口模块,连接方法如下图所示:<br>[[File:m4usb2serialport.jpg|frameless|500px]]<br> |
| NanoPi-NEO4 = | | NanoPi-NEO4 = | ||
| − | {{{1}}} | + | {{{1}}}需要使用USB转串口模块,连接方法如下图所示:<br>[[File:neo4usb2serialport.jpg|frameless|500px]]<br> |
| NanoPi-NEO2 = | | NanoPi-NEO2 = | ||
| − | + | 也可以使用USB转串口模块调试,请注意需要使用5V/2A电源给开发板MicroUSB供电:<br> | |
[[File:USB2UART-NEO2.jpg|frameless|400px]]<br> | [[File:USB2UART-NEO2.jpg|frameless|400px]]<br> | ||
| NanoPi-NEO-Core = | | NanoPi-NEO-Core = | ||
| − | + | 也可以使用USB转串口模块调试,请注意需要使用5V/2A电源给开发板MicroUSB供电:<br> | |
[[File:USB2UART-NEO-Core.jpg|frameless|400px]]<br> | [[File:USB2UART-NEO-Core.jpg|frameless|400px]]<br> | ||
| NanoPi-M1 = | | NanoPi-M1 = | ||
| − | + | 也可以使用USB转串口模块调试,请注意需要使用5V/2A电源给开发板MicroUSB供电:<br> | |
[[File:USB2UART-M1.jpg|frameless|400px]]<br> | [[File:USB2UART-M1.jpg|frameless|400px]]<br> | ||
| NanoPi-M1-Plus = | | NanoPi-M1-Plus = | ||
| − | + | 也可以使用USB转串口模块调试,请注意需要使用5V/2A电源给开发板MicroUSB供电:<br> | |
[[File:USB2UART-M1-Plus.jpg|frameless|400px]]<br> | [[File:USB2UART-M1-Plus.jpg|frameless|400px]]<br> | ||
| NanoPi-Duo = | | NanoPi-Duo = | ||
| − | + | 使用USB转串口模块调试,请注意需要使用5V/2A电源给开发板MicroUSB供电:<br> | |
[[File:USB2UART-Duo.jpg|frameless|400px]]<br> | [[File:USB2UART-Duo.jpg|frameless|400px]]<br> | ||
| NanoPi-Duo2 = | | NanoPi-Duo2 = | ||
| − | + | 使用USB转串口模块调试,请注意需要使用5V/2A电源给开发板MicroUSB供电:<br> | |
[[File:USB2UART-Duo2.jpg|frameless|400px]]<br> | [[File:USB2UART-Duo2.jpg|frameless|400px]]<br> | ||
| NanoPi-NEO-Plus2 = | | NanoPi-NEO-Plus2 = | ||
| − | + | 也可以使用USB转串口模块调试,请注意需要使用5V/2A电源给开发板MicroUSB供电:<br> | |
[[File:USB2UART-NEO-Plus2.jpg|frameless|400px]]<br> | [[File:USB2UART-NEO-Plus2.jpg|frameless|400px]]<br> | ||
| NanoPi-NEO = | | NanoPi-NEO = | ||
| − | + | 也可以使用USB转串口模块调试,请注意需要使用5V/2A电源给开发板MicroUSB供电:<br> | |
[[File:Matrix-USB2UART_nanopi_NEO.jpg|frameless|400px]]<br> | [[File:Matrix-USB2UART_nanopi_NEO.jpg|frameless|400px]]<br> | ||
| NanoPi-NEO-Air = | | NanoPi-NEO-Air = | ||
| − | + | 也可以使用USB转串口模块调试,请注意需要使用5V/2A电源给开发板MicroUSB供电:<br> | |
[[File:Matrix-USB2UART_NEO_Air.jpg|frameless|500px]]<br> | [[File:Matrix-USB2UART_NEO_Air.jpg|frameless|500px]]<br> | ||
| NanoPi-R1 = | | NanoPi-R1 = | ||
| − | + | 也可以使用USB转串口模块调试,请注意需要使用5V/2A电源给开发板MicroUSB供电:<br> | |
[[File:Matrix-USB2UART_nanopi_R1.jpg|frameless|500px]]<br> | [[File:Matrix-USB2UART_nanopi_R1.jpg|frameless|500px]]<br> | ||
| #default = | | #default = | ||
| − | + | 也可以使用USB转串口模块调试,请注意需要使用5V/2A电源给开发板MicroUSB供电。 | |
| + | }} | ||
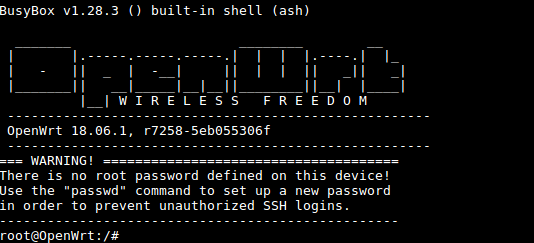
| − | + | 默认会以 root 用户自动登录,并且没有设置root用户的密码,你可以使用 passwd 命令来设置 root 用户的密码。<br /> | |
[[File:op_login.jpg|frameless|500px|op_login]]<br> | [[File:op_login.jpg|frameless|500px|op_login]]<br> | ||
| − | + | 第一次运行系统时,系统会自动拓展TF卡上文件系统分区到最大可用空间:<br> | |
[[File:resize_rootfs_userdata.png|frameless|500px|resize_rootfs_userdata]]<br> | [[File:resize_rootfs_userdata.png|frameless|500px|resize_rootfs_userdata]]<br> | ||
| − | + | 请耐心等待文件系统扩展完成。 | |
| − | * <strong> | + | * <strong>SSH登录</strong> |
{{#switch: {{{1}}} | {{#switch: {{{1}}} | ||
| NanoPi-R1 | | NanoPi-R1 | ||
| Line 108: | Line 110: | ||
| NanoPi-NEO-Plus2 | | NanoPi-NEO-Plus2 | ||
| NanoPi-NEO2 = | | NanoPi-NEO2 = | ||
| − | + | 在本开发板的OpenWrt系统里,有线网络(eth0) 被配置为WAN功能。<br> | |
| − | + | 启动系统前,请先用网线连接板子的有线以太网口到一级路由器的LAN口,以便该以太网(eth0) 能通过DHCP获取到IP地址。<br> | |
| − | + | 这里假设已经通过调试串口或者一级路由器确定板子的以太网(eth0) 的IP地址为192.168.1.163,执行下列命令通过SSH登录系统: | |
<syntaxhighlight lang="text"> | <syntaxhighlight lang="text"> | ||
$ ssh root@192.168.1.163 | $ ssh root@192.168.1.163 | ||
</syntaxhighlight> | </syntaxhighlight> | ||
| − | + | 无需密码,直接就可以登录。 | |
| NanoPi-NEO-Air | | NanoPi-NEO-Air | ||
| NanoPi-Duo2 | | NanoPi-Duo2 | ||
| NanoPi-Duo = | | NanoPi-Duo = | ||
| − | + | 本开发板的OpenWrt系统默认的WiFi AP热点名称类似为“OpenWrt-10:d0:7a:de:3d:92”,网段为192.168.2.x,没有密码,可用手机或者PC机连接该热点,然后执行下列命令SSH登录系统: | |
<syntaxhighlight lang="text"> | <syntaxhighlight lang="text"> | ||
$ ssh root@192.168.2.1 | $ ssh root@192.168.2.1 | ||
</syntaxhighlight> | </syntaxhighlight> | ||
| − | + | 无需密码,直接就可以登录。 | |
}} | }} | ||
| − | * <strong> | + | * <strong>Web登录</strong> |
| − | + | OpenWrt系统支持通过LuCI Web界面进行访问和配置。<br> | |
{{#switch: {{{1}}} | {{#switch: {{{1}}} | ||
| NanoPi-R1 | | NanoPi-R1 | ||
| Line 137: | Line 139: | ||
| NanoPi-NEO-Plus2 | | NanoPi-NEO-Plus2 | ||
| NanoPi-NEO2 = | | NanoPi-NEO2 = | ||
| − | + | 在已完成 <SSH登录> 章节里的设置的基础上,假设板子的有线以太网的IP地址为192.168.1.163,在浏览器中输入该IP地址就可以登录OpenWrt-LuCI界面了:<br> | |
[[File:R1-OpenWrt-LuCI.jpg|frameless|600px|R1-OpenWrt-LuCI]]<br> | [[File:R1-OpenWrt-LuCI.jpg|frameless|600px|R1-OpenWrt-LuCI]]<br> | ||
| NanoPi-NEO-Air | | NanoPi-NEO-Air | ||
| NanoPi-Duo2 | | NanoPi-Duo2 | ||
| NanoPi-Duo = | | NanoPi-Duo = | ||
| − | + | 在已完成<SSH登录>章节里的设置的基础上,在浏览器中输入 192.168.2.1 就可以登录OpenWrt-LuCI界面了:<br> | |
[[File:OpenWrt-LuCI_wlan0.jpg|frameless|600px|OpenWrt-LuCI_wlan0]]<br> | [[File:OpenWrt-LuCI_wlan0.jpg|frameless|600px|OpenWrt-LuCI_wlan0]]<br> | ||
}} | }} | ||
| − | + | 默认用户名为root,无需密码,直接点击"Login"按键即可登录。 | |
===Manage Software Packages=== | ===Manage Software Packages=== | ||
| Line 217: | Line 219: | ||
** [https://openwrt.org/docs/guide-user/additional-software/opkg openwrt opkg] | ** [https://openwrt.org/docs/guide-user/additional-software/opkg openwrt opkg] | ||
| − | === | + | ===查看系统状态=== |
| − | * <strong> | + | * <strong>命令行查看CPU温度和频率</strong> |
<syntaxhighlight lang="text"> | <syntaxhighlight lang="text"> | ||
$ cpu_freq | $ cpu_freq | ||
| Line 229: | Line 231: | ||
CPU3 online=1 temp=26548C governor=ondemand freq=624000KHz | CPU3 online=1 temp=26548C governor=ondemand freq=624000KHz | ||
</syntaxhighlight> | </syntaxhighlight> | ||
| − | + | 上述信息表示当前有4个CPU核在线, 温度均约为26.5摄氏度, 运行的策略均为根据需求来决定运行频率, 当前的运行频率均为624MHz,设置频率的命令如下: | |
<syntaxhighlight lang="text"> | <syntaxhighlight lang="text"> | ||
$ cpu_freq -s 1008000 | $ cpu_freq -s 1008000 | ||
| Line 242: | Line 244: | ||
These messages mean four CPU cores are working online. Each core's temperature is 26.5 degrees. Each core's governor is on demand and the frequency is 480 MHz. | These messages mean four CPU cores are working online. Each core's temperature is 26.5 degrees. Each core's governor is on demand and the frequency is 480 MHz. | ||
| − | * <strong> | + | * <strong>OpenWrt-LuCI Web界面查看系统状态</strong> |
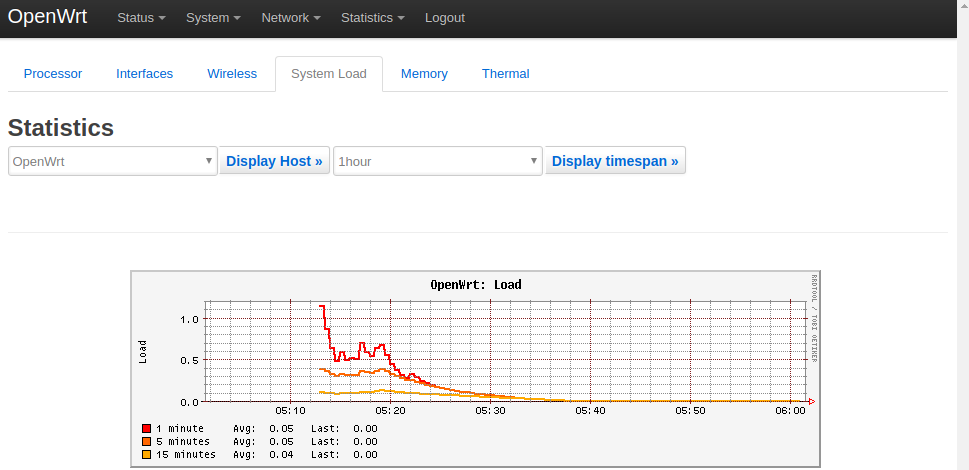
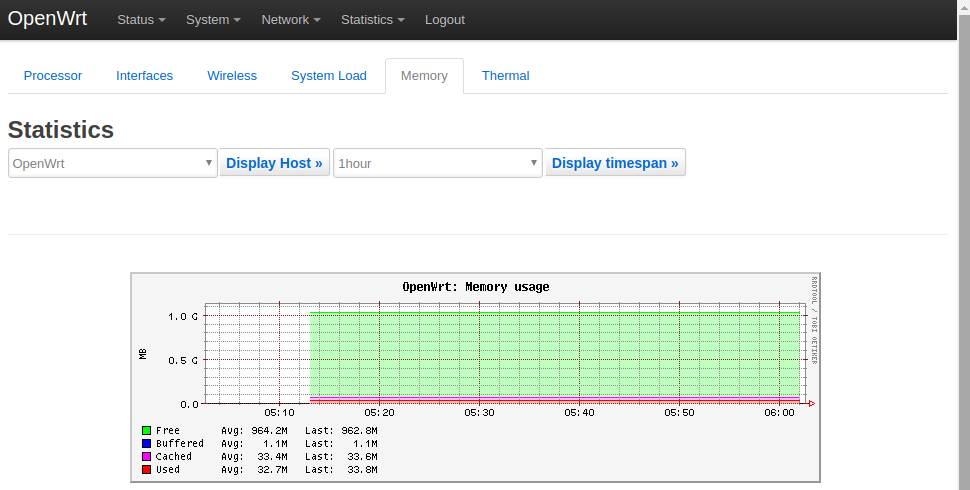
| − | + | 登录OpenWrt-LuCI界面后,点击顶部的 Statistics ---> Graphs,可以查看系统的各种软硬件状态信息(即statistics),例如:<br> | |
1) System Load:<br> | 1) System Load:<br> | ||
[[File:statistics_system_load.png|frameless|600px|statistics_system_load]] <br> | [[File:statistics_system_load.png|frameless|600px|statistics_system_load]] <br> | ||
| Line 250: | Line 252: | ||
3) CPU Temperature:<br> | 3) CPU Temperature:<br> | ||
[[File:statistics_thermal.png|frameless|600px|statistics_thermal]] <br> | [[File:statistics_thermal.png|frameless|600px|statistics_thermal]] <br> | ||
| − | + | Statistics界面对应软件包luci-app-statistics,luci-app-statistics软件包用Collectd工具收集状态数据并且用RRDtool工具将数据渲染为图表。<br> | |
| − | + | 你可以通过安装额外的collectd-mod-*软件包去使能更多的statistics. | |
<!-- | <!-- | ||
The statistics package uses Collectd to gather data and RRDtool to render diagram images. | The statistics package uses Collectd to gather data and RRDtool to render diagram images. | ||
| Line 263: | Line 265: | ||
** [https://openwrt.org/docs/guide-user/perf_and_log/statistic.custom openwrt statistic.custom] | ** [https://openwrt.org/docs/guide-user/perf_and_log/statistic.custom openwrt statistic.custom] | ||
| − | === | + | ===查看Network->Interfaces的配置=== |
| − | * | + | * 登录OpenWrt-LuCI界面后,点击顶部的 Network ---> Interfaces ,可以查看当前的网络设置: <br> |
{{#switch: {{{1}}} | {{#switch: {{{1}}} | ||
| NanoPi-R1 | | NanoPi-R1 | ||
| Line 282: | Line 284: | ||
[[File:op_interface_br.png|frameless|600px|op_interface_br]] <br> | [[File:op_interface_br.png|frameless|600px|op_interface_br]] <br> | ||
}} | }} | ||
| − | * | + | * Network->Interfaces界面的配置保存在/etc/config/network中。<br> |
{{#switch: {{{1}}} | {{#switch: {{{1}}} | ||
| Line 291: | Line 293: | ||
| NanoPi-Duo | | NanoPi-Duo | ||
| NanoPi-NEO-Air = | | NanoPi-NEO-Air = | ||
| − | === | + | ===查看Netwrok->Wireless的配置=== |
| − | * | + | * 登录OpenWrt-LuCI界面后,点击顶部的 Network ---> Wireless,可以查看WiFi 热点的设置界面:<br> |
[[File:op_wireless.jpg|frameless|600px|op_wireless]]<br> | [[File:op_wireless.jpg|frameless|600px|op_wireless]]<br> | ||
| − | + | 默认的WiFi AP热点名称类似为“OpenWrt-10:d0:7a:de:3d:92”,没有密码,手机可以直接连接该热点然后访问互联网。<br> | |
| − | * | + | * Network->Wireless界面的配置保存在/etc/config/wireless中。<br> |
}} | }} | ||
{{#switch: {{{1}}} | {{#switch: {{{1}}} | ||
| NanoPi-R1 = | | NanoPi-R1 = | ||
| − | === | + | ===查看LED的配置=== |
| − | * | + | * 登录OpenWrt-LuCI界面后,点击顶部的 System ---> LED Configuration,可以查看当前LED的功能配置: <br> |
[[File:R1_openwrt_led.png|frameless|600px|R1_openwrt_led]] <br> | [[File:R1_openwrt_led.png|frameless|600px|R1_openwrt_led]] <br> | ||
| − | * | + | * 默认LED的功能配置如下: |
| − | LED1: | + | LED1: 系统心跳灯,如果该LED不闪烁了,则表示系统死机了,必须断电重启系统。<br> |
| − | LED2: | + | LED2: 千兆以太网eth0 WAN口的状态灯,如果WAN口网线连接正常,则LED亮,反之则LED灭。用户可以通过勾选复选框"Transmit" / "Receive"以设置当发送 / 接收到数据时LED闪烁。<br> |
| − | LED3: | + | LED3: 百兆以太网eth1 LAN口的状态灯,如果LAN口网线连接正常,则LED亮,反之则LED灭。用户可以通过勾选复选框"Transmit" / "Receive"以设置当发送 / 接收到数据时LED闪烁。<br> |
| − | * | + | * 相关参考: |
** [https://openwrt.org/docs/guide-user/base-system/led_configuration openwrt led_configuration] | ** [https://openwrt.org/docs/guide-user/base-system/led_configuration openwrt led_configuration] | ||
}} | }} | ||
| Line 313: | Line 315: | ||
{{#switch: {{{1}}} | {{#switch: {{{1}}} | ||
| NanoPi-R1 = | | NanoPi-R1 = | ||
| − | === | + | ===查看BUTTON的配置=== |
| − | + | 本OpenWrt系统使用软件包triggerhappy配置按键的功能,默认的配置为按下按键就会触发系统执行reboot操作。 | |
| − | + | 如果系统发生了异常需要重启,建议使用该按键触发软件reboot,这样可以有效地避免由于断电而造成的文件系统损坏的问题。<br> | |
| − | + | triggerhappy对应的配置文件为/etc/triggerhappy/triggers.d/example.conf。 | |
| − | * | + | * 相关参考: |
** [https://openwrt.org/docs/guide-user/hardware/hardware.button openwrt hardware.button] | ** [https://openwrt.org/docs/guide-user/hardware/hardware.button openwrt hardware.button] | ||
}} | }} | ||
Revision as of 02:08, 6 May 2019
Contents
[hide]1 Work with OpenWrt
1.1 Introduction
OpenWrt is a highly extensible GNU/Linux distribution for embedded devices.Unlike many other distributions for routers, OpenWrt is built from the ground up to be a full-featured, easily modifiable operating system for embedded devices. In practice, this means that you can have all the features you need with none of the bloat, powered by a modern Linux kernel. For more details you can refer to:OpenWrt Website.
1.2 System Login
- 串口登录
如果您需要进行内核开发,最好选购一个串口配件,连接了串口,则可以通过串口终端对开发板进行操作。
使用串口模块能有效地提升开发效率,以下是串口模块的连接方法:
接上串口后,您可以选择从串口模块的DC口或者从MicroUSB口 (如果有) 进行供电。
也可以使用USB转串口模块调试,请注意需要使用5V/2A电源给开发板MicroUSB供电。
默认会以 root 用户自动登录,并且没有设置root用户的密码,你可以使用 passwd 命令来设置 root 用户的密码。
第一次运行系统时,系统会自动拓展TF卡上文件系统分区到最大可用空间:
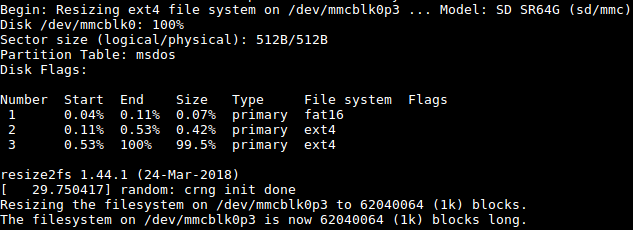
请耐心等待文件系统扩展完成。
- SSH登录
- Web登录
OpenWrt系统支持通过LuCI Web界面进行访问和配置。
默认用户名为root,无需密码,直接点击"Login"按键即可登录。
1.3 Manage Software Packages
OpenWrt has a package management utility: opkg. You can get its details by running the following command:
$ opkg
Package Manipulation:
        update                  Update list of available packages
        upgrade <pkgs>          Upgrade packages
        install <pkgs>          Install package(s)
        configure <pkgs>        Configure unpacked package(s)
        remove <pkgs|regexp>    Remove package(s)
        flag <flag> <pkgs>      Flag package(s)
         <flag>=hold|noprune|user|ok|installed|unpacked (one per invocation)

Informational Commands:
        list                    List available packages
        list-installed          List installed packages
        list-upgradable         List installed and upgradable packages
        list-changed-conffiles  List user modified configuration files
        files <pkg>             List files belonging to <pkg>
        search <file|regexp>    List package providing <file>
        find <regexp>           List packages whose name or description matches <regexp>
        info [pkg|regexp]       Display all info for <pkg>
        status [pkg|regexp]     Display all status for <pkg>
        download <pkg>          Download <pkg> to current directory
...
These are just part of the manual. Here are some popular opkg commands.
- Update Package List
Before you install a package you'd better update the package list:
$ opkg update
- Check Available Packages
$ opkg list
At the time of writing there are 3241 packages available.
- Check Installed Packages:
$ opkg list-installed
At the time of writing 124 packages have been installed.
- Install/Delete Packages:
$ opkg install <pkgs>
$ opkg remove <pkgs>
- Check Files Contained in Installed Packages:
$ opkg files <pkg>
- Install Chinese Language Package for LuCI
$ opkg install luci-i18n-base-zh-cn
- Check Changed Files:
$ opkg list-changed-conffiles
- Reference Links:
1.4 查看系统状态
- 命令行查看CPU温度和频率
$ cpu_freq
Aavailable frequency(KHz):
        480000 624000 816000 1008000
Current frequency(KHz):
        CPU0 online=1 temp=26548C governor=ondemand freq=624000KHz
        CPU1 online=1 temp=26548C governor=ondemand freq=624000KHz
        CPU2 online=1 temp=26548C governor=ondemand freq=624000KHz
        CPU3 online=1 temp=26548C governor=ondemand freq=624000KHz
上述信息表示当前有4个CPU核在线, 温度均约为26.5摄氏度, 运行的策略均为根据需求来决定运行频率, 当前的运行频率均为624MHz,设置频率的命令如下:
$ cpu_freq -s 1008000
Aavailable frequency(KHz):
        480000 624000 816000 1008000
Current frequency(KHz):
        CPU0 online=1 temp=36702C governor=userspace freq=1008000KHz
        CPU1 online=1 temp=36702C governor=userspace freq=1008000KHz
        CPU2 online=1 temp=36702C governor=userspace freq=1008000KHz
        CPU3 online=1 temp=36702C governor=userspace freq=1008000KHz
These messages mean four CPU cores are working online. Each core's temperature is 26.5 degrees. Each core's governor is on demand and the frequency is 480 MHz.
- OpenWrt-LuCI Web界面查看系统状态
登录OpenWrt-LuCI界面后,点击顶部的 Statistics ---> Graphs,可以查看系统的各种软硬件状态信息(即statistics),例如:
1) System Load:
2) RAM:
3) CPU Temperature:
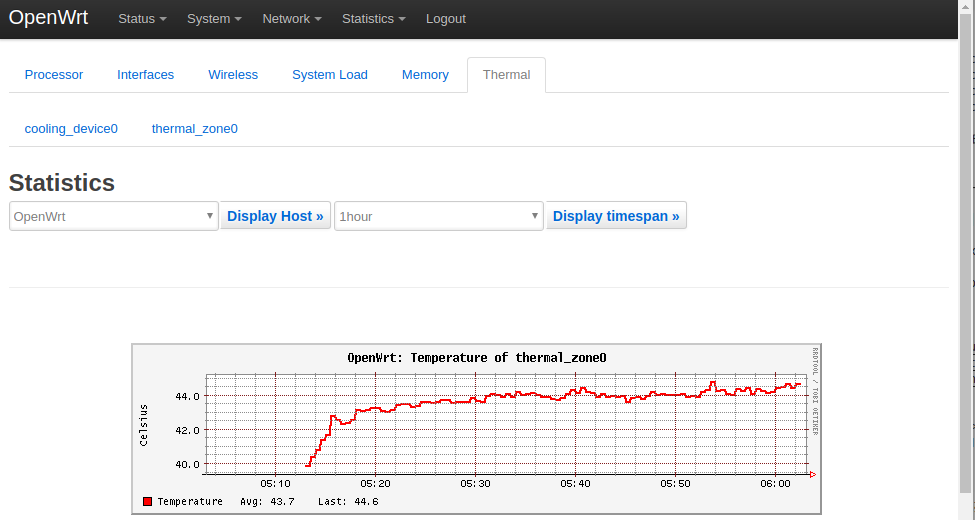
Statistics界面对应软件包luci-app-statistics,luci-app-statistics软件包用Collectd工具收集状态数据并且用RRDtool工具将数据渲染为图表。
你可以通过安装额外的collectd-mod-*软件包去使能更多的statistics.
All collectd-mod-* packages use the same configuration file: /etc/config/luci_statistics.
- Reference Links:
1.5 查看Network->Interfaces的配置
- 登录OpenWrt-LuCI界面后,点击顶部的 Network ---> Interfaces ,可以查看当前的网络设置:
- Network->Interfaces界面的配置保存在/etc/config/network中。