Difference between revisions of "Matrix - Temperature Sensor"
| Line 1: | Line 1: | ||
[[Matrix - Temperature Sensor/zh|查看中文]] | [[Matrix - Temperature Sensor/zh|查看中文]] | ||
| − | + | ==Introduction== | |
| − | == | + | |
[[File:TemperatureSensor01.png|thumb|Temperature Sensor]] | [[File:TemperatureSensor01.png|thumb|Temperature Sensor]] | ||
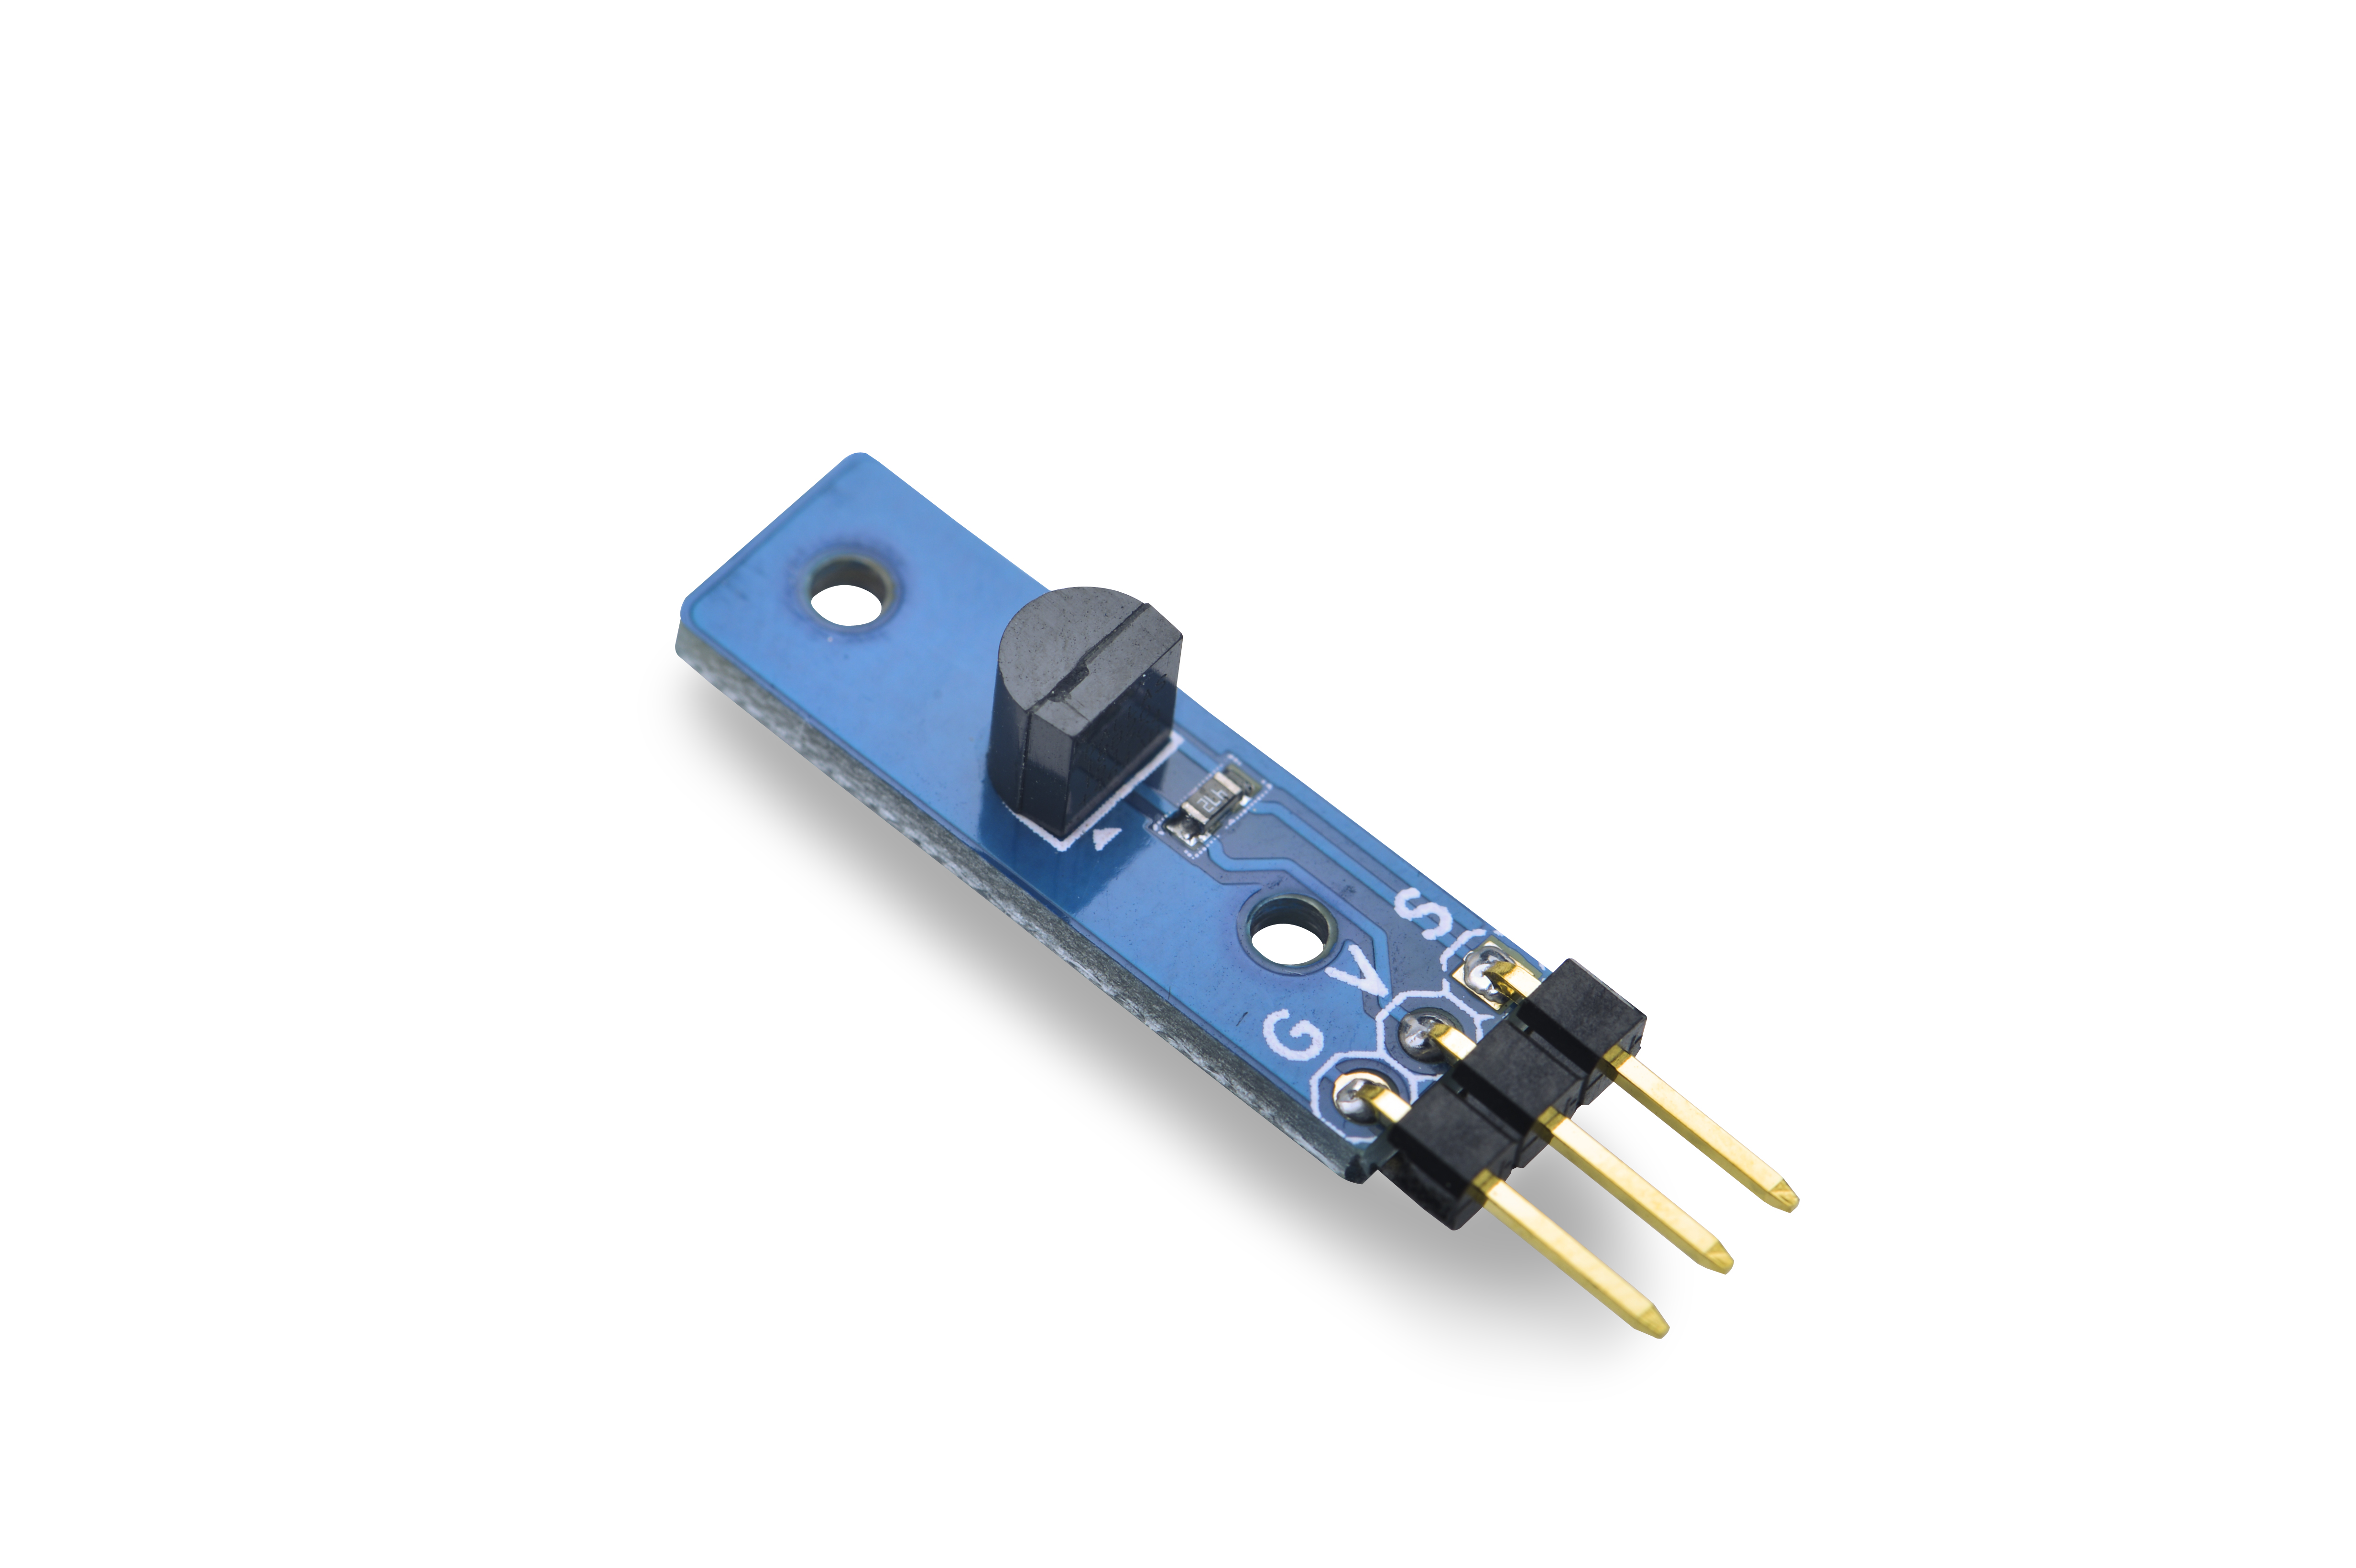
| − | * | + | * The matrix-temperature_sensor module is used to measure temperature. |
* 搭载了一颗非常流行的TO-92封装的DS18B20芯片。从DS18B20读出的信息或写入DS18B20的信息仅需要一根口线(单线接口)读写,温度变换功率来源于数据总线,总线本身也可以向所挂接的DS18B20供电。DSl820的电源可以由数据线本身提供而不需要外部电源,因为每一个DSl820在出厂时已经给定了唯一的序列号。 | * 搭载了一颗非常流行的TO-92封装的DS18B20芯片。从DS18B20读出的信息或写入DS18B20的信息仅需要一根口线(单线接口)读写,温度变换功率来源于数据总线,总线本身也可以向所挂接的DS18B20供电。DSl820的电源可以由数据线本身提供而不需要外部电源,因为每一个DSl820在出厂时已经给定了唯一的序列号。 | ||
* 测量范围是-55摄氏度到+125摄氏度,可选9-bit或12-bit,在-10摄氏度到+85摄氏度时可以精确到0.5度,采用一线协议通讯。我们把DS18B20的3个针脚全部引出,V对应电源引脚,G对应地引脚,S对应数据引脚。 | * 测量范围是-55摄氏度到+125摄氏度,可选9-bit或12-bit,在-10摄氏度到+85摄氏度时可以精确到0.5度,采用一线协议通讯。我们把DS18B20的3个针脚全部引出,V对应电源引脚,G对应地引脚,S对应数据引脚。 | ||
| + | |||
| + | |||
| + | We utilitze the DS18B20 in this module. The DS18B20 can be powered from its data line. Each DS18B20 is assigned a unique ID. Its temperature range is -55 degree Celsius to +125 degree Celsius. The thermometer resolution is programmable from 9 to 12 bits. When the measured temperature is between -10 degree Celsius to +85 degree Celsius the accuracy can be at 0.5 degree. It uses the unique 1-wire interface which requires only one port pin for communication. Among all three DS18B20 pins V is power, G is ground and S is data. | ||
| + | |||
==特性== | ==特性== | ||
Revision as of 02:38, 18 September 2015
Contents
1 Introduction
- The matrix-temperature_sensor module is used to measure temperature.
- 搭载了一颗非常流行的TO-92封装的DS18B20芯片。从DS18B20读出的信息或写入DS18B20的信息仅需要一根口线(单线接口)读写,温度变换功率来源于数据总线,总线本身也可以向所挂接的DS18B20供电。DSl820的电源可以由数据线本身提供而不需要外部电源,因为每一个DSl820在出厂时已经给定了唯一的序列号。
- 测量范围是-55摄氏度到+125摄氏度,可选9-bit或12-bit,在-10摄氏度到+85摄氏度时可以精确到0.5度,采用一线协议通讯。我们把DS18B20的3个针脚全部引出,V对应电源引脚,G对应地引脚,S对应数据引脚。
We utilitze the DS18B20 in this module. The DS18B20 can be powered from its data line. Each DS18B20 is assigned a unique ID. Its temperature range is -55 degree Celsius to +125 degree Celsius. The thermometer resolution is programmable from 9 to 12 bits. When the measured temperature is between -10 degree Celsius to +85 degree Celsius the accuracy can be at 0.5 degree. It uses the unique 1-wire interface which requires only one port pin for communication. Among all three DS18B20 pins V is power, G is ground and S is data.
2 特性
- -55摄氏度到+125摄氏度
- 一线协议
- 体积小巧, 带固定孔,方便嵌入到外壳
- 2.54mm排针接口,接线方便,通用性强
- PCB尺寸(mm):8X24
- 引脚说明:
| 名称 | 描述 |
| S | GPIO |
| V | 电源5V |
| G | 地 |
3 工作原理
DS18B20低温度系数晶振的振荡频率受温度影响很小,用于产生固定频率的脉冲信号送给计数器1。高温度系数晶振随温度变化其振荡率明显改变,所产生的信号作为计数器2的脉冲输入。计数器1和温度寄存器被预置在-55℃所对应的一个基数值。计数器1对低温度系数晶振产生的脉冲信号进行减法计数,当计数器1的预置值减到0时,温度寄存器的值将加1,计数器1的预置将重新被装入,计数器1重新开始对低温度系数晶振产生的脉冲信号进行计数,如此循环直到计数器2计数到0时,停止温度寄存器值的累加,此时温度寄存器中的数值即为所测温度。
4 下载Matrix源码
Matrix配件相关的代码是完全开源的,统一由一个仓库进行管理:git://github.com/friendlyarm/matrix.git
该仓库里不同的分支代表着Matrix配件所支持的不同开发板。
- nanopi分支包含了Matrix对NanoPi的支持;
- tiny4412分支包含了Matrix对Tiny4412的支持;
- raspberrypi分支包含了Matrix对RaspberryPi的支持;
在主机PC上安装git,以Ubuntu14.04为例
$ sudo apt-get install git
克隆Matrix配件代码仓库
$ git clone git://github.com/friendlyarm/matrix.git
克隆完成后会得到一个matrix目录,里面存放着所有Matrix配件的代码。
5 与NanoPi连接使用
5.1 准备工作
在NanoPi上运行Debian系统,然后在主机PC上安装并使用相应的编译器。参考wiki:NanoPi
注意:必须使用nanopi-v4.1.y-matrix分支编译出来的内核。
下载NanoPi内核源代码并编译
$ git clone https://github.com/friendlyarm/linux-4.x.y.git
$ cd linux-4.x.y
$ git checkout nanopi-v4.1.y-matrix
$ make nanopi_defconfig
$ touch .scmversion
$ make
5.2 硬件连接
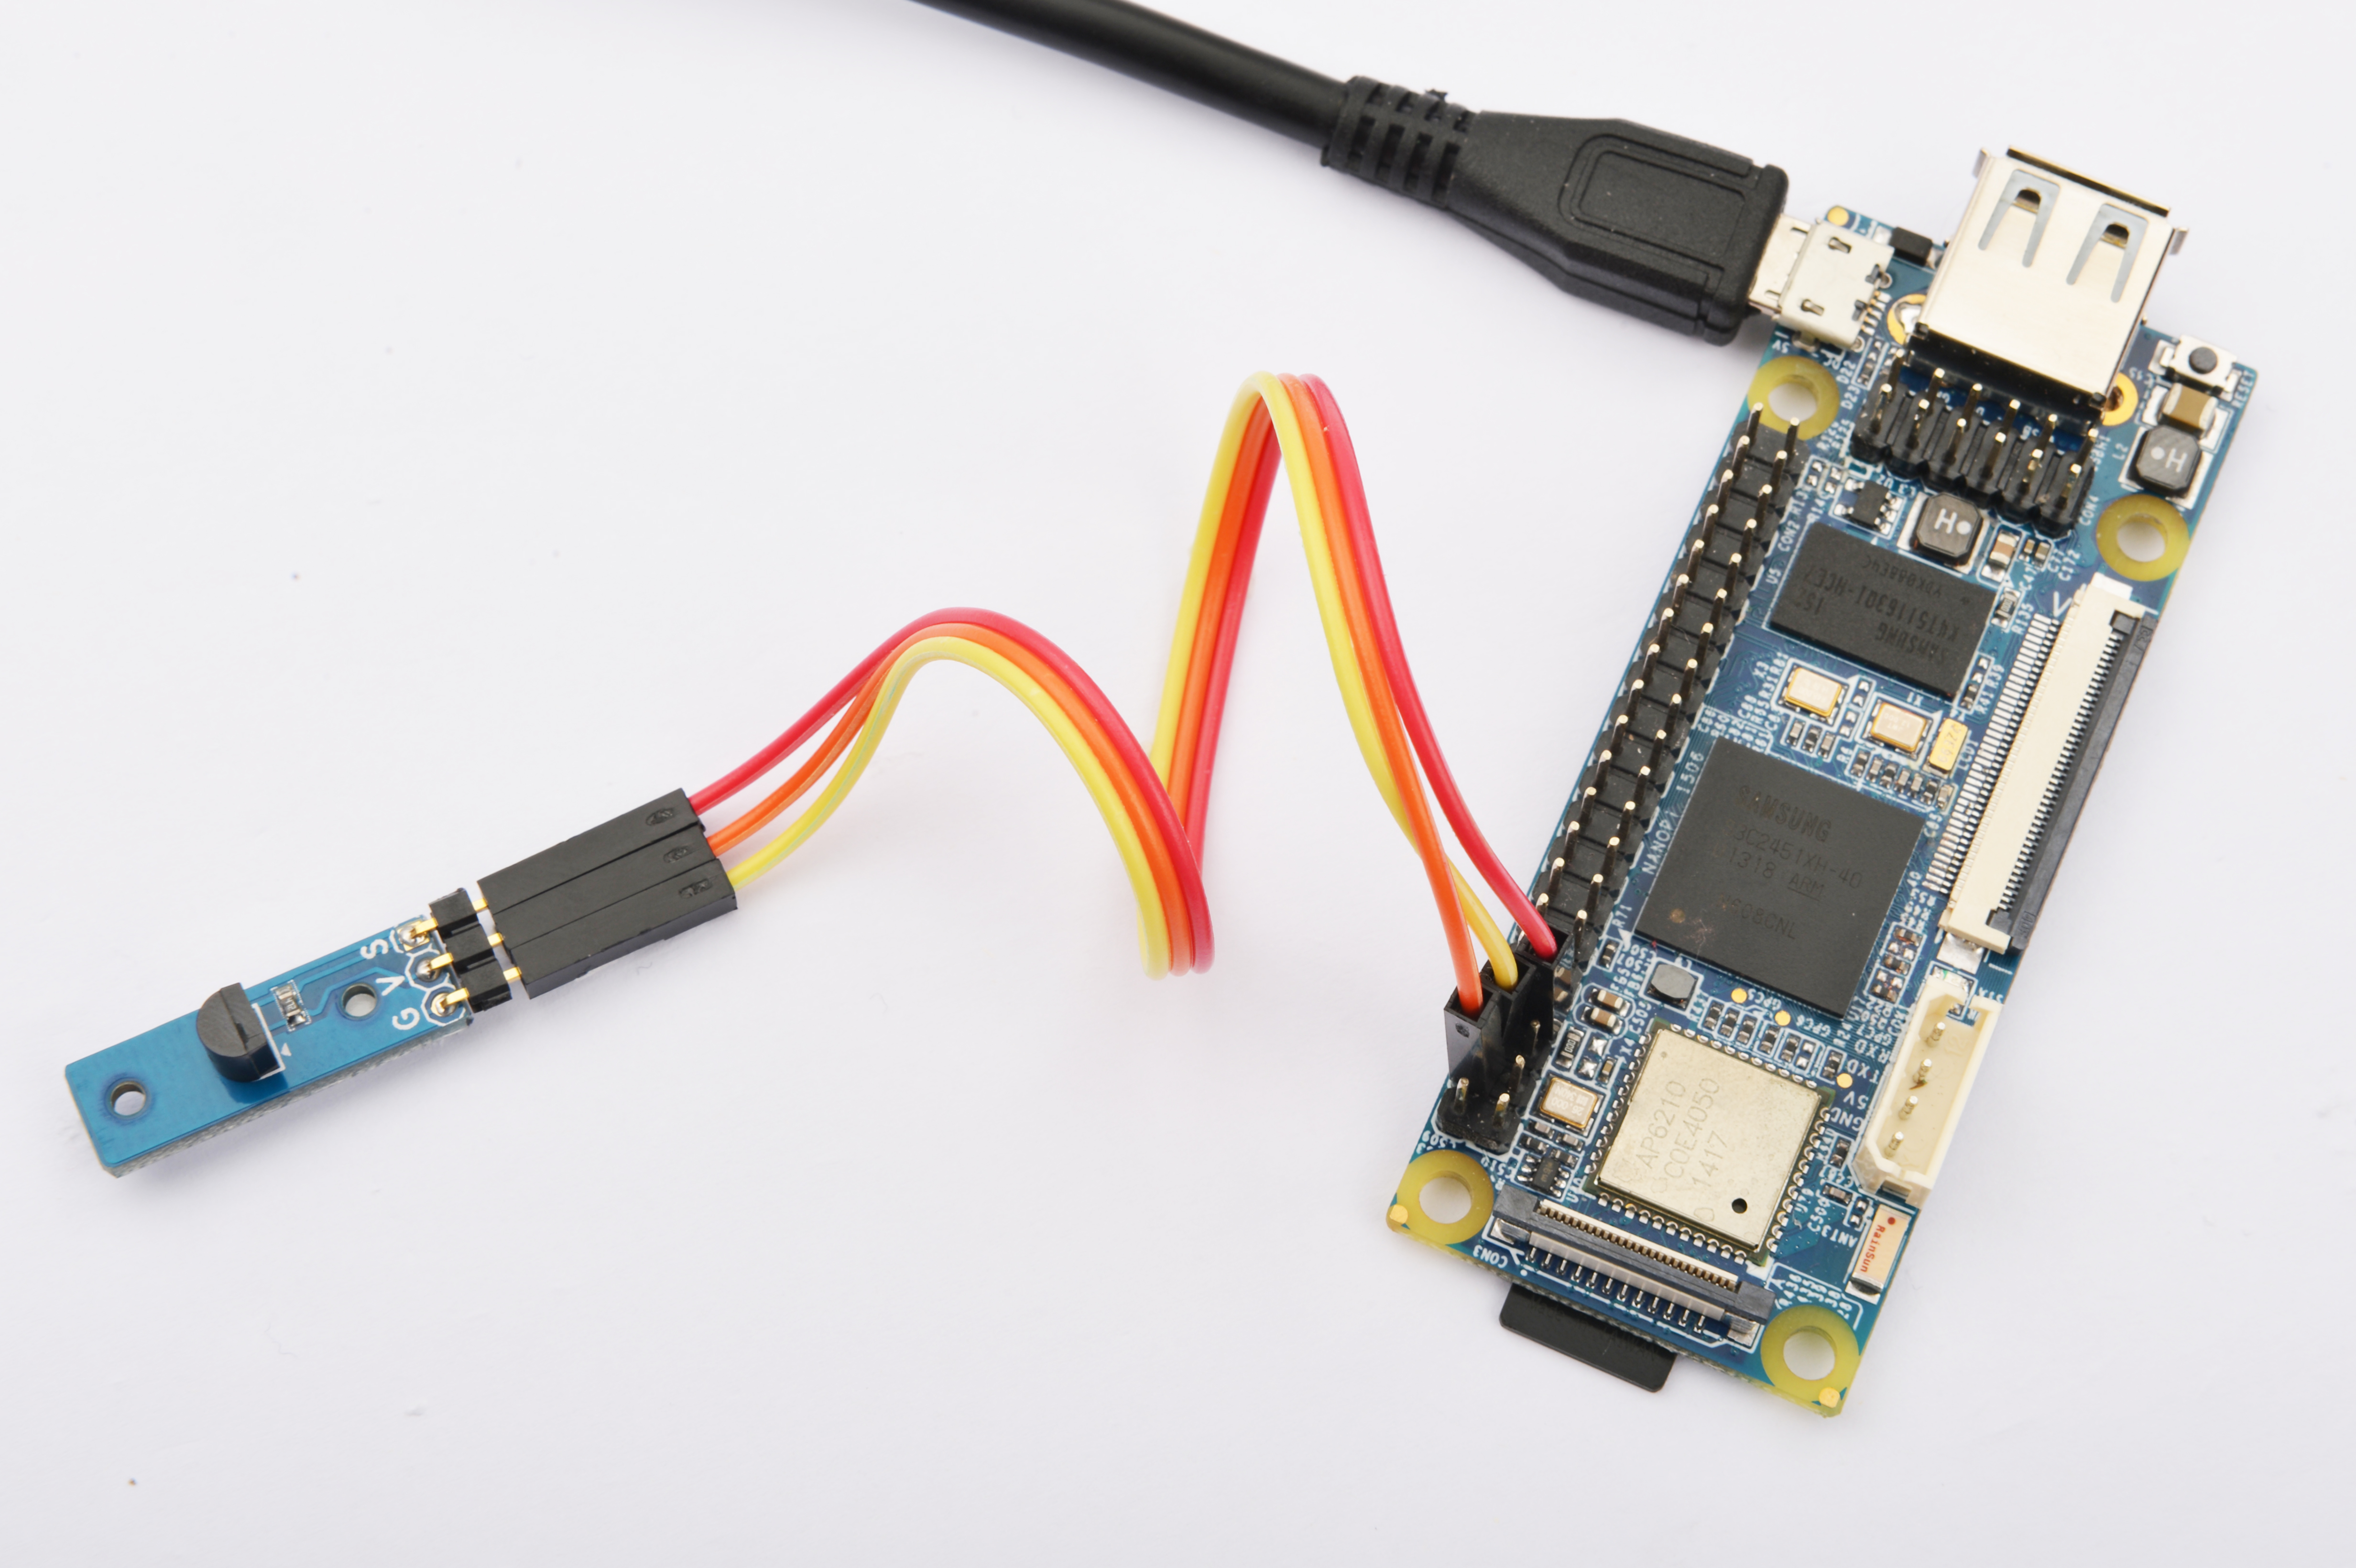
参考下图连接模块Matrix-Temperature_Sensor和NanoPi

连接说明:
| Matrix-Temperature Sensor | NanoPi |
| S | Pin7 |
| V | Pin4 |
| G | Pin6 |
5.3 编译测试程序
进入Matrix代码仓库,切换到nanopi分支
$ cd matrix
$ git checkout nanopi
编译Matrix配件代码
$ make CROSS_COMPILE=arm-linux- clean
$ make CROSS_COMPILE=arm-linux-
$ make CROSS_COMPILE=arm-linux- install
注意:请确保你的主机PC当前使用的交叉编译器为NanoPi-Debian配套的arm-linux-gcc-4.4.3。
编译出来的库文件位于install/lib目录下,而测试程序则位于install/usr/bin目录下,模块Matrix-Temperature_Sensor对应的测试程序为matrix-temperature_sensor。
5.4 运行测试程序
拷贝库文件和测试程序到NanoPi的文件系统上
$ cp install/usr/bin/* nanopi_rootfs/usr/bin/
$ cp install/lib/* nanopi_rootfs/lib/ -d
然后启动NanoPi,在Debian的shell终端中执行如下命令运行模块Matrix-Temperature_Sensor的测试程序
注意:此模块并不支持热插拔,启动系统前需要确保硬件正常连接。
$ matrix-temperature_sensor5.5 代码展示
int main(int argc, char ** argv)
{
    int devFD = -1;
    int pin = GPIO_PIN1;
    char *temperature = (char *) malloc(32);
    memset(temperature, 0, 32);

    if (argc == 2) {
        parseCmd(argc, argv, &pin);
    } else {
        printf("Using default pin GPIO_PIN1\n");
    }

    if ((devFD = ds18b20Init(pin)) == -1) {
        printf("Fail to init ds18b20\n");
        return -1;
    }
    if (ds18b20Read(temperature) > 0) {
        printf("Temperature = %s\n", temperature);
    } else {
        printf("Fail to get temperature\n");
    }
    free(temperature);
    ds18b20DeInit(devFD);
    return 0;
}
6 与Tiny4412连接使用
6.1 准备工作
参考Tiny4412光盘里的《友善之臂Ubuntu使用手册》,在Tiny4412上运行UbuntuCore系统,然后在主机PC上安装并使用相应的编译器。
注意:只能使用Tiny4412SDK-1506的底板。
6.2 硬件连接
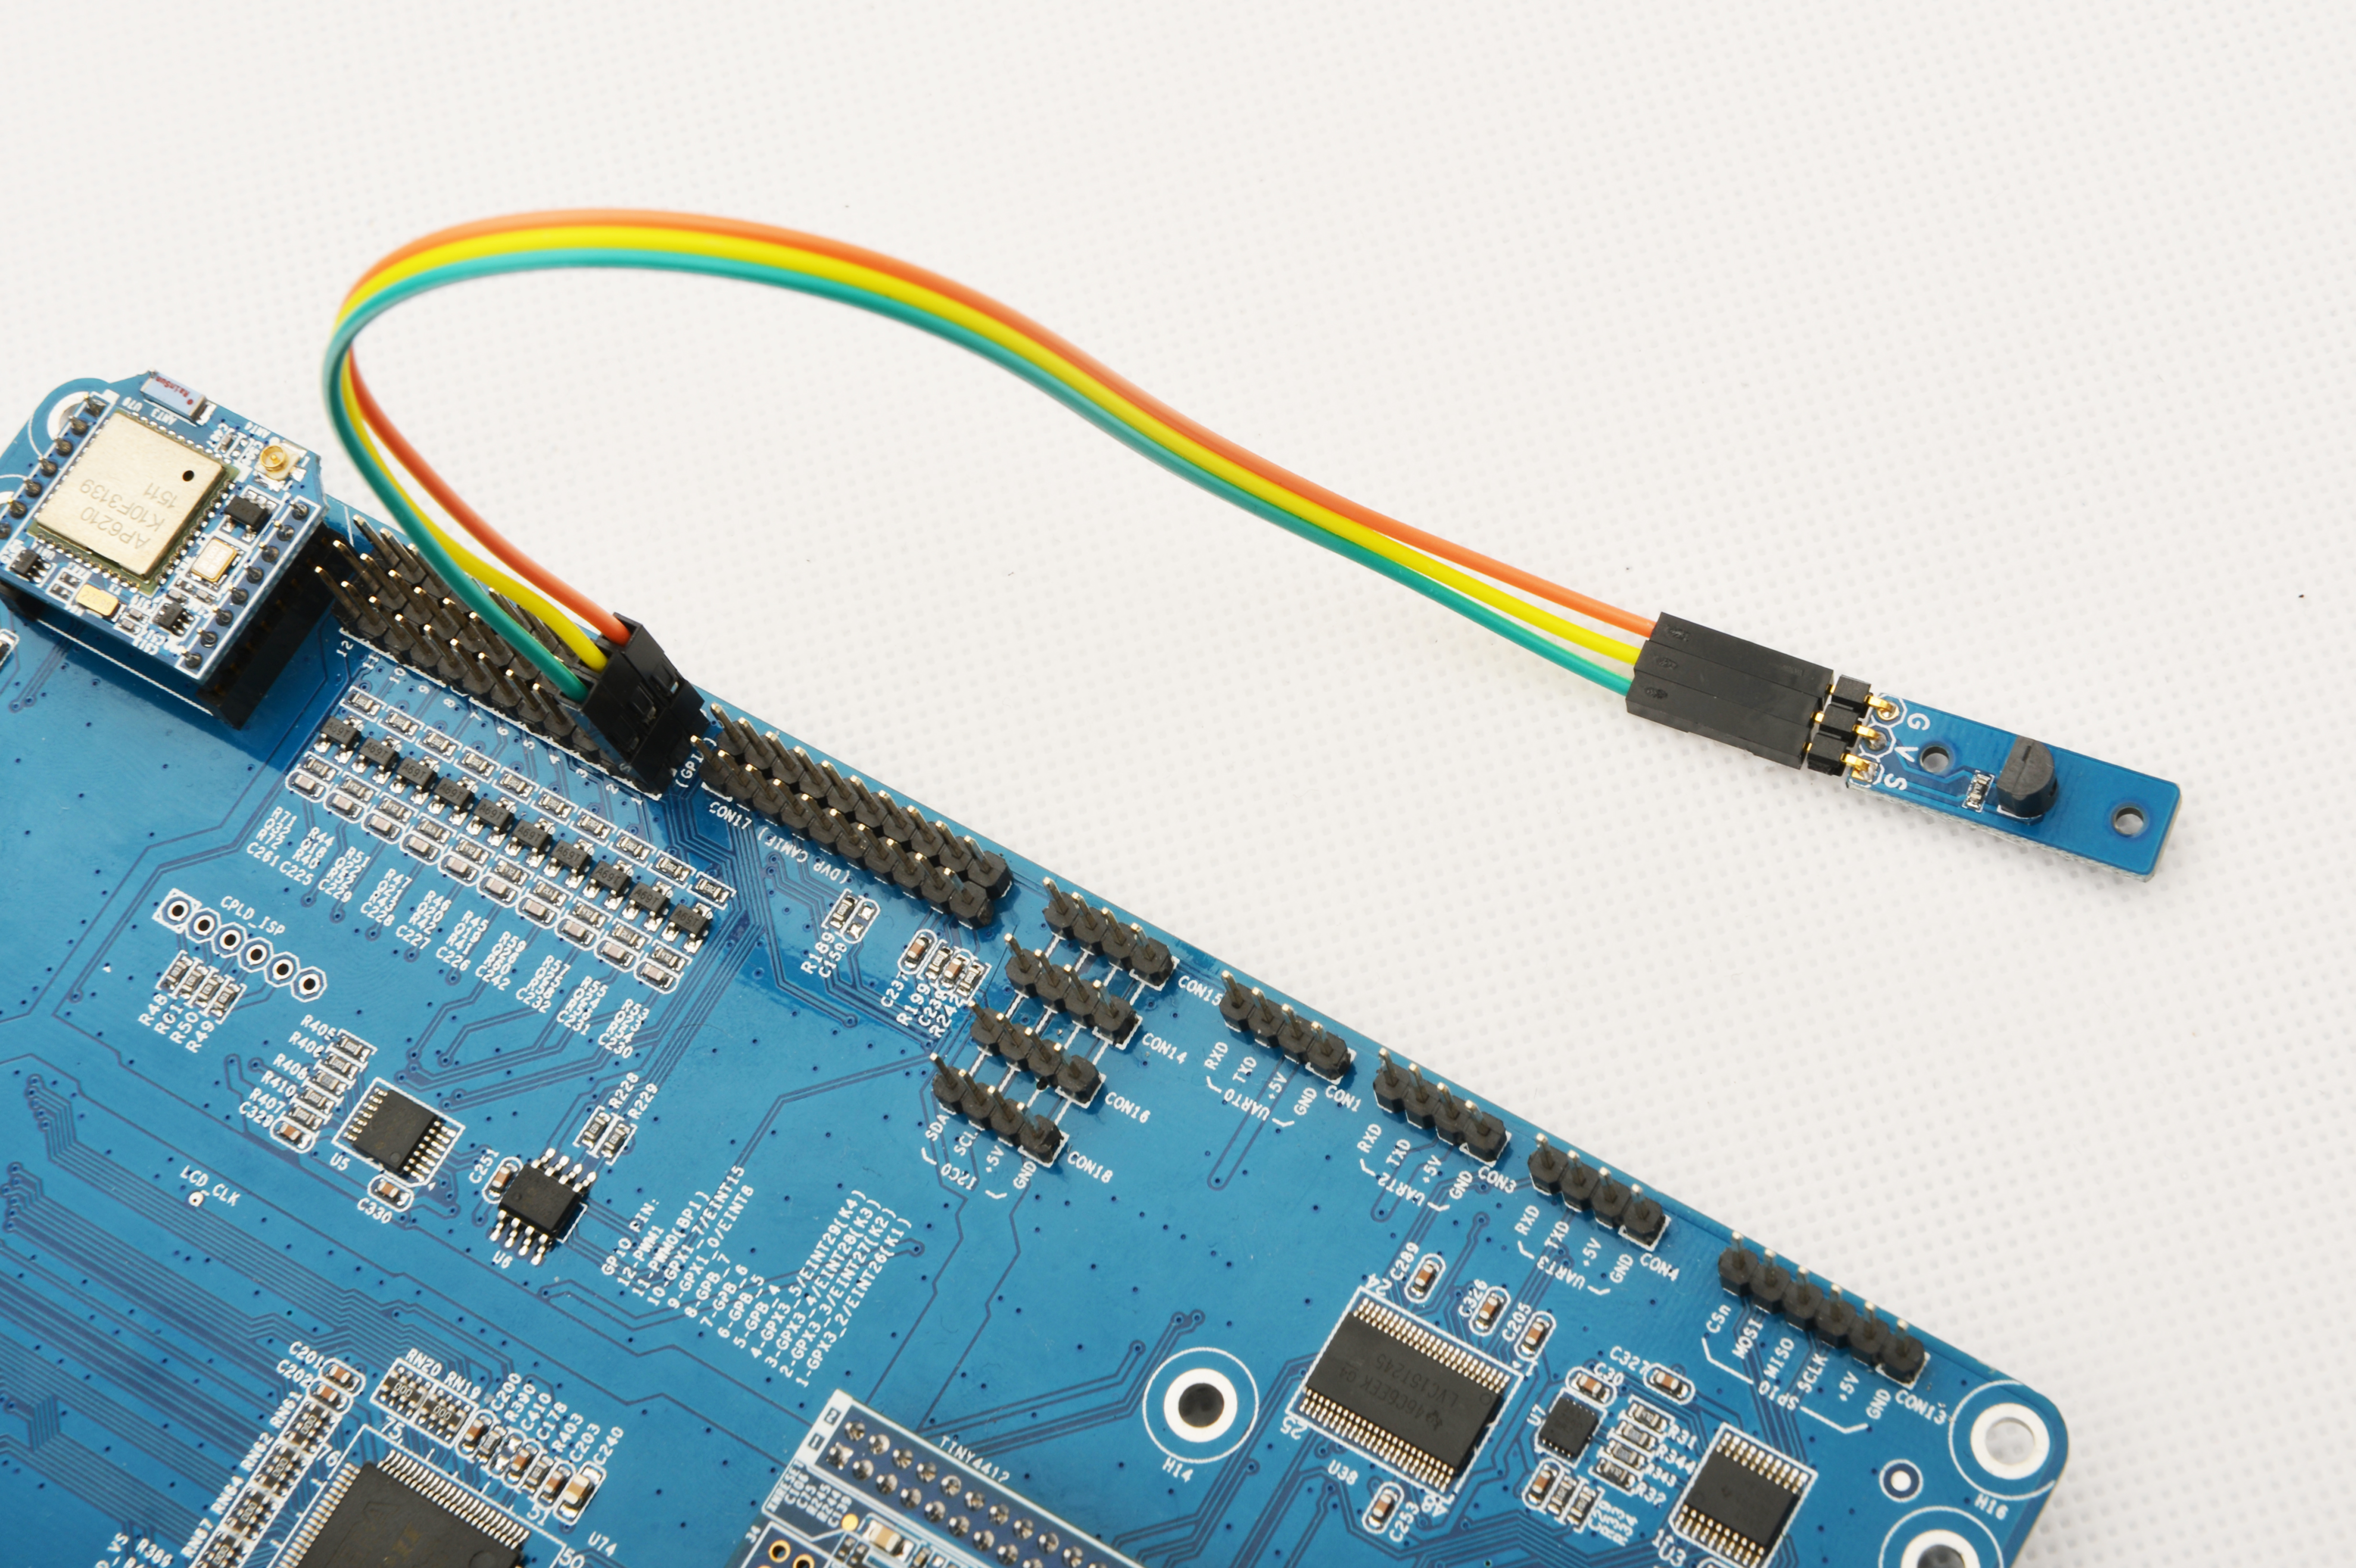
参考下图连接模块Matrix-Temperature_Sensor和Tiny4412

连接说明:
| Matrix-Temperature Sensor | Tiny4412 |
| S | GPIO1 S |
| V | GPIO1 5V |
| G | GPIO1 GND |
6.3 编译测试程序
进入Matrix代码仓库,切换到tiny4412分支
$ cd matrix
$ git checkout tiny4412
编译Matrix配件代码
$ make CROSS_COMPILE=arm-linux-gnueabihf- clean
$ make CROSS_COMPILE=arm-linux-gnueabihf-
$ make CROSS_COMPILE=arm-linux-gnueabihf- install
注意:请确保你的主机PC当前使用的交叉编译器为Tiny4412-UbuntuCore配套的arm-linux-gnueabihf-gcc-4.7.3。
编译出来的库文件位于install/lib目录下,而测试程序则位于install/usr/bin目录下,模块Matrix-Temperature_Sensor对应的测试程序为matrix-temperature_sensor。
6.4 运行测试程序
拷贝库文件和测试程序到Tiny4412的UbuntuCore的文件系统上
$ cp install/usr/bin/* tiny4412_rootfs/usr/bin/
$ cp install/lib/* tiny4412_rootfs/lib/ -d
然后启动Tiny4412,在UbuntuCore的shell终端中执行如下命令运行模块Matrix-Temperature_Sensor的测试程序
注意:此模块并不支持热插拔,启动系统前需要确保硬件正常连接。
$ matrix-temperature_sensor6.5 代码展示
int main(int argc, char ** argv)
{
    int devFD = -1;
    int pin = GPIO_PIN1;
    char *temperature = (char *) malloc(32);
    memset(temperature, 0, 32);

    if (argc == 2) {
        parseCmd(argc, argv, &pin);
    } else {
        printf("Using default pin GPIO_PIN1\n");
    }

    if ((devFD = ds18b20Init(pin)) == -1) {
        printf("Fail to init ds18b20\n");
        return -1;
    }
    if (ds18b20Read(temperature) > 0) {
        printf("Temperature = %s\n", temperature);
    } else {
        printf("Fail to get temperature\n");
    }
    free(temperature);
    ds18b20DeInit(devFD);
    return 0;
}
7 与RaspberryPi连接使用
8 与Arduino连接使用
9 相关资料

