Difference between revisions of "Template:BurnLinuxToEMMC-Allwinner"
From FriendlyELEC WiKi
(updated by API) |
(updated by API) |
||
| (9 intermediate revisions by 2 users not shown) | |||
| Line 1: | Line 1: | ||
| − | ===== | + | =====Flash to eMMC===== |
======Flash OS with eflasher Utility====== | ======Flash OS with eflasher Utility====== | ||
* For more details about eflasher refer to the wiki link: [[EFlasher|EFlasher]]。 | * For more details about eflasher refer to the wiki link: [[EFlasher|EFlasher]]。 | ||
* Extract the eflasher Image and win32diskimager.rar files. Insert a TF card(at least 4G) into a Windows PC and run the win32diskimager utility as administrator. On the utility's main window select your TF card's drive, the wanted image file and click on "write" to start flashing the TF card. | * Extract the eflasher Image and win32diskimager.rar files. Insert a TF card(at least 4G) into a Windows PC and run the win32diskimager utility as administrator. On the utility's main window select your TF card's drive, the wanted image file and click on "write" to start flashing the TF card. | ||
* Insert this card into your board's BOOT slot and power on (with a 5V/2A power source). If the green LED is on and the blue LED is blinking this indicates your board has successfully booted. | * Insert this card into your board's BOOT slot and power on (with a 5V/2A power source). If the green LED is on and the blue LED is blinking this indicates your board has successfully booted. | ||
| − | |||
| − | |||
| − | |||
| − | |||
| − | |||
| − | |||
| − | |||
| − | |||
* If your board doesn't support HDMI or no monitor is connected you can select an OS by running the following command: | * If your board doesn't support HDMI or no monitor is connected you can select an OS by running the following command: | ||
<syntaxhighlight lang="bash"> | <syntaxhighlight lang="bash"> | ||
| Line 17: | Line 9: | ||
$ eflasher | $ eflasher | ||
</syntaxhighlight> | </syntaxhighlight> | ||
| + | The password for "root" is "fa". <br> | ||
| − | {{#switch: {{{ | + | {{#switch: {{{2}}} |
| − | + | | h3 = | |
| − | + | We take "{{#replace:{{lc:{{{1}}}}}|category:|}}_eflasher_friendlycore-xenial_4.14_armhf_YYYYMMDD.img" as an example. After you run the "eflasher" command you will see the following messages:<br> | |
| − | + | | h5 = | |
| − | + | We take "{{#replace:{{lc:{{{1}}}}}|category:|}}_eflasher_friendlycore-xenial_4.14_arm64_YYYYMMDD.img" as an example. After you run the "eflasher" command you will see the following messages:<br> | |
| − | + | ||
| − | + | ||
| − | + | ||
| − | + | ||
| − | + | ||
| − | + | ||
}} | }} | ||
| − | + | ||
| − | + | [[File:eflasher_friendlycore1.jpg|frameless|600px|eflasher_friendlycore1]]<br> | |
| − | {{#switch: {{{ | + | Type "1", select writing friendlycore system to eMMC you will see the following messages:<br> |
| − | + | ||
| − | [[File: | + | {{#switch: {{{2}}} |
| + | | h3 = | ||
| + | [[File:eflasher_friendlycore2_h3.jpg|frameless|600px|eflasher_friendlycore2_h3]]<br> | ||
| + | | h5 = | ||
| + | [[File:eflasher_friendlycore2_h5.jpg|frameless|600px|eflasher_friendlycore2_h5]]<br> | ||
}} | }} | ||
| + | Type "yes" to start installation:<br> | ||
| + | [[File:eflasher_friendlycore3.jpg|frameless|600px|eflasher_friendlycore3]]<br> | ||
| + | After it is done power off the system, take off the TF card, power on again your system will be booted from eMMC. | ||
| + | * If you want to flash other system to eMMC you can download the whole images-for-eflasher directory and extract the package under that directory to the FRIENDLYARM partition of an installation SD card.<br> | ||
| + | {{#switch: {{{2}}} | ||
| + | | h3 = | ||
| + | [[File:eflasher_friendlyarm_h3.jpg|frameless|600px|eflasher_friendlyarm_h3]]<br> | ||
| + | | h5 = | ||
| + | [[File:eflasher_friendlyarm_h5.jpg|frameless|600px|eflasher_friendlyarm_h5]]<br> | ||
| + | }} | ||
{{#switch: {{{1}}} | {{#switch: {{{1}}} | ||
Latest revision as of 02:26, 20 August 2020
1 Flash to eMMC
1.1 Flash OS with eflasher Utility
- For more details about eflasher refer to the wiki link: EFlasher。
- Extract the eflasher Image and win32diskimager.rar files. Insert a TF card(at least 4G) into a Windows PC and run the win32diskimager utility as administrator. On the utility's main window select your TF card's drive, the wanted image file and click on "write" to start flashing the TF card.
- Insert this card into your board's BOOT slot and power on (with a 5V/2A power source). If the green LED is on and the blue LED is blinking this indicates your board has successfully booted.
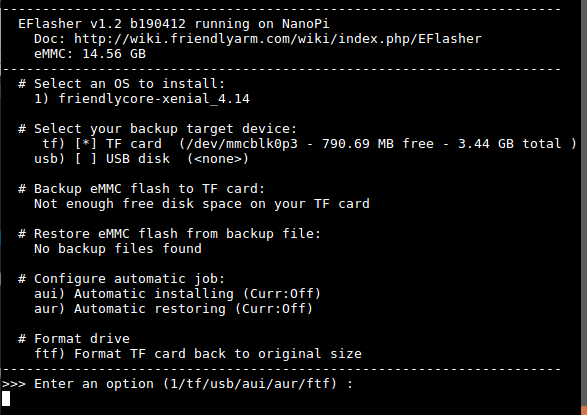
- If your board doesn't support HDMI or no monitor is connected you can select an OS by running the following command:
$ su root
$ eflasher
The password for "root" is "fa".

Type "1", select writing friendlycore system to eMMC you will see the following messages:
Type "yes" to start installation:

After it is done power off the system, take off the TF card, power on again your system will be booted from eMMC.
- If you want to flash other system to eMMC you can download the whole images-for-eflasher directory and extract the package under that directory to the FRIENDLYARM partition of an installation SD card.