Difference between revisions of "RPi.GPIO : NanoPi NEO/NEO2/Air GPIO Programming with Python"
(→支持RPi.GPIO_NP的开发板型号及固件列表) |
(updated by API) |
||
| (20 intermediate revisions by 3 users not shown) | |||
| Line 1: | Line 1: | ||
| − | + | [[RPi.GPIO : NanoPi NEO/NEO2/Air GPIO Programming with Python/zh|查看中文]] | |
| − | + | ==Introduction to RPi.GPIO_NP== | |
| − | + | ||
| − | + | ||
| − | + | For users to easily access GPIO with python FriendlyElec integrated RPi.GPIO in the FriendlyCore images for the NanoPi H3/H5.<br/> | |
| + | RPi.GPIO is a famous library in python for Raspberry Pi. FriendlyElec ported it to the NanoPi H3/H5's FriendlyCore images and renamed it as RPi.GPIO_NP.<br/> | ||
| + | Most RPi.GPIO_NP's APIs are the same as those of RPi.GPIO and you can refer to https://pypi.python.org/pypi/RPi.GPIO for more details.<br/> | ||
| − | RPi. | + | ==Install RPi.GPIO_NP== |
| + | The RPi.GPIO_NP library is integrated in all the FriendlyCore images that are and will be released after June 5, 2017. Therefore for images released after this date no installation is needed.<br /> | ||
| + | Source code:https://github.com/friendlyarm/RPi.GPIO_NP | ||
| − | == | + | ==Code Sample with RPi.GPIO_NP== |
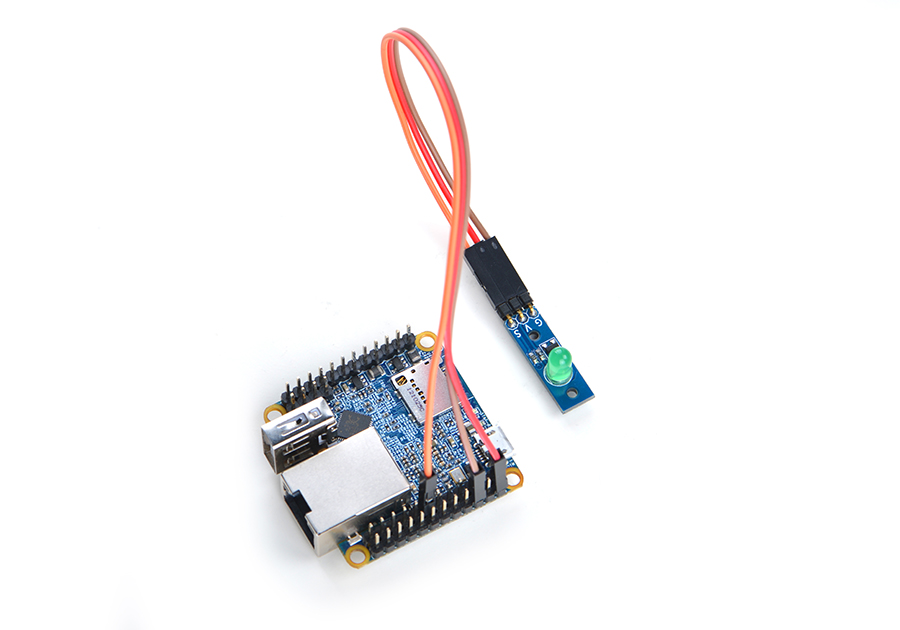
| − | + | Here is code sample on how to access a NanoPi NEO2. A [[Matrix - LED]] is connected to a NanoPi NEO2 in the following hardware setup:<br /> | |
| − | + | ||
| − | + | ||
| − | + | ||
| − | + | ||
| − | + | ||
| − | + | ||
| − | + | ||
| − | + | ||
| − | + | ||
| − | + | ||
| − | + | ||
| − | + | ||
| − | + | ||
| − | + | ||
[[File:WiringNP-LED-Demo.jpg|frameless|300px|WiringNP-LED-Demo]]<br /> | [[File:WiringNP-LED-Demo.jpg|frameless|300px|WiringNP-LED-Demo]]<br /> | ||
| − | + | Pin Connection:<br /> | |
{| class="wikitable" | {| class="wikitable" | ||
|- | |- | ||
| − | |Matrix-LED || NanoPi | + | |Matrix-LED || NanoPi NEO2 |
|- | |- | ||
|S || Pin7 | |S || Pin7 | ||
| Line 38: | Line 26: | ||
|} | |} | ||
| − | + | The code sample shows how to make an LED blink in Python<br /> | |
| − | + | Pin 7 is accessed in this code sample:<br /> | |
| − | === | + | ===Code Sample in Python=== |
| − | + | Create a source file in Python: | |
<syntaxhighlight lang="bash"> | <syntaxhighlight lang="bash"> | ||
vi led.py | vi led.py | ||
</syntaxhighlight> | </syntaxhighlight> | ||
| − | + | Type in the following lines: | |
<syntaxhighlight lang="python"> | <syntaxhighlight lang="python"> | ||
#!/usr/bin/env python | #!/usr/bin/env python | ||
| Line 61: | Line 49: | ||
time.sleep(1) | time.sleep(1) | ||
</syntaxhighlight> | </syntaxhighlight> | ||
| − | + | Run led.py: | |
<syntaxhighlight lang="bash"> | <syntaxhighlight lang="bash"> | ||
chmod +x led.py | chmod +x led.py | ||
sudo ./led.py | sudo ./led.py | ||
</syntaxhighlight> | </syntaxhighlight> | ||
| − | + | The LED module will blink if you do everything right. | |
| + | |||
| + | ==Update Log== | ||
| + | ===June-7-2017=== | ||
| + | * Released English Version | ||
Latest revision as of 07:33, 31 March 2023
Contents
1 Introduction to RPi.GPIO_NP
For users to easily access GPIO with python FriendlyElec integrated RPi.GPIO in the FriendlyCore images for the NanoPi H3/H5.
RPi.GPIO is a famous library in python for Raspberry Pi. FriendlyElec ported it to the NanoPi H3/H5's FriendlyCore images and renamed it as RPi.GPIO_NP.
Most RPi.GPIO_NP's APIs are the same as those of RPi.GPIO and you can refer to https://pypi.python.org/pypi/RPi.GPIO for more details.
2 Install RPi.GPIO_NP
The RPi.GPIO_NP library is integrated in all the FriendlyCore images that are and will be released after June 5, 2017. Therefore for images released after this date no installation is needed.
Source code:https://github.com/friendlyarm/RPi.GPIO_NP
3 Code Sample with RPi.GPIO_NP
Here is code sample on how to access a NanoPi NEO2. A Matrix - LED is connected to a NanoPi NEO2 in the following hardware setup:

Pin Connection:
| Matrix-LED | NanoPi NEO2 |
| S | Pin7 |
| V | Pin4 |
| G | Pin6 |
The code sample shows how to make an LED blink in Python
Pin 7 is accessed in this code sample:
3.1 Code Sample in Python
Create a source file in Python:
vi led.pyType in the following lines:
#!/usr/bin/env python
import RPi.GPIO as GPIO
import time
PIN_NUM = 7

GPIO.setmode(GPIO.BOARD)
GPIO.setup(PIN_NUM,GPIO.OUT)
while True:
        GPIO.output(PIN_NUM,True)
        time.sleep(1)
        GPIO.output(PIN_NUM,False)
        time.sleep(1)
Run led.py:
chmod +x led.py
sudo ./led.py
The LED module will blink if you do everything right.
4 Update Log
4.1 June-7-2017
- Released English Version