Difference between revisions of "RPi.GPIO : NanoPi NEO/NEO2/Air GPIO Programming with Python"
(→Applicable Board Types and Image Files) |
(→RPi.GPIO_NP示例) |
||
| Line 25: | Line 25: | ||
|} | |} | ||
| − | ==RPi. | + | ==Code Samples with RPi.GPIO_NP== |
| − | + | Here is code sample on how to access a NanoPi NEO2. A [[Matrix - LED]] is connected to a NanoPi NEO2 in the following hardware setup:<br /> | |
[[File:WiringNP-LED-Demo.jpg|frameless|300px|WiringNP-LED-Demo]]<br /> | [[File:WiringNP-LED-Demo.jpg|frameless|300px|WiringNP-LED-Demo]]<br /> | ||
| − | + | Pin Connection:<br /> | |
{| class="wikitable" | {| class="wikitable" | ||
|- | |- | ||
| − | |Matrix-LED || NanoPi | + | |Matrix-LED || NanoPi NEO2 |
|- | |- | ||
|S || Pin7 | |S || Pin7 | ||
| Line 40: | Line 40: | ||
|} | |} | ||
| − | + | The code sample shows how to make an LED blink in Python<br /> | |
| − | + | Pin 7 is accessed in this code sample:<br /> | |
| − | === | + | ===Code Sample in Python=== |
| − | + | Create a source file in Python: | |
<syntaxhighlight lang="bash"> | <syntaxhighlight lang="bash"> | ||
vi led.py | vi led.py | ||
</syntaxhighlight> | </syntaxhighlight> | ||
| − | + | Type in the following lines: | |
<syntaxhighlight lang="python"> | <syntaxhighlight lang="python"> | ||
#!/usr/bin/env python | #!/usr/bin/env python | ||
| Line 63: | Line 63: | ||
time.sleep(1) | time.sleep(1) | ||
</syntaxhighlight> | </syntaxhighlight> | ||
| − | + | Run led.py: | |
<syntaxhighlight lang="bash"> | <syntaxhighlight lang="bash"> | ||
chmod +x led.py | chmod +x led.py | ||
sudo ./led.py | sudo ./led.py | ||
</syntaxhighlight> | </syntaxhighlight> | ||
| − | + | The LED module will blink if you do everything right. | |
Revision as of 13:22, 7 June 2017
Contents
1 Introduction to RPi.GPIO_NP
For users to easily access GPIO with python FriendlyElec integrated RPi.GPIO in the UbuntuCore image for the NanoPi NEO/NEO2.
RPi.GPIO is a famous library in python for Raspberry Pi. FriendlyElec ported it to the NanoPi NEO/NEO2's UbuntuCore and renamed it as RPi.GPIO_NP.
Most RPi.GPIO_NP's APIs are the same as those of RPi.GPIO and you can refer to https://pypi.python.org/pypi/RPi.GPIO for more details.
2 Install RPi.GPIO_NP
The RPi.GPIO_NP library is integrated in all the UbuntuCore images that are and will be released after June 5, 2017. Therefore for images released after this date no installation is needed.
3 Applicable Board Types and Image Files
Here is a table which lists all the board types and image files that work with RPi.GPIO. These image files are under the "official-ROMs" directories of the corresponding download links:
Board Type Image File Download Link 1 Download Link 2 NanoPi NEO2 nanopi-neo2_ubuntu-core-xenial_4.11.0_YYYYMMDD.img.zip baidu MediaFire NanoPi NEO nanopi-neo_ubuntu-core-xenial_4.11.0_YYYYMMDD.img.zip baidu MediaFire NanoPi NEO Air nanopi-neo-air_ubuntu-core-xenial_4.11.0_YYYYMMDD.img.zip baidu MediaFire
4 Code Samples with RPi.GPIO_NP
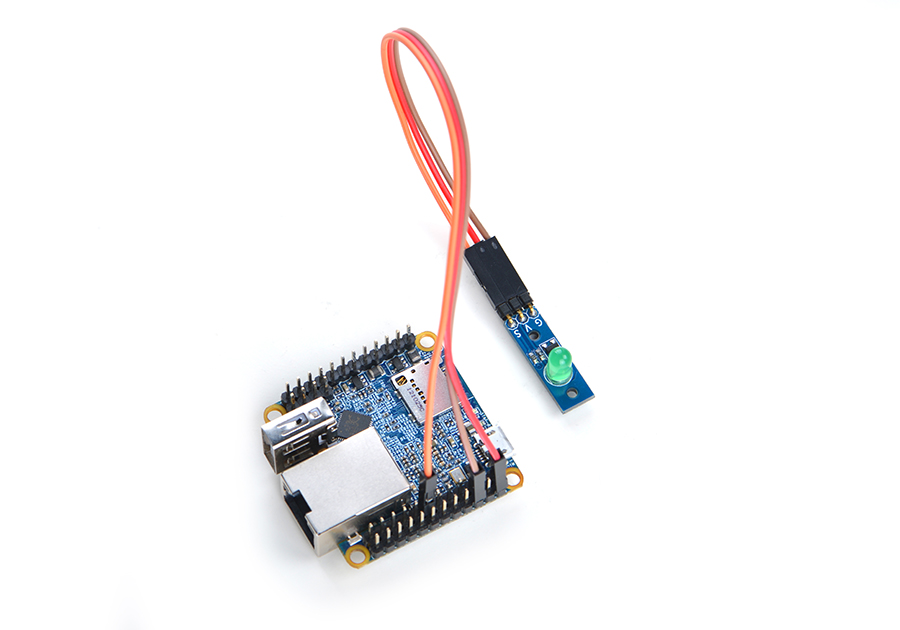
Here is code sample on how to access a NanoPi NEO2. A Matrix - LED is connected to a NanoPi NEO2 in the following hardware setup:

Pin Connection:
| Matrix-LED | NanoPi NEO2 |
| S | Pin7 |
| V | Pin4 |
| G | Pin6 |
The code sample shows how to make an LED blink in Python
Pin 7 is accessed in this code sample:
4.1 Code Sample in Python
Create a source file in Python:
vi led.pyType in the following lines:
#!/usr/bin/env python
import RPi.GPIO as GPIO
import time
PIN_NUM = 7

GPIO.setmode(GPIO.BOARD)
GPIO.setup(PIN_NUM,GPIO.OUT)
while True:
        GPIO.output(PIN_NUM,True)
        time.sleep(1)
        GPIO.output(PIN_NUM,False)
        time.sleep(1)
Run led.py:
chmod +x led.py
sudo ./led.py
The LED module will blink if you do everything right.