Difference between revisions of "How to setup RTMP server on NanoPC-T4"
(updated by API) |
(→Check Audio Device) |
||
| (15 intermediate revisions by 2 users not shown) | |||
| Line 1: | Line 1: | ||
| − | [[How to setup RTMP server on NanoPC-T4/zh| | + | [[How to setup RTMP server on NanoPC-T4/zh|查看中文]] |
| − | == | + | ==Introduction== |
| − | + | This article gives basic steps on how to use a RK3399 based board under Linux to collect real-time video stream data and push the data to a RTMP server which a user can visit and watch the video stream.<br /> | |
| − | + | All the steps presented in this article are verifies with the following OS systems:<br /> | |
* '''FriendlyCore''' | * '''FriendlyCore''' | ||
* '''FriendlyDesktop''' | * '''FriendlyDesktop''' | ||
| − | == | + | ==Setup a RTMP Server== |
| − | + | You will use a RK3399 board as a RTMP server. You need to install the nginx and nginx-rtmp-module packages by running the following commands: | |
<syntaxhighlight lang="bash"> | <syntaxhighlight lang="bash"> | ||
sudo apt-get update | sudo apt-get update | ||
| Line 31: | Line 31: | ||
sudo make install | sudo make install | ||
</syntaxhighlight> | </syntaxhighlight> | ||
| − | + | Check nginx's version and whether it is installed: | |
<syntaxhighlight lang="bash"> | <syntaxhighlight lang="bash"> | ||
nginx -v | nginx -v | ||
</syntaxhighlight> | </syntaxhighlight> | ||
| − | == | + | ==Configure a RTMP Server== |
| − | + | Open and edit the nginx's configuration file: | |
<syntaxhighlight lang="bash"> | <syntaxhighlight lang="bash"> | ||
sudo vim /etc/nginx/nginx.conf | sudo vim /etc/nginx/nginx.conf | ||
</syntaxhighlight> | </syntaxhighlight> | ||
| − | + | Append the following lines in the file: | |
<syntaxhighlight lang="bash"> | <syntaxhighlight lang="bash"> | ||
rtmp { | rtmp { | ||
| Line 54: | Line 54: | ||
} | } | ||
</syntaxhighlight> | </syntaxhighlight> | ||
| − | + | Restart the nginx service and activate its configuration: | |
<syntaxhighlight lang="bash"> | <syntaxhighlight lang="bash"> | ||
sudo systemctl restart nginx | sudo systemctl restart nginx | ||
</syntaxhighlight> | </syntaxhighlight> | ||
| − | == | + | ==Test RTMP Server== |
| − | + | Before you begin to use your RTMP server to get stream data you need to make sure it works: | |
<syntaxhighlight lang="bash"> | <syntaxhighlight lang="bash"> | ||
gst-launch-1.0 videotestsrc is-live=true ! videoconvert ! x264enc bitrate=1000 tune=zerolatency ! \ | gst-launch-1.0 videotestsrc is-live=true ! videoconvert ! x264enc bitrate=1000 tune=zerolatency ! \ | ||
| Line 66: | Line 66: | ||
rtmpsink sync=false location='rtmp://192.168.1.122:1935/live/test' | rtmpsink sync=false location='rtmp://192.168.1.122:1935/live/test' | ||
</syntaxhighlight> | </syntaxhighlight> | ||
| − | + | Under Ubuntu run the following rtmpdump command to retrieve stream data: | |
<syntaxhighlight lang="bash"> | <syntaxhighlight lang="bash"> | ||
rtmpdump -r "rtmp://192.168.1.122/live/test" -V -z -o out.flv | rtmpdump -r "rtmp://192.168.1.122/live/test" -V -z -o out.flv | ||
</syntaxhighlight> | </syntaxhighlight> | ||
| − | + | If it can get data continuously and the output file out.flv can be played it means your RTMP server works. | |
| − | == | + | ==Push Pictures Captured by OV13850 Camera to RMTP Server== |
| − | + | There are two commands of which one only shows images but doesn't output audio and the other plays complete audio and video.<br /> | |
| − | + | The one that only shows images but doesn't output audio: | |
<syntaxhighlight lang="bash"> | <syntaxhighlight lang="bash"> | ||
gst-launch-1.0 rkisp io-mode=4 device=/dev/video0 ! \ | gst-launch-1.0 rkisp io-mode=4 device=/dev/video0 ! \ | ||
| Line 81: | Line 81: | ||
rtmpsink sync=false location='rtmp://192.168.1.122:1935/live/test' | rtmpsink sync=false location='rtmp://192.168.1.122:1935/live/test' | ||
</syntaxhighlight> | </syntaxhighlight> | ||
| − | + | The other that plays both audio and video: | |
<syntaxhighlight lang="bash"> | <syntaxhighlight lang="bash"> | ||
gst-launch-1.0 rkisp io-mode=4 device=/dev/video0 ! \ | gst-launch-1.0 rkisp io-mode=4 device=/dev/video0 ! \ | ||
| Line 91: | Line 91: | ||
</syntaxhighlight> | </syntaxhighlight> | ||
| − | == | + | ==Push Pictures Captured by Logitech C922 Pro Camera to RMTP Server== |
| − | === | + | ===Check USB Camera Node=== |
| − | + | Run the following command to check the USB camera device node: | |
<syntaxhighlight lang="bash"> | <syntaxhighlight lang="bash"> | ||
uvcdynctrl -l | uvcdynctrl -l | ||
</syntaxhighlight> | </syntaxhighlight> | ||
| − | + | We used a Logitech C922 Pro camera and we can get the pictures captured by it from /dev/video8 : | |
<syntaxhighlight lang="bash"> | <syntaxhighlight lang="bash"> | ||
video8 C922 Pro Stream Webcam | video8 C922 Pro Stream Webcam | ||
</syntaxhighlight> | </syntaxhighlight> | ||
| − | === | + | ===Check Available Formats for USB Camera=== |
| − | + | Install necessary utilities: | |
<syntaxhighlight lang="bash"> | <syntaxhighlight lang="bash"> | ||
sudo apt install v4l-utils | sudo apt install v4l-utils | ||
</syntaxhighlight> | </syntaxhighlight> | ||
| − | + | You can run the following command to check the available formats for a USB camera. For a RK3399 board you can focus on the MJPG format and its resolution and frame rate: | |
<syntaxhighlight lang="bash"> | <syntaxhighlight lang="bash"> | ||
sudo v4l2-ctl --list-formats-ext -d /dev/video8 | sudo v4l2-ctl --list-formats-ext -d /dev/video8 | ||
</syntaxhighlight> | </syntaxhighlight> | ||
| − | + | Note: the device node on your board might not be "/dev/video8" you need to make sure to use the node on your device. | |
| − | === | + | ===Play Real-Time Video with USB Camera=== |
| − | + | Run the following command: | |
<syntaxhighlight lang="bash"> | <syntaxhighlight lang="bash"> | ||
gst-launch-1.0 v4l2src device=/dev/video8 ! "image/jpeg,width=1280,height=720,framerate=30/1" ! jpegdec ! videoconvert ! queue ! mpph264enc ! queue ! h264parse ! flvmux streamable=true ! queue ! rtmpsink sync=false location='rtmp://192.168.1.122:1935/live/test' | gst-launch-1.0 v4l2src device=/dev/video8 ! "image/jpeg,width=1280,height=720,framerate=30/1" ! jpegdec ! videoconvert ! queue ! mpph264enc ! queue ! h264parse ! flvmux streamable=true ! queue ! rtmpsink sync=false location='rtmp://192.168.1.122:1935/live/test' | ||
</syntaxhighlight> | </syntaxhighlight> | ||
| − | == | + | ==Play Video Stream== |
| − | === | + | ===Play on Smart Phone=== |
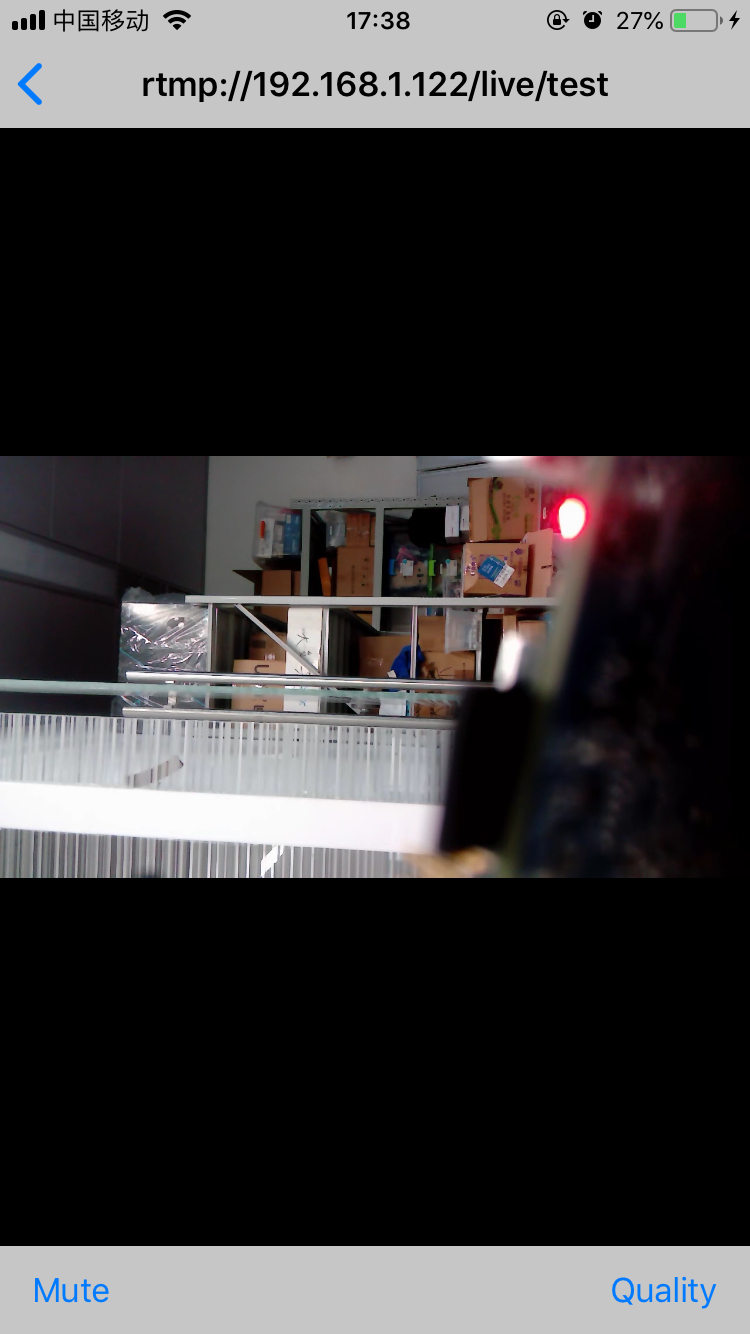
| − | + | If you use an iPhone you can install the SLDP Player utility which is free. Open this address "rtmp://192.168.1.122/live/test" with the utility and you will be able to view real-time video:<br /> | |
[[File:Rk3399-iphone-rtmp.jpg|frameless|250px]] | [[File:Rk3399-iphone-rtmp.jpg|frameless|250px]] | ||
| − | === | + | ===Play on Web Page=== |
| − | + | We will create a web page and play a video on the page. Here are the steps: | |
<syntaxhighlight lang="bash"> | <syntaxhighlight lang="bash"> | ||
mkdir -p ~/strobe_src | mkdir -p ~/strobe_src | ||
| Line 132: | Line 132: | ||
sudo cp -r for\ Flash\ Player\ 10.1 /var/www/html/strobe | sudo cp -r for\ Flash\ Player\ 10.1 /var/www/html/strobe | ||
</syntaxhighlight> | </syntaxhighlight> | ||
| − | + | Open and edit the /var/www/html/index.html file and add the following contents. Note: you need to replace the IP address with your actual IP address which can be obtained by running the ifconfig command: | |
<syntaxhighlight lang="html4strict"> | <syntaxhighlight lang="html4strict"> | ||
<!DOCTYPE html PUBLIC "-//W3C//DTD XHTML 1.0 Strict//EN" "http://www.w3.org/TR/xhtml1/DTD/xhtml1-strict.dtd"> | <!DOCTYPE html PUBLIC "-//W3C//DTD XHTML 1.0 Strict//EN" "http://www.w3.org/TR/xhtml1/DTD/xhtml1-strict.dtd"> | ||
| Line 176: | Line 176: | ||
</html> | </html> | ||
</syntaxhighlight> | </syntaxhighlight> | ||
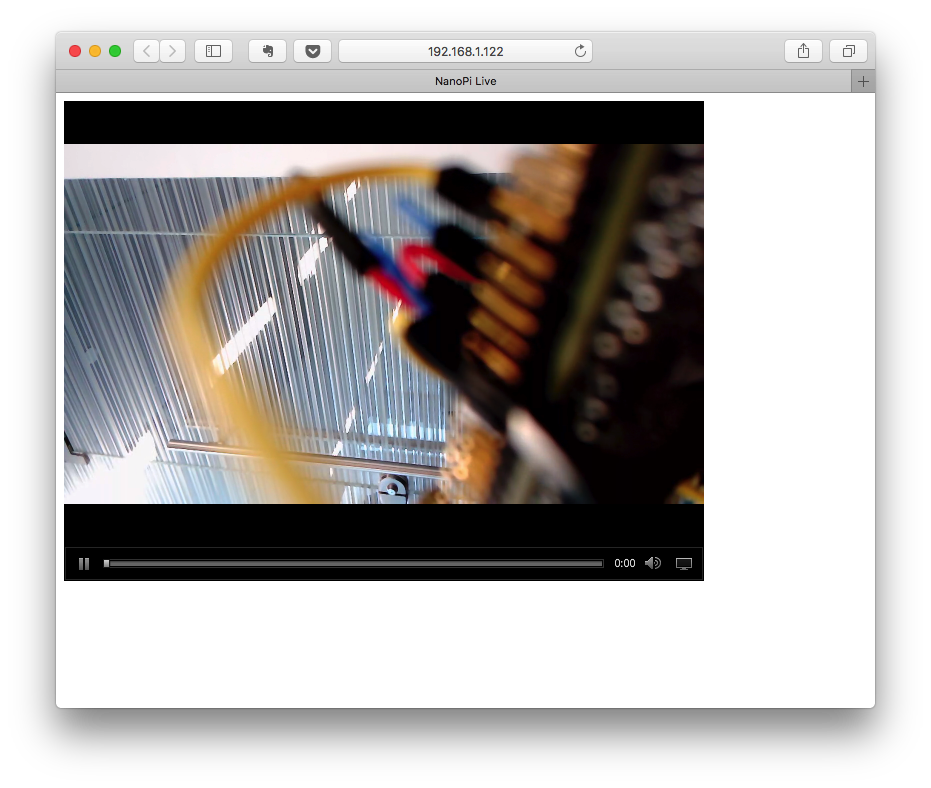
| − | + | Open a browser on a host PC and type the IP address in the browser's address bar and you will play a video. Here is what you will get:<br /> | |
[[File:Rk3399-rtmp.png|frameless|500px]] | [[File:Rk3399-rtmp.png|frameless|500px]] | ||
| − | == | + | ==Push to Online Video Site== |
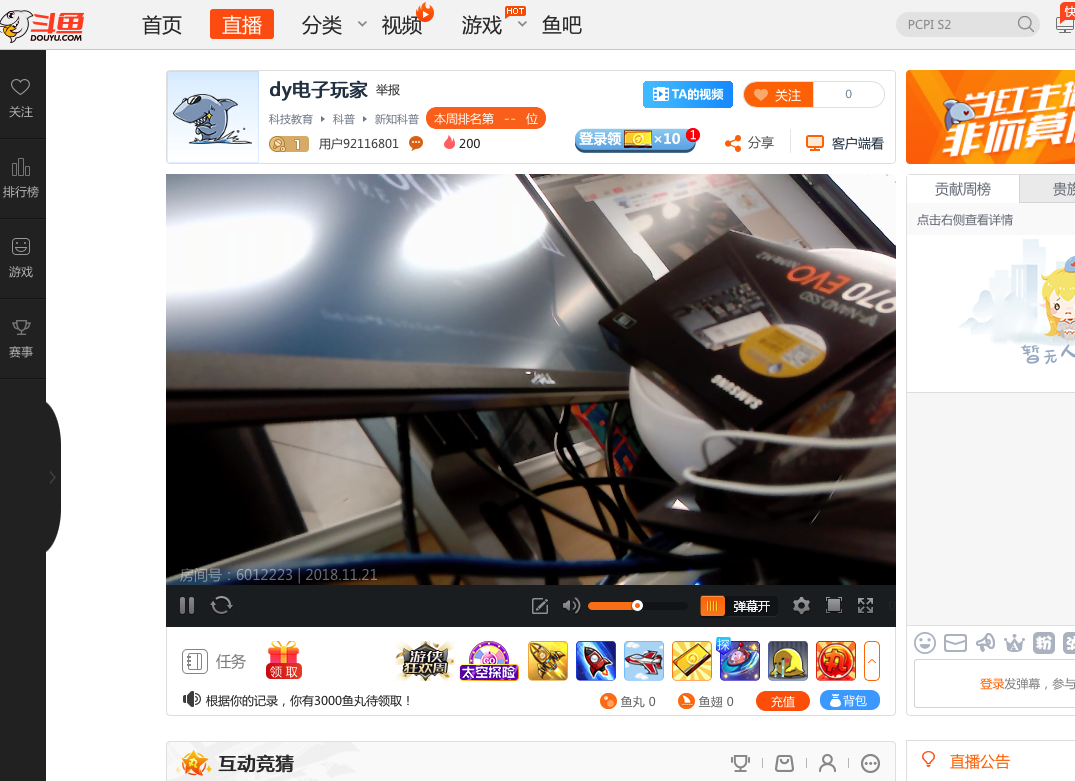
| − | + | The GStreamer utility has a parameter "location" which is used to specify where video stream is to be sent. You can point your stream data to a RTMP server.<br /> | |
| − | + | The douyu site supports RTMP. Here are the steps to push video stream to douyu.<br /><br /> | |
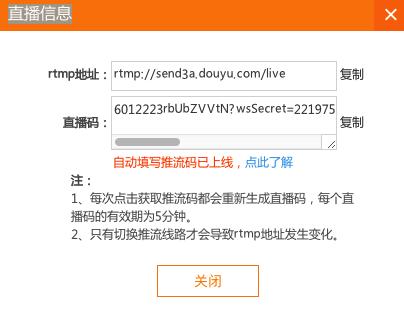
| − | + | Firstly you need to get douyu's RTMP address. Here is what you need to do:<br /> | |
[[File:douyu-location.png|frameless|300px]]<br /> | [[File:douyu-location.png|frameless|300px]]<br /> | ||
| − | + | We combine the two parameters to a complete address: | |
<syntaxhighlight lang="bash"> | <syntaxhighlight lang="bash"> | ||
rtmp://send3a.douyu.com/live/6012223rbUbZVVtN?wsSecret=221975cd093c763ab688f17ba8a7eb63&wsTime=5bf5315e&wsSeek=off&wm=0&tw=0 | rtmp://send3a.douyu.com/live/6012223rbUbZVVtN?wsSecret=221975cd093c763ab688f17ba8a7eb63&wsTime=5bf5315e&wsSeek=off&wm=0&tw=0 | ||
</syntaxhighlight> | </syntaxhighlight> | ||
| − | + | Use this complete address as "location" and here is the command: | |
<syntaxhighlight lang="bash"> | <syntaxhighlight lang="bash"> | ||
gst-launch-1.0 rkisp io-mode=4 device=/dev/video8 ! \ | gst-launch-1.0 rkisp io-mode=4 device=/dev/video8 ! \ | ||
| Line 199: | Line 199: | ||
[[File:douyu-live.png|frameless|400px]] | [[File:douyu-live.png|frameless|400px]] | ||
| − | == | + | ==Others== |
| − | === | + | ===Remove Screen Locker under FriendlyDesktop=== |
<syntaxhighlight lang="bash"> | <syntaxhighlight lang="bash"> | ||
sudo apt-get -y remove light-locker | sudo apt-get -y remove light-locker | ||
</syntaxhighlight> | </syntaxhighlight> | ||
| − | === | + | ===Check Audio Device=== |
<syntaxhighlight lang="bash"> | <syntaxhighlight lang="bash"> | ||
aplay -L | aplay -L | ||
</syntaxhighlight> | </syntaxhighlight> | ||
| + | |||
| + | ==Update Log== | ||
| + | ===May-16-2019=== | ||
| + | * Released English version | ||
Latest revision as of 07:44, 16 May 2019
Contents
1 Introduction
This article gives basic steps on how to use a RK3399 based board under Linux to collect real-time video stream data and push the data to a RTMP server which a user can visit and watch the video stream.
All the steps presented in this article are verifies with the following OS systems:
- FriendlyCore
- FriendlyDesktop
2 Setup a RTMP Server
You will use a RK3399 board as a RTMP server. You need to install the nginx and nginx-rtmp-module packages by running the following commands:
sudo apt-get update
sudo apt-get -y install nginx
sudo apt-get -y remove nginx
sudo apt-get clean
sudo rm -rf /etc/nginx/*
sudo apt-get install -y curl build-essential libpcre3 libpcre3-dev libpcre++-dev zlib1g-dev libcurl4-openssl-dev libssl-dev
sudo mkdir -p /var/www
rm -rf nginx_src
mkdir -p nginx_src
cd nginx_src
NGINXSRC=$PWD
wget http://nginx.org/download/nginx-1.13.8.tar.gz
git clone https://github.com/arut/nginx-rtmp-module.git
(cd nginx-rtmp-module/; git checkout -b ng1.13.8 791b6136f02bc9613daf178723ac09f4df5a3bbf)
tar -zxvf nginx-1.13.8.tar.gz
cd nginx-1.13.8
./configure --prefix=/var/www --sbin-path=/usr/sbin/nginx --conf-path=/etc/nginx/nginx.conf --pid-path=/var/run/nginx.pid --error-log-path=/var/log/nginx/error.log --http-log-path=/var/log/nginx/access.log --with-http_ssl_module --without-http_proxy_module --add-module=$NGINXSRC/nginx-rtmp-module
make
sudo make install
Check nginx's version and whether it is installed:
nginx -v3 Configure a RTMP Server
Open and edit the nginx's configuration file:
sudo vim /etc/nginx/nginx.conf
Append the following lines in the file:
rtmp {
    server {
        listen 1935;
        chunk_size 4096;
        application live {
            live on;
            record off;
        }
    }
}
Restart the nginx service and activate its configuration:
sudo systemctl restart nginx4 Test RTMP Server
Before you begin to use your RTMP server to get stream data you need to make sure it works:
gst-launch-1.0 videotestsrc is-live=true ! videoconvert ! x264enc bitrate=1000 tune=zerolatency ! \
    video/x-h264 ! h264parse ! video/x-h264 ! queue ! flvmux streamable=true name=mux ! \
    rtmpsink sync=false location='rtmp://192.168.1.122:1935/live/test'
Under Ubuntu run the following rtmpdump command to retrieve stream data:
rtmpdump -r "rtmp://192.168.1.122/live/test" -V -z -o out.flv
If it can get data continuously and the output file out.flv can be played it means your RTMP server works.
5 Push Pictures Captured by OV13850 Camera to RMTP Server
There are two commands of which one only shows images but doesn't output audio and the other plays complete audio and video.
The one that only shows images but doesn't output audio:
gst-launch-1.0 rkisp io-mode=4 device=/dev/video0 ! \
    video/x-raw,format=NV12,width=1280,height=720,framerate=30/1 ! queue ! mpph264enc ! h264parse ! \
    flvmux streamable=true ! queue ! \
    rtmpsink sync=false location='rtmp://192.168.1.122:1935/live/test'
The other that plays both audio and video:
gst-launch-1.0 rkisp io-mode=4 device=/dev/video0 ! \
    video/x-raw,format=NV12,width=1280,height=720,framerate=30/1 ! queue ! mpph264enc ! h264parse ! \
    flvmux name=mux streamable=true alsasrc device=hw:0 ! queue ! \
    audioresample ! audio/x-raw,rate=48000 ! \
    queue ! voaacenc bitrate=32000 ! aacparse ! queue ! mux. mux. ! \
    rtmpsink sync=false location='rtmp://192.168.1.122:1935/live/test'
6 Push Pictures Captured by Logitech C922 Pro Camera to RMTP Server
6.1 Check USB Camera Node
Run the following command to check the USB camera device node:
uvcdynctrl -lWe used a Logitech C922 Pro camera and we can get the pictures captured by it from /dev/video8 :
video8 C922 Pro Stream Webcam
6.2 Check Available Formats for USB Camera
Install necessary utilities:
sudo apt install v4l-utils
You can run the following command to check the available formats for a USB camera. For a RK3399 board you can focus on the MJPG format and its resolution and frame rate:
sudo v4l2-ctl --list-formats-ext -d /dev/video8
Note: the device node on your board might not be "/dev/video8" you need to make sure to use the node on your device.
6.3 Play Real-Time Video with USB Camera
Run the following command:
gst-launch-1.0 v4l2src device=/dev/video8 ! "image/jpeg,width=1280,height=720,framerate=30/1" ! jpegdec ! videoconvert ! queue ! mpph264enc ! queue ! h264parse ! flvmux streamable=true ! queue ! rtmpsink sync=false location='rtmp://192.168.1.122:1935/live/test'
7 Play Video Stream
7.1 Play on Smart Phone
If you use an iPhone you can install the SLDP Player utility which is free. Open this address "rtmp://192.168.1.122/live/test" with the utility and you will be able to view real-time video:

7.2 Play on Web Page
We will create a web page and play a video on the page. Here are the steps:
mkdir -p ~/strobe_src
cd ~/strobe_src
wget http://downloads.sourceforge.net/project/smp.adobe/Strobe%20Media%20Playback%201.6%20Release%20%28source%20and%20binaries%29/StrobeMediaPlayback_1.6.328-full.zip
unzip StrobeMediaPlayback_1.6.328-full.zip
sudo cp -r for\ Flash\ Player\ 10.1 /var/www/html/strobe
Open and edit the /var/www/html/index.html file and add the following contents. Note: you need to replace the IP address with your actual IP address which can be obtained by running the ifconfig command:
<!DOCTYPE html PUBLIC "-//W3C//DTD XHTML 1.0 Strict//EN" "http://www.w3.org/TR/xhtml1/DTD/xhtml1-strict.dtd">
<html xmlns="http://www.w3.org/1999/xhtml">
    <head>
    <title>NanoPi Live</title>
    <script type="text/javascript" src="strobe/lib/swfobject.js"></script>
    <script type="text/javascript">
        // Create a StrobeMediaPlayback configuration
        var parameters = {
        // src: "http://players.edgesuite.net/videos/big_buck_bunny/bbb_448x252.mp4",
        src: "rtmp://192.168.1.122/live/test",
        autoPlay: true,
            controlBarAutoHide: false,
            playButtonOverlay: true,
            showVideoInfoOverlayOnStartUp: false,
            optimizeBuffering : false,
            initialBufferTime : 0.1,
            expandedBufferTime : 0.1,
            minContinuousPlayback : 0.1,
            poster: "strobe/images/poster.png"
        };

        // Embed the player SWF:
        swfobject.embedSWF
        ( "strobe/StrobeMediaPlayback.swf"
            , "strobeMediaPlayback"
            , 640
            , 480
            , "10.1.0"
            , {}
            , parameters
            , { allowFullScreen: "true"}
            , { name: "strobeMediaPlayback" }
        );
    </script>
    </head>
    <body>
        <div id="strobeMediaPlayback">
          <p>Alternative content</p>
        </div>
    </body>
</html>
Open a browser on a host PC and type the IP address in the browser's address bar and you will play a video. Here is what you will get:

8 Push to Online Video Site
The GStreamer utility has a parameter "location" which is used to specify where video stream is to be sent. You can point your stream data to a RTMP server.
The douyu site supports RTMP. Here are the steps to push video stream to douyu.
Firstly you need to get douyu's RTMP address. Here is what you need to do:

We combine the two parameters to a complete address:
rtmp://send3a.douyu.com/live/6012223rbUbZVVtN?wsSecret=221975cd093c763ab688f17ba8a7eb63&wsTime=5bf5315e&wsSeek=off&wm=0&tw=0
Use this complete address as "location" and here is the command:
gst-launch-1.0 rkisp io-mode=4 device=/dev/video8 ! \
    video/x-raw,format=NV12,width=1280,height=720,framerate=30/1 ! queue ! mpph264enc ! h264parse ! \
    flvmux name=mux streamable=true alsasrc device=hw:0 ! queue ! \
    audioresample ! audio/x-raw,rate=48000 ! \
    queue ! voaacenc bitrate=32000 ! aacparse ! queue ! mux. mux. ! \
    rtmpsink sync=false location='rtmp://send3a.douyu.com/live/6012223rbUbZVVtN?wsSecret=221975cd093c763ab688f17ba8a7eb63&wsTime=5bf5315e&wsSeek=off&wm=0&tw=0'
9 Others
9.1 Remove Screen Locker under FriendlyDesktop
sudo apt-get -y remove light-locker
9.2 Check Audio Device
aplay -L
10 Update Log
10.1 May-16-2019
- Released English version
