|
|
| (49 intermediate revisions by the same user not shown) |
| Line 1: |
Line 1: |
| − | ===Build u-boot and kernel===
| |
| − | ====Kernel and u-boot versions====
| |
| − | {| class="wikitable"
| |
| − | |-
| |
| − | ! Operating System
| |
| − | ! Kernel Version
| |
| − | ! U-boot version
| |
| − | ! Cross-compiler
| |
| − | ! Partition type
| |
| − | ! Packaging Tool
| |
| − | ! Kernel branch
| |
| − | ! Kernel configuration
| |
| − | ! U-boot branch
| |
| − | ! U-boot configuration
| |
| − | |-
| |
| − | | buildroot
| |
| − | | rowspan="12" | linux v5.10.y
| |
| − | | rowspan="12" | u-boot <br />v2017.09
| |
| − | | rowspan="12" | 11.3-aarch64
| |
| − | | rowspan="12" | [https://github.com/friendlyarm/sd-fuse_rk3588/blob/master/prebuilt/parameter.template GPT]
| |
| − | | rowspan="12" | [https://github.com/friendlyarm/sd-fuse_rk3588/tree/master sd-fuse]
| |
| − | | rowspan="12" | [https://github.com/friendlyarm/kernel-rockchip/tree/nanopi5-v5.10.y_opt nanopi5-v5.10.y_opt]
| |
| − | | rowspan="8" | nanopi6_linux_defconfig
| |
| − | | rowspan="12" | [https://github.com/friendlyarm/uboot-rockchip/tree/nanopi6-v2017.09 nanopi6-v2017.09]
| |
| − | | rowspan="12" | rk3588_defconfig
| |
| − | |-
| |
| − | | ubuntu-jammy-desktop-arm64
| |
| − | |-
| |
| − | | ubuntu-jammy-minimal-arm64
| |
| − | |-
| |
| − | | friendlycore-focal-arm64
| |
| − | |-
| |
| − | | debian-bullseye-core-arm64
| |
| − | |-
| |
| − | | debian-bullseye-desktop-arm64
| |
| − | |-
| |
| − | | debian-bullseye-minimal-arm64
| |
| − | |-
| |
| − | | debian-buster-desktop-arm64
| |
| − | |-
| |
| − | | friendlywrt21
| |
| − | | rowspan="4" | nanopi6_linux_defconfig<br />friendlywrt.config
| |
| − | |-
| |
| − | | friendlywrt21-docker
| |
| − | |-
| |
| − | | friendlywrt22
| |
| − | |-
| |
| − | | friendlywrt22-docker
| |
| − | |}
| |
| − | * Kernel git repo:https://github.com/friendlyarm/kernel-rockchip
| |
| − | * U-boot git repo:https://github.com/friendlyarm/uboot-rockchip
| |
| − | * The cross-compile toolchain is located in the path: /opt/FriendlyARM/toolchain/. Using the toolchain is as simple as adding the toolchain’s bin directory in your PATH, such as:
| |
| − | <syntaxhighlight lang="bash">
| |
| − | export PATH=/opt/FriendlyARM/toolchain/11.3-aarch64/bin/:$PATH
| |
| − | </syntaxhighlight>
| |
| − | * The [https://github.com/friendlyarm/sd-fuse_rk3588/tree/master sd-fuse] is a helper script to make bootable SD card image.
| |
| − | ====Build kernel linux-v5.10.y====
| |
| − | Clone the repository to your local drive then build:
| |
| − | <syntaxhighlight lang="bash">
| |
| − | git clone https://github.com/friendlyarm/kernel-rockchip --single-branch --depth 1 -b nanopi5-v5.10.y_opt kernel-rockchip
| |
| − | cd kernel-rockchip
| |
| − | export PATH=/opt/FriendlyARM/toolchain/11.3-aarch64/bin/:$PATH
| |
| − | touch .scmversion
| |
| − | # Configuring the Kernel
| |
| − | # Load default configuration
| |
| − | make CROSS_COMPILE=aarch64-linux-gnu- ARCH=arm64 nanopi6_linux_defconfig
| |
| − | # Optionally, load configuration for FriendlyWrt
| |
| − | # make CROSS_COMPILE=aarch64-linux-gnu- ARCH=arm64 nanopi6_linux_defconfig friendlywrt.config
| |
| − | # Optionally, if you want to change the default kernel config
| |
| − | # make CROSS_COMPILE=aarch64-linux-gnu- ARCH=arm64 menuconfig
| |
| − | # Start building kernel
| |
| − | make CROSS_COMPILE=aarch64-linux-gnu- ARCH=arm64 nanopi6-images -j$(nproc)
| |
| − | # Start building kernel modules
| |
| − | mkdir -p out-modules && rm -rf out-modules/*
| |
| − | make CROSS_COMPILE=aarch64-linux-gnu- ARCH=arm64 INSTALL_MOD_PATH="$PWD/out-modules" modules -j$(nproc)
| |
| − | make CROSS_COMPILE=aarch64-linux-gnu- ARCH=arm64 INSTALL_MOD_PATH="$PWD/out-modules" modules_install
| |
| − | KERNEL_VER=$(make CROSS_COMPILE=aarch64-linux-gnu- ARCH=arm64 kernelrelease)
| |
| − | [ ! -f "$PWD/out-modules/lib/modules/${KERNEL_VER}/modules.dep" ] && depmod -b $PWD/out-modules -E Module.symvers -F System.map -w ${KERNEL_VER}
| |
| − | (cd $PWD/out-modules && find . -name \*.ko | xargs aarch64-linux-strip --strip-unneeded)
| |
| − | </syntaxhighlight>
| |
| − | The generated files:
| |
| − | {| class="wikitable"
| |
| − | |-
| |
| − | | kernel.img
| |
| − | | resource.img
| |
| − | | <del>boot.img This img is deprecated</del>
| |
| − | | The kernel modules are located in the out-modules directory
| |
| − | |}
| |
| − | Apply kernel: <br>
| |
| − | Please click on [[#Apply u-boot and the kernel]]<br>
| |
| − | ====Compile u-boot v2017.09====
| |
| − | Clone the repository to your local drive then build:
| |
| − | <syntaxhighlight lang="bash">
| |
| − | git clone https://github.com/friendlyarm/rkbin --single-branch --depth 1 -b nanopi6
| |
| − | git clone https://github.com/friendlyarm/uboot-rockchip --single-branch --depth 1 -b nanopi6-v2017.09
| |
| − | export PATH=/opt/FriendlyARM/toolchain/11.3-aarch64/bin/:$PATH
| |
| − | cd uboot-rockchip/
| |
| − | ./make.sh nanopi6
| |
| − | </syntaxhighlight>
| |
| − | After the compilation, the following files will be generated:
| |
| − | {| class="wikitable"
| |
| − | |-
| |
| − | | uboot.img
| |
| − | | rk3588_spl_loader_v1.08.111.bin (aka MiniLoaderAll.bin)
| |
| − | |}
| |
| − | Apply u-boot: <br>
| |
| − | Please click on [[#Apply u-boot and the kernel]]<br>
| |
| | | | |
| − | ====Apply u-boot and the kernel====
| + | {{RockchipUnbrick/zh|NanoPC-T6}} |
| − | =====Install to target board=====
| + | |
| − | Since the rk3588's OS uses GPT partitions by default, you can use the dd command to write the image file to the partition, the device nodes for SD card and eMMC are shown below:
| + | |
| − | * The SD/TF Card device node: /dev/mmcblk0 <br />
| + | |
| − | * The eMMC device node: /dev/mmcblk2 <br />
| + | |
| − | <br />
| + | |
| − | Use the 'parted' command to view the partition layout:
| + | |
| − | <syntaxhighlight lang="bash">
| + | |
| − | parted /dev/mmcblk2 print
| + | |
| − | </syntaxhighlight>
| + | |
| − | Sample outputs:
| + | |
| − | <syntaxhighlight lang="bash">
| + | |
| − | Model: MMC A3A551 (sd/mmc)
| + | |
| − | Disk /dev/mmcblk2: 31.0GB
| + | |
| − | Sector size (logical/physical): 512B/512B
| + | |
| − | Partition Table: gpt
| + | |
| − | Disk Flags:
| + | |
| − | | + | |
| − | Number Start End Size File system Name Flags
| + | |
| − | 1 8389kB 12.6MB 4194kB uboot
| + | |
| − | 2 12.6MB 16.8MB 4194kB misc
| + | |
| − | 3 16.8MB 21.0MB 4194kB dtbo
| + | |
| − | 4 21.0MB 37.7MB 16.8MB resource
| + | |
| − | 5 37.7MB 79.7MB 41.9MB kernel
| + | |
| − | 6 79.7MB 113MB 33.6MB boot
| + | |
| − | 7 113MB 147MB 33.6MB recovery
| + | |
| − | 8 147MB 31.0GB 30.9GB ext4 rootfs
| + | |
| − | </syntaxhighlight>
| + | |
| − | as shown above, the resource partition is located at 4 and the kernel partition is located at 5. Use the dd command to write the resource.img and kernel.img files to these partitions, the commands are as follows:
| + | |
| − | <syntaxhighlight lang="bash">
| + | |
| − | dd if=resource.img of=/dev/mmcblk2p4 bs=1M
| + | |
| − | dd if=kernel.img of=/dev/mmcblk2p5 bs=1M
| + | |
| − | </syntaxhighlight>
| + | |
| − | If you want to update u-boot:
| + | |
| − | <syntaxhighlight lang="bash">
| + | |
| − | dd if=boot.img of=/dev/mmcblk2p1 bs=1M
| + | |
| − | </syntaxhighlight>
| + | |
| − | To update new driver modules, copy the newly compiled driver modules to the appropriate directory under /lib/modules.
| + | |
| − | | + | |
| − | =====Packaging and creating an SD image=====
| + | |
| − | To create a new OS image file, you need to use the "sd-fuse" packaging tool.<br />
| + | |
| − | <br />
| + | |
| − | "sd-fuse" is a collection of scripts that can be used to create bootable SD card images for FriendlyElec boards. Its main features include:<br />
| + | |
| − | * Creation of root filesystem images from a directory <br />
| + | |
| − | * Building of bootable SD card images<br />
| + | |
| − | * Simple compilation of kernel, U-Boot, and third-party drivers<br />
| + | |
| − | Please click on the following link to find out more:
| + | |
| − | {| class="wikitable" | + | |
| − | |-
| + | |
| − | ! Kernel version
| + | |
| − | ! Packaging Tool
| + | |
| − | |-
| + | |
| − | | linux v5.10.y
| + | |
| − | | [https://github.com/friendlyarm/sd-fuse_rk3588/tree/master sd-fuse_rk3588]
| + | |
| − | |}
| + | |
| − | =====USB flashing=====
| + | |
| − | ======Linux======
| + | |
| − | To flash U-Boot and kernel using the "upgrade_tool" tool, please use the following command:
| + | |
| − | <syntaxhighlight lang="bash">
| + | |
| − | sudo upgrade_tool ul MiniLoaderAll.bin
| + | |
| − | sudo upgrade_tool di -p parameter.txt
| + | |
| − | sudo upgrade_tool di uboot uboot.img
| + | |
| − | sudo upgrade_tool di resource resource.img
| + | |
| − | sudo upgrade_tool di kernel kernel.img
| + | |
| − | sudo upgrade_tool RD
| + | |
| − | </syntaxhighlight>
| + | |
| − | Note: "upgrade_tool" is a command-line tool provided by Rockchip for Linux operating systems (Linux_Upgrade_Tool).
| + | |
| − | ===Compile Android===
| + | |
| − | ====Download android source code from the netdrive====
| + | |
| − | Netdisk URL: [http://download.friendlyelec.com/{{#replace:{{#replace:{{BASEPAGENAME}}| |}}|/zh|}} Click here]<br />
| + | |
| − | File location on netdisk:"07_Source codes/rk35xx-android12-xxxxxxx-YYYYMMDD.tgz" (YYYYMMDD represents the date of the package, and xxxxxxx represents the final commit-id)<br />
| + | |
| − | Unzip and fetch updates:
| + | |
| − | <syntaxhighlight lang="bash">
| + | |
| − | tar xzf '/path/to/netdisk/07_Source codes/rk35xx-android12-xxxxxxx-YYYYMMDD.tgz'
| + | |
| − | cd rk35xx-android12
| + | |
| − | git pull
| + | |
| − | </syntaxhighlight>
| + | |
| − | ====Compile Android Table====
| + | |
| − | <syntaxhighlight lang="bash">
| + | |
| − | echo "ROCKCHIP_DEVICE_DIR := device/rockchip/rk3588/nanopi6" > .rockchip_device.mk
| + | |
| − | # export INSTALL_GAPPS_FOR_TESTING=yes # include google apps
| + | |
| − | . setenv.sh
| + | |
| − | ./build.sh -FMu
| + | |
| − | </syntaxhighlight>
| + | |
| − | ====Compile Android TV====
| + | |
| − | <syntaxhighlight lang="bash">
| + | |
| − | echo "ROCKCHIP_DEVICE_DIR := device/rockchip/rk3588/nanopi6_box" > .rockchip_device.mk
| + | |
| − | # export INSTALL_GAPPS_FOR_TESTING=yes # include google apps
| + | |
| − | . setenv.sh
| + | |
| − | ./build.sh -FMu
| + | |
| − | </syntaxhighlight>
| + | |
| − | ====Installing Android====
| + | |
| − | After the Android compilation is completed, the image file will be stored in the rockdev/Image-aosp_nanopi3 subdirectory of the Android source code directory.
| + | |
| − | =====USB Flashing=====
| + | |
| − | Use the rockchip tool to flash the following file: rockdev/Image-aosp_nanopi3/update.img
| + | |
| − | =====SD-to-eMMC Flash=====
| + | |
| − | Refer to the following steps: <br />
| + | |
| − | 1) Insert the SD card of the eflasher system into the host; <br />
| + | |
| − | 2) Copy the files in the rockdev/Image-aosp_nanopi3 directory to the android12 or androidtv directory in the FRIENDLYARM partition of the SD card: <br />
| + | |
| − | <syntaxhighlight lang="bash">
| + | |
| − | sudo cp -af parameter.txt config.cfg MiniLoaderAll.bin uboot.img \
| + | |
| − | dtbo.img vbmeta.img boot.img recovery.img \
| + | |
| − | misc.img pcba_small_misc.img pcba_whole_misc.img \
| + | |
| − | baseparameter.img super.img /media/$USER/FriendlyARM/android12
| + | |
| − | </syntaxhighlight>
| + | |
| − | 3) Insert the SD card into {{{1}}} and re-flash; <br />
| + | |
| − | ====Pack the new SD Image====
| + | |
| − | <syntaxhighlight lang="bash">
| + | |
| − | git clone https://github.com/friendlyarm/sd-fuse_rk3588.git
| + | |
| − | SDFUSE=$PWD/sd-fuse_rk3588
| + | |
| − | mkdir $SDFUSE/android12
| + | |
| − | | + | |
| − | cd /path/to/rk35xx-android12/rockdev/Image-aosp_nanopi3
| + | |
| − | cp -af parameter.txt config.cfg MiniLoaderAll.bin uboot.img \
| + | |
| − | dtbo.img vbmeta.img boot.img recovery.img \
| + | |
| − | misc.img pcba_small_misc.img pcba_whole_misc.img \
| + | |
| − | baseparameter.img super.img $SDFUSE/android12
| + | |
| − | | + | |
| − | cd $SDFUSE/
| + | |
| − | ./mk-sd-image.sh android12
| + | |
| − | | + | |
| − | tar xvzf /path/to/netdrive/03_Partition\ image\ files/emmc-flasher-images.tgz
| + | |
| − | ./mk-emmc-image.sh android12
| + | |
| − | </syntaxhighlight>
| + | |
| − | For more information, please refer to [[#Packaging and creating an SD image]]<br>
| + | |
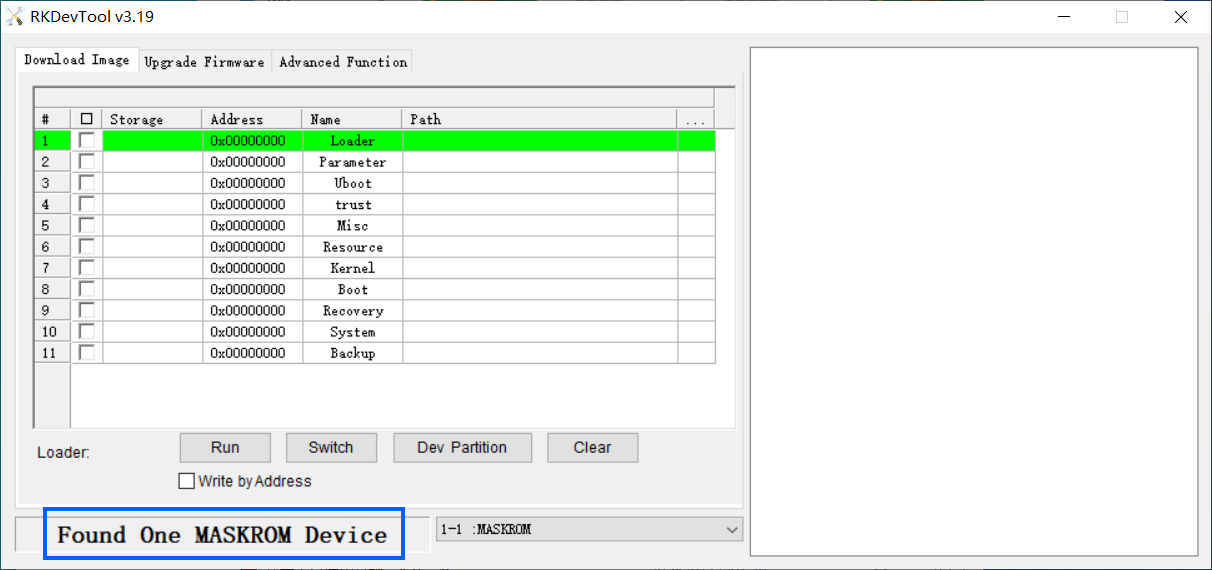
显示类似 "DevNo=1 Vid=0x2207,Pid=0x350b,LocationID=13 Mode=Maskrom SerialNo=" 的内容表示已检测到设备。


